96 Tacoma Dash Removal and Assembly
 12-21-2012, 09:41 PM
#1

96 Tacoma Dash Removal and Assembly
I did not take pictures when I removed the DASH. These are the steps necessary to reassemble the DASH.
REMOVING the DASH is in the reverse order of assembling the dash. If you need to remove the dash…. Start at (A) and work back up to (R)…
Just replace the word INSTALL with REMOVE…
NOTE: (1) you do not need to remove (9/J). But if necessary.. (9/J) can be the last thing you remove and the first thing you put back on. It will still work at (9/J) if you forget as I did..
NOTE: (2) All panels have a combination of screws, nuts, clips, bolts and 2 or more snap-in type anchors. After removing all screws, nuts, clips and bolts… you will have to tug on panel to pop them loose..
EXCEPT Ignition Clock Panel (12/G)…and AC Bezel (18/B) Both uses snap-in type anchors only…
START:
A: Set steering wheel to lowest position if you have tilt:
B: DISCONNECT BATTERY!:
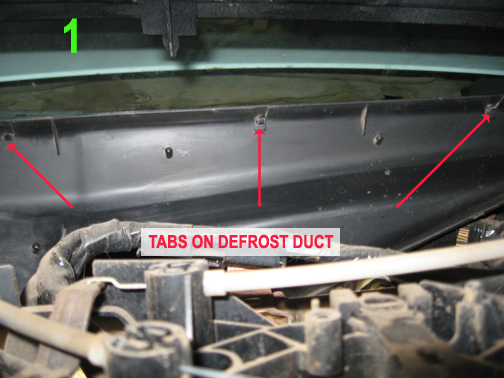
1/R: Check that these tabs are fully locked on the Defroster Duct.
2/Q: Put the slot at bottom…back of the AC controls on the steel bracket. It will come off with all the action.. Insure it stays on when placing the DASH (Pix. 3) in position.

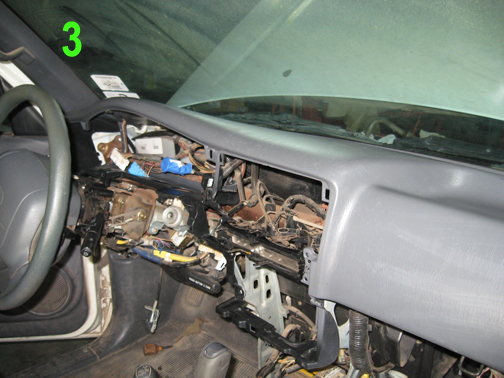
3/P: Place the dash in position: Confirm the center of DASH is on top of the Defrost duct. Check that back of AC control remained on the steel bracket: (Pix. 2)
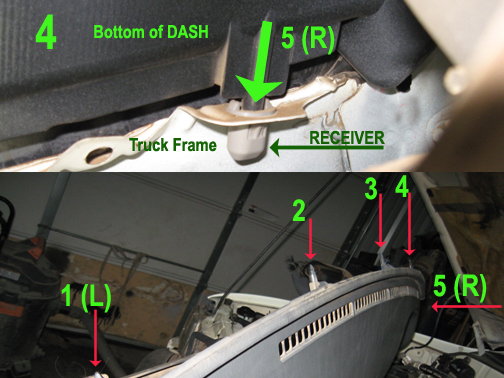
4/O: Align the #1L and #5R DASH pins with the receivers on the frame.. I started with the Right side and just started to insert it, then moved to the Left side and only started to insert it.. I confirmed the back of AC control were still on the steel bracket. Then with sharp force ….set the DASH in the frame.
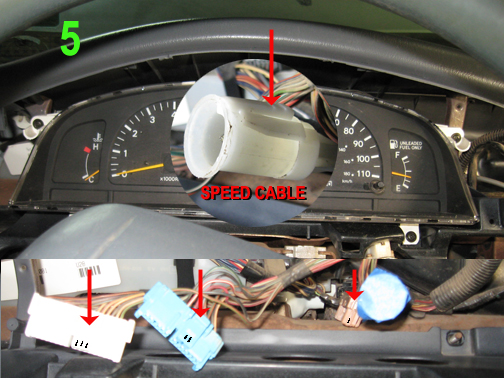
5/N: Speed Cluster Gauges: I marked the connectors and back of gauge housing with I…II and III marks. I taped the Speed Cable to prevent dirt. When removing the speed cable…. Push tab down and pull out. When disconnecting the electrical…. Push tab down and pull out..
To assemble…. Just push all on… Secure gauge panel with 4 screws.
6/M: Left Center Panel: Install dash light control switch (A) …..with peg (B) aligned with slot on back side of panel.. Install panel (C).
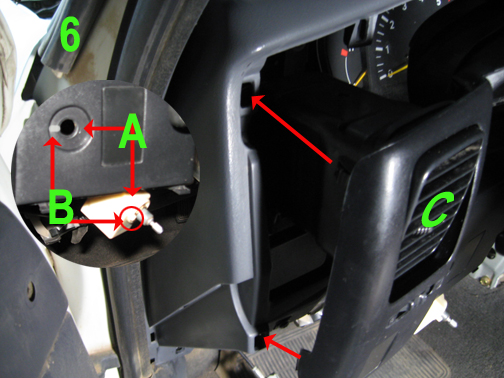
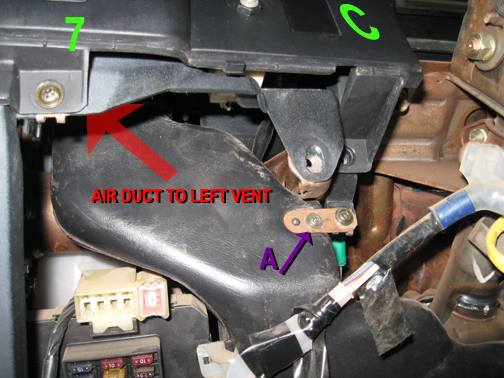
7/L: Secure left air duct to bottom of left air vent in (C) panel. Secure the screws at (A).
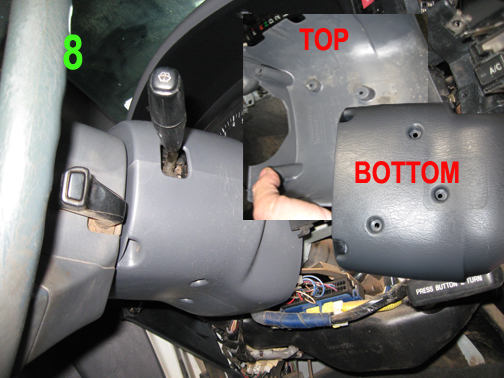
8/K: Install top and bottom steering column covers with 3 machine screws and 2 metal screws.
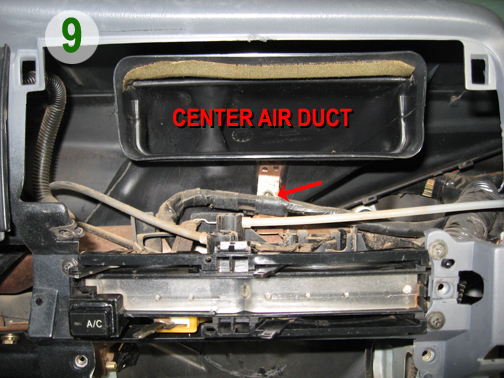
9/J: Install center air duct… secure with one screw.
(It is not necessary to remove this duct..)
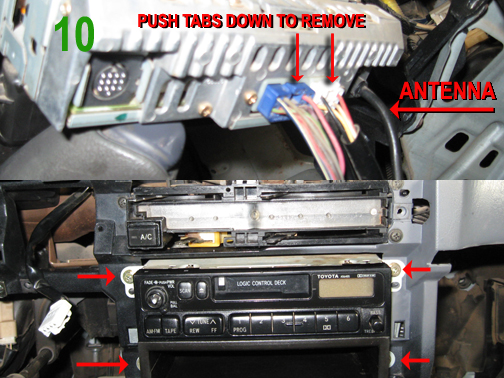
10/I: Install radio antenna and electrical… secure with 4 screws. To remove electrical push tab down and pull. To install just push in..
11/H: Connect cigarette lighter and install Center Middle Panel.
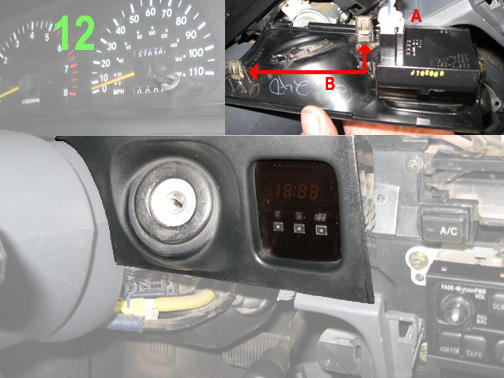
12/G: Ignition and Clock Panel: Connect electrical (A) : Uses no screws.
Pressure connections (B).
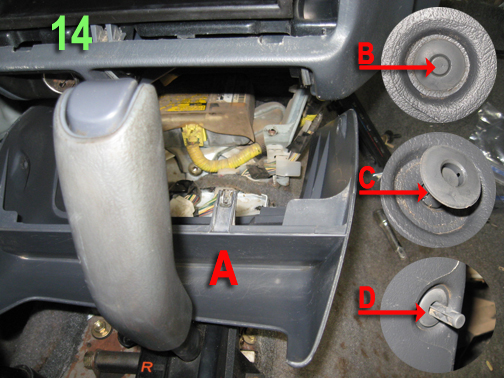
14/F: Center Bottom Panel (A): With one additional CLIP on each bottom side.
To remove: (B) Use small blunt tip punch and press center of clip in: (C) Pull the clip out.
To Install: With center of CLIP all the way out….. Put clip in and then insert the center (D) of clip to lock it in place….. Then it will look like (B).
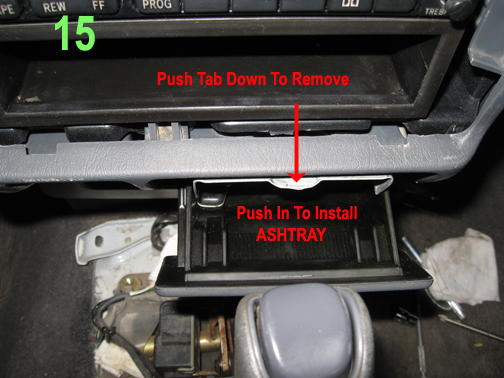
15/E: Ashtray: To remove push down on tab and pull out:
Install: Just align and push in.
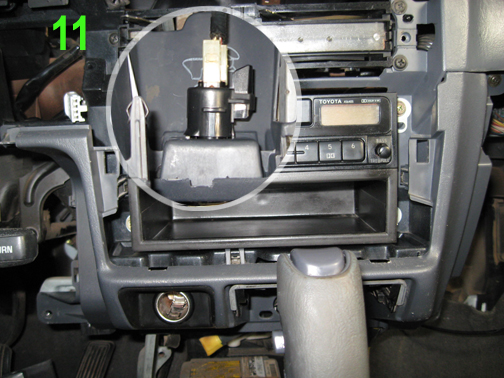
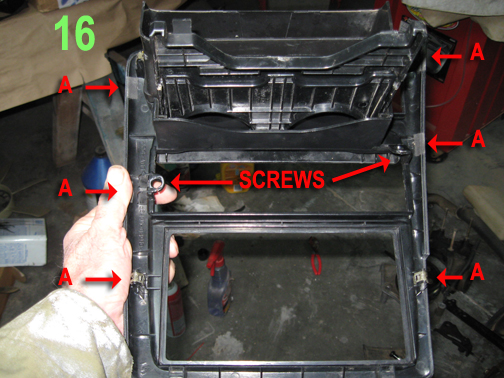
16/D: Center Consol Radio and AC Bezel: (A) Are press-in anchors with only 2 screws.
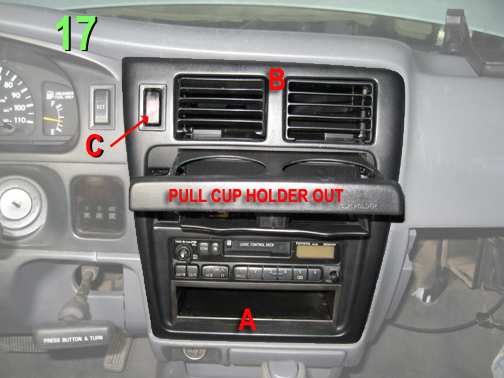
17/C: Install Center Consol Radio and AC Bezel:
Install Emergency Flasher switch (C) and hook electrical up:
Pull cup holder out:
Set (A) in position at bottom. (B) Push bezel in place.
Push cup holder in and Secure with 2 screws.
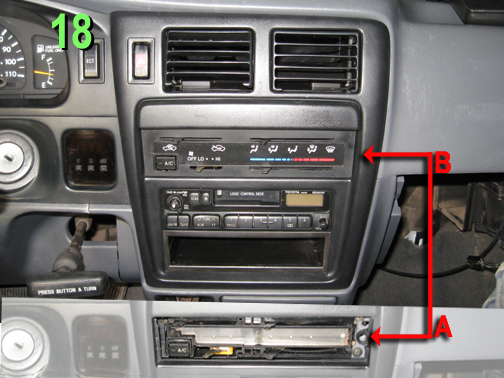
18/B: AC Bezel:
(A) AC controls without Bezel (B) AC controls with Bezel…
To install AC Bezel just snap it in place:
To remove AC Bezel….use small flathead screwdriver… Pry under one end of AC Bezel to pop it loose: USE CAUTION to prevent damaging the edge of bezel.
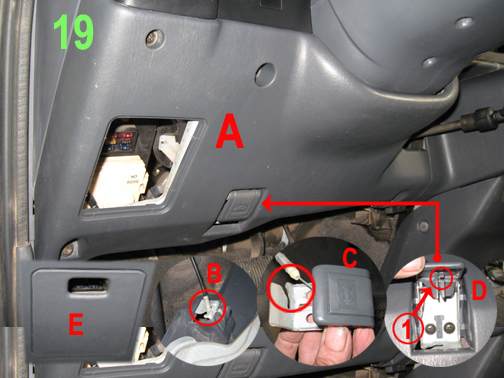
19/A: Install Left Lower Panel (A):
For ease.. I had removed the hood cable. I reattached (D) hood latch …to (A).
I installed (A) left bottom panel to frame.
Then I installed the hood cable by inserting the end of hood cable into D-1
Then swung it around to lock in at (C)
Locked in at (B)..
Last… Install fuse box cover (E):
20: Completed Install except for AC Evaporator. I will be starting AC work next week.
If you need to take the dash apart…
Start at (A) and work back up to (R).
Any questions…. Just ask…..
I did not take pictures when I removed the DASH. These are the steps necessary to reassemble the DASH.
REMOVING the DASH is in the reverse order of assembling the dash. If you need to remove the dash…. Start at (A) and work back up to (R)…
Just replace the word INSTALL with REMOVE…
NOTE: (1) you do not need to remove (9/J). But if necessary.. (9/J) can be the last thing you remove and the first thing you put back on. It will still work at (9/J) if you forget as I did..
NOTE: (2) All panels have a combination of screws, nuts, clips, bolts and 2 or more snap-in type anchors. After removing all screws, nuts, clips and bolts… you will have to tug on panel to pop them loose..
EXCEPT Ignition Clock Panel (12/G)…and AC Bezel (18/B) Both uses snap-in type anchors only…
START:
A: Set steering wheel to lowest position if you have tilt:
B: DISCONNECT BATTERY!:
1/R: Check that these tabs are fully locked on the Defroster Duct.
2/Q: Put the slot at bottom…back of the AC controls on the steel bracket. It will come off with all the action.. Insure it stays on when placing the DASH (Pix. 3) in position.
3/P: Place the dash in position: Confirm the center of DASH is on top of the Defrost duct. Check that back of AC control remained on the steel bracket: (Pix. 2)
4/O: Align the #1L and #5R DASH pins with the receivers on the frame.. I started with the Right side and just started to insert it, then moved to the Left side and only started to insert it.. I confirmed the back of AC control were still on the steel bracket. Then with sharp force ….set the DASH in the frame.
5/N: Speed Cluster Gauges: I marked the connectors and back of gauge housing with I…II and III marks. I taped the Speed Cable to prevent dirt. When removing the speed cable…. Push tab down and pull out. When disconnecting the electrical…. Push tab down and pull out..
To assemble…. Just push all on… Secure gauge panel with 4 screws.
6/M: Left Center Panel: Install dash light control switch (A) …..with peg (B) aligned with slot on back side of panel.. Install panel (C).
7/L: Secure left air duct to bottom of left air vent in (C) panel. Secure the screws at (A).
8/K: Install top and bottom steering column covers with 3 machine screws and 2 metal screws.
9/J: Install center air duct… secure with one screw.
(It is not necessary to remove this duct..)
10/I: Install radio antenna and electrical… secure with 4 screws. To remove electrical push tab down and pull. To install just push in..
11/H: Connect cigarette lighter and install Center Middle Panel.
12/G: Ignition and Clock Panel: Connect electrical (A) : Uses no screws.
Pressure connections (B).
14/F: Center Bottom Panel (A): With one additional CLIP on each bottom side.
To remove: (B) Use small blunt tip punch and press center of clip in: (C) Pull the clip out.
To Install: With center of CLIP all the way out….. Put clip in and then insert the center (D) of clip to lock it in place….. Then it will look like (B).
15/E: Ashtray: To remove push down on tab and pull out:
Install: Just align and push in.
16/D: Center Consol Radio and AC Bezel: (A) Are press-in anchors with only 2 screws.
17/C: Install Center Consol Radio and AC Bezel:
Install Emergency Flasher switch (C) and hook electrical up:
Pull cup holder out:
Set (A) in position at bottom. (B) Push bezel in place.
Push cup holder in and Secure with 2 screws.
18/B: AC Bezel:
(A) AC controls without Bezel (B) AC controls with Bezel…
To install AC Bezel just snap it in place:
To remove AC Bezel….use small flathead screwdriver… Pry under one end of AC Bezel to pop it loose: USE CAUTION to prevent damaging the edge of bezel.
19/A: Install Left Lower Panel (A):
For ease.. I had removed the hood cable. I reattached (D) hood latch …to (A).
I installed (A) left bottom panel to frame.
Then I installed the hood cable by inserting the end of hood cable into D-1
Then swung it around to lock in at (C)
Locked in at (B)..
Last… Install fuse box cover (E):
20: Completed Install except for AC Evaporator. I will be starting AC work next week.
If you need to take the dash apart…
Start at (A) and work back up to (R).
Any questions…. Just ask…..

The following users liked this post:
Shadewalker (12-20-2019)

Thread
Thread Starter
Forum
Replies
Last Post
ashersullivan88yota
86-95 Trucks & 4Runners
24
01-18-2022 05:37 PM
WTB[PacNorWest]: WTB - Tacoma/4runner 3.4 Charcoal canister and igniter
94whiterunner
Items Wanted
0
07-12-2015 07:15 PM
Poncho0206
95.5-2004 Tacomas & 96-2002 4Runners
3
07-10-2015 06:21 PM
crashburnoveride
86-95 Trucks & 4Runners
1
07-10-2015 06:39 AM


