Sagging Rear Suspension and LSPV Adjustment
 12-06-2010, 09:54 AM
#1
Registered User
Thread Starter

Join Date: Dec 2010
Posts: 121
Likes: 0
Received 0 Likes
on
0 Posts
Sagging Rear Suspension and LSPV Adjustment
'87 SR5 4x4, stock, no lift
I've been having problems with my rear end locking up, and I confirmed it is from my LSPV. Currently the LSPV is adjusted fully up, which is not good! I do not know how long it has been like this, and if my rear suspension is sagging or not. So I have a couple questions:
First, does anyone know the stock ride height? Maybe the distance between the bumpers and the stops? Or which ever way it is measured. The distance between my bump stops and their stops looks short (see pic below), so I am wondering what the normal distance is.
Second, what is the best way to adjust my LSPV? I don't have any of the equipment the FSM recommends having (pressure gauges, etc). I read about people going out on gravel roads and locking up the wheels, and seeing if the front or rear locks up first, and adjusting it accordingly?
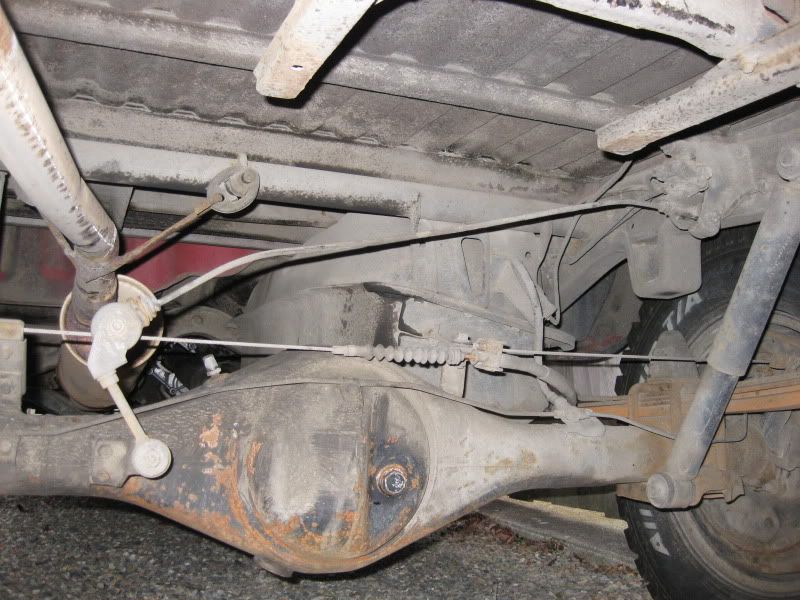
Here is a picture of my rear end (the trucks rear end!). You can see the LSPV is fully up!
I've been having problems with my rear end locking up, and I confirmed it is from my LSPV. Currently the LSPV is adjusted fully up, which is not good! I do not know how long it has been like this, and if my rear suspension is sagging or not. So I have a couple questions:
First, does anyone know the stock ride height? Maybe the distance between the bumpers and the stops? Or which ever way it is measured. The distance between my bump stops and their stops looks short (see pic below), so I am wondering what the normal distance is.
Second, what is the best way to adjust my LSPV? I don't have any of the equipment the FSM recommends having (pressure gauges, etc). I read about people going out on gravel roads and locking up the wheels, and seeing if the front or rear locks up first, and adjusting it accordingly?
Here is a picture of my rear end (the trucks rear end!). You can see the LSPV is fully up!
 12-06-2010, 11:44 AM
#3
Registered User
Thread Starter
Join Date: Dec 2010
Posts: 121
Likes: 0
Received 0 Likes
on
0 Posts
But, since the valve itself is fine, I'd much rather just adjust it so the system is working properly.
12-06-2010, 01:13 PM
#4
LSPV adjustment:
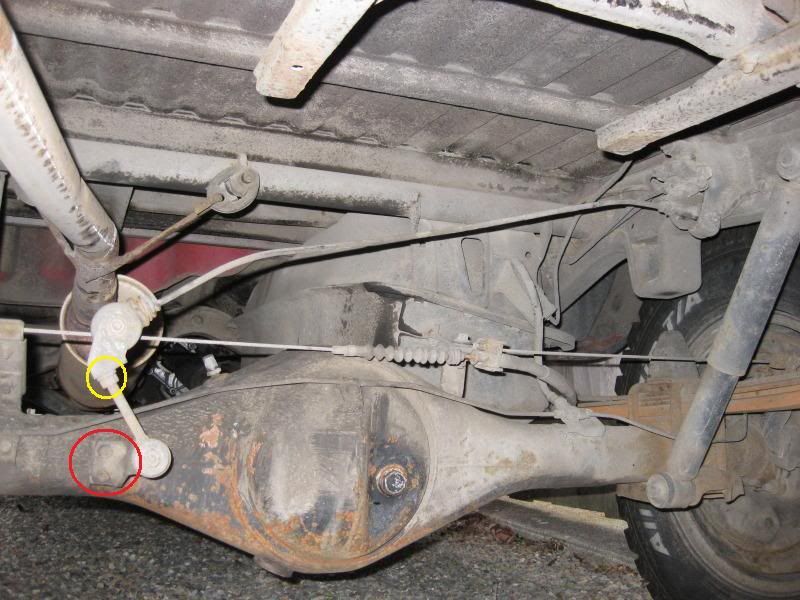
1. Remove the two bolts circled in red.
2. Loosen the nut circled in yellow.
3. Twist the adjustment rod holding the nut you just loosened untill the pressure sensing rod is just barely holding the valve fully open when in the starting position. Meaning, when you go to put it back where it was, and put the two bolts back in, it should be set so that the pressure sensing rod is just barely topped out against the valve piston. You don't want it to be under any tension(pushing on the valve piston more than enough to fully open it)when the suspension is resting at ride height as it appears to be in the pic. You want it to be just barely topped out/holding the valve fully open, and not so low that it's not. If that's the way it's set already, then it doesn't really need adjusted. I can't tell by looking at the pic if the pressure sensing rod is under any tension or not. It does appear to be "fully up", but that's how it should be. If it's under even slight tension though, then the pressure sensing rod needs to be lowered untill it's just barely keeping the valve fully open/"fully up"/topped out when the truck is parked on a level surface(crucial), bed unloaded(crucial), and the suspension resting at ride height(crucial). What ever the actual ride height number is isn't important. The ride height of your vehicle, stock or not, is just what it is and the LSPV should be adjusted accordingly. Meaning if it's lifted beyond stock, or sagging below stock, ride height that will require the LSPV to be adjusted for proper rear braking performance.
Simple as that!
Last edited by MudHippy; 12-06-2010 at 02:32 PM.
12-06-2010, 01:42 PM
#5
Registered User
Join Date: Jan 2009
Location: Moyock,NC
Posts: 477
Likes: 0
Received 0 Likes
on
0 Posts
My back brakes just started locking up when I hit the brake last week. Do you think the LSVP is my problem? If so I like the idea of adding the new valve from summit.
12-06-2010, 02:05 PM
#6
Registered User
Thread Starter
Join Date: Dec 2010
Posts: 121
Likes: 0
Received 0 Likes
on
0 Posts
Thank you for the detailed procedure. I think I understand what you are saying as far as making the adjustment, but the terminology is mixed up. I did some reading and I understand more about how it works.
When there is no pressure in the system (ie no brakes being applied), the LSPV is always "open". The spring inside the LSPV forces the piston up, keeping the valve open. An "open" valve allows normal pressure to the rear.
When brakes are applied, the LSPV remains "open" until the pressure on the rear-brake side of the piston becomes greater than the force on the other side of the piston (from the internal spring, and, if the truck is loaded, the additional force from the load sensing lever). When that pressure becomes great enough, the piston is forced down, "closing" the valve and regulating the pressure to the back brakes.
That being said, when the truck is unloaded, the piston only has to overcome the force from the internal spring to "close" the valve.
When the truck is loaded, the piston has to overcome the combined force from the internal spring AND the load sensing lever to "close" the valve. Until now, I didn't realize the stiffness of load sensing lever is utilized in the system (ie as an additional spring force).
So, when the truck is unloaded, we do not want the load sensing lever to be touching the piston...or as you decribed it as not being under tension. The gap between the lever and the piston is the controlling factor here.
My first step is to crawl under there to see if the lever is touching the piston or not...If it is, then I found my problem. If not, well...I'll think about that later.
Thanks again!
From everything I read about the back brakes locking up, it turns out to be the LSVP. Either the LSVP isn't working correctly or its out of adjustment.
In my case, my back brakes don't act funny when its dry out. When it is wet outside, I can feel my back brakes acting differently. I'm not talking about lockup...of course they will lock up easier on a wet road. I am not really sure how to describe it beside that the braking feels different. And I don't know what to say about it being wet outside or not...maybe moisture on the brakes or LSPV? Beats me!
Actually, my brakes didn't actually "lock up" until last week, and I've noticed this problem for a over a year. When they did lock up recently, I was going fairly slow, and not braking very hard when I was coming up to a stop sign.
When there is no pressure in the system (ie no brakes being applied), the LSPV is always "open". The spring inside the LSPV forces the piston up, keeping the valve open. An "open" valve allows normal pressure to the rear.
When brakes are applied, the LSPV remains "open" until the pressure on the rear-brake side of the piston becomes greater than the force on the other side of the piston (from the internal spring, and, if the truck is loaded, the additional force from the load sensing lever). When that pressure becomes great enough, the piston is forced down, "closing" the valve and regulating the pressure to the back brakes.
That being said, when the truck is unloaded, the piston only has to overcome the force from the internal spring to "close" the valve.
When the truck is loaded, the piston has to overcome the combined force from the internal spring AND the load sensing lever to "close" the valve. Until now, I didn't realize the stiffness of load sensing lever is utilized in the system (ie as an additional spring force).
So, when the truck is unloaded, we do not want the load sensing lever to be touching the piston...or as you decribed it as not being under tension. The gap between the lever and the piston is the controlling factor here.
My first step is to crawl under there to see if the lever is touching the piston or not...If it is, then I found my problem. If not, well...I'll think about that later.
Thanks again!
In my case, my back brakes don't act funny when its dry out. When it is wet outside, I can feel my back brakes acting differently. I'm not talking about lockup...of course they will lock up easier on a wet road. I am not really sure how to describe it beside that the braking feels different. And I don't know what to say about it being wet outside or not...maybe moisture on the brakes or LSPV? Beats me!
Actually, my brakes didn't actually "lock up" until last week, and I've noticed this problem for a over a year. When they did lock up recently, I was going fairly slow, and not braking very hard when I was coming up to a stop sign.
Last edited by jstluise; 12-06-2010 at 02:14 PM.
12-06-2010, 02:05 PM
#7
An MPV can only be set to perform effectively under ONE certain load condition, and will not react to/adjust for others while the vehicle is in motion. Unless you were to route the brake lines into the cab and place the MPV within arms reach in an attempt to make adjustments manually on-the-fly. Which would not only be difficult, distracting, require more hands/arms than you have, it could become extremely dangerous!
Trending Topics
12-06-2010, 02:26 PM
#8
Thank you for the detailed procedure. I think I understand what you are saying as far as making the adjustment, but the terminology is mixed up. I did some reading and I understand more about how it works.
When there is no pressure in the system (ie no brakes being applied), the LSPV is always "open". The spring inside the LSPV forces the piston up, keeping the valve open. An "open" valve allows normal pressure to the rear.
When brakes are applied, the LSPV remains "open" until the pressure on the rear-brake side of the piston becomes greater than the force on the other side of the piston (from the internal spring, and, if the truck is loaded, the additional force from the load sensing lever). When that pressure becomes great enough, the piston is forced down, "closing" the valve and regulating the pressure to the back brakes.
That being said, when the truck is unloaded, the piston only has to overcome the force from the internal spring to "close" the valve.
But other than that I believe what I've said is as close to correct as it needs to be. What I mean by that is, it still describes one procedural way to make adjustments to the LSPV, and do so with an understanding of how it should be set to function correctly(or as close to correctly as possible without the LSPV pressure gauge SST). Whether those instructions are followed to a "T", or the brake biasing pressure is actually measured with a gauge to verify it's accuracy/correct setting, the overall theory of operation remains the same. You can still use those instructions to make adjustments based on the braking performance observed on your particular vehicle during it's operation. What I left out was the repositioning of the valve itself to get extra adjustment, in addition to lengthening or shortening the adjustment rod, if necessary.
I'll edit my previous post to reflect the true meanings of when the valve is "open" and "closed".
For those not "in the know" here's a technical article describing Toyota's hydraulic braking control systems.
http://autoshop101.com/forms/brake08.pdf
Last edited by MudHippy; 12-06-2010 at 06:29 PM.
12-06-2010, 04:46 PM
#9
Registered User
Join Date: May 2010
Location: Rapid City, SD
Posts: 77
Likes: 0
Received 0 Likes
on
0 Posts
thats good to know ^ i'll have to read up on it. took my spare tire out to mount a 31" and saw that back under there and started to wonder what the hell it was for.
12-06-2010, 05:17 PM
#10
Registered User
Join Date: May 2010
Location: Rapid City, SD
Posts: 77
Likes: 0
Received 0 Likes
on
0 Posts
according to that pdf file. it says if you lengthen the rod you'll get more pressure to your valve. and if you shorten it then you'll get less pressure.
and if that doesn't work reposition your valve.
that was before the worksheets. is that correct? i replaced my shoes in the rear a while ago. because it seemed like it didn't quite brake like its should in the rear. the cylinder then went out in the rear of my drum. so that got replaced as well. and adjusted the brakes. seemed to help a little.
but adjusting this valve seems like it would help alot.
yes? no? maybe so?
12-06-2010, 06:25 PM
#11
For instance, with my truck's 2" supension lift, I wasn't able to get the length of the adjustment rod long enough. So instead of repositioning the valve, I just pushed/forced/bent the axle end of the sensing rod/spring towards the valve end. This put additional arc in the sensing rod/spring, which effectively lengthened the adustment, without having to reposition the valve. It just seemed easier that way. Of course, the opposite could also be done by pushing/bending the sensing rod/spring down to lessen it's arc, and thereby effectively shortening it's adjustment if need be.
Last edited by MudHippy; 12-06-2010 at 06:27 PM.
12-06-2010, 06:32 PM
#12
Yep, all the way up if full rear braking, lower and you lower the rear braking pressure. I modified mine many years ago to be manually adjustable:
- http://www.4crawler.com/4x4/4R_suspe...ortioningValve
Easy way to check setting w/o fancy FSM tools is to find a vacant parking lot, preferably w/ wet pavement and make some test stops. Keep adjusting bias until front brakes lock up a bit before the rears do.
- http://www.4crawler.com/4x4/4R_suspe...ortioningValve
Easy way to check setting w/o fancy FSM tools is to find a vacant parking lot, preferably w/ wet pavement and make some test stops. Keep adjusting bias until front brakes lock up a bit before the rears do.
12-06-2010, 06:37 PM
#13
Registered User
Join Date: May 2010
Location: Rapid City, SD
Posts: 77
Likes: 0
Received 0 Likes
on
0 Posts
hot damn, i'll have to toy with it. no wet pavement around to test but if it braks better. i'd be very happy. seems like trail ridding down hills its tough to get the thing to stop as easy as i'd like. i'll dink with it when i get time but cant wait!
my rear springs sag (stock) so i'll have to beef em up with an add a leaf or something so i'm sure i'll have to dink with it some more that day too. i'll check it out! now that i know what it is.
Thanks Guys, very good info. :thumbsup:
my rear springs sag (stock) so i'll have to beef em up with an add a leaf or something so i'm sure i'll have to dink with it some more that day too. i'll check it out! now that i know what it is.
Thanks Guys, very good info. :thumbsup:
12-06-2010, 06:44 PM
#14
Registered User
Thread Starter
Join Date: Dec 2010
Posts: 121
Likes: 0
Received 0 Likes
on
0 Posts
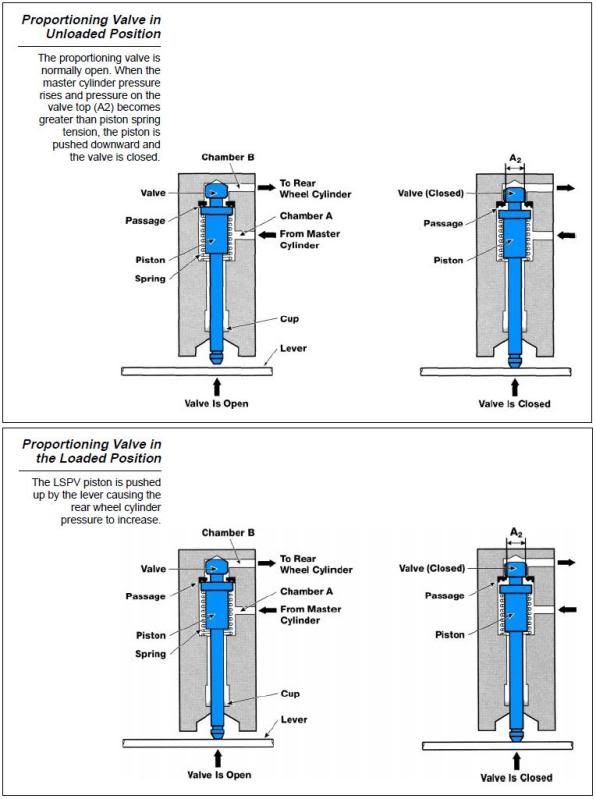
This figure is a good representation how the LSPV works:

For the unloaded condition, the spring inside the LSPV determines the location of 'A'. The LSPV piston will move once the pressure is high enough, and thus regulate the rear brake pressure. From what I gather, in the unloaded operation the load sensing lever never touches the piston. What do you think Mudhippy?
The condition of the LSPV may change the location of 'A'. For example, a broken internal spring would cause the valve to close immediately (or it will just stay closed), and the rear brakes would always be regulated.
In the loaded case, the tension on the load sensing lever will determine the location of 'C'. If you lengthen the rod (putting more tension on the lever), 'C' will move toward 'D' and you'll get more rear braking before the valve is closed. If you shorten the rod (less tension on lever), 'C' will move toward 'A', and your rear brakes will be regulated at a lower pressure.
12-07-2010, 09:10 PM
#15
This figure is a good representation how the LSPV works:
For the unloaded condition, the spring inside the LSPV determines the location of 'A'. The LSPV piston will move once the pressure is high enough, and thus regulate the rear brake pressure. From what I gather, in the unloaded operation the load sensing lever never touches the piston. What do you think Mudhippy?
For the unloaded condition, the spring inside the LSPV determines the location of 'A'. The LSPV piston will move once the pressure is high enough, and thus regulate the rear brake pressure. From what I gather, in the unloaded operation the load sensing lever never touches the piston. What do you think Mudhippy?
If I could figure out how you were able to clip that graph out of the PDF and save it to your photobucket account for posting in this thread, I'd do the same thing to the diagram on page 100. Which shows the piston in contact with the load sensing lever when the valve is closed during the unloaded condition.
If you could do that for me that'd be great!
 12-08-2010, 09:59 AM
#16
Registered User
Thread Starter
Join Date: Dec 2010
Posts: 121
Likes: 0
Received 0 Likes
on
0 Posts
I'm pretty sure at deflection point "A" the piston is touching the load sensing lever.
If I could figure out how you were able to clip that graph out of the PDF and save it to your photobucket account for posting in this thread, I'd do the same thing to the diagram on page 100. Which shows the piston in contact with the load sensing lever when the valve is closed during the unloaded condition.
If you could do that for me that'd be great!
Yes, I saw that the piston is touching the lever, but I wasn't sure if the lever was contributing at all to the upward force on the piston. It doesn't seem like it does, since the valve is closed and the piston can't move down any farther. I dunno.
At another part in the text, it mentions that when the vehicle is loaded, there should be no gap between the lever and the piston (with no master cylinder pressure). I take that as saying when the vehicle is loaded, the lever should just be touching the piston, but not pushing up on the piston.
12-08-2010, 12:00 PM
#17
Yes, I saw that the piston is touching the lever, but I wasn't sure if the lever was contributing at all to the upward force on the piston. It doesn't seem like it does, since the valve is closed and the piston can't move down any farther. I dunno.
At another part in the text, it mentions that when the vehicle is loaded, there should be no gap between the lever and the piston (with no master cylinder pressure). I take that as saying when the vehicle is loaded, the lever should just be touching the piston, but not pushing up on the piston.
At another part in the text, it mentions that when the vehicle is loaded, there should be no gap between the lever and the piston (with no master cylinder pressure). I take that as saying when the vehicle is loaded, the lever should just be touching the piston, but not pushing up on the piston.
In the unloaded condition the piston is merely contacting the load sensing lever, without the lever applying any upward pushing force to it, when the brakes are applied hard enough. So during the unloaded condition the load sensing lever wouldn't serve any real purpose in theory.
What I was wondering about that though was, what about braking while the vehicle is travelling backwards, or in reverse gear? That could pitch the weight of the vehicle towards the tail when braking and cause the load sensing lever to come into contact with the piston before the valve was closed. Even during the unloaded condition. Of course the effects of which would be the same as the loaded condition as far as the valve sees it. And with the valve being held open by the load sensing lever, as if the loaded condition were present, the fluid pressure transmitted to the rear wheel cylinders would be higher than it would be during other instances of the unloaded condition. The effect of which would be more braking bias towards the rear wheels. But the effective load of the vehicle's weight is being transfered more towards the rear wheels as it pitches rearward under braking while travelling backwards/in reverse. That would mean that with the valve being held open by the load sensing lever, the raised amount of fluid pressure at the rear wheel cylinders would be appropriate during such instances. Because, with more weight now concentrated on the rear wheels, the brakes would be less likely to lock up, and therefor would actually need the valve to be open to operate most effectively. What a long-winded way of stating that the LSPV is capable of working even when the vehicle isn't moving forward. No?
On the load sensing lever applying pushing force against the piston with vehicle in the loaded condition, that would depend on the amount of the load present over the rear axle. Lighty loaded, the load sensing lever might be just touching the piston, and/or barely holding the valve open with the aid of the piston return spring. With a heavier load, the load sensing lever will be applying pushing force to the piston well above what the piston return spring is capable of. And that will help to keep the valve from closing prematurely. Thus keeping the braking bias more towards the rear as it's needed to be for that particular load condition.
Now if that's not over-complication of such a relatively simple system to understand, I don't know what is!

PS: One needs also to realize that the LSPV system, as it's setup from the factory, is set so it will perform effectively with the vehicle in it's stock configuration. So when the user encounters an apparent malfunction of the LSPV, he needs to take into account things such as;
a) What amount of weight has been added to, or subtracted from, the rear of the vehicle through add-ons or modifications to it?
b) Are the size of the wheels/tires, front and rear, larger/smaller diameter or wider/skinnier than stock?
c) Are the wheels/tires heavier or lighter than what came stock?
d) Are the tires themselves more, or less, likely to cause the brakes to lock up than stock tires based on their composition?(softer tread compounds will be less likely to skid under braking, harder compounds will tend to skid with less braking force applied. Traction tires or traction aiding devices, such as tire studs, will also affect braking performance by being less prone to skidding.)
e) Is the braking system still similar to stock(ie. enhanced performance friction components, or conversion to disc brakes from drums.)?
f) Has the ride height, measured at the front and rear axles, been changed by lifting or lowering the supension(ie lift springs/blocks/shackles/spacers, lowering springs/blocks/shackles/spacers, SOA/SUA conversion, cranked torsion bars, BJ spacers, etc.)?
Any of those things may require for the LSPV to be adjusted from the stock position, in either the unloaded or loaded conditions, to be most effective at it's intended function.
Last edited by MudHippy; 01-28-2011 at 06:42 PM.
12-08-2010, 12:14 PM
#18
Registered User
Join Date: Jan 2009
Location: Moyock,NC
Posts: 477
Likes: 0
Received 0 Likes
on
0 Posts
mud hippy it's funny you just posted that. I only noticed a change in my rear brakes when I put my new wheels and tires on. New: 35x12.50x15 Old:35x14.50x15.
I took a look at the LSVP system this afternoon to kind of put together what you guys have been talking about. So basically what I need to do is raise my line to stock location with some kind of bracket?? I also tried to loosen the nut you have circled in yellow but it wouldn't budge. I'm going to hit it with some PB and see what happens.
I took a look at the LSVP system this afternoon to kind of put together what you guys have been talking about. So basically what I need to do is raise my line to stock location with some kind of bracket?? I also tried to loosen the nut you have circled in yellow but it wouldn't budge. I'm going to hit it with some PB and see what happens.
12-08-2010, 12:24 PM
#19
Registered User
Thread Starter
Join Date: Dec 2010
Posts: 121
Likes: 0
Received 0 Likes
on
0 Posts
IOn the load sensing lever applying pushing force against the vehicle in the loaded condition, that would depend on the amount of the load preset over the rear axle. Lighty loaded, the load sensing lever might be just touching the piston, and/or barely holding the valve open with the aid of the piston return spring. With a heavier load, the load sensing lever will be applying pushing force to the piston well above what the piston return spring is capable of. And that will help to keep the valve from closing prematurely. Thus keeping the braking bias more towards the rear as it's needed to be for that particular load condition.
I would agree with you on the 'braking when going backwards' scenario, too.
That's a good list that shows all the different contributing factors for this braking system. Makes me think the FSM's procedure for adjusting the LSPV isn't the best, since they are only looking brake pressures. BUT, that is probably assuming EVERYTHING is stock, which they take into account when coming up with their numbers.
Last edited by jstluise; 12-08-2010 at 12:26 PM.
12-08-2010, 12:32 PM
#20
Registered User
Thread Starter
Join Date: Dec 2010
Posts: 121
Likes: 0
Received 0 Likes
on
0 Posts
mud hippy it's funny you just posted that. I only noticed a change in my rear brakes when I put my new wheels and tires on. New: 35x12.50x15 Old:35x14.50x15.
I took a look at the LSVP system this afternoon to kind of put together what you guys have been talking about. So basically what I need to do is raise my line to stock location with some kind of bracket?? I also tried to loosen the nut you have circled in yellow but it wouldn't budge. I'm going to hit it with some PB and see what happens.
I took a look at the LSVP system this afternoon to kind of put together what you guys have been talking about. So basically what I need to do is raise my line to stock location with some kind of bracket?? I also tried to loosen the nut you have circled in yellow but it wouldn't budge. I'm going to hit it with some PB and see what happens.
It depends on what is happening with your brakes. If you're locking up to easily, then you need to lower the load sensing lever. What did you notice differently when you put your new wheels/tires on?
You shouldn't need any brackets, unless you making up for a lift. Anything with wheel/tires will not change the geometry between the rear axle and the frame (but a lift will).


