
 02-10-2016, 09:06 AM
Last edit by: IB Advertising
See related guides and technical advice from our community experts:
Browse all: Fuel System Guides
- Toyota 4Runner 1984-1995 How to Replace Fuel Filter
Step by step instructions for do-it-yourself repairs
Browse all: Fuel System Guides

Replacing the 3VZE Fuel Filter (w/pictures)
08-27-2010, 11:07 AM
#1
Registered User
Thread Starter

Join Date: Sep 2007
Location: San Francisco East Bay
Posts: 8,251
Likes: 0
Received 820 Likes
on
648 Posts
Replacing the 3VZE Fuel Filter (w/pictures)
Replacing the Fuel filter can be a frustrating job, because there is very little room around the forward end of the filter. But with patience, you can replace it easily without removing major parts of the vehicle, or setting yourself on fire.
First, assemble your tools:
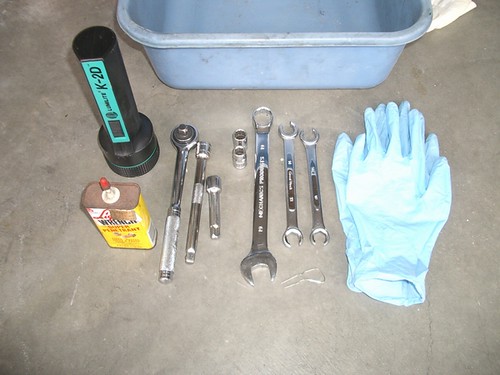
You'll need a 10mm and 12mm socket, a 19mm open-end wrench, and a 14mm Flare nut wrench. Note that a 9/16" flare nut wrench will "fit," (it's only about 3% too big), but you'll regret using it. Once you round over the flats on the brass flare nut, you'll need to replace the entire fuel line. Get a good flare nut wrench; it's worth the money.
You'll also need Nitrile gloves (the latex gloves your girlfriend uses for thoracic surgery will disintegrate instantly on contact with gasoline), Liquid Wrench (or PB Blaster, etc.), your "special service tool" to connect B+ to FP to run the fuel pump for a pressure test, and a container to catch the small (~1 cup) of gasoline you will lose when you open the line..
Last, I recommend a flashlight, NOT that terrific drop light you usually use. Even if you are very careful, you will drip out enough gasoline to worry about. If you drop that 110v light and break the bulb, we will probably never even hear about it. I recommend doing this with lots of daylight, but you still might need a little extra light. And leave the door open; I don't care how cold it is, you'll need that fresh air.
Next, REMOVE THE GAS CAP. The fuel tank is under pressure from the gasoline vapors, and on a warm day there is enough pressure to eventually empty the tank. All of that gas will drop on your head if you don't relieve that pressure first.
There is still residual pressure in the fuel line itself, but there's not much you can do about it. Running the truck and pulling the FP fuse [there is no separate FP fuse, it's on the EFI fuse] will only drop the pressure a little before the truck stops running. In theory, pulling a vacuum on the fuel pressure regulator reference port will reduce the pressure slightly (from 55psi down to 40-45psi), but that's not worth the trouble. And opening a connection in the engine compartment just means you're leaking fuel somewhere else, and you'll need new seals to close up that connection. So just be prepared to lose a little fuel.
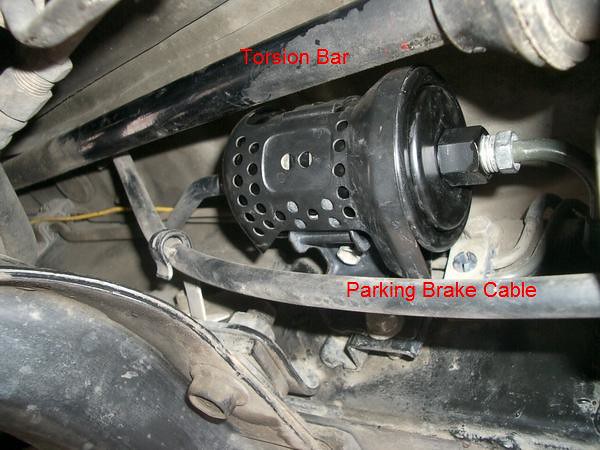
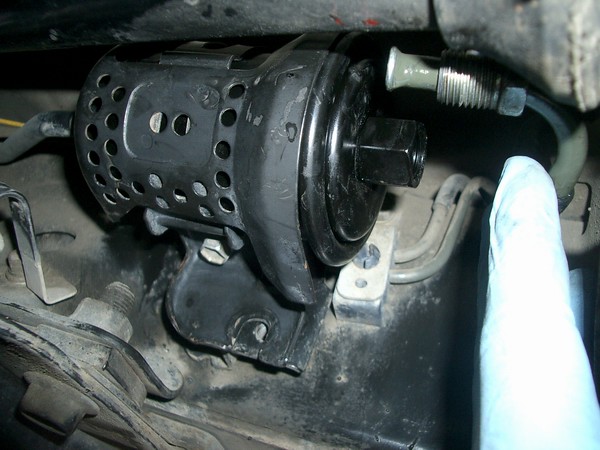
Get the work area as clean as you can with rags or paper towels. Put a few drops of Liquid Wrench on the fittings on each end of the filter. The parking brake cable is in the way, and not hard to remove.
There is a clevis and captured cotter pin at the aft end, and a "U" clip to hold the casing. Remove the rubber boot from the casing (a slip fit into a groove) before trying to get the casing out of the holder.
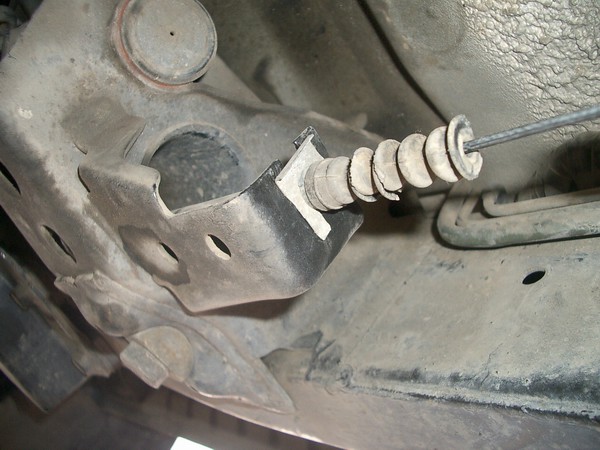
Then just move it out of the way. Remove the bolt on the first fuel-line hold-down aft of the filter, and pop the fuel line out of the clip.
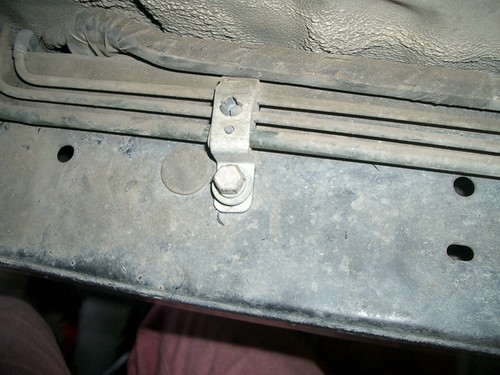
This will give you enough flex in the aft fuel line to get it out of the way of the filter when it comes time to pull it out.
The aft flare nut isn't too difficult to remove with the parking brake cable set aside. DO NOT remove any of the three bolts holding the filter carrier. You don't want the filter to move, or you could "wind up" the other fuel line. Set up the 19mm wrench and the 14mm flare nut wrench next to each other, and squeeze them like a pair of scissors. There's enough room to swing the wrench more than 60 degrees, so you won't even need to flip the wrench to unscrew the flare nut the rest of the way..
Now, the fun part. You DO NOT need to remove the transmission support (that would be a thankless task.) There is just enough room to swing the flare nut wrench about 30 degrees; if you are lucky that will break the connection and you can unscrew the flare nut with your fingers. Then, loosen the bottom 8mm bolt attaching the filter carrier to the frame, and the vertical 6mm bolt holding the filter in the carrier. Gently pull the aft fuel line out of the way and remove the old filter.
But if you were that lucky, you wouldn't need to read this. I found that if you removed the two 8mm bolts holding the filter carrier to the frame, that you can move the carrier up and down enough to get sufficient travel on the wrench. Do not remove the vertical 6mm bolt; you do not want the filter to move when you apply pressure to the flare nut (or you will be winding up the fuel line), so pressing the filter carrier against the flat of the frame helps keep it from rotating. (The carrier actually attaches to a spacer, but the spacer is parallel to the frame. Just press the carrier against the spacer.)

You might have to put the flare nut wrench above the torsion bar with the filter carrier lifted, then after you wrench it a bit, slide the carrier down and put the wrench below the torsion bar. You should have enough hands to put the 19mm wrench on the aft end of the filter, push the filter carrier against the frame as a no-rotation reference, and put some pressure on the flare nut.
Whew! If you were really clever, you might think you could install the new filter by getting it started on the forward flare nut, hold that nut with a wrench, and then "screw" the whole filter into the flare nut with the 19mm wrench on the back of the filter. You won't be happy with that. First, you're grinding the flared fuel line into the filter, rather than gently pulling it together with the nut. More importantly, the filter itself has three ribs spaced 120 degrees apart, and the filter carrier has three slots to capture the ribs. You need to get the filter aligned with the carrier, or you will crush the filter (via the ribs) when you tighten it.
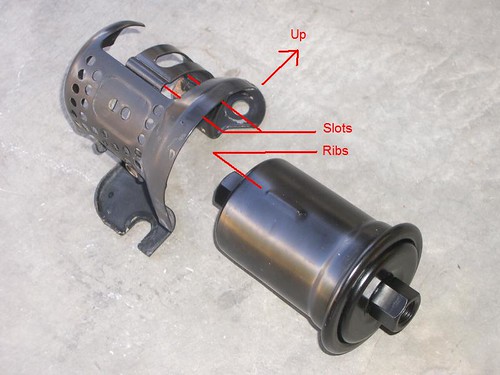
I was able to a) put the filter into the carrier with the ribs aligned, b) tighten the 6mm bolt to hold the filter in the carrier, c) start the forward flare nut by hand, and by pressing the carrier against the frame while holding the 19mm wrench on the back end, keep the filter/carrier from turning while I tightened the forward flare nut. To get enough wrench swing, I just needed to slide the carrier up and down a tiny bit while keeping the carrier flat against the frame as a reference against rotation.
Now start the aft flare nut into the filter. Before tightening the flare nut, put the 8mm bolts in to hold the carrier to the frame. Then using the two wrenches tighten the flare nut to 22 ft-lb (the flare nut will seal at a much lower torque, but 22 is the spec.)
DO NOT START the truck; not yet. Turn the key to on, connect B+ and FP with your "special service tool", and listen for the fuel pump. Immediately look for leaks, and then let the pump run for a minute.
No leaks? Of course not! Reattach the aft fuel line clamp, and reinstall the parking brake. Put on the gas cap. Have yourself a well-earned adult refreshment.
First, assemble your tools:
You'll need a 10mm and 12mm socket, a 19mm open-end wrench, and a 14mm Flare nut wrench. Note that a 9/16" flare nut wrench will "fit," (it's only about 3% too big), but you'll regret using it. Once you round over the flats on the brass flare nut, you'll need to replace the entire fuel line. Get a good flare nut wrench; it's worth the money.
You'll also need Nitrile gloves (the latex gloves your girlfriend uses for thoracic surgery will disintegrate instantly on contact with gasoline), Liquid Wrench (or PB Blaster, etc.), your "special service tool" to connect B+ to FP to run the fuel pump for a pressure test, and a container to catch the small (~1 cup) of gasoline you will lose when you open the line..
Last, I recommend a flashlight, NOT that terrific drop light you usually use. Even if you are very careful, you will drip out enough gasoline to worry about. If you drop that 110v light and break the bulb, we will probably never even hear about it. I recommend doing this with lots of daylight, but you still might need a little extra light. And leave the door open; I don't care how cold it is, you'll need that fresh air.
Next, REMOVE THE GAS CAP. The fuel tank is under pressure from the gasoline vapors, and on a warm day there is enough pressure to eventually empty the tank. All of that gas will drop on your head if you don't relieve that pressure first.
There is still residual pressure in the fuel line itself, but there's not much you can do about it. Running the truck and pulling the FP fuse [there is no separate FP fuse, it's on the EFI fuse] will only drop the pressure a little before the truck stops running. In theory, pulling a vacuum on the fuel pressure regulator reference port will reduce the pressure slightly (from 55psi down to 40-45psi), but that's not worth the trouble. And opening a connection in the engine compartment just means you're leaking fuel somewhere else, and you'll need new seals to close up that connection. So just be prepared to lose a little fuel.
Get the work area as clean as you can with rags or paper towels. Put a few drops of Liquid Wrench on the fittings on each end of the filter. The parking brake cable is in the way, and not hard to remove.
There is a clevis and captured cotter pin at the aft end, and a "U" clip to hold the casing. Remove the rubber boot from the casing (a slip fit into a groove) before trying to get the casing out of the holder.
Then just move it out of the way. Remove the bolt on the first fuel-line hold-down aft of the filter, and pop the fuel line out of the clip.
This will give you enough flex in the aft fuel line to get it out of the way of the filter when it comes time to pull it out.
The aft flare nut isn't too difficult to remove with the parking brake cable set aside. DO NOT remove any of the three bolts holding the filter carrier. You don't want the filter to move, or you could "wind up" the other fuel line. Set up the 19mm wrench and the 14mm flare nut wrench next to each other, and squeeze them like a pair of scissors. There's enough room to swing the wrench more than 60 degrees, so you won't even need to flip the wrench to unscrew the flare nut the rest of the way..
Now, the fun part. You DO NOT need to remove the transmission support (that would be a thankless task.) There is just enough room to swing the flare nut wrench about 30 degrees; if you are lucky that will break the connection and you can unscrew the flare nut with your fingers. Then, loosen the bottom 8mm bolt attaching the filter carrier to the frame, and the vertical 6mm bolt holding the filter in the carrier. Gently pull the aft fuel line out of the way and remove the old filter.
But if you were that lucky, you wouldn't need to read this. I found that if you removed the two 8mm bolts holding the filter carrier to the frame, that you can move the carrier up and down enough to get sufficient travel on the wrench. Do not remove the vertical 6mm bolt; you do not want the filter to move when you apply pressure to the flare nut (or you will be winding up the fuel line), so pressing the filter carrier against the flat of the frame helps keep it from rotating. (The carrier actually attaches to a spacer, but the spacer is parallel to the frame. Just press the carrier against the spacer.)
You might have to put the flare nut wrench above the torsion bar with the filter carrier lifted, then after you wrench it a bit, slide the carrier down and put the wrench below the torsion bar. You should have enough hands to put the 19mm wrench on the aft end of the filter, push the filter carrier against the frame as a no-rotation reference, and put some pressure on the flare nut.
Whew! If you were really clever, you might think you could install the new filter by getting it started on the forward flare nut, hold that nut with a wrench, and then "screw" the whole filter into the flare nut with the 19mm wrench on the back of the filter. You won't be happy with that. First, you're grinding the flared fuel line into the filter, rather than gently pulling it together with the nut. More importantly, the filter itself has three ribs spaced 120 degrees apart, and the filter carrier has three slots to capture the ribs. You need to get the filter aligned with the carrier, or you will crush the filter (via the ribs) when you tighten it.
I was able to a) put the filter into the carrier with the ribs aligned, b) tighten the 6mm bolt to hold the filter in the carrier, c) start the forward flare nut by hand, and by pressing the carrier against the frame while holding the 19mm wrench on the back end, keep the filter/carrier from turning while I tightened the forward flare nut. To get enough wrench swing, I just needed to slide the carrier up and down a tiny bit while keeping the carrier flat against the frame as a reference against rotation.
Now start the aft flare nut into the filter. Before tightening the flare nut, put the 8mm bolts in to hold the carrier to the frame. Then using the two wrenches tighten the flare nut to 22 ft-lb (the flare nut will seal at a much lower torque, but 22 is the spec.)
DO NOT START the truck; not yet. Turn the key to on, connect B+ and FP with your "special service tool", and listen for the fuel pump. Immediately look for leaks, and then let the pump run for a minute.
No leaks? Of course not! Reattach the aft fuel line clamp, and reinstall the parking brake. Put on the gas cap. Have yourself a well-earned adult refreshment.
Last edited by scope103; 08-27-2010 at 12:32 PM.
 08-27-2010, 11:25 AM
#2
Registered User
Thanks a lot for the great write up!!! i'm sure i'll have to do this sometime....and it'll prolly be on the side of the road out in bum fricked nowhere with my luck.......knock on wood..
Mods, Sticky worthy????
Mods, Sticky worthy????
08-27-2010, 08:30 PM
#3
Registered User
Just call it a beer, scope. I'm having one right now, thanks. Guiness, lads......it'll put the hair on yer chest, now. 
Good write up, man. A few things I hadn't thought of.
Good write up, man. A few things I hadn't thought of.
09-14-2010, 08:58 AM
#5
Registered User
great post, thank you I am going to tackle this very soon. Quick question does anyone know the thread size of the two male fittings on each line end that goes into the fuel filter? I was thinking of installing a aftermarket fuel filter relocation kit to make things a lot easier down the road.
Something like this.
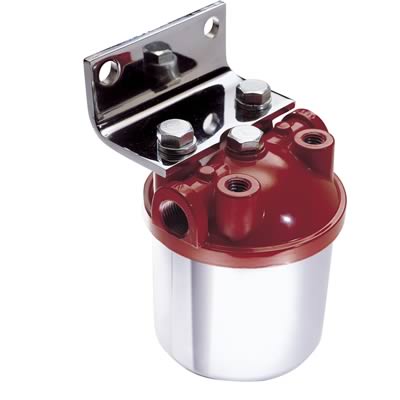
Something like this.
09-14-2010, 02:42 PM
#6
Contributing Member
Join Date: Mar 2003
Location: COTKU,Ontario,Canada
Posts: 11,334
Likes: 0
Received 0 Likes
on
0 Posts
Wow! I've never seen a fuel filter in that good condition before... around here the corrode to a solid piece of metal quickly and you nearly always fracture the lines getting it loose.
Looks good though... nice write up.
Looks good though... nice write up.
Trending Topics
09-14-2010, 03:31 PM
#9

nice. i replacd mine and it looked just like that i was surprised. cut it open and it wasnt bad. i had to replace it since i wasnt sure when it had if ever been replaced
 09-14-2010, 04:45 PM
#11
Registered User
I wouldn't call that an ideal location either, bleeder. I think the 22re location is still easier than the 3vze. That relocation filter looks good for both, though. Hmmm.....
09-15-2010, 12:57 PM
#12
Registered User

Join Date: Mar 2010
Location: Marathon ON
Posts: 21
Likes: 0
Received 0 Likes
on
0 Posts
Just got the filter from NAPA and read this thread.Thanks.Very helpfull though my old filter looks nothing like that.I think Ill post a pic-its an 89 original filter and I live in Northern Ontario.
 09-16-2010, 08:21 AM
#15
Registered User
I think I am going to give the filter relocation kit a try, just need to figure out what the thread size is of the two male fittings that screw into the stock filter?
Chris
Chris
09-17-2010, 12:42 PM
#17
Registered User
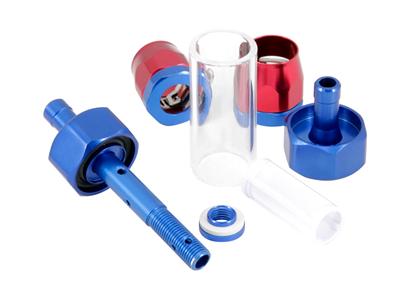
Here is the link to Summit: http://www.summitracing.com/parts/SUM-G1507/
Also if you search "Fuel Filter" at Summit you will see all of the kits they offer.
I will also be installing a clear inline fuel filter under the hood so I can quickly view if there is any issues with the fuel.
Here is the searched results from Summit.
http://www.summitracing.com/search/?...20filter&dds=1
 10-11-2010, 10:45 AM
#20
Contributing Member
Join Date: May 2002
Location: Graham, Wa.
Posts: 1,002
Likes: 0
Received 0 Likes
on
0 Posts


