Rear Disc Brake Conversion - Writeup
 08-02-2007, 10:41 PM
#1
Registered User
Thread Starter
Rear Disc Brake Conversion - Writeup
Ok as promised in my previous thread heres the short writeup on my disc brake conversion.
Search Keywords:
Disc Brakes ; Disc Brake Conversion ; Rear Disc Brake Conversion ; Brake Conversion ; Toyota Rear Brakes ; Replacing rear drum brakes ; Drum Brake Alternatives ;
*It's very important to include the above as this helps people find threads of this nature.. The sole purpose of this thread is to HELP others learn from MY dumb mistakes and SMART decisions... and all the crap inbetween. =P
***************
First and foremost I'd like to DIRECT ALL YOU to Elvota's Disc brake conversion writeup found here @ yotatech:
https://www.yotatech.com/forums/f116...c-swap-107749/
His writeup covers all the important aspects of this conversion. You will find all the neccessary part #'s that I won't repeat here! So READ IT!
Here are a few more links for information regarding this conversion:
http://www.mindspring.com/~jayk3/toyota/discs.htm
http://www.pirate4x4.com/forum/showt...=281059&page=1
I'll only be detailing the CHANGES and DIFFERENCES I encountered in my disc brake conversion. If I didn't encounter obstacles different from Elvotas I wouldnt really have a purpose of writing this .. Repeating is unneccessary. =D
I used Sky Manufacturing's:
-Caliper Brackets
-Milled Chevy Rotors
-Rear Flex brake lines
$485 after shipping! (just for skys stuff, the other parts required cost more $... read on) ... headache cost saved $? $Infinite... It all came in one box. I didnt have to deal with a dumb a$$ at a machine shop or try and source brake lines from 10 different trucks ... but if you want save $ by ALL MEANS READ Elvotas writeup. THERE ARE CHEAPER METHODS! ... I've found when i try to tackle saving $ I end up redoing my mistakes ... IE... this whole conversion is a result of REDOING DRUM BRAKES that only ended up the same condition as the brakes i replaced a year earlier...
mud, water, sand, grit DO NOT MIX WITH DRUM BRAKES!!!!!
Here is a glamour shot of all the neccessary parts needed for this conversion:

NOTE: I find it important to mention that Skys brake lines come tagged with a note stating they are NOT DOT approved brake lines. The Load proportioning valve from Summit racing is also NOT DOT approved. They are tagged "FOR OFFROAD USE ONLY". If you are concerned about laws in your area I'd reconsider this whole swap. In my case I don't give a rats butt about the rules in my area because my rig is not checked by any state official, ever. There are no emission checks or anything of that nature. In other words do this swap at YOUR OWN RISK. Dont say no one warned ya =)
*************
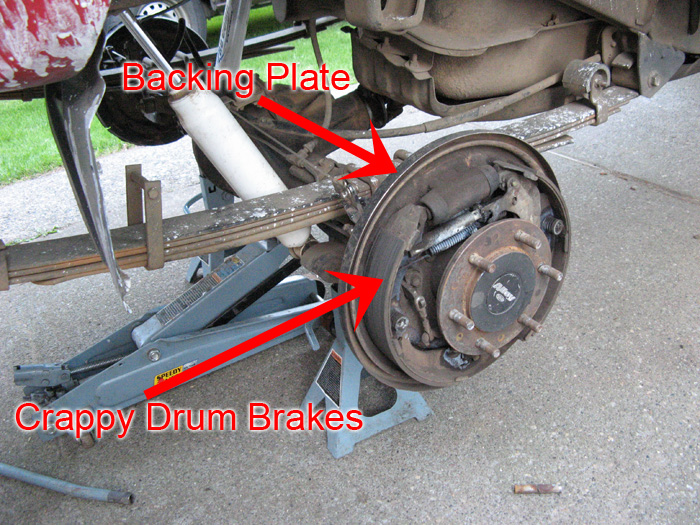
To remove the OEM backing plates which are SEPARATE from the bearing case on your rear axle you must:
A) remove them yourself by removing the wheel bearing and retainer (dont forget the C clip or retainer clip, whatever people call it)... Sliding the axle out removing the backing plate (punch out the 4 studs!).
B) Pay a shop to remove the backing plate.
C) Cut the mother off!!! YOU WONT EVER NEED IT AGAIN! Say goodbye to that PIECE OF CRAP!
This is the backing plate you will be removing. It's sole purpose is to allow a place for the drum brake mechanisms to mount to and provide the rigidity withstand the forces of braking. I estimate its made of about 3/16" steel (sorry didnt care to measure!)
Search Keywords:
Disc Brakes ; Disc Brake Conversion ; Rear Disc Brake Conversion ; Brake Conversion ; Toyota Rear Brakes ; Replacing rear drum brakes ; Drum Brake Alternatives ;
*It's very important to include the above as this helps people find threads of this nature.. The sole purpose of this thread is to HELP others learn from MY dumb mistakes and SMART decisions... and all the crap inbetween. =P
***************
First and foremost I'd like to DIRECT ALL YOU to Elvota's Disc brake conversion writeup found here @ yotatech:
https://www.yotatech.com/forums/f116...c-swap-107749/
His writeup covers all the important aspects of this conversion. You will find all the neccessary part #'s that I won't repeat here! So READ IT!
Here are a few more links for information regarding this conversion:
http://www.mindspring.com/~jayk3/toyota/discs.htm
http://www.pirate4x4.com/forum/showt...=281059&page=1
I'll only be detailing the CHANGES and DIFFERENCES I encountered in my disc brake conversion. If I didn't encounter obstacles different from Elvotas I wouldnt really have a purpose of writing this .. Repeating is unneccessary. =D
I used Sky Manufacturing's:
-Caliper Brackets
-Milled Chevy Rotors
-Rear Flex brake lines
$485 after shipping! (just for skys stuff, the other parts required cost more $... read on) ... headache cost saved $? $Infinite... It all came in one box. I didnt have to deal with a dumb a$$ at a machine shop or try and source brake lines from 10 different trucks ... but if you want save $ by ALL MEANS READ Elvotas writeup. THERE ARE CHEAPER METHODS! ... I've found when i try to tackle saving $ I end up redoing my mistakes ... IE... this whole conversion is a result of REDOING DRUM BRAKES that only ended up the same condition as the brakes i replaced a year earlier...
mud, water, sand, grit DO NOT MIX WITH DRUM BRAKES!!!!!
Here is a glamour shot of all the neccessary parts needed for this conversion:
NOTE: I find it important to mention that Skys brake lines come tagged with a note stating they are NOT DOT approved brake lines. The Load proportioning valve from Summit racing is also NOT DOT approved. They are tagged "FOR OFFROAD USE ONLY". If you are concerned about laws in your area I'd reconsider this whole swap. In my case I don't give a rats butt about the rules in my area because my rig is not checked by any state official, ever. There are no emission checks or anything of that nature. In other words do this swap at YOUR OWN RISK. Dont say no one warned ya =)
*************
To remove the OEM backing plates which are SEPARATE from the bearing case on your rear axle you must:
A) remove them yourself by removing the wheel bearing and retainer (dont forget the C clip or retainer clip, whatever people call it)... Sliding the axle out removing the backing plate (punch out the 4 studs!).
B) Pay a shop to remove the backing plate.
C) Cut the mother off!!! YOU WONT EVER NEED IT AGAIN! Say goodbye to that PIECE OF CRAP!
This is the backing plate you will be removing. It's sole purpose is to allow a place for the drum brake mechanisms to mount to and provide the rigidity withstand the forces of braking. I estimate its made of about 3/16" steel (sorry didnt care to measure!)
Last edited by drew303; 08-03-2007 at 12:22 AM.
 08-02-2007, 11:14 PM
#2
Contributing Member
Ok as promised in my previous thread heres the short writeup on my disc brake conversion.
Search Keywords:
Disc Brakes ; Disc Brake Conversion ; Rear Disc Brake Conversion ; Brake Conversion ; Toyota Rear Brakes ; Replacing rear drum brakes ; Drum Brake Alternatives ;
*It's very important to include the above as this helps people find threads of this nature.. The sole purpose of this thread is to HELP others learn from MY dumb mistakes and SMART decisions... and all the crap inbetween. =P
***************
First and foremost I'd like to DIRECT ALL YOU to Elvota's Disc brake conversion writeup found here @ yotatech:
https://www.yotatech.com/forums/f116...c-swap-107749/
His writeup covers all the important aspects of this conversion. You will find all the neccessary part #'s that I won't repeat here! So READ IT!
Here are a few more links for information regarding this conversion:
http://www.mindspring.com/~jayk3/toyota/discs.htm
http://www.pirate4x4.com/forum/showt...=281059&page=1
I'll only be detailing the CHANGES and DIFFERENCES I encountered in my disc brake conversion. If I didn't encounter obstacles different from Elvotas I wouldnt really have a purpose of writing this .. Repeating is unneccessary. =D
I used Sky Manufacturing's:
-Caliper Brackets
-Milled Chevy Rotors
-Rear Flex brake lines
$485 after shipping! ... headache cost saved $? $Infinite... It all came in one box. I didnt have to deal with a dumb a$$ at a machine shop or try and source brake lines from 10 different trucks ... but if you want save $ by ALL MEANS READ Elvotas writeup. THERE ARE CHEAPER METHODS! ... I've found when i try to tackle saving $ I end up redoing my mistakes ... IE... this whole conversion is a result of REDOING DRUM BRAKES that only ended up the same condition as the brakes i replaced a year earlier...
mud, water, sand, grit DO NOT MIX WITH DRUM BRAKES!!!!!
Here is a glamour shot of all the neccessary parts needed for this conversion:
NOTE: I find it important to mention that Skys brake lines come tagged with a note stating they are NOT DOT approved brake lines. The Load proportioning valve from Summit racing is also NOT DOT approved. They are tagged "FOR OFFROAD USE ONLY". If you are concerned about laws in your area I'd reconsider this whole swap. In my case I don't give a rats butt about the rules in my area because my rig is not checked by any state official, ever. There are no emission checks or anything of that nature. In other words do this swap at YOUR OWN RISK. Dont say no one warned ya =)
*************
To remove the OEM backing plates which are SEPARATE from the bearing case on your rear axle you must:
A) remove them yourself by removing the wheel bearing and retainer (dont forget the C clip or retainer clip, whatever people call it)... Sliding the axle out removing the backing plate (punch out the 4 studs!).
B) Pay a shop to remove the backing plate.
C) Cut the mother off!!! YOU WONT EVER NEED IT AGAIN! Say goodbye to that PIECE OF CRAP!
This is the backing plate you will be removing. It's sole purpose is to allow a place for the drum brake mechanisms to mount to and provide the rigidity withstand the forces of braking. I estimate its made of about 3/16" steel (sorry didnt care to measure!)
08-02-2007, 11:18 PM
#3
Registered User
Thread Starter
*well my dumb butt hit submit thread so heres the rest of it... unless i hit submit thread instead of preview, there might be more replies in order hehe*
Heres how i cut my backing plates off.. sorry I didnt get any shots of them cut or being cut (without me in the way).. but this was the most effective way to get them off using a 4 1/2" grinder with cutting wheel!
The red lines show the cuts you should make (all the way through, ie cut through to the bearing case BUT DONT CUT THE BEARING CASE!). The arrow indicates how it will slide off. You only have to cut enough material to fit the backing plate down past the bearing case outer oil seal which is like almost half the diamtuer of the actual bearing case. DONT FORGET the backing plate is SEPARATE from the bearing case. knock ALL OF THE STUDS out before you cut. you wont need them anyways. One of the studs you will HAVE TO CUT to get it out since it controls part of the OEM parking brake.. it just wont come out =) not enough room so cut that mother!

DONT CUT THE BACKING PLATE WHILE ITS STILL ON THE TRUCK. TAKE THE AXLE OUT!.... common sense would say duh, you gotta knock the studs out but dont use this above pictures an idea WHERE you should attempt to cut the backing plate!!! Look below, i used a bench and vice. Not that you couldnt but I'd just advise AGAINST this practice.
*common sense check...remove brake hardware before cutting.
A friend helped me with this step of the project since he happened to stop by... He actually was a blessing because it was quite the PITA to cut these backing plates off with a 4 1/2" cutting wheel on a grinder. So dont be alarmed if you find it extremely annoying and difficult to cut them off! Just get creative and have a BFH on hand =)
he did get this shot of me tho:

And here we have the backing plates gone... via whichever way you decided to go, they should be gone by this step. Preferably sold or better yet in the garbage where they can no longer cause ANYMORE MIGRAINES! =)

Install the Sky brackets this way... pay attention since this can get mixed up. The longer finger should like 'grab' the top of the axle housing... if you look you should get what im saying: (it will make more sense when the brackets are in your hands, trust me).

*The brackets came untreated from Sky so i painted them red with caliper paint
*********
I got my calipers brand new from Napa.. They are 1982 Monte Carlo FRONT calipers. Dont really have a part # for ya but if you go to NAPA and just tell them you need front right and left calipers for a 82 monte carlo they will tell you a few different makes and stuff to pick from...
Mine came to around ~$50 loaded, each. $100+ for both... I was content with that.
You will still need to get banjo bolts!
Its important to get banjo bolts thare a 10mm x 1.5x2 if you plan on using skys brake lines!!!
stock banjo bolts for this caliper are TOO SHORT! .. I almost ruined a caliper because of this mistake..well i didnt know any better. I sourced some longer banjo bolts and everything fits up perfect now.
My calipers came with crush copper washers... but the banjo bolts you buy SHOULD come with one crush copper sleeve that is INTENDED for that banjo bolt. The ones with the caliper wont work for the banjo bolts outer side.. fyi
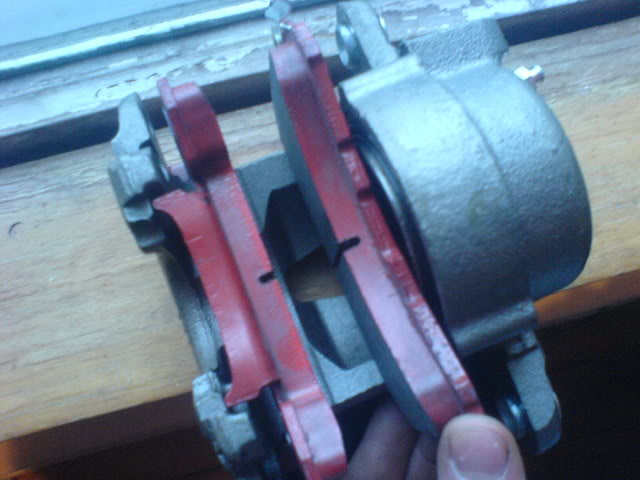
Heres the modifications i had to make to my calipers to make them work with skys brackets and brake lines.
Here is the stock caliper ..almost.. I didnt get a picture of the calipers before i started grinding. grind this nub down before installation. it will hit the mounting brackets and wont mount till its gone:

...thats a pretty common grinding mod to gm calipers...
my calipers ARE DIFFERENT from elvotas.. Mine have the bleeder screw ontop and the fluid intake on the bottom WITH A GUARD.
I had to grind this guard off to make the brake lines work. There wasnt enough room between the caliper and axle housing to fit a banjo fitting and flex brake line.. it just WASNT POSSIBLE. So grind this metal off so you have more room to fit the banjo fitting:

*Im not sure if other GM calipers of this same nature have this guard.. if yours do grind it off! =)
** will post more in next post.
Heres how i cut my backing plates off.. sorry I didnt get any shots of them cut or being cut (without me in the way).. but this was the most effective way to get them off using a 4 1/2" grinder with cutting wheel!
The red lines show the cuts you should make (all the way through, ie cut through to the bearing case BUT DONT CUT THE BEARING CASE!). The arrow indicates how it will slide off. You only have to cut enough material to fit the backing plate down past the bearing case outer oil seal which is like almost half the diamtuer of the actual bearing case. DONT FORGET the backing plate is SEPARATE from the bearing case. knock ALL OF THE STUDS out before you cut. you wont need them anyways. One of the studs you will HAVE TO CUT to get it out since it controls part of the OEM parking brake.. it just wont come out =) not enough room so cut that mother!
DONT CUT THE BACKING PLATE WHILE ITS STILL ON THE TRUCK. TAKE THE AXLE OUT!.... common sense would say duh, you gotta knock the studs out but dont use this above pictures an idea WHERE you should attempt to cut the backing plate!!! Look below, i used a bench and vice. Not that you couldnt but I'd just advise AGAINST this practice.
*common sense check...remove brake hardware before cutting.
A friend helped me with this step of the project since he happened to stop by... He actually was a blessing because it was quite the PITA to cut these backing plates off with a 4 1/2" cutting wheel on a grinder. So dont be alarmed if you find it extremely annoying and difficult to cut them off! Just get creative and have a BFH on hand =)
he did get this shot of me tho:
And here we have the backing plates gone... via whichever way you decided to go, they should be gone by this step. Preferably sold or better yet in the garbage where they can no longer cause ANYMORE MIGRAINES! =)
Install the Sky brackets this way... pay attention since this can get mixed up. The longer finger should like 'grab' the top of the axle housing... if you look you should get what im saying: (it will make more sense when the brackets are in your hands, trust me).
*The brackets came untreated from Sky so i painted them red with caliper paint
*********
I got my calipers brand new from Napa.. They are 1982 Monte Carlo FRONT calipers. Dont really have a part # for ya but if you go to NAPA and just tell them you need front right and left calipers for a 82 monte carlo they will tell you a few different makes and stuff to pick from...
Mine came to around ~$50 loaded, each. $100+ for both... I was content with that.
You will still need to get banjo bolts!
Its important to get banjo bolts thare a 10mm x 1.5x2 if you plan on using skys brake lines!!!
stock banjo bolts for this caliper are TOO SHORT! .. I almost ruined a caliper because of this mistake..well i didnt know any better. I sourced some longer banjo bolts and everything fits up perfect now.
My calipers came with crush copper washers... but the banjo bolts you buy SHOULD come with one crush copper sleeve that is INTENDED for that banjo bolt. The ones with the caliper wont work for the banjo bolts outer side.. fyi
Heres the modifications i had to make to my calipers to make them work with skys brackets and brake lines.
Here is the stock caliper ..almost.. I didnt get a picture of the calipers before i started grinding. grind this nub down before installation. it will hit the mounting brackets and wont mount till its gone:
...thats a pretty common grinding mod to gm calipers...
my calipers ARE DIFFERENT from elvotas.. Mine have the bleeder screw ontop and the fluid intake on the bottom WITH A GUARD.
I had to grind this guard off to make the brake lines work. There wasnt enough room between the caliper and axle housing to fit a banjo fitting and flex brake line.. it just WASNT POSSIBLE. So grind this metal off so you have more room to fit the banjo fitting:
*Im not sure if other GM calipers of this same nature have this guard.. if yours do grind it off! =)
** will post more in next post.
Last edited by drew303; 08-02-2007 at 11:21 PM.
08-02-2007, 11:30 PM
#6
Registered User
Thread Starter
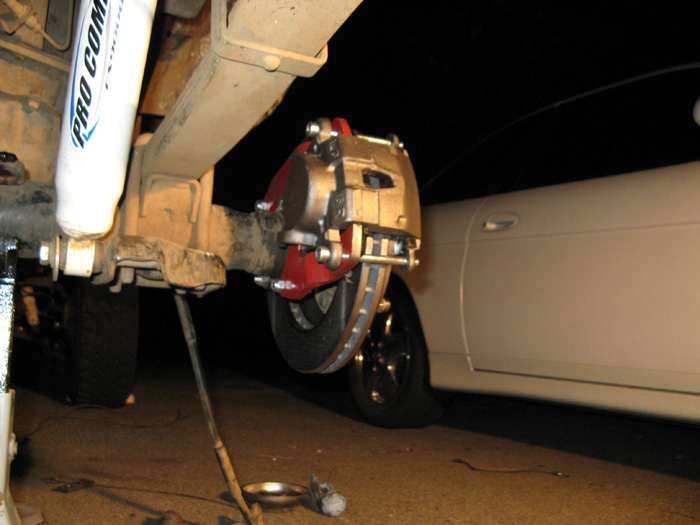
Here is the calipers and rotors mounted. Testing how it all fits. No brake lines fitted yet. The calipers require some kind of allen head to screw them in... honestly I cant tell you what size because I DONT HAVE AN ALLEN head big enough or small enough (ha every size but it)... to screw the caliper screws into the brackets. I got lucky and found a steel punch with the same body as the allen head needed.. a 10mm wrench worked well enough to torque them in.
In other words i used a steel punch's butt end (oppsite the punch) to fit into the caliper screws and a wrench to turn it. HAHA LUCK! ... not sure where i could of found a allen wrench at 2am in the morning!
*yea thats a lexus SC300 ... to bad it didnt have the 1UZ motor... damn.. but still a damn nice car, to bad Lexus doesnt make em anymore, damn shame! ..that new I think SC400? ... i dunno..convertible something or other, is fugly! LMAO
...
NOTE: The bleeder screw should always be ONTOP Of the caliper, the fluid intake might be near it or at best always BELOW IT... you cant get the calipers mixed up Left to Right if you know this.
ok so thats the end of the photos i have.... so all you olharleys out there reading this..before replying allow me to go take some final pictures before interupting the rest of this write up =) thnx!
Last edited by drew303; 08-03-2007 at 12:31 AM.
08-02-2007, 11:37 PM
#7
Registered User
Thread Starter

I live in Lacey off of Ruddel Road.. inbetween College and ruddel behind Komachin middle school... Everyone feel free to stop by and BS about yotas since im hard to miss when i got this truck torn apart. =) Especially about 2am when i got the flood lights out and driveway full of tools!
Trails across from hawks prairie... well im assuming you're speaking of the trails near or past the dump.. well NO.. its developed for the most part and more industrial going in as we speak.
A few year ago I had the extreme priveledge to test drive a late 60's Mercedes Unimog (doka) back on those them trails!.. What a blast that was! .. but those trails are gone.
The gravel pits are still there.. (almost broke my neck in a Honda Odyssey... if your old enough you will know thats NOT A VAN!) ... in the pit on the second roundabout before the golf course on Marvin Rd.!!!!
NOT SURE where the "roy side of ft lewis" is??? .... As far as me or anyone is concerned offroading on Ft Lewis is like asking to be sent to prison. After 9/11 you are pretty much forbidden from going on Ft Lewis (in the woods)... The days of waving at, or bullsh.ting with the guys training in the woods ARE OVER! ... sad to cuz there is A LOT of good wheelin out near Rainier (the town, not mountain) .. Rainier Rd... steadman rd etc
Last edited by drew303; 08-02-2007 at 11:39 PM.
Trending Topics
08-03-2007, 12:03 AM
#8
Registered User
Thread Starter
I installed a 1" bore Master Cylinder I think is intended for a FJ80 but regardless any toyota 1" master will suffice.. All this does is make your pedal travel less annoying.
My stock MC has a bore of 13/16" and this is clearly marked on both Masters. The plumbing intakes is a bit dif on these two masters but nothing a lil bending and creativity wont overcome. They are direct bolt ups btw... no modding of booster.
Heres a shot of the new master cylinder and how i configured the manual load proportioning valve:

I just re-used brake line from the rear. You will end up with twp spare hardlines from the rear end. The short line between the T and pass side drum and the long line between the T and driver side drum...
I LEFT THE STOCK LSPV VALVE IN PLACE.. I found without the stock LSPV (just the manual LP valve) the rear brakes recieved TO MUCH PRESSURE and caused them to lock up far prematurely when you braked hard. This is a extremely dangerous attitude that I dont know how other people deal with. The FRONT tires should ALWAYS lock up before the rears.. or at any rate should lock up at about the same time as the rears AT LEAST... Rear tire lock = loss of directional control. Its not as serious at slow speeds but at highway speeds you will most likely end up rolling or in a ditch. Its SERIOUS.
I found in my research most folks that have done this swap only trailer and use the rigs offroad.. no highway use... so the safety issue is less of a concern for them... This is my daily driver. This upgrade is a safety and performance upgrade... I want it to be SAFE under ALL conditions so i reccomend NOT TO REMOVE THE STOCK LSPV... just configure it however you want to reduce as much pressure it can (lower rod down as far as possible) and then adjust brakes with the manual LP valve. ...
I didnt reduce mine down completely. I just left it bolted to stock location on my axle.. I only have a few inches of shackle lift so this works out fine for me. ADJUST ACCORDINGLY to your rig!
I used the short line from flex line to LSPV to inline the manual LP valve then used the short hard line from the axle T to drum ... make sense? probably not but regardless once u get these hard lines off you'll be able to figure something out that works =)
Heres what an OEM Load Sensing Proportioning Valve (LSPV) looks like:
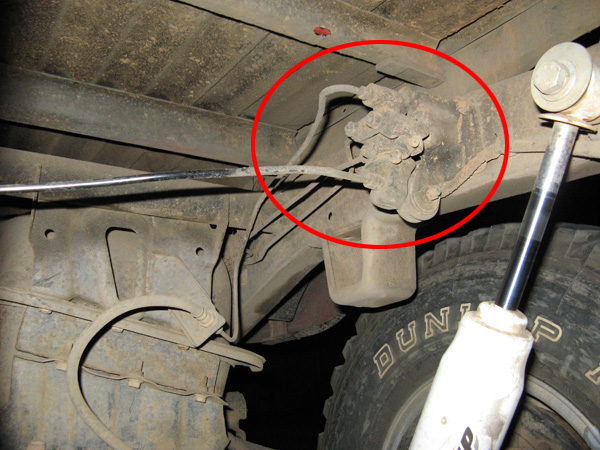
*The line going from the LSPBV to the front T is NOT a return line. There is a second valve inside the LSPV called a BV (Bypass Valve). It is held shut by front brake line pressure. In the event the front brakes fail (lose pressure) this pressure valve opens due to no pressure holding it shut. This allows full pressure to the rear brakes 'bypassing' the load proportioning valve. This is a safety feature.
Most writeups mention removing the stock LSPV and pluggin this T at the pass side front wheel (as seen in elvotas writeup)... I found on MY truck the overall braking performance was bettered by NOT removing the LSPV and instead supplementing it with a MANUAL LP valve inline with the rear brakes (as see in the above picture).
Do whatever you want but I'd test your brake setup WITH THE LSPV in.. if you want then to remove it, remove it. Save yourself the headache of having to REINSTALL It like I did. =)
FYI here is the junction located behind the passanger front wheel of the braking lines.

The 90 is the Master Cylinder to LSPV line... The T... The line coming from the top is from the MC directly from the Front piston in the MC that goes to a T below the M (that separates Left from right front calipers)...
the left part of the T is the return line from the LSPV.. and the right side of the T goes to the passanger side FRONT caliper.
Most writeups replace that T or plug the pressure line to the LSPV (since its commonly removed).
I found in my installation (before reinstalling the LSPV) that it was next to impossible to find a coupler to MC to passanger side caliper lines... So I just stretched the MC to -T line to make it to the flex line that feeds the right passanger front caliper. there is PLENTY OF LINE to make this work on a truck with NO body lift. I have 2" of body lift so i got creative but its possible and SAFE to make it stretch. I would of had to get VERY Creative with that hard line if i had more than 2" of body lift.
My stock MC has a bore of 13/16" and this is clearly marked on both Masters. The plumbing intakes is a bit dif on these two masters but nothing a lil bending and creativity wont overcome. They are direct bolt ups btw... no modding of booster.
Heres a shot of the new master cylinder and how i configured the manual load proportioning valve:
I just re-used brake line from the rear. You will end up with twp spare hardlines from the rear end. The short line between the T and pass side drum and the long line between the T and driver side drum...
I LEFT THE STOCK LSPV VALVE IN PLACE.. I found without the stock LSPV (just the manual LP valve) the rear brakes recieved TO MUCH PRESSURE and caused them to lock up far prematurely when you braked hard. This is a extremely dangerous attitude that I dont know how other people deal with. The FRONT tires should ALWAYS lock up before the rears.. or at any rate should lock up at about the same time as the rears AT LEAST... Rear tire lock = loss of directional control. Its not as serious at slow speeds but at highway speeds you will most likely end up rolling or in a ditch. Its SERIOUS.
I found in my research most folks that have done this swap only trailer and use the rigs offroad.. no highway use... so the safety issue is less of a concern for them... This is my daily driver. This upgrade is a safety and performance upgrade... I want it to be SAFE under ALL conditions so i reccomend NOT TO REMOVE THE STOCK LSPV... just configure it however you want to reduce as much pressure it can (lower rod down as far as possible) and then adjust brakes with the manual LP valve. ...
I didnt reduce mine down completely. I just left it bolted to stock location on my axle.. I only have a few inches of shackle lift so this works out fine for me. ADJUST ACCORDINGLY to your rig!
I used the short line from flex line to LSPV to inline the manual LP valve then used the short hard line from the axle T to drum ... make sense? probably not but regardless once u get these hard lines off you'll be able to figure something out that works =)
Heres what an OEM Load Sensing Proportioning Valve (LSPV) looks like:
*The line going from the LSPBV to the front T is NOT a return line. There is a second valve inside the LSPV called a BV (Bypass Valve). It is held shut by front brake line pressure. In the event the front brakes fail (lose pressure) this pressure valve opens due to no pressure holding it shut. This allows full pressure to the rear brakes 'bypassing' the load proportioning valve. This is a safety feature.
Most writeups mention removing the stock LSPV and pluggin this T at the pass side front wheel (as seen in elvotas writeup)... I found on MY truck the overall braking performance was bettered by NOT removing the LSPV and instead supplementing it with a MANUAL LP valve inline with the rear brakes (as see in the above picture).
Do whatever you want but I'd test your brake setup WITH THE LSPV in.. if you want then to remove it, remove it. Save yourself the headache of having to REINSTALL It like I did. =)
FYI here is the junction located behind the passanger front wheel of the braking lines.
The 90 is the Master Cylinder to LSPV line... The T... The line coming from the top is from the MC directly from the Front piston in the MC that goes to a T below the M (that separates Left from right front calipers)...
the left part of the T is the return line from the LSPV.. and the right side of the T goes to the passanger side FRONT caliper.
Most writeups replace that T or plug the pressure line to the LSPV (since its commonly removed).
I found in my installation (before reinstalling the LSPV) that it was next to impossible to find a coupler to MC to passanger side caliper lines... So I just stretched the MC to -T line to make it to the flex line that feeds the right passanger front caliper. there is PLENTY OF LINE to make this work on a truck with NO body lift. I have 2" of body lift so i got creative but its possible and SAFE to make it stretch. I would of had to get VERY Creative with that hard line if i had more than 2" of body lift.
Last edited by drew303; 12-09-2008 at 12:34 PM.
08-03-2007, 12:14 AM
#9
Contributing Member
LOL man you're cracking me up tonight, seriously, lol.
I live in Lacey off of Ruddel Road.. inbetween College and ruddel behind Komachin middle school... Everyone feel free to stop by and BS about yotas since im hard to miss when i got this truck torn apart. =) Especially about 2am when i got the flood lights out and driveway full of tools!
Trails across from hawks prairie... well im assuming you're speaking of the trails near or past the dump.. well NO.. its developed for the most part and more industrial going in as we speak.
A few year ago I had the extreme priveledge to test drive a late 60's Mercedes Unimog (doka) back on those them trails!.. What a blast that was! .. but those trails are gone.
The gravel pits are still there.. (almost broke my neck in a Honda Odyssey... if your old enough you will know thats NOT A VAN!) ... in the pit on the second roundabout before the golf course on Marvin Rd.!!!!
NOT SURE where the "roy side of ft lewis" is??? .... As far as me or anyone is concerned offroading on Ft Lewis is like asking to be sent to prison. After 9/11 you are pretty much forbidden from going on Ft Lewis (in the woods)... The days of waving at, or bullsh.ting with the guys training in the woods ARE OVER! ... sad to cuz there is A LOT of good wheelin out near Rainier (the town, not mountain) .. Rainier Rd... steadman rd etc
08-03-2007, 12:18 AM
#10
Registered User
Thread Starter
And to conclude this writeup (sorry if it seems half azzed)
Here is how i ran Skys rear brake lines. This ... not to brag seems to be the EASIEST and best way to run the rear brake lines.
No mods required. I re-used the HARD LINE mounts (straps) ... Believe it or not you can stretch them out to fit this larger diameter flex line and use the extra bolts you've acquired to mount this flex line like a hardline (SECURELY) ...and run it out of harms way.

*I also adjusted the LSPV rod where it attaches to the axle down as far is it could go with the adjusting nut (you will see what im talking about once you look at your own)
Here is how i ran Skys rear brake lines. This ... not to brag seems to be the EASIEST and best way to run the rear brake lines.
No mods required. I re-used the HARD LINE mounts (straps) ... Believe it or not you can stretch them out to fit this larger diameter flex line and use the extra bolts you've acquired to mount this flex line like a hardline (SECURELY) ...and run it out of harms way.
*I also adjusted the LSPV rod where it attaches to the axle down as far is it could go with the adjusting nut (you will see what im talking about once you look at your own)
Last edited by drew303; 08-03-2007 at 12:39 AM.
08-03-2007, 12:43 AM
#11
Registered User
Thread Starter
LAST post for tonight... just to express opinion
***before opinion, thought I'd mention BLEED THE BRAKES, and before installing the new master BENCH BLEED IT!... Google bench bleeding a master cylinder if your not sure how to do it, LOL.
I just feel it neccessary to implenent the overlooked. I'm guilty of not reading between the lines and many times wished someone didnt just assume i was a master mechanic =)
By far the most IMPORTANT but yet the most satisfying mod I've done to this truck to date.
The smoothness and overall braking power this modification provides is INCREDIBLE! I highly reccomend it to EVERYONE.
DRUM BRAKES SUCK... They are NOT as efficient (im not speaking of braking power), simple or reliable as a caliper (disc brake) design. The only benefit of a drum setup is they DO provide more braking power but we as truck/4runner owners do NOT even come close to utilizing the braking power of a drum setup... we only experience every possible drawback. The pendulum swings NOT in our favor when it comes to stock rear drum brakes.
The manufactures only saves $ by using drum brakes... Bottom line.
Again, highly reccomended modification.
Last edited by drew303; 08-03-2007 at 12:49 AM.
08-03-2007, 12:56 AM
#12
Registered User
Thread Starter
I lied, that wasnt the last post of the night
I havent installed skys parking brake yet.... I just got the disc swap done LAST night, haha.... The time involved was rediculous to get this all installed and it ALL took place between 10pm and 4am... i work full time and go to school full time.. you can imagine the spare time i have! HAHAAHAHA
anyways, ill post some info on the parking brake install when i get to it HOPEFULLY tonight =) .... i already know theres a few things worth mentioning on that install i think most writeups overlook .=p
08-03-2007, 02:34 AM
#13
Registered User
The new Lexus coupe is the SC430. I work for Lexus and never liked that car. It has a back seat but no one can sit back there, and your right it is fugly, and it rides way too hard (runflats). The only thing good about the car is the way the hardtop operates.
Sorry for the hijack, but I'm thinking about the rear disc swap, and like to see how people did it.
Sorry for the hijack, but I'm thinking about the rear disc swap, and like to see how people did it.
10-10-2007, 10:47 PM
#14
Registered User
Thread Starter
brakes have been on for a few months now. They'are GREAT!
I have them adjusted just where i want them. Next thing to add is a dual diaphgram booster.... make braking a bit easier as it's pretty stiff without it with the bigger MC. doesnt bug me but people without as much oomph in their step might find it a bit hard to stop =p
I have them adjusted just where i want them. Next thing to add is a dual diaphgram booster.... make braking a bit easier as it's pretty stiff without it with the bigger MC. doesnt bug me but people without as much oomph in their step might find it a bit hard to stop =p
01-22-2009, 12:35 PM
#16
Registered User
hey guys i dont know if you can help me with this but i dont know why theres no springs or clips or waterver holding my brake pads to the calipers when doing a rear convertion like this,is that normal??
Last edited by Chief_Yota; 01-22-2009 at 04:35 PM.
01-22-2009, 08:23 PM
#19
Registered User
Thread Starter
i remember the piston side pad having a clip that kinda springs it (holds it) ... or pops into the piston. and I think the other side kinda fits in there and holds itself
01-23-2009, 11:23 PM
#20
the pad that sits against the piston should have 2 spring metal clips that fit inside the bore of the piston...
chevy has been using that design since they started producing vehicles with disc brakes on vehicles... heck, even my moms 98 buick has the same style cpring clips as my 78 GMC disc brake pads...
chevy has been using that design since they started producing vehicles with disc brakes on vehicles... heck, even my moms 98 buick has the same style cpring clips as my 78 GMC disc brake pads...


