Philbert's 87 4runner W56 tranny swap/build thread
 01-02-2012, 10:21 PM
#1
Registered User
Thread Starter
iTrader: (2)
Join Date: Dec 2009
Location: Pleasanton, CA - SF Bay Area
Posts: 2,159
Likes: 0
Received 7 Likes
on
5 Posts
Philbert's 87 4runner W56 tranny swap/build thread
Hi Guys,
This could be a slow going build but I'd like to document it and get tips/help along the way to help others in the future (as well as myself of course!).
Long story short, my (rebuilt) W56 started going haywire on me back in September, and through YT and self diagnosis, I came to the concusion that the bearings in the unput shaft of the transmission were shot, leading to worse things inside. Toward the end of me still driving it (short distances), I think I felt/heard symptoms of the throwout bearing going. I also noticed more oil under it when parked than before, but closer to the transmission/motor union, so who knows, maybe my rear main is gone too...should be interesting when I open it up!
That said, I finally have garage space for the truck (My Datsun Dash restoration project took way longer than I thought it would).
I have in the garage:
Tonight I did these things (per the FSM):
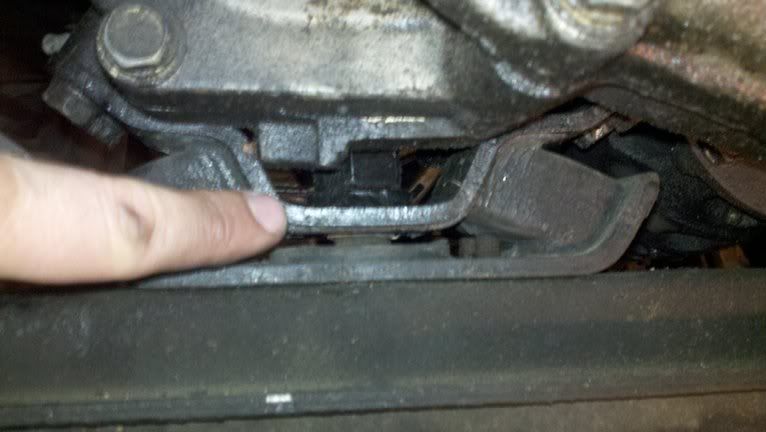
1) I cannot seem to get a tool in to remove the 4 bolts that connect the front driveshaft to the transmission - the crossmember is in the way it seems and I don't feel comfortable removing that without the jack to support it.
TIPS?
2) I'm confused regarding the FSM's instructions to remove the bolts/hardware for the "rear engine mount". I'm guessing this means the crossmember that the transmission sits atop? Also, the FSM recommends jacking the transmission up slightly and then shimming a small piece of wood (less than an inch) between the oil pan and the front suspension crossmember (I have IFS). Since I have a 4" bracket lift, the space between the oil pan and crossmember is much larger. ANY TIPS HERE?
I'm not sure what the sequence is to remove the crossmember that the transmission sits atop - I don't want to put too much stress on the transmission/bolts that mount the bellhousing to the motor (I assume this is where the wood shim comes into play, but I have to think there is still a ton of leverage on the bellhousing if we do that and remove the crossmember that holds the transmission?
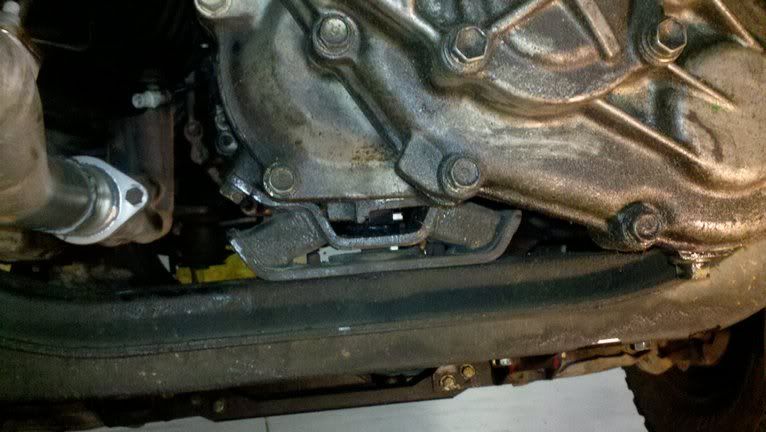
Here are some photos of what I'm referring to:
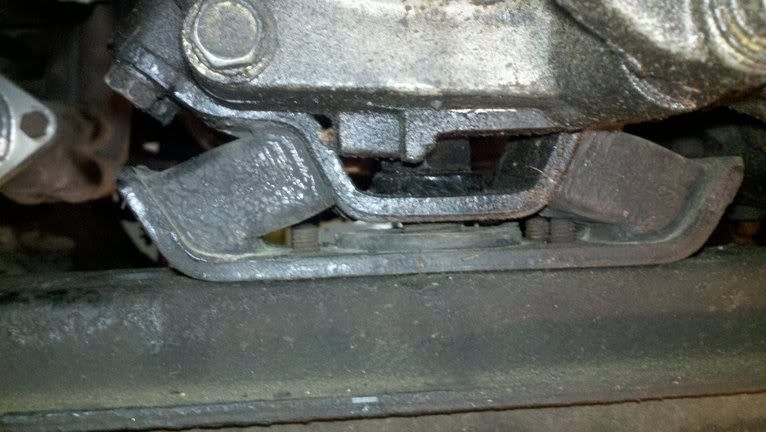
The front drive shaft (I remove the bolts for the "shield" that protects the U joint but it appears to be broken on the top and kind of bends/folds backward/upward):
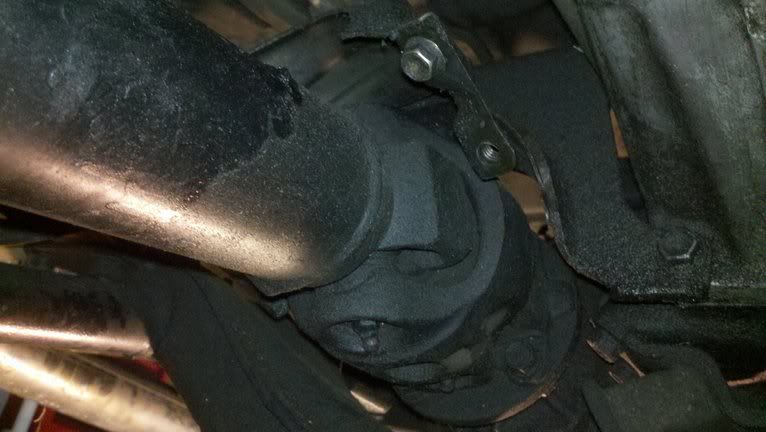
Here's a fun one....the support bracket that sits between the transmission and the crossmember appears to be pretty loose (if you read through my previous posting with videos, you can see why the whole transmission was flexing while under load - it move a couple inches each time!). Basically, the large threaded bolt that holds the rubberized "carrier" part of this mount was finger loose. Check out the 1/8" GAP between the top of the bolt and the surface it was supposed to be mated to! Now, if I'm wrong, and this is supposed to be loose to allow flex, someone please chime in and let me know. There are no torque specs for how to button this thing back up in the FSM BTW....
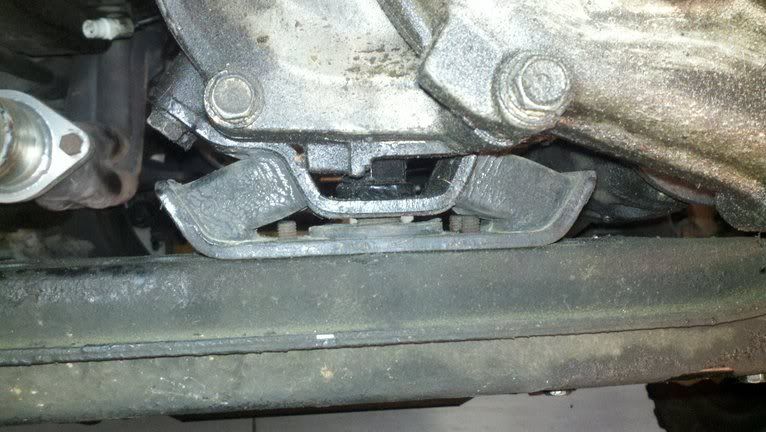
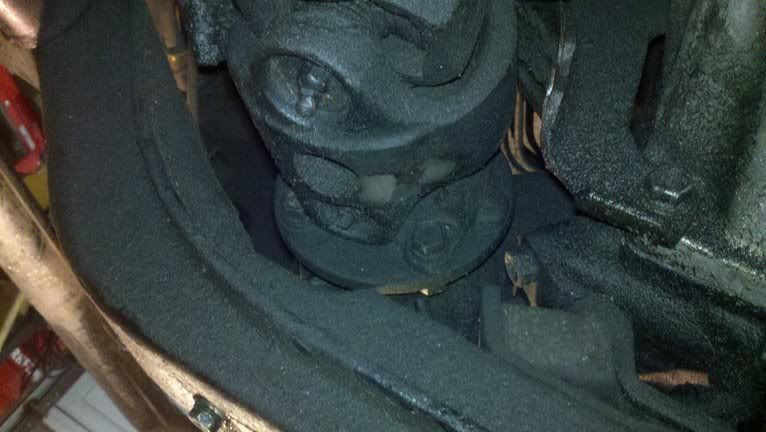
My truck comes with these supports that bolt onto the crossmember, and then mount up to the back of the 4" front IFS crossmember (the things just inside of the shocks in this photo). With my truck sitting on its own weight in the garage, is there any danger of my unbolting these or will I need to support the front IFS crossmember for this to happen? I imagine these are just for braking/impact reinforcement since the "new" IFS sits so "tall".....

My next steps will likely happen when I get the jack (hopefully in the next couple days), but I'd like some advice from those who've messed with this before on how best to approach:
- Removing the main crossmember that supports the transmission
- Dealing with accessing the front driveshaft flange bolts
- Addressing the Pro Comp supports that share the mounting bolts with my crossmember (as do my nerf bars)
I'll keep this thread updated with my progress and add more photos as I move on.
Thanks in advance guys!
Phil
This could be a slow going build but I'd like to document it and get tips/help along the way to help others in the future (as well as myself of course!).
Long story short, my (rebuilt) W56 started going haywire on me back in September, and through YT and self diagnosis, I came to the concusion that the bearings in the unput shaft of the transmission were shot, leading to worse things inside. Toward the end of me still driving it (short distances), I think I felt/heard symptoms of the throwout bearing going. I also noticed more oil under it when parked than before, but closer to the transmission/motor union, so who knows, maybe my rear main is gone too...should be interesting when I open it up!
That said, I finally have garage space for the truck (My Datsun Dash restoration project took way longer than I thought it would).
I have in the garage:
- (1) 1987 4Runner SR5 with a 4" Pro Comp bracket lift up front and ZUK mod in the rear, on 32" BFG ATs
- (1) used W56 from an 86 4runner with 160,000 miles on it. I turned the shafts in all gears and reverse as well as 4WD high/low and heard no "dragging" or other bad noises, so I think it's sound. Truck was running fine when pulled he said...
- (1) Trailgear/WabFab Aisin clutch kit
- (1) Rear main seal (Felpro) - might as well with 270K on the motor
- (1) crankshaft micro sleeve (Felpro) just in case
Tonight I did these things (per the FSM):
- Disconnected negative terminal from battery
- Removed shifters from cab
- Disconnected main drive shaft from transmission and moved aside
- Disconnected slave cylinder from transmission and moved aside
- Disconnected speedo cable and electronic sensor wiring from transmission.
- Disconnected starter and moved aside
- Drained oil in transmission and transfer case in current transmission and replacement one.
- Removed the 4 bolts holding the transmission to the rubberized support piece (see photos below for what I'm referring to), and the 4 bolts that secure that piece to the crossmember itself. The piece remains lodged between the crossmember and the transmission still.
1) I cannot seem to get a tool in to remove the 4 bolts that connect the front driveshaft to the transmission - the crossmember is in the way it seems and I don't feel comfortable removing that without the jack to support it.
TIPS?
2) I'm confused regarding the FSM's instructions to remove the bolts/hardware for the "rear engine mount". I'm guessing this means the crossmember that the transmission sits atop? Also, the FSM recommends jacking the transmission up slightly and then shimming a small piece of wood (less than an inch) between the oil pan and the front suspension crossmember (I have IFS). Since I have a 4" bracket lift, the space between the oil pan and crossmember is much larger. ANY TIPS HERE?
I'm not sure what the sequence is to remove the crossmember that the transmission sits atop - I don't want to put too much stress on the transmission/bolts that mount the bellhousing to the motor (I assume this is where the wood shim comes into play, but I have to think there is still a ton of leverage on the bellhousing if we do that and remove the crossmember that holds the transmission?
Here are some photos of what I'm referring to:
The front drive shaft (I remove the bolts for the "shield" that protects the U joint but it appears to be broken on the top and kind of bends/folds backward/upward):
Here's a fun one....the support bracket that sits between the transmission and the crossmember appears to be pretty loose (if you read through my previous posting with videos, you can see why the whole transmission was flexing while under load - it move a couple inches each time!). Basically, the large threaded bolt that holds the rubberized "carrier" part of this mount was finger loose. Check out the 1/8" GAP between the top of the bolt and the surface it was supposed to be mated to! Now, if I'm wrong, and this is supposed to be loose to allow flex, someone please chime in and let me know. There are no torque specs for how to button this thing back up in the FSM BTW....
My truck comes with these supports that bolt onto the crossmember, and then mount up to the back of the 4" front IFS crossmember (the things just inside of the shocks in this photo). With my truck sitting on its own weight in the garage, is there any danger of my unbolting these or will I need to support the front IFS crossmember for this to happen? I imagine these are just for braking/impact reinforcement since the "new" IFS sits so "tall".....
My next steps will likely happen when I get the jack (hopefully in the next couple days), but I'd like some advice from those who've messed with this before on how best to approach:
- Removing the main crossmember that supports the transmission
- Dealing with accessing the front driveshaft flange bolts
- Addressing the Pro Comp supports that share the mounting bolts with my crossmember (as do my nerf bars)
I'll keep this thread updated with my progress and add more photos as I move on.
Thanks in advance guys!
Phil
 01-03-2012, 04:35 AM
#2
Registered User
to get to all the front drive shaft bolts roll the truck back and forth so the shafts rotate so you can get all the nuts and bolts
i think there is 4 bolts on that transmission/crossmember mount... btw there isn't anything special going on here, we've all got the same cross member mount as you.
when I did mine all 4 were broken bolt studs, and I am still driving it that way today if it makes you feel better. thisis on my long list of things to do.
you can loosen up the cross memeber to frame bolts a little but take out all the transmission to engine bolts out first and then support it with jack and work the last 4 bolts out then the drop the xmember on the floor cause it will be disconnected via xmember mount and frame
01-03-2012, 05:40 AM
#4
While you are in there consider replacing the transfer case mount entirely. Either with a stock one (the V6 fits and is supposed to be an upgrade) or get the aftermarket heavy duty one from TG or Marlin:
http://www.trail-gear.com/transfer-case-mounts
http://www.marlincrawler.com/armor/c...ember-mount-hd
TG warns of possible additional vibration but I didn't notice any difference with mine. My main consideration was price, but the item works great.
http://www.trail-gear.com/transfer-case-mounts
http://www.marlincrawler.com/armor/c...ember-mount-hd
TG warns of possible additional vibration but I didn't notice any difference with mine. My main consideration was price, but the item works great.
 01-03-2012, 08:34 AM
#6
Registered User
Thread Starter
iTrader: (2)
Join Date: Dec 2009
Location: Pleasanton, CA - SF Bay Area
Posts: 2,159
Likes: 0
Received 7 Likes
on
5 Posts
Thanks everyone for chiming in on this so quickly!
Wabbit - I was thinking of doing just that - thanks for suggesting.
Am I correct assuming that the free play I have in the OEM crossmember brace's large bolt (the 1/8" gap in the photos above) is BAD? Would this have led to the transmission flexing like crazy?
I was going to order some shifter bushings and other small parts from Marlin so I think I'll just add that brace you guys suggested too.
No one really addressed yet my concern about the Pro Comp bars that are attached to the 4" IFS bracket and my frame's crossmember mounting area...are they' "pre loaded" with the suspension and do I need to take load off the front IFS before unbolting/removing?
Based on feedback here, these are my next steps:
1) Get transmission jack and place under transmission/crossmember/transfter case and support weight-even jack it up slightly
2) Remove the bolts connecting the bellhousing to the motor
3) remove the 4 (2 per side) bolts that mount the crossmember to the frame (as well as my nerf bars and the Pro Comp rods)
4) SLOWLY and CAREFULLY slide transmission out and lower
Does this sound right?
01-03-2012, 09:28 AM
#7
Registered User
Thread Starter
iTrader: (2)
Join Date: Dec 2009
Location: Pleasanton, CA - SF Bay Area
Posts: 2,159
Likes: 0
Received 7 Likes
on
5 Posts
Just ordered the Marlin shift boot, seat, as well as the TG Bomb Proof mount (Marlin's was out of stock).
Picking up the jack tonight after work.
Phil
Picking up the jack tonight after work.
Phil
Trending Topics
01-03-2012, 11:23 PM
#8
Registered User
Thread Starter
iTrader: (2)
Join Date: Dec 2009
Location: Pleasanton, CA - SF Bay Area
Posts: 2,159
Likes: 0
Received 7 Likes
on
5 Posts
more progress
Tonight i picked up the "transmission jack" from my coworker....turns out it is just a larger floor jack than mine lol....i think it will work and i have some scrap wood i can use under the transmission to diatribute the load.
Progress made:
Removed 4 bolts on front diff/driveshaft
Removed/made finger loose the 8 bellhousing bolts...DAMN those top two are a PITA!!!
Tomorrow's plan is to (in this order):
1) use large floor jack and plank to support transmission, jack up slightly
2) remove all 8 bellhousing bolts
3) remove 8 crossmember bolts
4) slowly and carefully slide jack and transmission backward to remove
Missing anything? Any advice on using the floor jack? Don't have tie down straps... would bungee cords help?
01-04-2012, 08:49 AM
#9
Registered User
Join Date: Oct 2009
Location: San Jose, CA
Posts: 57
Likes: 0
Received 0 Likes
on
0 Posts
I doubt bungee cords will be strong enough. I have several ratcheting tie down straps that you can borrow also. Let me know.
01-04-2012, 10:12 AM
#10
Registered User

I would stongly reccomend renting a transmission jack. At least consider one for the install. You don't want the input shaft hanging on the clutch or pilot bearing on the way in.
It might not be too bad if you have a helper but if you are working by yourself that using that jack will be really dangerous.
I did the clutch in my 86 runner by myself with a Harbor freight tranny jack and it was pretty easy.
I would at least borrow the ratchet straps.
Good luck!
Robb
It might not be too bad if you have a helper but if you are working by yourself that using that jack will be really dangerous.
I did the clutch in my 86 runner by myself with a Harbor freight tranny jack and it was pretty easy.
I would at least borrow the ratchet straps.
Good luck!
Robb
01-04-2012, 10:18 AM
#12
Registered User
Thread Starter
iTrader: (2)
Join Date: Dec 2009
Location: Pleasanton, CA - SF Bay Area
Posts: 2,159
Likes: 0
Received 7 Likes
on
5 Posts
Thanks Robb and Gulliver - I worried about that too (the input shaft alignment.
Gulliver - I may just take you up on the offer - is there a good time to hook up in SJ this week?
I'll ask my "car guys" at work too if they have straps and/or a transmission jack, since that exchange would likely be easier
Phil
Gulliver - I may just take you up on the offer - is there a good time to hook up in SJ this week?
I'll ask my "car guys" at work too if they have straps and/or a transmission jack, since that exchange would likely be easier
Phil
01-04-2012, 10:32 AM
#13
Registered User
Join Date: Oct 2009
Location: San Jose, CA
Posts: 57
Likes: 0
Received 0 Likes
on
0 Posts
Sorry, I'd offer to help out, but we got some family events for the next several weekends.
I can meet up with you after 1130am tomorrow or Friday.
I thought I had your number, but it looks like I misplaced it. I will email you to work out the logistics.
I can meet up with you after 1130am tomorrow or Friday.
I thought I had your number, but it looks like I misplaced it. I will email you to work out the logistics.
01-05-2012, 11:43 PM
#14
Registered User
Thread Starter
iTrader: (2)
Join Date: Dec 2009
Location: Pleasanton, CA - SF Bay Area
Posts: 2,159
Likes: 0
Received 7 Likes
on
5 Posts
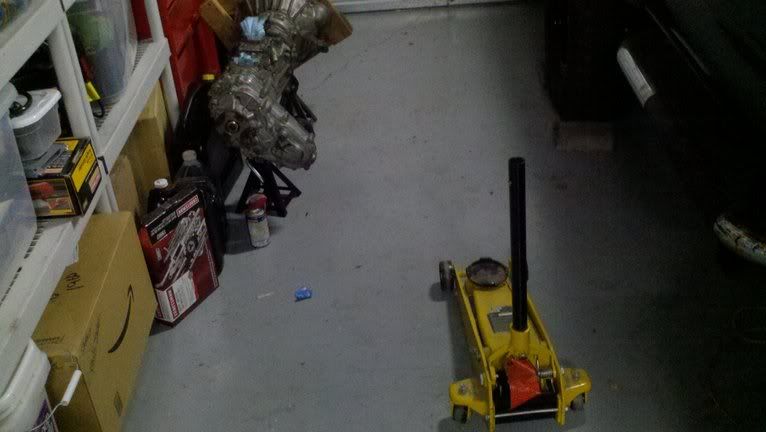
Thanks Gulliver for the jack and tie down straps. They got dirty so i may need to get you replacements :-(
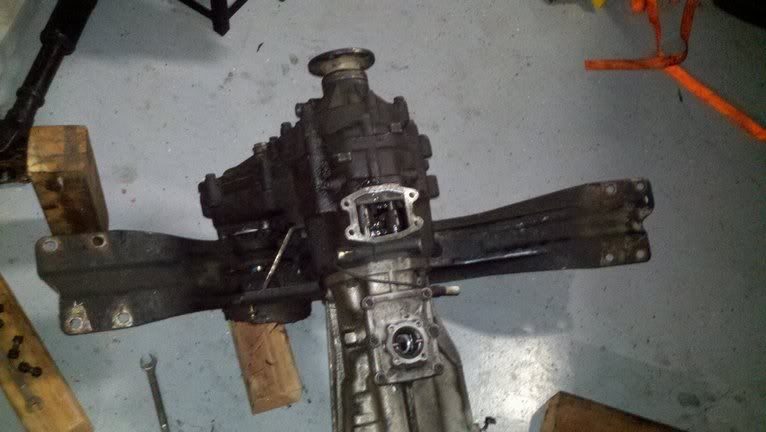
I spent almost four hours on it tonight, and got the sucker out finally. I braced it with a jack and piece of wood, just in front of the crossmember. Then i strung tie downs across the frame and under the bellhousing. I wiggled the hell iut of it and finally broke it loose using a tie down connected to the rear axle. Then it was a matter of slowly lowering it down. I don't think the install will work this way...at least not by myself!!
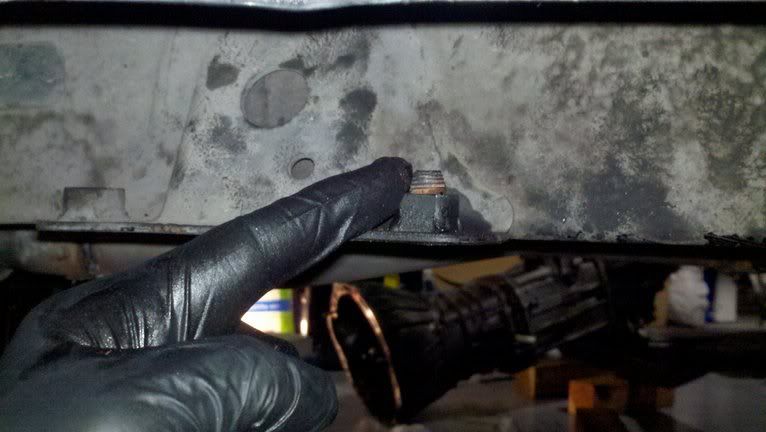
Ran into an issue with the rear most outer drivers side bolt holding the crossmember to the frame. It would turn but would not back out. Or tighten again when i tried that. I ended up hacksawing the head off...will deal with it later.
Here it is in its glory.....
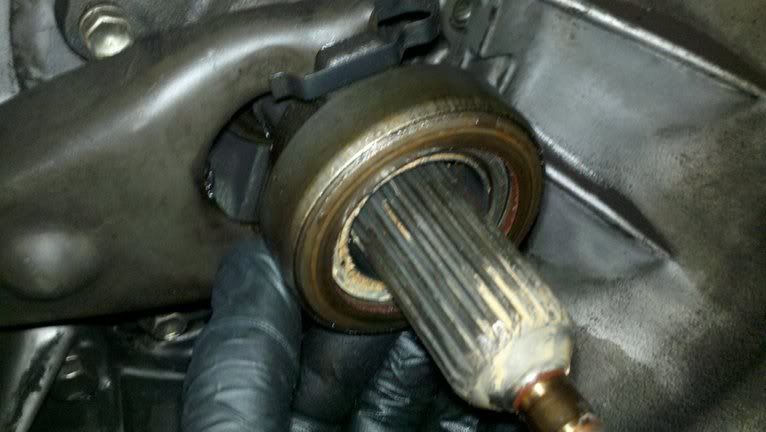
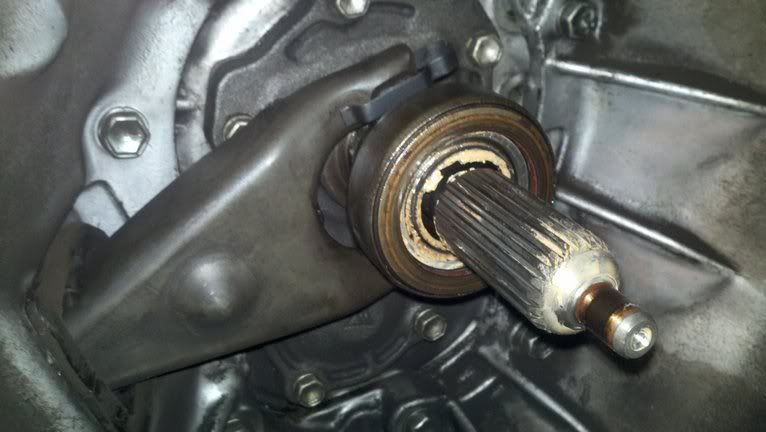
This is the old throwout bearing.....does that look normal?
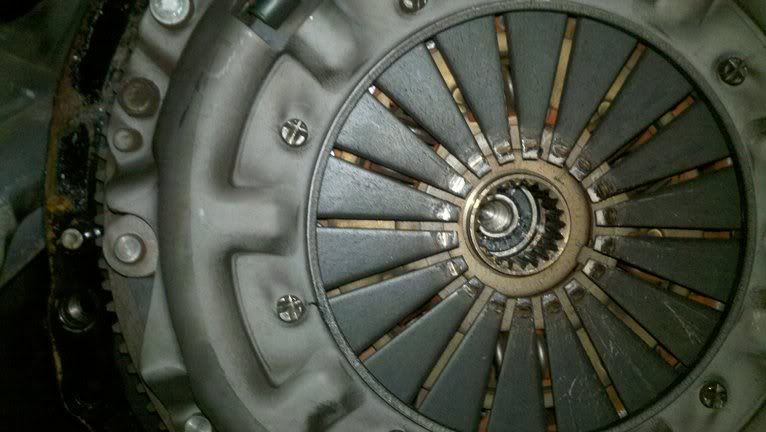
And here is the clutch. Looks like scoring near the middle? This has 20,000 miles on it, as did the remanufactured transmission.....
Will get into the clutch, rear main sealthis weekend, time permitting.
Any diagnosis onwhat went wrong, based on these photos?
I spent almost four hours on it tonight, and got the sucker out finally. I braced it with a jack and piece of wood, just in front of the crossmember. Then i strung tie downs across the frame and under the bellhousing. I wiggled the hell iut of it and finally broke it loose using a tie down connected to the rear axle. Then it was a matter of slowly lowering it down. I don't think the install will work this way...at least not by myself!!
Ran into an issue with the rear most outer drivers side bolt holding the crossmember to the frame. It would turn but would not back out. Or tighten again when i tried that. I ended up hacksawing the head off...will deal with it later.
Here it is in its glory.....
This is the old throwout bearing.....does that look normal?
And here is the clutch. Looks like scoring near the middle? This has 20,000 miles on it, as did the remanufactured transmission.....
Will get into the clutch, rear main sealthis weekend, time permitting.
Any diagnosis onwhat went wrong, based on these photos?
01-06-2012, 09:41 AM
#15
Registered User
Join Date: Oct 2009
Location: San Jose, CA
Posts: 57
Likes: 0
Received 0 Likes
on
0 Posts
No worries on the tie down. I knew you were going to use it to help secure the tranny so it doesn't fall on you. I knew it would get dirty!! Good job on getting that down by yourself.
01-06-2012, 09:53 AM
#16
Registered User
Join Date: Mar 2008
Location: Temecula Valley, CA
Posts: 12,723
Likes: 0
Received 4 Likes
on
4 Posts
You can see the clutch diapragm "fingers" worn more on one side than the other suggesting the release bearing moved off center or applied pressure from the release lever unevenly.
01-06-2012, 10:26 AM
#18
Registered User
Thread Starter
iTrader: (2)
Join Date: Dec 2009
Location: Pleasanton, CA - SF Bay Area
Posts: 2,159
Likes: 0
Received 7 Likes
on
5 Posts
Thanks Abecedarian -appreicate your following of this thread and your comments, since this is my first transmission/clutch job.
The bearing itself rotates freely by hand - if it had seized, would it still you think? I have the whole clutch kit ready to go (Trailgear Aisin/Seco), and I think it comes with the piece in the photos, as well as the other bearing that goes into the flywheel (forget what it's called right now). I thought the bearing in the photos was called the throwout bearing?
Can you explain to me on a more plebean level waht you mean about the fingers scoring, and what that could have possibly led to in my transmission failing?
When you say "Carrier" do you mean the clutch fork that sits behind the bearing?
The tranny, BTW, makes loud dragging noise when I rotate by hand (multiplay that by ~3000 RPM and you get an idea of the awful noises I was hearing...).
01-06-2012, 11:24 AM
#19
Registered User
Join Date: Mar 2008
Location: Temecula Valley, CA
Posts: 12,723
Likes: 0
Received 4 Likes
on
4 Posts
You can look at your clutch diaphragm and see that the release bearing wasn't centered over the mechanism... on second thought, it could just be lighting. From your pic, note that there is deeper scoring on the "fingers" at the upper-left and only light scoring on the fingers at the lower-right... or maybe that's just a lighting issue; hard to tell. The fact there is scoring / wear on the fingers, grooves worn in, suggests the release bearing wasn't spinning well- maybe it wasn't siezed but it wasn't spinning the same speed as the diaphragm. Make sense?
I suppose it could be the "carrier" or slider or whatever you want to call it that's attached to the release fork by simple spring clips and holds the release bearing causing the issue. And, that carrier is a pain to get the bearing off of, by the way, if you don't have a press or at least creative thoughts.
For what it's worth, the release bearing wouldn't cause the input shaft of the trans to have failed bearings nor should failing transmission bearings cause the release bearing to fail. All the release bearing does is take the throw of the fork and apply pressure to the diaphagm so the diaphragm can "release" the clutch disc and let you shift gears. Since the diaphragm is bolted to the flywheel, it rotates in more-or-less a perfect circle.
I'm probably looking at things a little too deeply.
Last edited by abecedarian; 01-06-2012 at 11:25 AM.
01-06-2012, 11:28 AM
#20
Registered User
Join Date: Mar 2008
Location: Temecula Valley, CA
Posts: 12,723
Likes: 0
Received 4 Likes
on
4 Posts
If you have a full clutch kit, it should come with the clutch disc, diaphragm / pressure plate, release bearing and pilot bearing. It won't come with the part that attaches the release bearing to the release arm / fork- has the little spring clips on it. That's what I was referring to as "carrier". It takes a press or creative means to get your old release bearing off and the new one on.


