Philbert's 87 4Runner Head Gasket & head replacement - take II
 02-19-2013, 10:28 PM
#1
Registered User
Thread Starter
iTrader: (2)
Join Date: Dec 2009
Location: Pleasanton, CA - SF Bay Area
Posts: 2,159
Likes: 0
Received 7 Likes
on
5 Posts
Philbert's 1987 4Runner Head Gasket Replacement Thread
Hi everyone,
Well, the time has come....I developed a coolant "seep" from my head gasket on the drivers side. Rather than monkey around and hope nothing worse happened, I decided to take the plunge. After 275,000 miles, I guess Iwas living on borrowed time (I've had the truck 10 years and put 75,000 on it).
The goal of this thread is to document what I am doing, come up withquestions others may have (and find/get answers along the way to help others).It's also selfishly to help me along, since I know there are lots of regulars on here who have done this job and can lend a hand
That said, this thread may take some time - life is busy, and my truck is not my primary vehicle (now that the Datsun is running again, I have another vehicle to drive while this guy goes under the knife). I do want to get this done quickly, but right. I also have some other things I may do while I have it apart:
- 120A GM alternator (thanks Chefyota!)
- Supra AFM and battery swap (thanks Kiyobrown!)
- Big 3 (wire) upgrade
- Relocate autometer coolant temp sender (ideas would be welcome here)
- Get injectors cleaned by Witchhunter
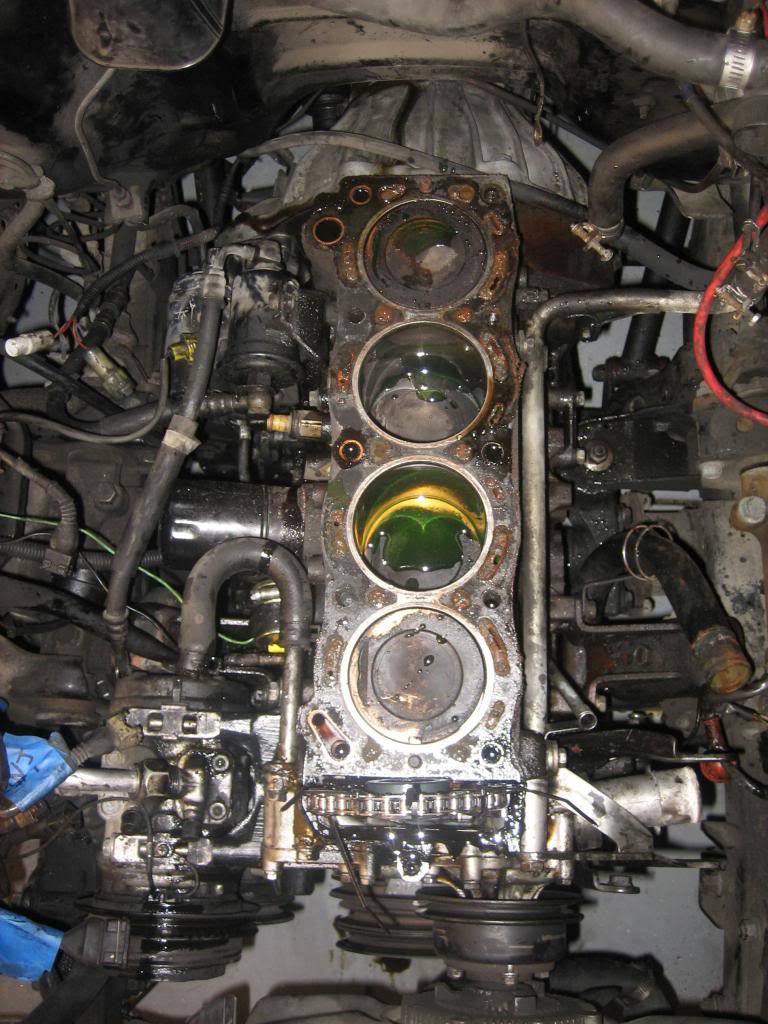
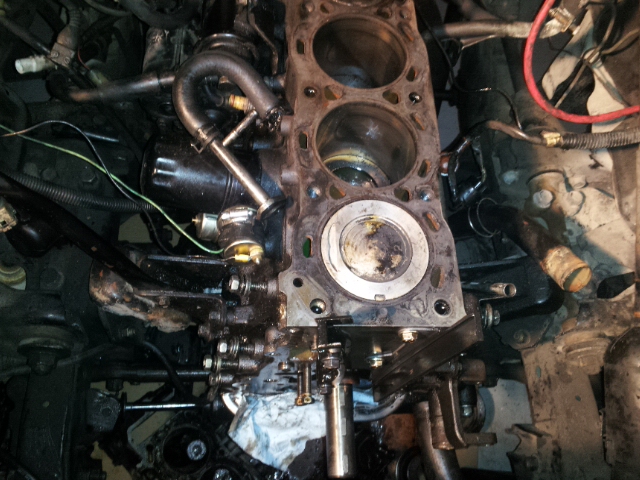
I started last night and spent about 4 hours on it, getting most things unplugged, and the upper intake manifold out of the way. Tonight I Spent 2 more hours getting the header off, the lower intake manifold off (that allen bolt was fused and I stripped it...had to use vise grips to get it off...), and finally the head itself.
Here's where she sits tonight:
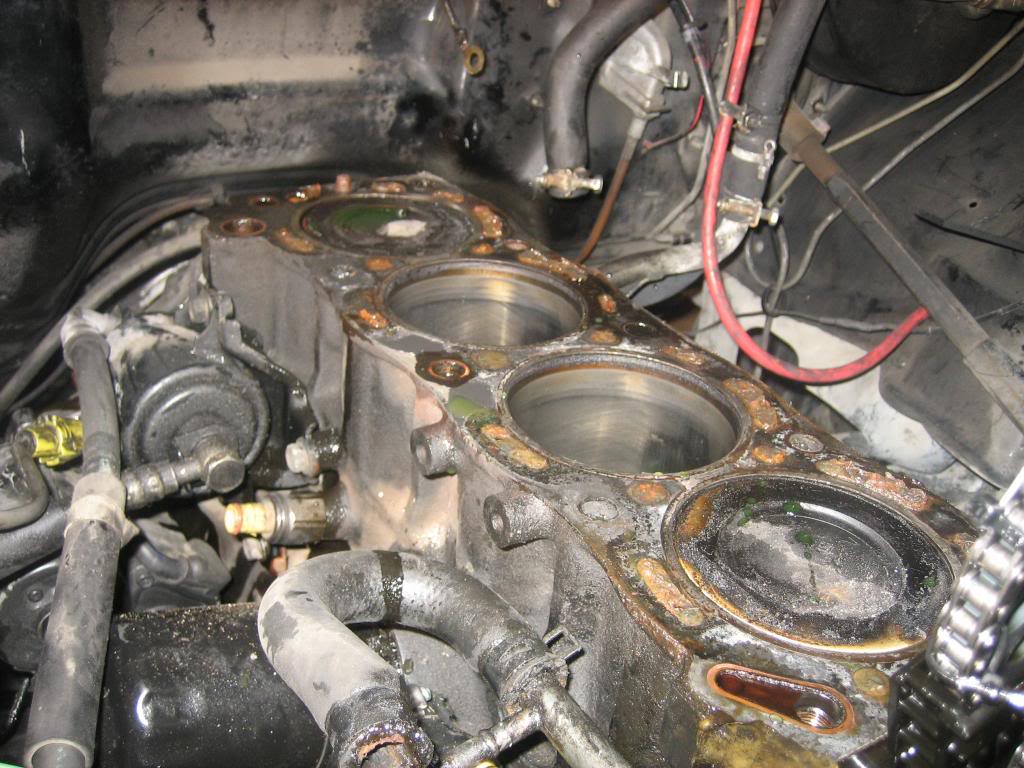
I still can't believe that the timing chain stays on the crankshaft during all this....I zip tied the cam sprocket onto the chain to keep in place. Note that brown gunk....that's jb weld that I had put there 2 years ago to stop an oil leak from where the head gasket material had chipped off during the timing cover replacement....
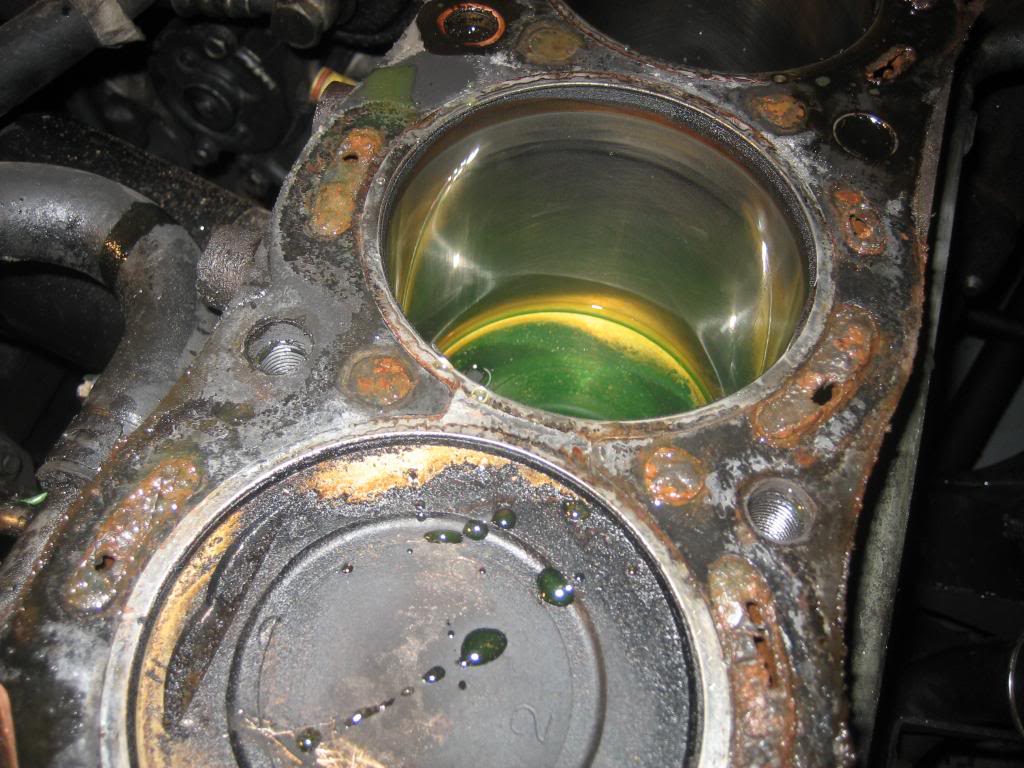
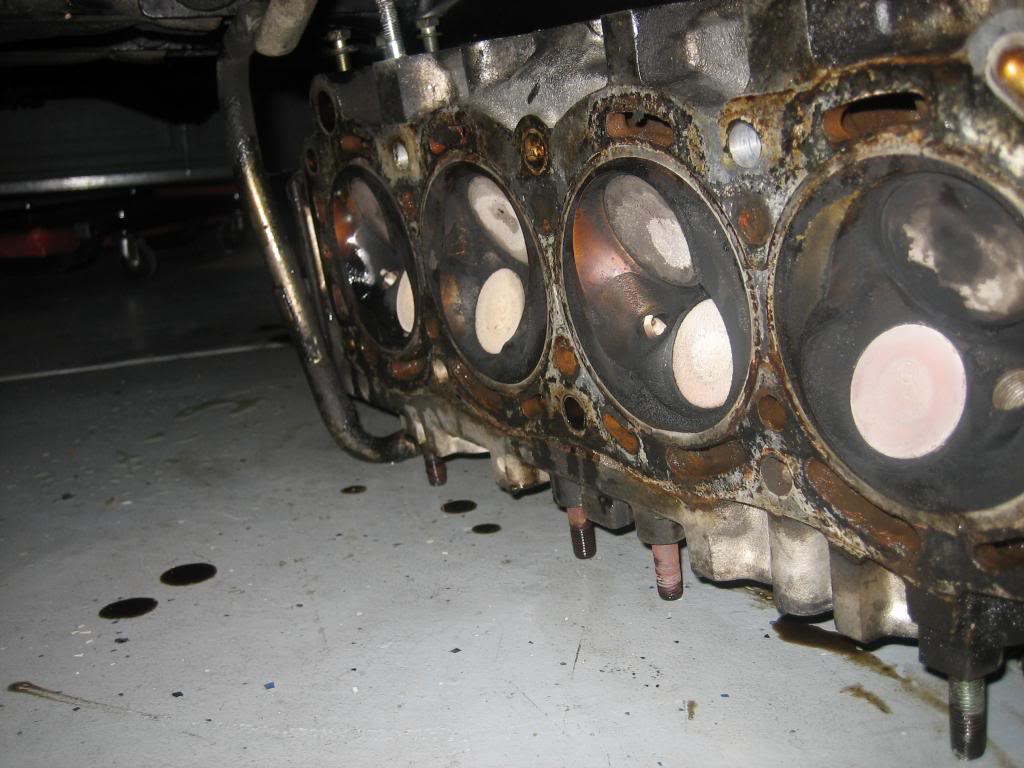
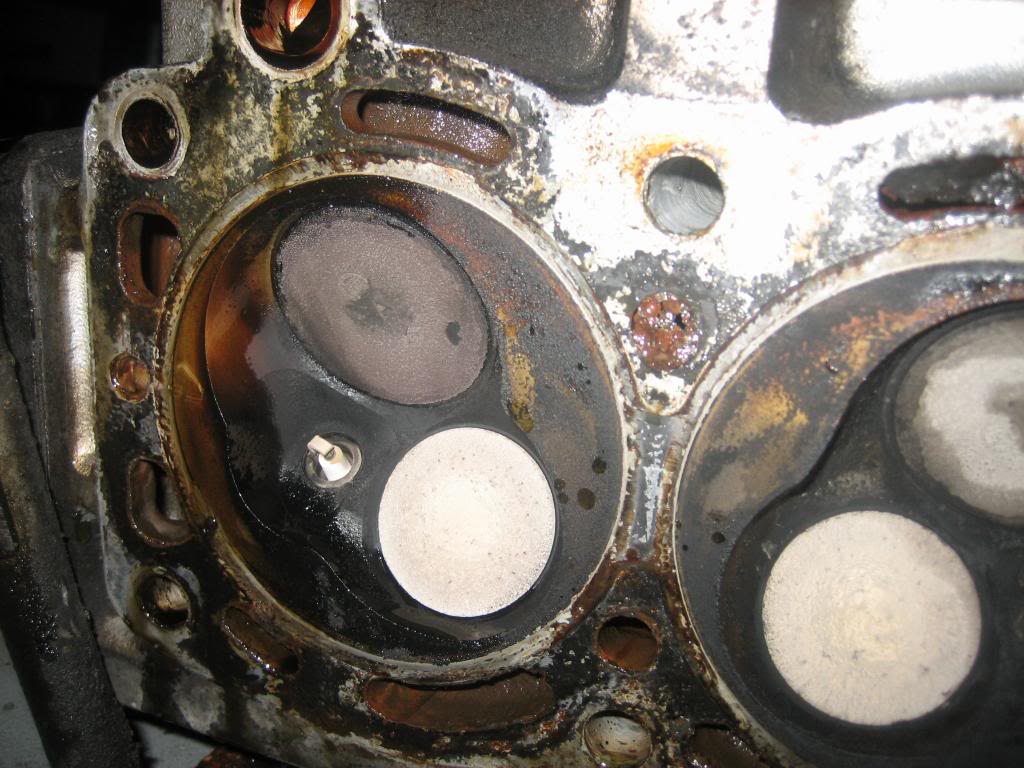
This is where it was leaking from most recently:
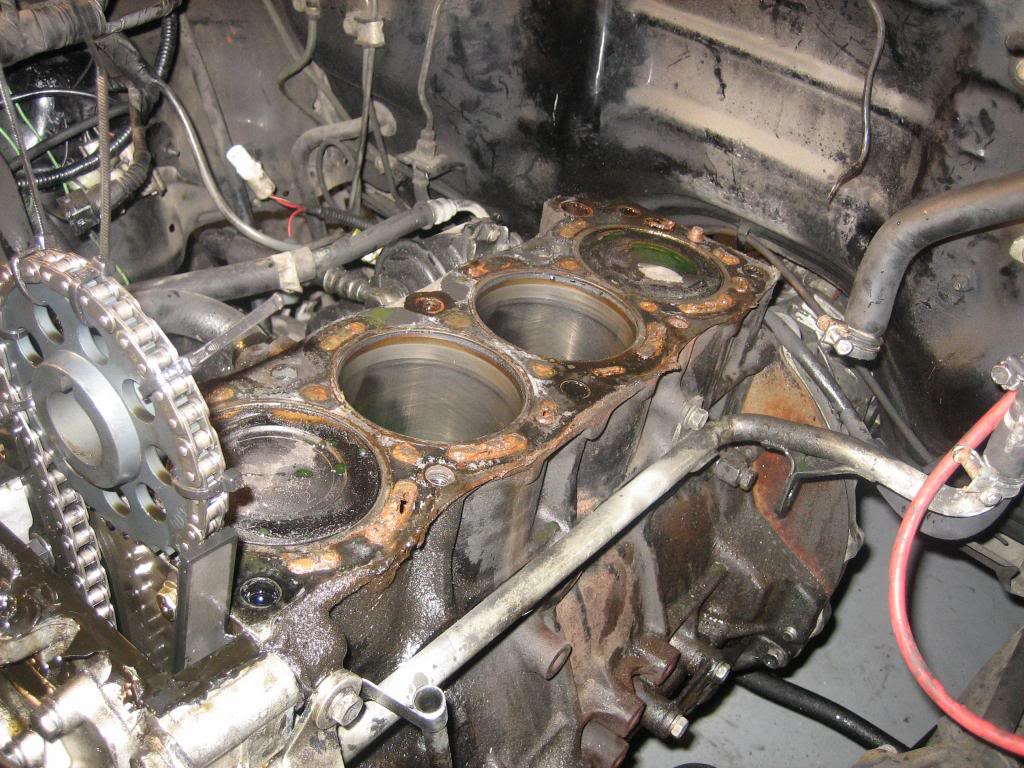
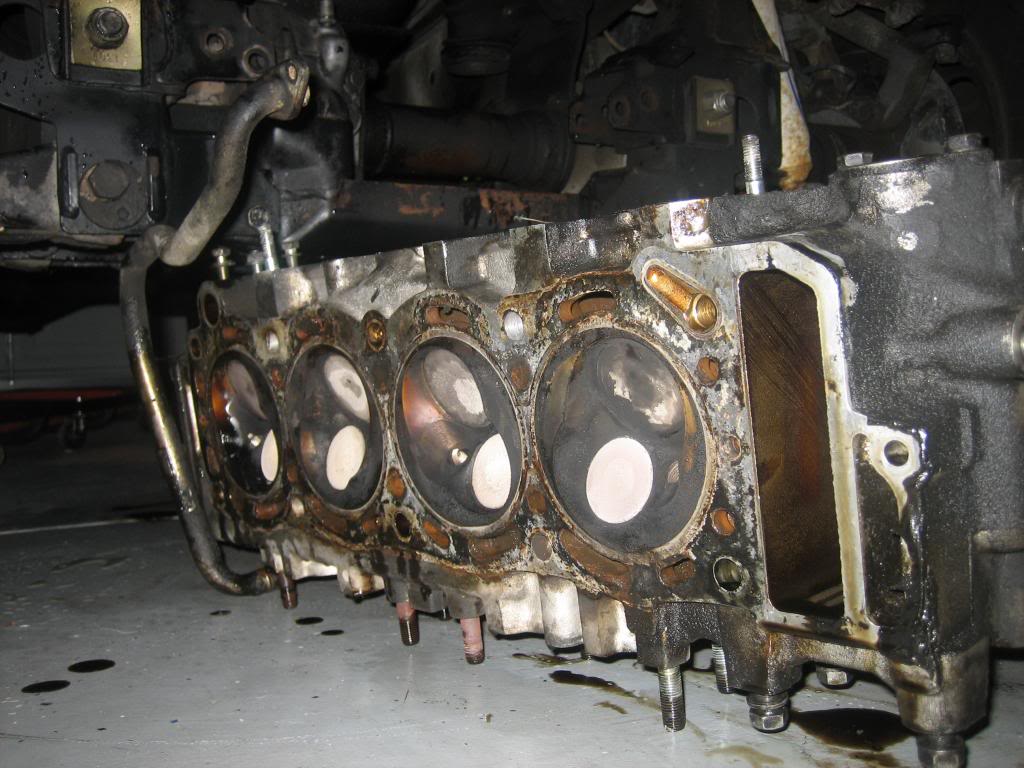
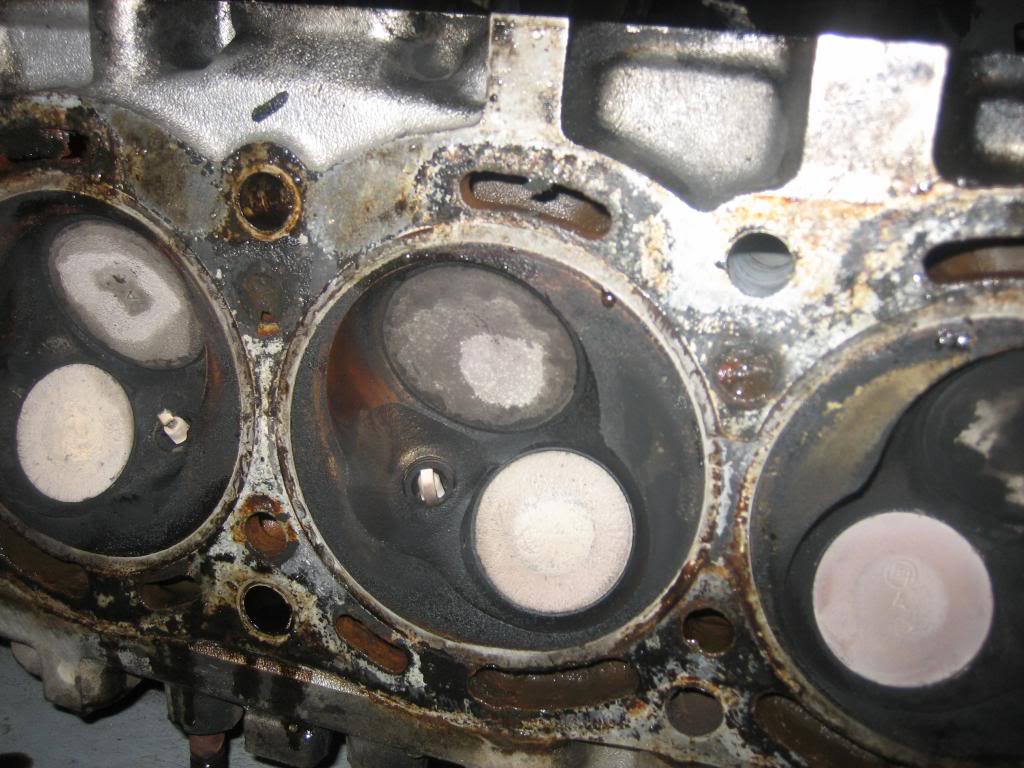
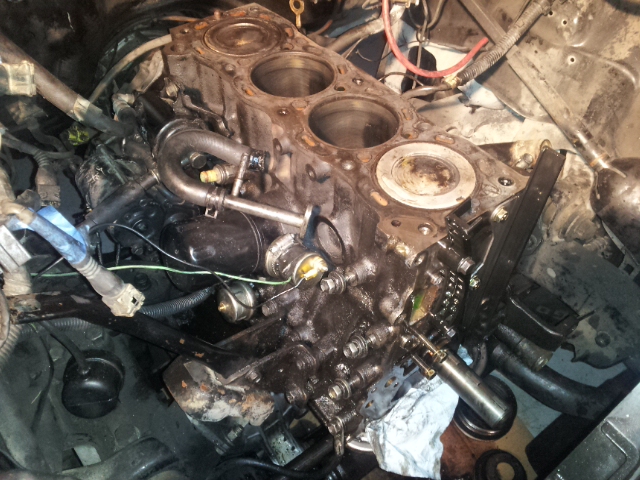
From the top!
Just me, or do those coolant passages looks completely gunked up??
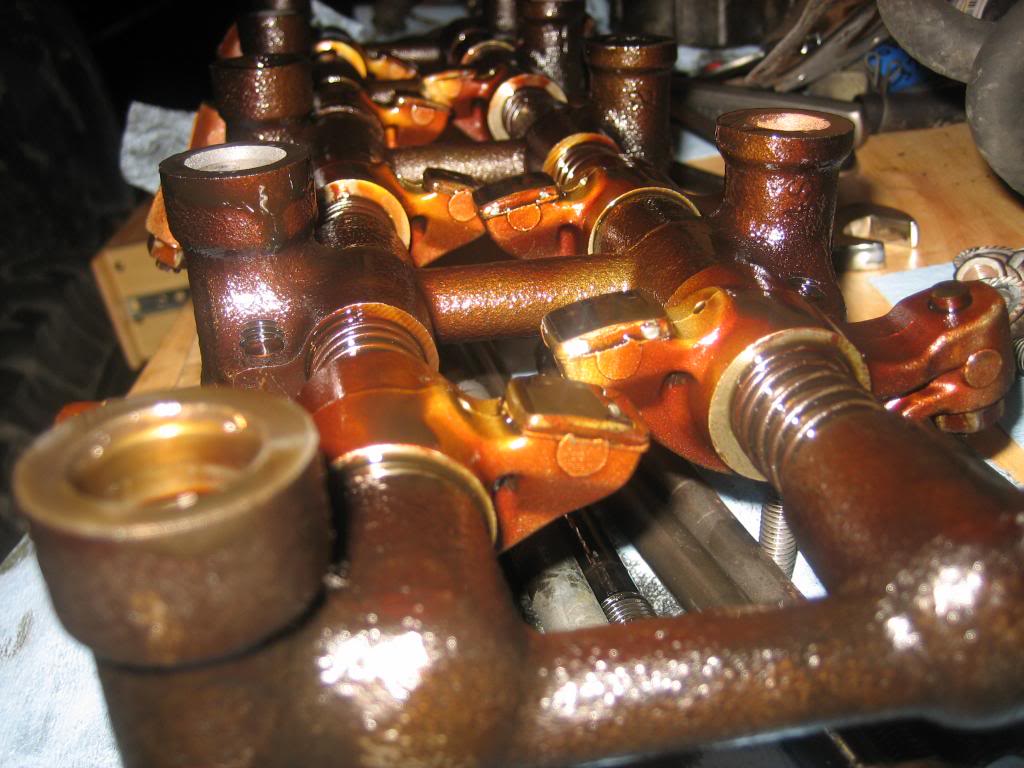
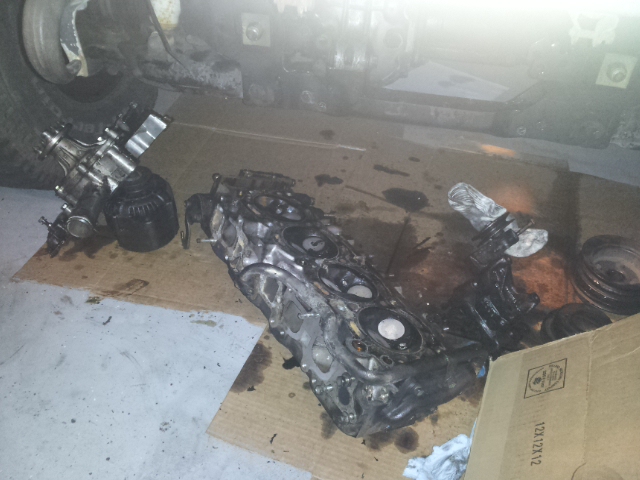
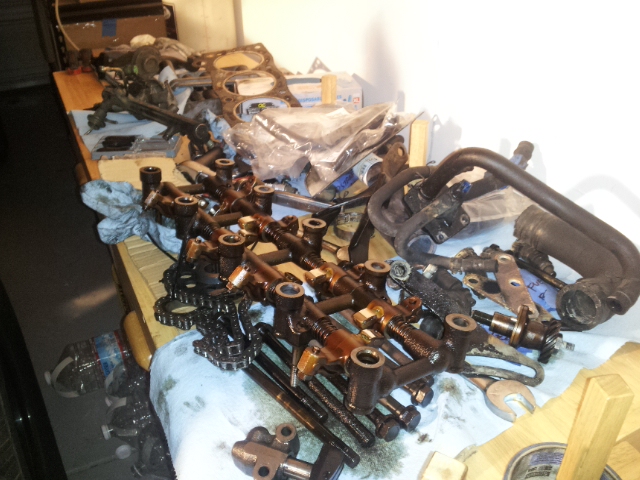
The parts (well, some of them...):
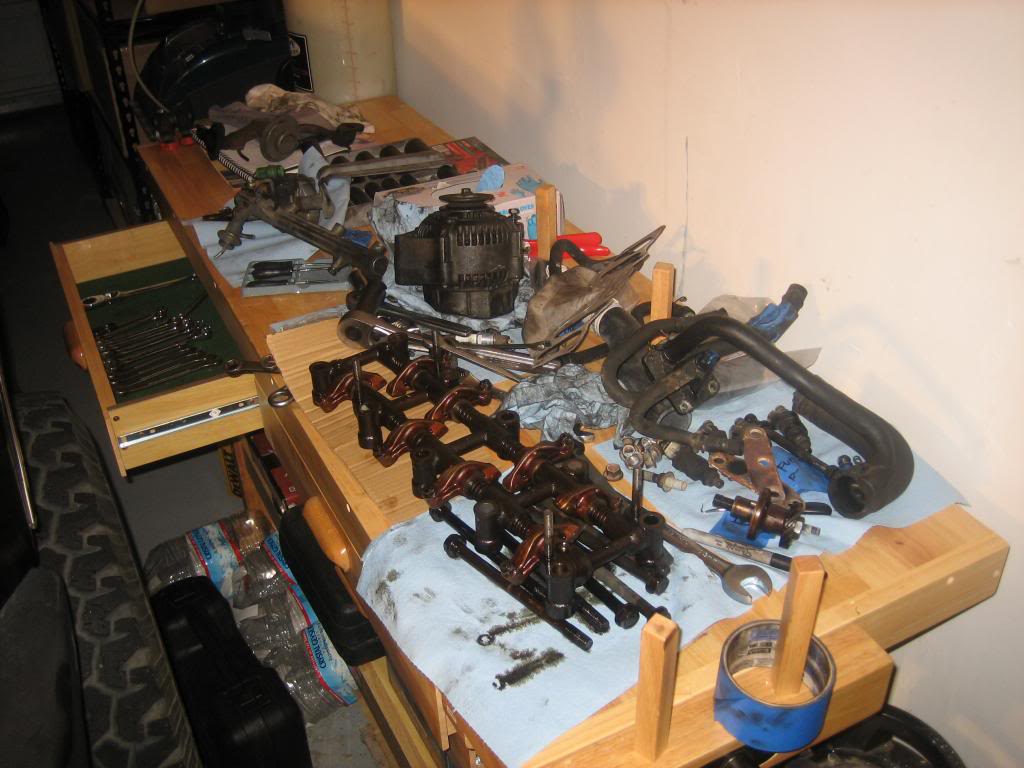
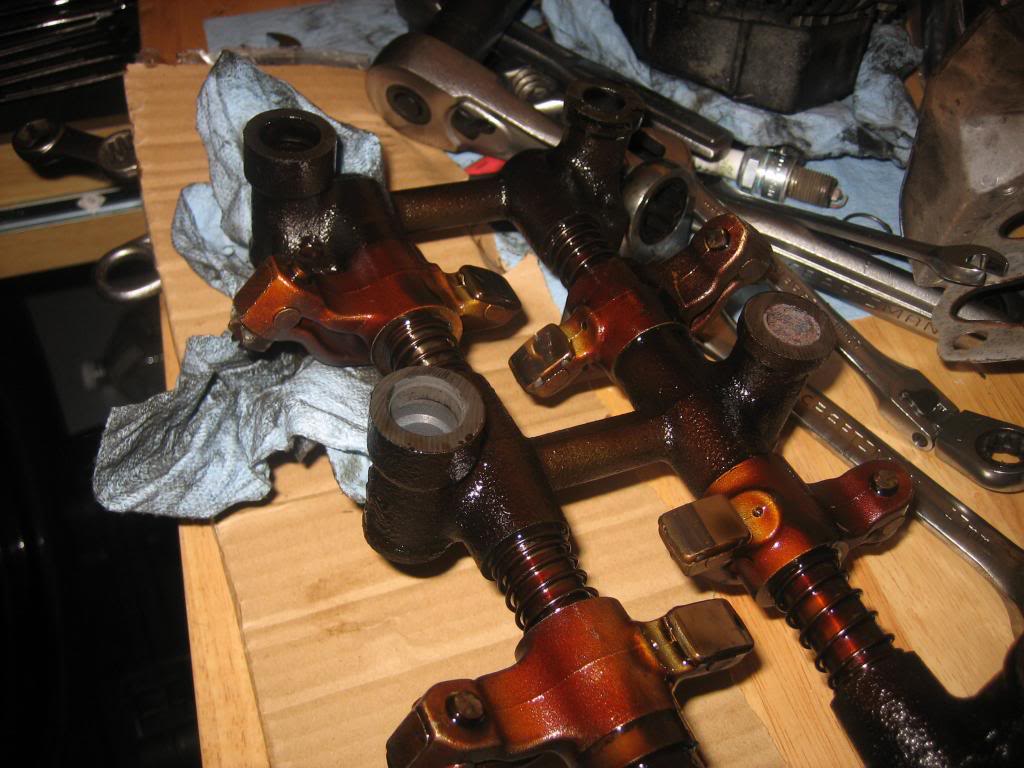
Rockers look pretty good - didn't see any marring:

The head:

And that's it for tonight!
Next steps:
- clean head and block with razor blades
- check head for warpage using straight edge (I kind of hope it's messed up so I can get a new one with a cam from ENGNBLDR)
- general parts cleaning and putting on new hoses (and figuring out which ones i still need to order)
Current questions:
- When cleaning, should you use a wire brush or just razor blades?
- What's the best method to clean the cylinders? The 1 and 4 cylinders are at top, so cleaning is easy...but I can't rotate the crank to bring 2 and 3 up...what do I do here?
- Anything else I'm missing at this point?
Thanks!
Well, the time has come....I developed a coolant "seep" from my head gasket on the drivers side. Rather than monkey around and hope nothing worse happened, I decided to take the plunge. After 275,000 miles, I guess Iwas living on borrowed time (I've had the truck 10 years and put 75,000 on it).
The goal of this thread is to document what I am doing, come up withquestions others may have (and find/get answers along the way to help others).It's also selfishly to help me along, since I know there are lots of regulars on here who have done this job and can lend a hand
That said, this thread may take some time - life is busy, and my truck is not my primary vehicle (now that the Datsun is running again, I have another vehicle to drive while this guy goes under the knife). I do want to get this done quickly, but right. I also have some other things I may do while I have it apart:
- 120A GM alternator (thanks Chefyota!)
- Supra AFM and battery swap (thanks Kiyobrown!)
- Big 3 (wire) upgrade
- Relocate autometer coolant temp sender (ideas would be welcome here)
- Get injectors cleaned by Witchhunter
I started last night and spent about 4 hours on it, getting most things unplugged, and the upper intake manifold out of the way. Tonight I Spent 2 more hours getting the header off, the lower intake manifold off (that allen bolt was fused and I stripped it...had to use vise grips to get it off...), and finally the head itself.
Here's where she sits tonight:
I still can't believe that the timing chain stays on the crankshaft during all this....I zip tied the cam sprocket onto the chain to keep in place. Note that brown gunk....that's jb weld that I had put there 2 years ago to stop an oil leak from where the head gasket material had chipped off during the timing cover replacement....
This is where it was leaking from most recently:
From the top!
Just me, or do those coolant passages looks completely gunked up??
The parts (well, some of them...):
Rockers look pretty good - didn't see any marring:
The head:
And that's it for tonight!
Next steps:
- clean head and block with razor blades
- check head for warpage using straight edge (I kind of hope it's messed up so I can get a new one with a cam from ENGNBLDR)
- general parts cleaning and putting on new hoses (and figuring out which ones i still need to order)
Current questions:
- When cleaning, should you use a wire brush or just razor blades?
- What's the best method to clean the cylinders? The 1 and 4 cylinders are at top, so cleaning is easy...but I can't rotate the crank to bring 2 and 3 up...what do I do here?
- Anything else I'm missing at this point?
Thanks!
 02-20-2013, 03:01 AM
#2
YotaTech Milestone-Two Millionth Post
hey. nice pics.
glad you are digging in.
were you able to see a bad spot on the gasket?
not sure what to tell you with the pistons since I was able to rotate the crank to squeegee the gunk out. just be meticulous so you don't clog your cat.
I would personally not use a wire brush...maybe just a razor blade and acetone....gently.
what was the JB weld about? I'd be concerned about getting that right.
02-20-2013, 05:42 AM
#3
Registered User
Thread Starter
iTrader: (2)
Join Date: Dec 2009
Location: Pleasanton, CA - SF Bay Area
Posts: 2,159
Likes: 0
Received 7 Likes
on
5 Posts
I was hoping you'd chime in
Thanks for the tips on cleaning. When you rotated the crank did you have the timing cover off anyway (I think you did, from your write up)? Do razor blades have any issues with the not completely flat pistons at all?
I didn't see a clear spot on the gasket where it leaked but haven't removed it yet. In the photos of the head you can kind of see what I think are "leak marks"....need to dig in more.
The jb weld is what I used a couple years ago to patch an oil leak...basically I would get a tablespoon of oil that would leak out from there the moment I shut the engine down (not when running though). The head gasket there was gone from when I did the timing. Cover, so oil was leaking from where it collects where the hidden bolt is near the cam gear....I was worried about this a lot but it snapped easily when I lifted the head.
02-20-2013, 06:16 AM
#4
Registered User
Thread Starter
iTrader: (2)
Join Date: Dec 2009
Location: Pleasanton, CA - SF Bay Area
Posts: 2,159
Likes: 0
Received 7 Likes
on
5 Posts
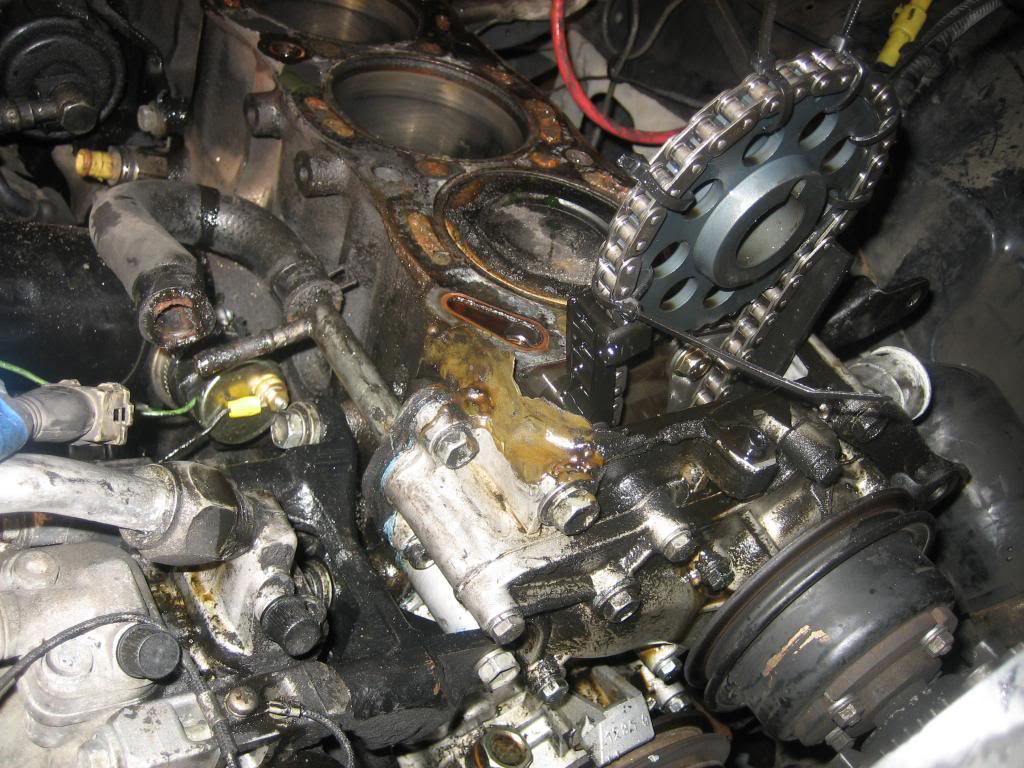
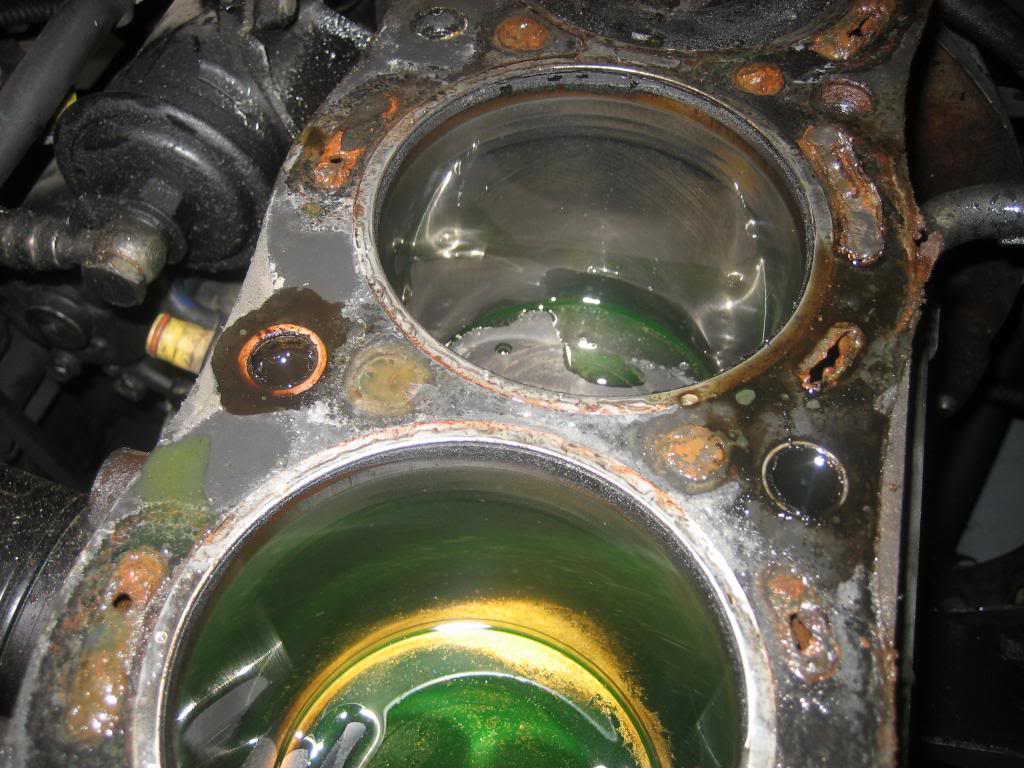
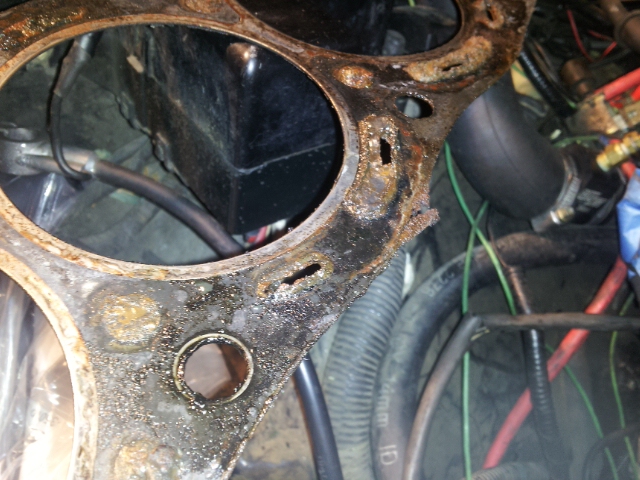
This is where I think it may have been leaking - see the "stains" in the lower left corner - that's on the drivers side, about where the leaks were coming from....

Last edited by Philbert; 02-20-2013 at 06:17 AM. Reason: details
02-20-2013, 07:09 AM
#6
Registered User
Thread Starter
iTrader: (2)
Join Date: Dec 2009
Location: Pleasanton, CA - SF Bay Area
Posts: 2,159
Likes: 0
Received 7 Likes
on
5 Posts
Thanks Highlux, it's a christmas gift from my wife - Harbor Freight. I really like it - came in handy when building shelves last month  I'm trying my best to keep the oil and grime off it during this job!
100% OEM from Toyotapartszone.com yes.
How do you like your ENGNBLDR RV head aned cam? I have the timing kit from him and really like his stuff/service. I also have the LCE header/exhaust. When they ship you the head with cam, is it all greased and ready - you just put in on, slap on your rockers, and bolt up - that simple? I'm getting head bolts from him either way...just not sure I *need* a new head (yet).
I'm trying my best to keep the oil and grime off it during this job!100% OEM from Toyotapartszone.com yes.
How do you like your ENGNBLDR RV head aned cam? I have the timing kit from him and really like his stuff/service. I also have the LCE header/exhaust. When they ship you the head with cam, is it all greased and ready - you just put in on, slap on your rockers, and bolt up - that simple? I'm getting head bolts from him either way...just not sure I *need* a new head (yet).
02-20-2013, 07:11 AM
#7
YotaTech Milestone-Two Millionth Post
I was hoping you'd chime in
Thanks for the tips on cleaning. When you rotated the crank did you have the timing cover off anyway (I think you did, from your write up)? Do razor blades have any issues with the not completely flat pistons at all?
I didn't see a clear spot on the gasket where it leaked but haven't removed it yet. In the photos of the head you can kind of see what I think are "leak marks"....need to dig in more.
The jb weld is what I used a couple years ago to patch an oil leak...basically I would get a tablespoon of oil that would leak out from there the moment I shut the engine down (not when running though). The head gasket there was gone from when I did the timing. Cover, so oil was leaking from where it collects where the hidden bolt is near the cam gear....I was worried about this a lot but it snapped easily when I lifted the head.
Thanks for the tips on cleaning. When you rotated the crank did you have the timing cover off anyway (I think you did, from your write up)? Do razor blades have any issues with the not completely flat pistons at all?
I didn't see a clear spot on the gasket where it leaked but haven't removed it yet. In the photos of the head you can kind of see what I think are "leak marks"....need to dig in more.
The jb weld is what I used a couple years ago to patch an oil leak...basically I would get a tablespoon of oil that would leak out from there the moment I shut the engine down (not when running though). The head gasket there was gone from when I did the timing. Cover, so oil was leaking from where it collects where the hidden bolt is near the cam gear....I was worried about this a lot but it snapped easily when I lifted the head.
That^^^ made my day!!! Thanks for the compliment.
I wasn't clear that you meant cleaning the piston tops. In the FSM, is shows a scraper being used. slow-and-steady-wins the race. so, with that in mind, I would say, any means you can use that doesn't damage or leave grit, would be applicable. with that said, I would just be diligent with gentle scraping, brake cleaner, acetone, lather rinse repeat.
yes. I had the timing cover off and turned the crank by hand. when I was doing my motor, and Joe's, I constantly thought to myself that I hoped I never had to be THIS deep into the motor again, or any time soon. I do believe you referenced doing the timing cover not so long ago...so, that is not a concern, right? But why I am saying that is just simply for the purpose of turning the crank. and only that.
make sure you clean out those head bolt holes very well. I did not have an air compressor at the time I was doing mine, so I was meticulous with the q-tips and acetone.
as far as the appearance of the blocked passages....indeed, it looks that way. I used a paper clip and a sheetrock screw to pull that crap out on mine (mine wasn't that bad). on Joe's motor, they were that bad....and when I replaced the freeze plugs on his, I cold not believe the amount of crap I could see inside the water jacket.....veritable pebbles and larger of stuff that was the equivalent of solidified talcum powder. my assumption is that it was from the previous owner(s) likely using tap-water in the radiator and this was the accumulation of mineral deposits solidifying. as you can see, the passages on the head gasket are smaller than the actual passages on the block and head. not sure why that is. but just like the arteries in a human, narrowing equals a place to accumulate stuff.
Trending Topics
02-20-2013, 07:33 AM
#8
Registered User
I love the 268 cam and rv head. Combined with my lc header...its alot more powerful. No doubt about it.
It was good to go out of the box. I checked torque on cam to be safe. Lubed the lobes up with high zinc assembly lube.
Is it a rocket ship? Nope. Did it really wake it up? Def. at 900 rpm idle, it has a sweet little lope. Id dust a stock 3.0 runner now.
Ps. You need the head and cam. I will testify to the cracks i see in the head and worn cam to any wife that asks.
Last edited by HighLux; 02-20-2013 at 07:35 AM.
02-20-2013, 07:48 AM
#9
Registered User
Thread Starter
iTrader: (2)
Join Date: Dec 2009
Location: Pleasanton, CA - SF Bay Area
Posts: 2,159
Likes: 0
Received 7 Likes
on
5 Posts
Thanks guys!
92 TOY, I do have a compressor and will use that to clear out the head bolt holes - saw that trick on the eric the car guy youtube channel (this is a great channel if you haven't seen it yet). I like the idea of using the screw to "hook" any sediment in the water jacket holes, thanks. I did do the timing cover a couple few years back and I think it's fine, but kind of tempted just to pull, clean and re seal, while everything is so easy to acccess right now....
Hilux, thanks for the background on the cam setup. Can you use general purpose grease or do you NEED to use what you described? When you rotated, did you just make sure the "dot" was at 12:00 before you bolted down the rockers? I assume you torqued it down while it was OFF the block?
And, thanks for the keen eye on my cracks...I hadn't noticed them until you mentioned it just now....
More to come - thanks for following along guys!
02-21-2013, 10:03 AM
#10
Registered User
Thread Starter
iTrader: (2)
Join Date: Dec 2009
Location: Pleasanton, CA - SF Bay Area
Posts: 2,159
Likes: 0
Received 7 Likes
on
5 Posts
Not too much new today
Only had about 15 minutes free last night and I was really tired.
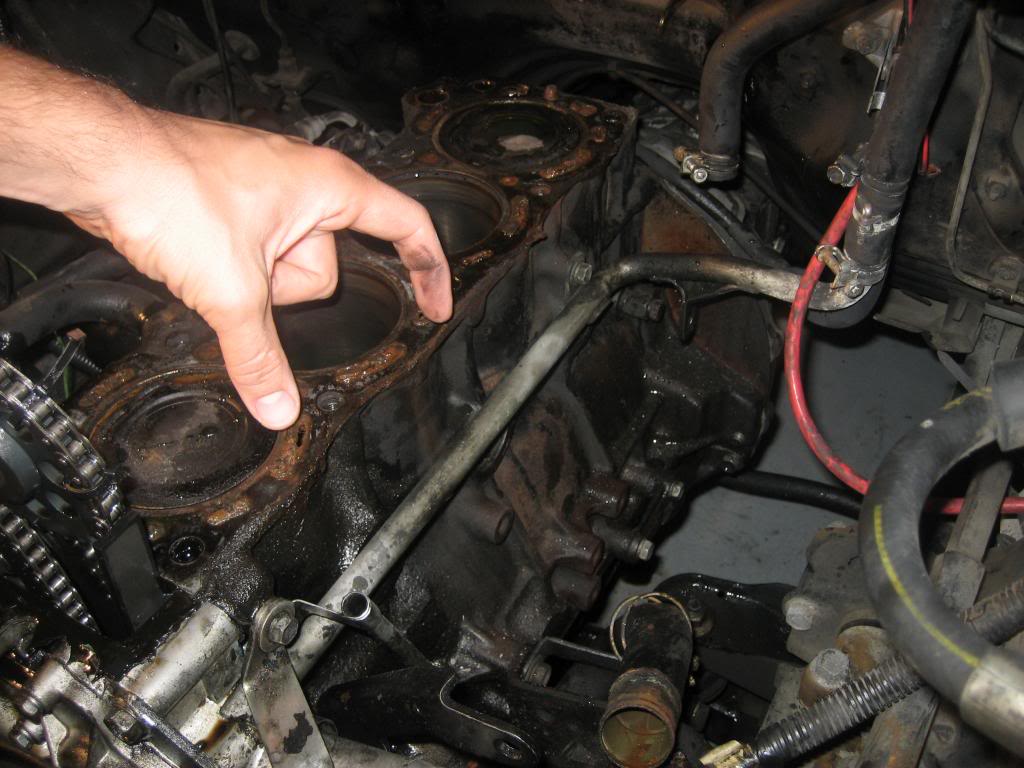
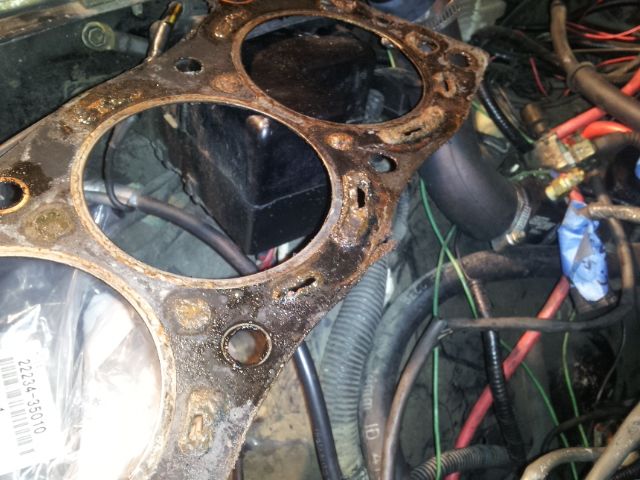
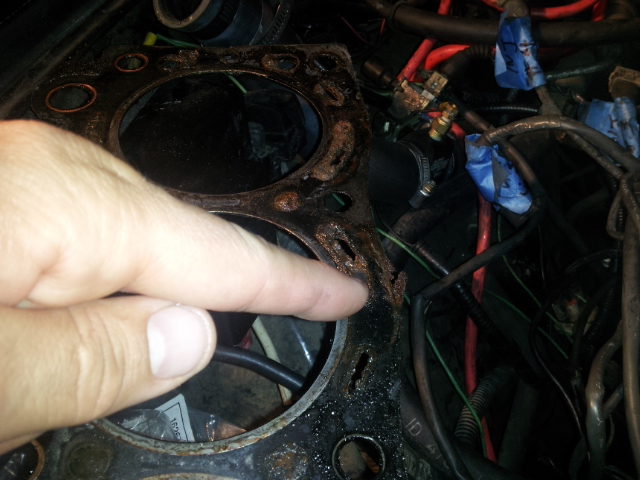
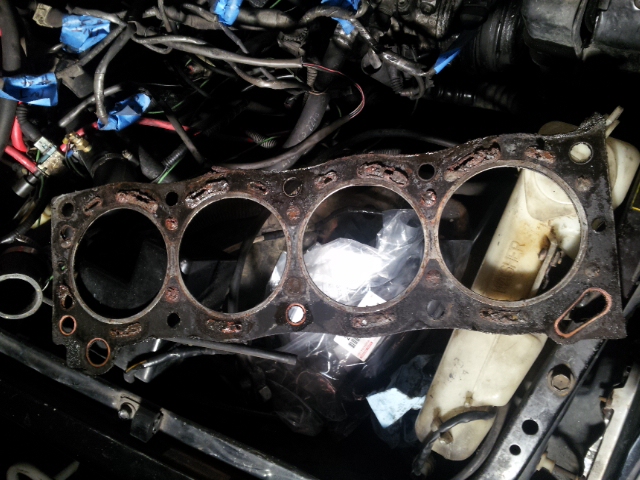
Took off the actual HG and snapped some pics below.
On the #3 cylinder, drivers side, you can see where a piece of the HG seemed to break loose...wonder if this is associated with the leak? Leak occurred in 2 places, along #2 and #3, on drivers side.

The block with the HG off:
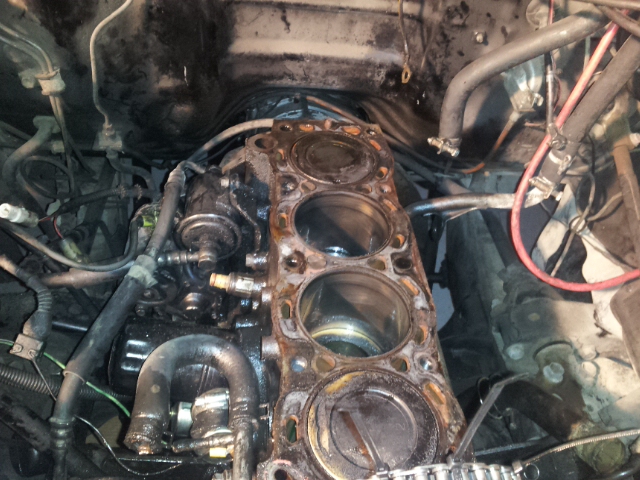
Trying to show all the crap built up where the water jacket openings are:

I've decided to remove, clean and reseal the timing cover while I'm doing this whole thing....I'm almost that far in anyway Last time, I used the gaskets that came with the ENGNBLDR kit, as well as blue silicon. My question is, can I use FIPG black and NO gasket instead? I really want to seal this up good. Can I use FIPG for the water pump, oil pump and timing cover?
Thanks
Took off the actual HG and snapped some pics below.
On the #3 cylinder, drivers side, you can see where a piece of the HG seemed to break loose...wonder if this is associated with the leak? Leak occurred in 2 places, along #2 and #3, on drivers side.
The block with the HG off:
Trying to show all the crap built up where the water jacket openings are:
I've decided to remove, clean and reseal the timing cover while I'm doing this whole thing....I'm almost that far in anyway
Last time, I used the gaskets that came with the ENGNBLDR kit, as well as blue silicon. My question is, can I use FIPG black and NO gasket instead? I really want to seal this up good. Can I use FIPG for the water pump, oil pump and timing cover?Thanks
02-21-2013, 01:13 PM
#11
Registered User
I'd use the gaskets and put the black rtv where the factory service manual says to.
They say to use a high zinc assembly lube on cam lobes to break in a new cam and rockers. You can get it cheap on ebay if you cant find it local.
Yes get the cam ready so the upper gear will pop on easier. The keyway.
They say to use a high zinc assembly lube on cam lobes to break in a new cam and rockers. You can get it cheap on ebay if you cant find it local.
Yes get the cam ready so the upper gear will pop on easier. The keyway.
Last edited by HighLux; 02-21-2013 at 01:16 PM.
02-21-2013, 01:36 PM
#12
Registered User
Thread Starter
iTrader: (2)
Join Date: Dec 2009
Location: Pleasanton, CA - SF Bay Area
Posts: 2,159
Likes: 0
Received 7 Likes
on
5 Posts
Thanks Highlux - makes sense!
Getting stoked about this, but bummed...I'll be out of town pretty much all next week, so the following week should be when I start really knocking this stuff out. I also have a buddy at work getting me the GM alternator bracket from TG (he knows a guy locally so I'm saving on shipping). I've read so many articles on the swap, with different instructions on how to adapt the Toy wiring to the GM plug and my brain is full
Getting stoked about this, but bummed...I'll be out of town pretty much all next week, so the following week should be when I start really knocking this stuff out. I also have a buddy at work getting me the GM alternator bracket from TG (he knows a guy locally so I'm saving on shipping). I've read so many articles on the swap, with different instructions on how to adapt the Toy wiring to the GM plug and my brain is full
02-22-2013, 07:13 AM
#13
Registered User
Thread Starter
iTrader: (2)
Join Date: Dec 2009
Location: Pleasanton, CA - SF Bay Area
Posts: 2,159
Likes: 0
Received 7 Likes
on
5 Posts
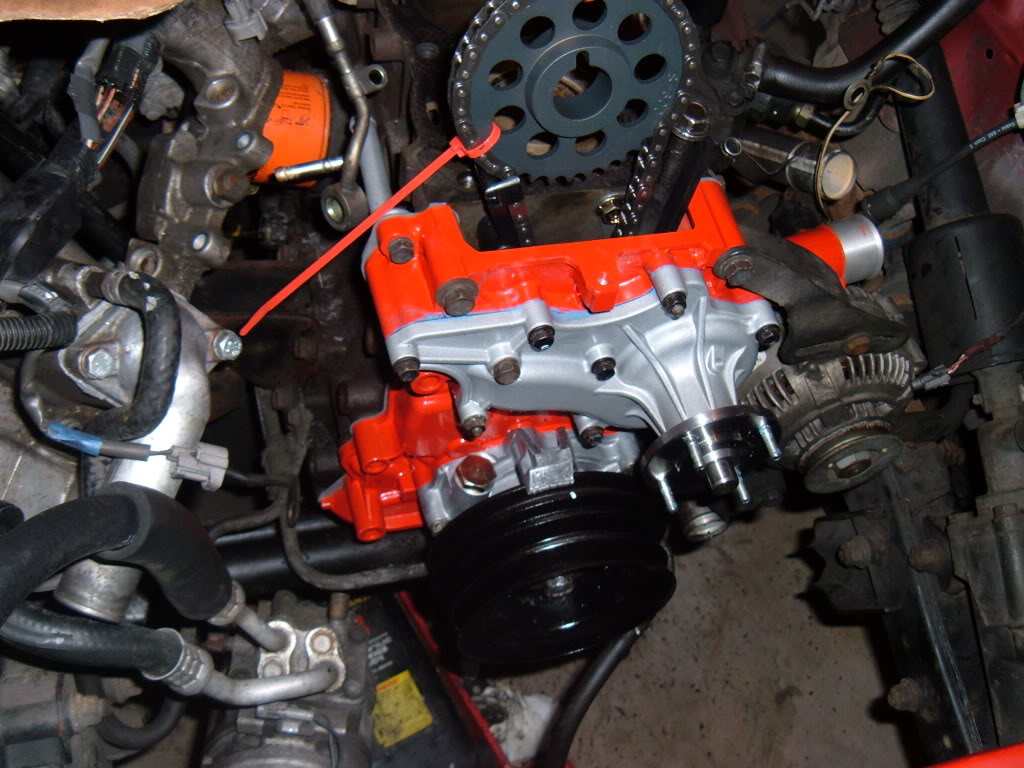
Timing cover off!
OK, well last night I spent about 3 more hours on it, trying to clean up gunk on the A/C hardware, as well as the PS and alternator brackets....damn there is a lot of caked on grease! I used 2 wire brushes, Krud Kutter and several rags and still have a ways to go...any recommendations on how to move faster on this stuff?
I also took off the timing cover....the chain on the crank slipped when I did this (I had an idea it might), so I took that off again. Guess I'll have to read up again on the Timing chain replacement job LOL....I'm a little worried since when I did it before I had the cam and head in place so I could snake the sprocket with chain over the front of the cam to keep tension, before installing the timing cover.....I obviously don't have that now. Have you guys done this and how do you keep tension on the system? I'm thinking of using a bungee to the rafter above the truck in the garage (I already zip tied the chain on the sprocket so the bright link is on the dot, so all I have to do is get the crank gear and chain lined up right).
I also did some scraping with a razor blade and scotch brite bad on the block and top of cylinder #1. I'm getting there, but I still have "stains" that show, even if the surface is smooth to the touch - is this normal? I have seen folks talk about using sand paper (800 grit?) on the block deck and piston tops...is that safe? Did you use a block of wood or just your hand and the paper?
I have not touched the head yet - want to clean the mating surface up and check if it's level or warped.
It's coming along, but damn it's daunting - I want to stay on top of it while it's all fresh in my head - not looking forward to being out of town all next week and losing momentum
Phil
02-22-2013, 07:52 AM
#14
YotaTech Milestone-Two Millionth Post
and then....you say..."man, there's not much left, I should just pull the whole thing and be done with it". cuz, that's what I said to myself. and swore that if I ever did this again, I would pull the motor. if for no other reason than doing the oil pan.
I've read about NEVER using sandpaper. maybe a MAGIC ERASER???
I did tie off the chain to the hood and I remember wedging long bolts to hold it in place too. I think there's a pic of that.
and far as re-planting the head. it was at least a 4-arm operation. at least to thread the string that was holding the chain in place. also the head gets VERY heavy when holding it out in front of you while trying to put it all in place on the 1st try.\\
EDIT:...yup. page 2 of my "THREAD B" near the bottom, I have pics of that.
Last edited by 92 TOY; 02-22-2013 at 07:56 AM.
02-22-2013, 09:45 AM
#15
Registered User
Thread Starter
iTrader: (2)
Join Date: Dec 2009
Location: Pleasanton, CA - SF Bay Area
Posts: 2,159
Likes: 0
Received 7 Likes
on
5 Posts
Thanks! I see where you have the bolt wedged in there in the photo below....but it looks like it's in a long socket too?? I plan to line up the bright links and dimples on both sprockets, slip the lower one on the crank with tension on the drivers side, and then use a bungee to keep tension. I guess I don't see in your photos how you kept that bolt in there - is it simply "Crammed" in between the chain and the timing chain guide as it appears below?
I have my hood off for this job which makes it easier, but I think I can do the same thing with my garage's rafter
I have my hood off for this job which makes it easier, but I think I can do the same thing with my garage's rafter
02-22-2013, 02:18 PM
#17
Registered User
Thread Starter
iTrader: (2)
Join Date: Dec 2009
Location: Pleasanton, CA - SF Bay Area
Posts: 2,159
Likes: 0
Received 7 Likes
on
5 Posts
LOL, I know, I have 10 sitting on my workbench
For some reason, when I was looking at the photo earlier, it appeared to be as long and thick and shiny as a deep well socket....now I see it clear as day.Another suggestion I came across today was to use a zip tie on the chain immediately below the cam sprocket, to keep tension on the whole thing. You can then cut it off once the timing cover is on.
Both good ideas - I'll monkey with it and find what works best.
Thanks!
02-22-2013, 03:14 PM
#19


