
Oil Pan Removal and Eventual Top End Rebuild
 02-15-2011, 03:27 PM
#1
Registered User
Thread Starter
Join Date: Jun 2009
Location: Los Angeles, Ca
Posts: 63
Likes: 0
Received 0 Likes
on
0 Posts
Oil Pan Removal and Eventual Top End Rebuild
First: 90 4runner 4x4 22re 5 speed (stock). I am a noob and working in my backyard.
On a roadtrip my truck started producing a loud top end tapping. The car ran well aside from the noise, and I made it back home. Took it to a mechanic who identified an exhaust manifold leak, and showed me that the 3&4 exhaust rockers were badly worn along with the cam--looked like they had been starved for oil. The timing chain was replaced by the previous owner and the guides are intact.
The mechanic quoted me $700 for replacing the two rockers, exhaust rocker shaft, and the cam. I decided to go for this myself, and replace all the rockers, shafts, and throw on EB 268. I also had a leaky pan and decided that now was the time to pull that guy off and reseal it.
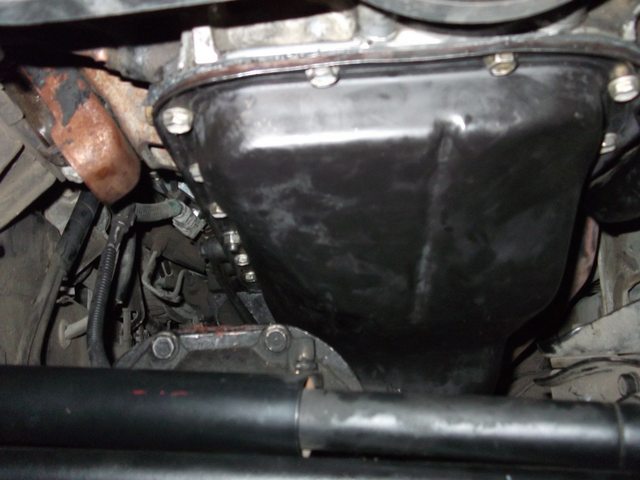
So I began late today on getting the oil pan off as per the "Oil Pan Removal Thread" posted by AllCammedUp.
My truck has been sitting for the last two weeks while I have assembled the parts for the project. I discovered coolant on the bottom of the radiator, which ran down the skid plate to the cross member. Then as I lay under the oil pan I looked up and saw coolant where the block and tranny meet (coolant is off to the right).
I drained the radiator and the block and pulled the radiator out--there was no oil present in the coolant. Nor was there coolant in the oil that I drained.
Ran out of light before I could get the pan off. I have the differential lowered, need to pull the relay rod off the pitman arm end and take off the steering dampener. I will post pics tomorrow of what I find in the pan.
Any thoughts on why the coolant was back there? Also, what should I look for in the bottom end when the pan is off?
Thanks again for helping!
On a roadtrip my truck started producing a loud top end tapping. The car ran well aside from the noise, and I made it back home. Took it to a mechanic who identified an exhaust manifold leak, and showed me that the 3&4 exhaust rockers were badly worn along with the cam--looked like they had been starved for oil. The timing chain was replaced by the previous owner and the guides are intact.
The mechanic quoted me $700 for replacing the two rockers, exhaust rocker shaft, and the cam. I decided to go for this myself, and replace all the rockers, shafts, and throw on EB 268. I also had a leaky pan and decided that now was the time to pull that guy off and reseal it.
So I began late today on getting the oil pan off as per the "Oil Pan Removal Thread" posted by AllCammedUp.
My truck has been sitting for the last two weeks while I have assembled the parts for the project. I discovered coolant on the bottom of the radiator, which ran down the skid plate to the cross member. Then as I lay under the oil pan I looked up and saw coolant where the block and tranny meet (coolant is off to the right).

I drained the radiator and the block and pulled the radiator out--there was no oil present in the coolant. Nor was there coolant in the oil that I drained.
Ran out of light before I could get the pan off. I have the differential lowered, need to pull the relay rod off the pitman arm end and take off the steering dampener. I will post pics tomorrow of what I find in the pan.
Any thoughts on why the coolant was back there? Also, what should I look for in the bottom end when the pan is off?
Thanks again for helping!
Last edited by Smelliottkuhn; 02-15-2011 at 08:00 PM.
 02-15-2011, 03:37 PM
#2
Registered User
edit never mind that, I just read it again and realized what you were trying to say.
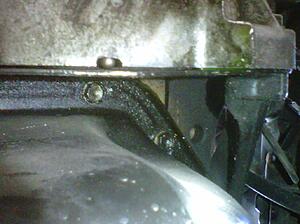
Here is a plate in the back of the head that has coolant running through it, it's possible that that was leaking. The you got the heater core back there and the heater control valve as well.
Here is a plate in the back of the head that has coolant running through it, it's possible that that was leaking. The you got the heater core back there and the heater control valve as well.
Last edited by xxxtreme22r; 02-15-2011 at 03:43 PM.
02-16-2011, 05:33 PM
#3
Registered User
Thread Starter
Join Date: Jun 2009
Location: Los Angeles, Ca
Posts: 63
Likes: 0
Received 0 Likes
on
0 Posts
Oil Pan Off -- Pictures
Got the pan off today and there were no signs of coolant inside--looks like the coolant I found around the rear of the block was leaking from somewhere else. I will take a look tomorrow at the rear plate xxxtreme22r mentioned.
So I am preparing to partially rebuild the top end. Here is the thread I started after learning that I needed to replace my rockers and cam: "Question--Need Cam, Rockers, and Exhaust Rocker Shaft Replaced". (If you are looking for prices on these parts, I posted a list of vendors with their links and prices at the bottom).
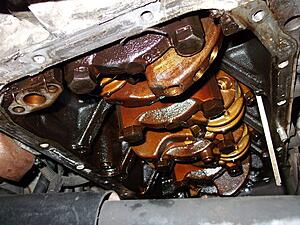
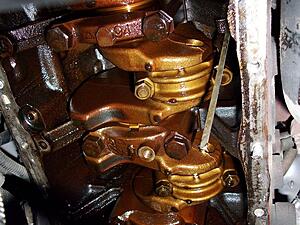
The image on my inital post shows the burnt rockers, but here it is as well:
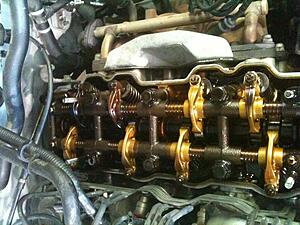
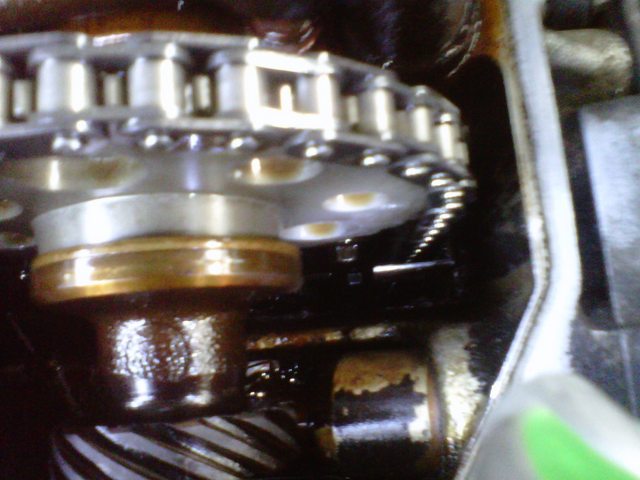
I checked the timing chain/guides and had the mechanic confirm that they are new and intact:


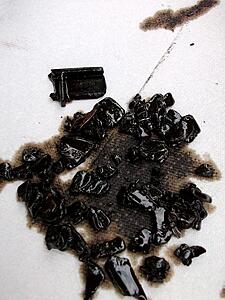
So the plastic I found in my oil change back in December was due to the PO never dropping the pan. Since I am about to do some top end work, I figured I would go ahead and do the pan as well.
So I followed AllCammedUp's Removal--with the discovery that there was a third bolt on the front diff mounting bracket on the passenger side (step 4 in his process)--I posted a reply on that thread(at the bottom).
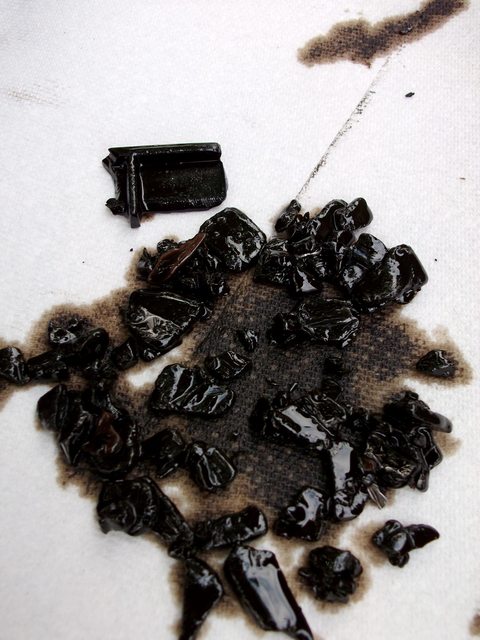
Got the pan out and found the remains of the PO's old timing chain guides:
Here is a look at the bottom end from the front (Note: the right stud came out when I unscrewed the nut):
A little further back:
I have been told that I should plastiguage the bearings or even replace them. I will have to read up on that.
Currently I am waiting for my rocker assembly to arrive from Putney's.
So today went well. Tomorrow I will get to scraping the old gasket off the block.
So I am preparing to partially rebuild the top end. Here is the thread I started after learning that I needed to replace my rockers and cam: "Question--Need Cam, Rockers, and Exhaust Rocker Shaft Replaced". (If you are looking for prices on these parts, I posted a list of vendors with their links and prices at the bottom).
The image on my inital post shows the burnt rockers, but here it is as well:

I checked the timing chain/guides and had the mechanic confirm that they are new and intact:

So the plastic I found in my oil change back in December was due to the PO never dropping the pan. Since I am about to do some top end work, I figured I would go ahead and do the pan as well.
So I followed AllCammedUp's Removal--with the discovery that there was a third bolt on the front diff mounting bracket on the passenger side (step 4 in his process)--I posted a reply on that thread(at the bottom).
Got the pan out and found the remains of the PO's old timing chain guides:
Here is a look at the bottom end from the front (Note: the right stud came out when I unscrewed the nut):

A little further back:

I have been told that I should plastiguage the bearings or even replace them. I will have to read up on that.
Currently I am waiting for my rocker assembly to arrive from Putney's.
So today went well. Tomorrow I will get to scraping the old gasket off the block.
Last edited by Smelliottkuhn; 02-21-2011 at 07:55 PM.
02-21-2011, 06:09 PM
#4
Registered User
Thread Starter
Join Date: Jun 2009
Location: Los Angeles, Ca
Posts: 63
Likes: 0
Received 0 Likes
on
0 Posts
Oil Pan On! Engine at TDC
So, I got through the new oil pan installed. Didn't plastiguage and didn't replace the bearings. Perhaps this is the kiss of death, but the truck was running real strong, and things looked good, so away we go, and karma will either be a bitch or a saint.

AllCammedUp's write up worked swell. Definitely made use of two jacks when getting the differential back together. Left my bottle jack underneath the diff, and moved my floor jack around to push up different parts and line up bolt holes. Torqued everything back to spec--thank you Haynes manual for the quick and easy references.
Learned that the oil pan I got from the salvage yard was off a 22r, not a 22re. How do I know this? Well there is a difference in the pan mating surfaces. The 22r which was meant to have a gasket, has a raised surface, where as the 22re, which is designed for just the FIPG has a series of trenchs to hold the liquid gasket. I got sort of frustrated when I figured this out. I read a few threads about using only FIPG on 22r pans, and it seemed like people had success with it--the gaskets always seem to fail. So I decided to go for it.
Did a dry run without the sealant to see which was the best way to get the pan in:
So I undid it, and cleaned al the holts up with parts cleaner and a wire brush. Then I wiped both the pan and the block mating surfaces down with acetone. I applied Permatex Right Stuff around the hole pan going along the center ridge (since I didn't have those nice pockets). I went around in one continuous bead, and dipped inside of each bolt hole. I then applied a secondary light bead on the outside of the center ridge. Placed a bead on the four corners of the engine block, along the exposed seams (see your FSM or Haynes).
Got the pan on as stated above, and tightened all the bolts down in a criss-cross fashion--definitely did not torque them down, but just good enough to squeeze a little bit of the FIPG out the side. We will see what the story is when I fill up the engine for the cam break in.
I have the valve cover off and the engine set to TDC i think: rotor is at 11 o'clock; the correct rockers are loose as per FSM, and the cam sprocket looks like this--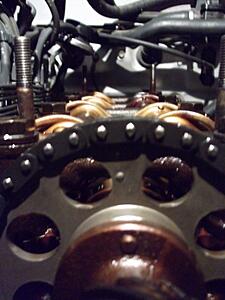
dowel mark at 12 and chain dimples are slightly to the left--though the bright link isn't there, had read that it would be.
Rockers are here tomorrow from Putney's. Hoping to get it all done tomorrow. Not pulling the head, so the radiator and the block are drained, and I am going to leave the hidden bolt under the dizzy driveshaft, along with ratchet strapping the head down to the frame.
Got some Hy-per Lube zinc-additive for the cam break in, along with assembly lube. I am putting in the EB 268, though after reading some threads on cam timing etc. it looks like the 261 is more of what I was looking for (I would love to have some extra on the hills and on the freeway). We will see how it goes with my stock head and intake, 4.10 w/ 31" tires, and Flowmaster exhaust, which the PO installed. I am going to try setting the valve lash at EB's recommended .007(I)/.009(E). Though I am wondering with it cold, if I won't tighten it up to .006(I)/.008(E) (but that seems really tight, going to send an email on that one). I was thinking of the folks on YT who set their valves cold, and drop the stock specs to .007/.011 from .008/.012. Blah blah blah. We shall see.
Hoping to find a sweet spot on the timing around 7 BTDC--seems like most people are retarding the time a bit more with these cams. I don't have an adjustable cam sprocket currently, though I did see a used LCE on CL yesterday.
More tomorrow.
AllCammedUp's write up worked swell. Definitely made use of two jacks when getting the differential back together. Left my bottle jack underneath the diff, and moved my floor jack around to push up different parts and line up bolt holes. Torqued everything back to spec--thank you Haynes manual for the quick and easy references.
Learned that the oil pan I got from the salvage yard was off a 22r, not a 22re. How do I know this? Well there is a difference in the pan mating surfaces. The 22r which was meant to have a gasket, has a raised surface, where as the 22re, which is designed for just the FIPG has a series of trenchs to hold the liquid gasket. I got sort of frustrated when I figured this out. I read a few threads about using only FIPG on 22r pans, and it seemed like people had success with it--the gaskets always seem to fail. So I decided to go for it.
Did a dry run without the sealant to see which was the best way to get the pan in:
So I undid it, and cleaned al the holts up with parts cleaner and a wire brush. Then I wiped both the pan and the block mating surfaces down with acetone. I applied Permatex Right Stuff around the hole pan going along the center ridge (since I didn't have those nice pockets). I went around in one continuous bead, and dipped inside of each bolt hole. I then applied a secondary light bead on the outside of the center ridge. Placed a bead on the four corners of the engine block, along the exposed seams (see your FSM or Haynes).
Got the pan on as stated above, and tightened all the bolts down in a criss-cross fashion--definitely did not torque them down, but just good enough to squeeze a little bit of the FIPG out the side. We will see what the story is when I fill up the engine for the cam break in.
I have the valve cover off and the engine set to TDC i think: rotor is at 11 o'clock; the correct rockers are loose as per FSM, and the cam sprocket looks like this--

dowel mark at 12 and chain dimples are slightly to the left--though the bright link isn't there, had read that it would be.
Rockers are here tomorrow from Putney's. Hoping to get it all done tomorrow. Not pulling the head, so the radiator and the block are drained, and I am going to leave the hidden bolt under the dizzy driveshaft, along with ratchet strapping the head down to the frame.
Got some Hy-per Lube zinc-additive for the cam break in, along with assembly lube. I am putting in the EB 268, though after reading some threads on cam timing etc. it looks like the 261 is more of what I was looking for (I would love to have some extra on the hills and on the freeway). We will see how it goes with my stock head and intake, 4.10 w/ 31" tires, and Flowmaster exhaust, which the PO installed. I am going to try setting the valve lash at EB's recommended .007(I)/.009(E). Though I am wondering with it cold, if I won't tighten it up to .006(I)/.008(E) (but that seems really tight, going to send an email on that one). I was thinking of the folks on YT who set their valves cold, and drop the stock specs to .007/.011 from .008/.012. Blah blah blah. We shall see.
Hoping to find a sweet spot on the timing around 7 BTDC--seems like most people are retarding the time a bit more with these cams. I don't have an adjustable cam sprocket currently, though I did see a used LCE on CL yesterday.
More tomorrow.
Last edited by Smelliottkuhn; 02-22-2011 at 08:38 PM.
02-21-2011, 06:12 PM
#5
Registered User
Learned that the oil pan I got from the salvage yard was off a 22r, not a 22re. How do I know this? Well there is a difference in the pan mating surfaces. The 22r which was meant to have a gasket, has a raised surface, where as the 22re, which is designed for just the FIPG has a series of trenchs to hold the liquid gasket. I got sort of frustrated when I figured this out. I read a few threads about using only FIPG on 22r pans, and it seemed like people had success with it--the gaskets always seem to fail. So I decided to go for it.
It was a year thing I think it was an earlier 22r/22re thing maybe 83-85?? not sure but it's not a 22r vs 22re thing though.
02-21-2011, 06:36 PM
#6
Registered User
You'll like the 268 depending on what you are really doing. The 268 is nice if you like the higher R's it really comes to life about 2500. You will notice a difference coming off idle as well. If you like to play in the lower R's the 261 would have been a better cam. I rarely go over 3300 sometimes I hit 3500 so for me I should have taken the 261 but I do like the 268. Someday I'll change it again.
As for the valves set them cold to EB spec's then at the 500 mile mark retorque the head do this warm so then you can readjust the valves.
Your timing seems alright but I'd keep it about 5 instead of 7. You should not need an adjustable cam sprocket.
The larger exhaust will also help out.
When I first tore into mine I had stock exhaust and it ran really poorly. When the HG went I had put in the 268, then a little later a 2.5" exhaust. Later I installed the Street R/V Head. With every mod I noticed a difference, how much I don't know but I know I have a lot more behind her now than when I did.
If I were you I'd also send the injectors to WitchHunter also, should have them back in about a week or so if you can wait that long. I think it's like $75.00 or something like that for the 4 of them.
Also plugs, cap, rotor, and wires while your doing it. NGK plugs are what I like, others do some don't.
Just some thoughts...
02-21-2011, 07:12 PM
#7
Registered User
Thread Starter
Join Date: Jun 2009
Location: Los Angeles, Ca
Posts: 63
Likes: 0
Received 0 Likes
on
0 Posts
Thanks for thoughts man: plugs, cap, rotor and wires, Check!
As for the cam, I definitely feel like the 261 would have fit more my style, but like you said, someday I will swap it. For the meantime it will be nice to see how the engine responds to the 268.
I was planning on given the head bolts a retorque along with another valve adjustment at the end of the cam break in, and I will do it then again at 500.
I will go ahead and and stay with 5 BTDC.
I should have done the injectors a week ago, unfortunately I need to get the runner back up and going.
You'll like the 268 depending on what you are really doing. The 268 is nice if you like the higher R's it really comes to life about 2500. You will notice a difference coming off idle as well. If you like to play in the lower R's the 261 would have been a better cam. I rarely go over 3300 sometimes I hit 3500 so for me I should have taken the 261 but I do like the 268. Someday I'll change it again.
As for the valves set them cold to EB spec's then at the 500 mile mark retorque the head do this warm so then you can readjust the valves.
Your timing seems alright but I'd keep it about 5 instead of 7. You should not need an adjustable cam sprocket.
The larger exhaust will also help out.
When I first tore into mine I had stock exhaust and it ran really poorly. When the HG went I had put in the 268, then a little later a 2.5" exhaust. Later I installed the Street R/V Head. With every mod I noticed a difference, how much I don't know but I know I have a lot more behind her now than when I did.
If I were you I'd also send the injectors to WitchHunter also, should have them back in about a week or so if you can wait that long. I think it's like $75.00 or something like that for the 4 of them.
Also plugs, cap, rotor, and wires while your doing it. NGK plugs are what I like, others do some don't.
Just some thoughts...
As for the valves set them cold to EB spec's then at the 500 mile mark retorque the head do this warm so then you can readjust the valves.
Your timing seems alright but I'd keep it about 5 instead of 7. You should not need an adjustable cam sprocket.
The larger exhaust will also help out.
When I first tore into mine I had stock exhaust and it ran really poorly. When the HG went I had put in the 268, then a little later a 2.5" exhaust. Later I installed the Street R/V Head. With every mod I noticed a difference, how much I don't know but I know I have a lot more behind her now than when I did.
If I were you I'd also send the injectors to WitchHunter also, should have them back in about a week or so if you can wait that long. I think it's like $75.00 or something like that for the 4 of them.
Also plugs, cap, rotor, and wires while your doing it. NGK plugs are what I like, others do some don't.
Just some thoughts...
Trending Topics
02-21-2011, 07:13 PM
#8
Registered User
Thread Starter
Join Date: Jun 2009
Location: Los Angeles, Ca
Posts: 63
Likes: 0
Received 0 Likes
on
0 Posts
So its not a 22r/22re thing... good to know. Wish I had known about this small detail in pan choice prior to purchasing, but so it goes.
Last edited by Smelliottkuhn; 02-21-2011 at 07:15 PM.
02-22-2011, 08:09 PM
#9
Registered User
Thread Starter
Join Date: Jun 2009
Location: Los Angeles, Ca
Posts: 63
Likes: 0
Received 0 Likes
on
0 Posts
Cam installed
OK, so my freakin' rocker assembly is still not here from Putney's, but I decided to go ahead and install the EB 268 cam today.
Zip tied the chain to the cam sprocket. Put the tranny in 5th, and got the cam bolt loose with barely moving it out of TDC--rotated it back into place from the crank bolt. Slid of the cam gear and bungeed it to the hood.
Next, as per the Haynes manual and Josh Carleson's write up on "22r Cam Install" on 4x4Wire, I began backing off the head bolts in the pattern described, at about 1/4 turn a piece. They all backed off easily except for the bolt that was between the damaged 3 & 4 exhaust rockers--I literally had to rotate it out the entire way--it was dirty and covered in grease. Also, after I initially began backing it out, there was a slight bubbling escaping between the flanged head bolt and the rocker arm mating surface.
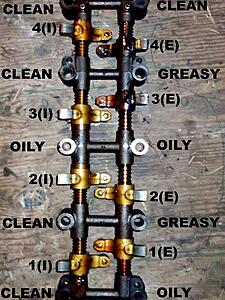
The head bolts were not uniform in their condition. Check the pictures below. I rotated the rockers outwards so the pads were visible (3&4(E) were ugly), but the assembly is right side up, and appears as it would if you were facing the engine block from the front of the truck. I wrote in the respective valves next to each rocker, and next to the bolt holes I noted the condition of the head bolts. Some were clean, some were oily, and some were greasy:
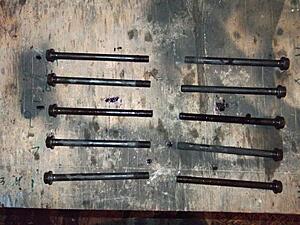
Here are the actual head bolts laid out in order (bottom of picture is the front of the block):
I had an exhaust leak at the same area of the fried 3&4 Exhaust Rockers, and the difficult greasy head bolt--any chance that the heat/exhaust escaping in that area, caused the deterioration of those components?
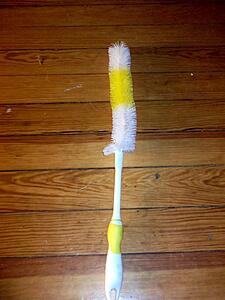
Anywho, I snagged a toilet bowl washer for $2 at Walgreens, cut the loop, and I am going to trim down the bristles, to use this for cleaning out the head bolt holes:
I installed the new EB 268 cam, and applied a liberal amount of assembly lube to all the lobes and bearing surfaces (they looked good). Torqued the journal bolts down to 14ft/lbs, and checked for any binding, while rotating the cam around--it felt nice and smooth. I should check the cam end play tomorrow. Here is a pic, with the cam sprocket zip-tied and suspended, and the new EB 268 in place:

Left it like that for the night. Hope the rockers are here by the time I get back from work tomorrow. Got the new cap, rotor, plugs, and wires at the ready.
Zip tied the chain to the cam sprocket. Put the tranny in 5th, and got the cam bolt loose with barely moving it out of TDC--rotated it back into place from the crank bolt. Slid of the cam gear and bungeed it to the hood.
Next, as per the Haynes manual and Josh Carleson's write up on "22r Cam Install" on 4x4Wire, I began backing off the head bolts in the pattern described, at about 1/4 turn a piece. They all backed off easily except for the bolt that was between the damaged 3 & 4 exhaust rockers--I literally had to rotate it out the entire way--it was dirty and covered in grease. Also, after I initially began backing it out, there was a slight bubbling escaping between the flanged head bolt and the rocker arm mating surface.
The head bolts were not uniform in their condition. Check the pictures below. I rotated the rockers outwards so the pads were visible (3&4(E) were ugly), but the assembly is right side up, and appears as it would if you were facing the engine block from the front of the truck. I wrote in the respective valves next to each rocker, and next to the bolt holes I noted the condition of the head bolts. Some were clean, some were oily, and some were greasy:

Here are the actual head bolts laid out in order (bottom of picture is the front of the block):

I had an exhaust leak at the same area of the fried 3&4 Exhaust Rockers, and the difficult greasy head bolt--any chance that the heat/exhaust escaping in that area, caused the deterioration of those components?
Anywho, I snagged a toilet bowl washer for $2 at Walgreens, cut the loop, and I am going to trim down the bristles, to use this for cleaning out the head bolt holes:

I installed the new EB 268 cam, and applied a liberal amount of assembly lube to all the lobes and bearing surfaces (they looked good). Torqued the journal bolts down to 14ft/lbs, and checked for any binding, while rotating the cam around--it felt nice and smooth. I should check the cam end play tomorrow. Here is a pic, with the cam sprocket zip-tied and suspended, and the new EB 268 in place:

Left it like that for the night. Hope the rockers are here by the time I get back from work tomorrow. Got the new cap, rotor, plugs, and wires at the ready.
Last edited by Smelliottkuhn; 02-22-2011 at 08:11 PM.
02-23-2011, 11:33 AM
#11
Registered User
Thread Starter
Join Date: Jun 2009
Location: Los Angeles, Ca
Posts: 63
Likes: 0
Received 0 Likes
on
0 Posts
 02-23-2011, 11:08 PM
#13
Registered User
Thread Starter
Join Date: Jun 2009
Location: Los Angeles, Ca
Posts: 63
Likes: 0
Received 0 Likes
on
0 Posts
Head Off!
Question 1: I have the timing chain zip-tied to the cam sprocket from when I set it to TDC. At some point during head removal, perhaps when I was disconnecting the power steering pump, I rotated the engine backwards to about 8 BTDC. With the head off, can I rotate the crank back to TDC? Also, do I need to keep tension on the chain, or can I let it is just rest on the TC guides?
02-24-2011, 02:58 AM
#14
YotaTech Milestone-Two Millionth Post
hey...I think I can answer that.
assuming that the timing chain was in the right spot on the lower gear (@ the crankshaft) when you pull tension on it , the chain should remain in the same spot.......BUT....now that you've moved the crank, in my opinion, there is a good chance that the chain has come off.
when I did mine, I had the link lined up on the crankshaft gear and THEN wedged the upper gear and then put tension on it when I put the head on.
it's tricky business, but it can be done......but your concern / my concern is whether or not the chain moved off it's mark down below. I guess if you are confident in how you did it, you are the only one that can make that call....my humble opinion.
hey....if you didn't trip across it already, my thread (THREAD B in my sig) has lots of pictures for this job and I may have others that did not get included there......you can hit me up and I'll see if I have what you need.
By the way....good job on removing the head,, you'll be much happier / confident, that you did.
02-24-2011, 05:41 AM
#15
Registered User
I don't think the chain can slip off the lower sprocket/crank. I would however keep it bungee strapped to the top and keep it taunt.
Good thing you decided to pull the head...Found your leak.
Good thing you decided to pull the head...Found your leak.
02-24-2011, 07:17 PM
#16
Registered User
Thread Starter
Join Date: Jun 2009
Location: Los Angeles, Ca
Posts: 63
Likes: 0
Received 0 Likes
on
0 Posts
hey...I think I can answer that.
assuming that the timing chain was in the right spot on the lower gear (@ the crankshaft) when you pull tension on it , the chain should remain in the same spot.......BUT....now that you've moved the crank, in my opinion, there is a good chance that the chain has come off.
when I did mine, I had the link lined up on the crankshaft gear and THEN wedged the upper gear and then put tension on it when I put the head on.
it's tricky business, but it can be done......but your concern / my concern is whether or not the chain moved off it's mark down below. I guess if you are confident in how you did it, you are the only one that can make that call....my humble opinion.
hey....if you didn't trip across it already, my thread (THREAD B in my sig) has lots of pictures for this job and I may have others that did not get included there......you can hit me up and I'll see if I have what you need.
By the way....good job on removing the head,, you'll be much happier / confident, that you did.
assuming that the timing chain was in the right spot on the lower gear (@ the crankshaft) when you pull tension on it , the chain should remain in the same spot.......BUT....now that you've moved the crank, in my opinion, there is a good chance that the chain has come off.
when I did mine, I had the link lined up on the crankshaft gear and THEN wedged the upper gear and then put tension on it when I put the head on.
it's tricky business, but it can be done......but your concern / my concern is whether or not the chain moved off it's mark down below. I guess if you are confident in how you did it, you are the only one that can make that call....my humble opinion.
hey....if you didn't trip across it already, my thread (THREAD B in my sig) has lots of pictures for this job and I may have others that did not get included there......you can hit me up and I'll see if I have what you need.
By the way....good job on removing the head,, you'll be much happier / confident, that you did.
As for the cam--I rotated the crank back to TDC, and when I pulled the cam sprocket up with the bungee, it had moved back to a 12 o'clock position (the notch in the pulley that is). I think since I ziptied the chain to the cam sprocket, the chain has no option on the lower end but to fall in line...I hope.
Thanks again for all your help!
02-24-2011, 07:39 PM
#17
Registered User
Thread Starter
Join Date: Jun 2009
Location: Los Angeles, Ca
Posts: 63
Likes: 0
Received 0 Likes
on
0 Posts
Here is the head--a lot of carbon on all four cylinders--what does this mean? What do y'all recommend for cleaning things up?
 02-25-2011, 02:18 AM
#18
YotaTech Milestone-Two Millionth Post
brake cleaner and lots of it for cleaning. the FSM shows using a tool that almost looks like a chisel.....I used razor blades.....something you will get a feel for using it's a tedious process.....same kinda tedious process for cleaning out the head bolt holes and the block surface but is very important.
02-25-2011, 02:24 AM
#19
YotaTech Milestone-Two Millionth Post
another thing....and I believe I'm totally correct, but the others can chime in.....looks like you did NOT have a head gasket leak into the cylinders.....from what I've read, the piston top would be shiney and clean from the "steam cleaning" that it would be getting. Ill call that a good thing. now as far as where you were leaking, not sure of the reason for seeing the coolant you did.....perhaps still head gasket, but leaking to the outside of the head rather than into the head (if that's possible).
as far as the chain concern.......what I would do, in order to not have to take the timing cover off would be to "dry run" the head (put the head on minus the gasket and see if you can get the chain on the cam gear correctly)......again, someone with more experience than me should chime in.......and LUMPY has experience in that department.
as far as the chain concern.......what I would do, in order to not have to take the timing cover off would be to "dry run" the head (put the head on minus the gasket and see if you can get the chain on the cam gear correctly)......again, someone with more experience than me should chime in.......and LUMPY has experience in that department.
02-25-2011, 03:27 AM
#20
Registered User
those conditions of the head bolts are normal. Some of those bolts go through oil passages in the block. So oil and carbon on those bolts is normal.
And Jerry remember he had coolant leaking at the back of the head. So if the it was the headgasket leaking then the coolant was going outside of the engine and not to the cyl's.
Although uncommon for a headgasket to leak outside of the engine, it's possible. Had that happen to our 2.2 cavalier.
And Jerry remember he had coolant leaking at the back of the head. So if the it was the headgasket leaking then the coolant was going outside of the engine and not to the cyl's.
Although uncommon for a headgasket to leak outside of the engine, it's possible. Had that happen to our 2.2 cavalier.


