My 87 Toyota 4X4 or Fun and mysteries of restoring a Toyota 4X4 that is a "gem"
 02-11-2015, 04:00 PM
#21
Registered User
Thread Starter

Pedals are basically same height. Pedal does not move after initial pressure put on it. Is it possible to have a bad MC causing no rear brakes? If so how would I test for it?
How would I bleed an already install MC?
grey
How would I bleed an already install MC?
grey
 02-11-2015, 04:40 PM
#22

If you have a firm pedal then I'd suspect the LSPV is out of adjustment or faulty. If you don't have a firm pedal, you can re-bleed the master by cracking the lines slightly loose while someone presses the pedal, tighten them before they release it, then bleed at all wheels to make sure all air is out of the system. Again, check to see if PO cranked on the park brake cable adjuster to adjust rear brakes, I've seen it done many times.
02-11-2015, 06:05 PM
#23
Registered User
Thread Starter
Meant to ask what you meant by, "see if PO cranked on the park brake cable adjuster to adjust rear brakes" Where on the park brake adjuster it seem I have more then one location that can be adjusted.
grey
grey
02-11-2015, 07:12 PM
#24
Registered User
Thread Starter
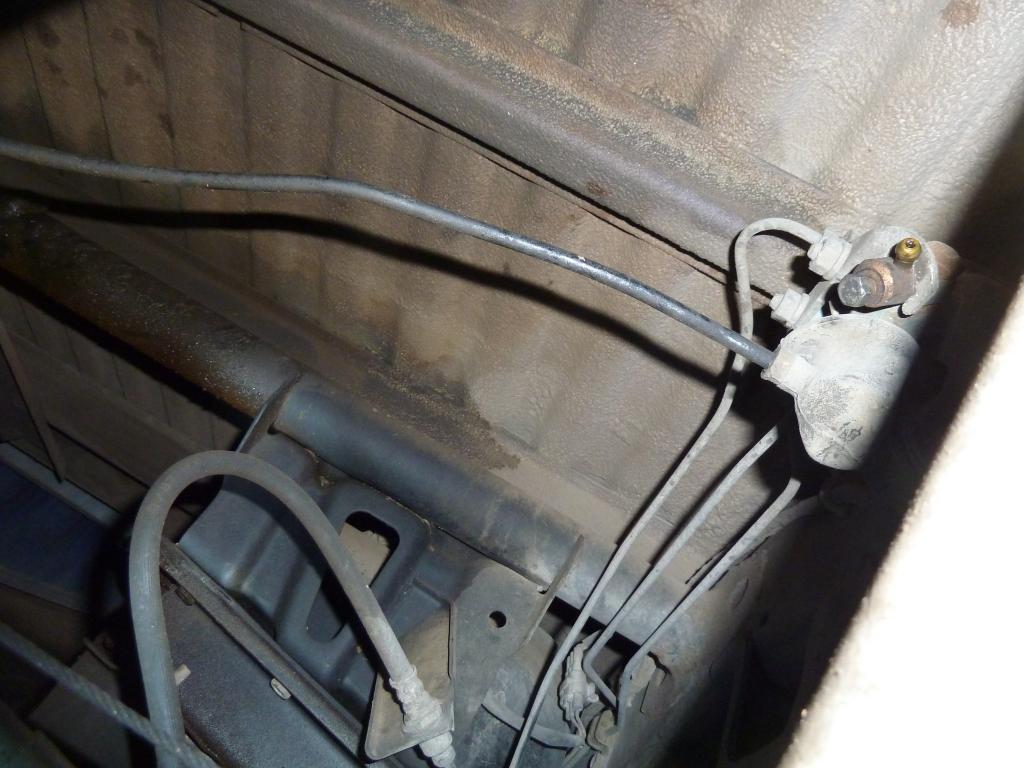
I just crawled under the truck to look at the LSPV and it is all the way up against the stop, could that be my problem? My sensor arm comes out of the LSPV towards the differential then takes a curve matching the spare tire then straightens out as it gets to the anchor on the axle.
The arm on my truck looks like it has been bent to me, does it look like the arm has been bent to anyone else? What is the arm supposed to look like untouched?
Here is the LSPV from the behind.
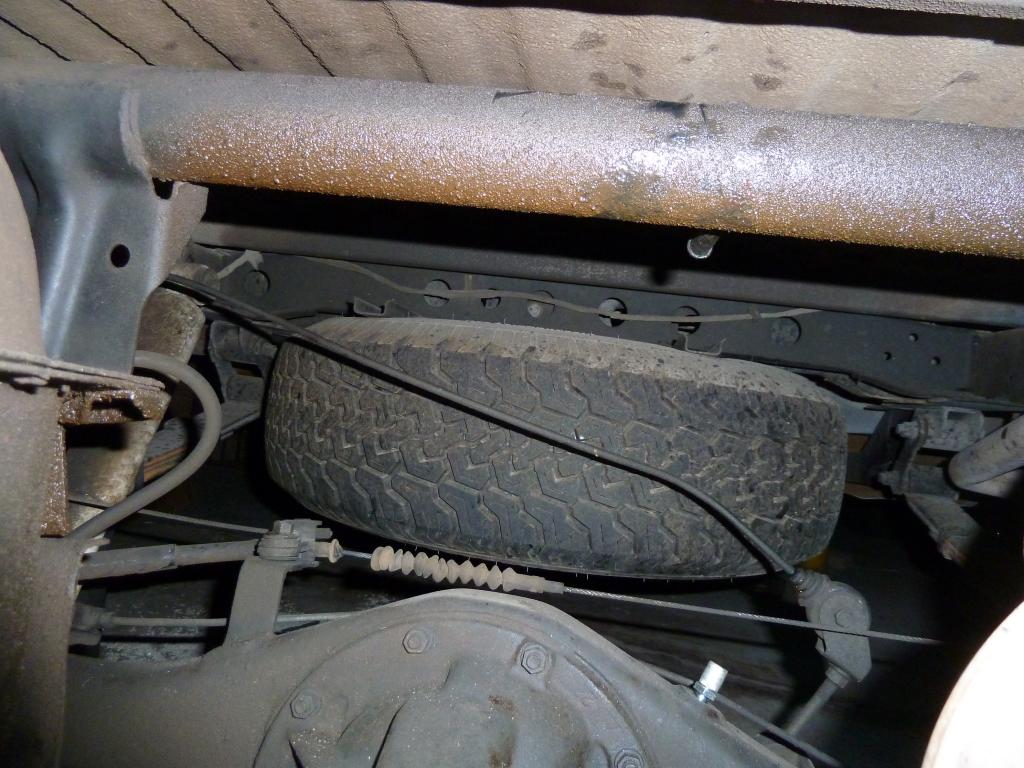
This is the LSPV as the arm comes by the spare tire:
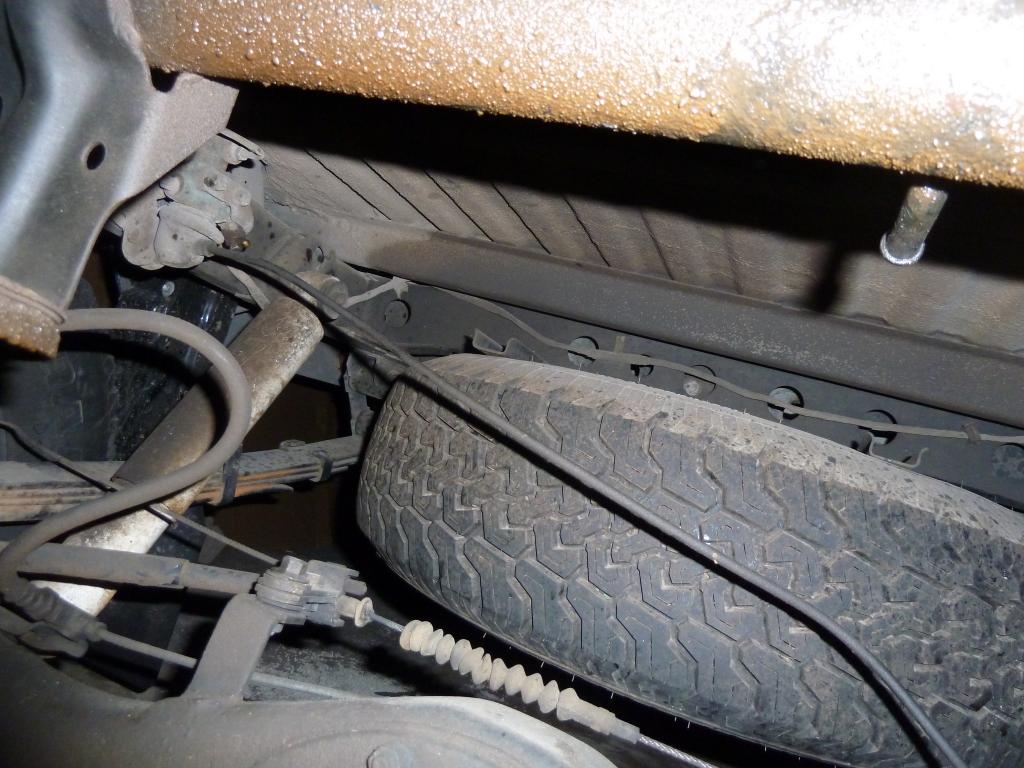
This is the LSPV arm connecting to the anchor:
The arm on my truck looks like it has been bent to me, does it look like the arm has been bent to anyone else? What is the arm supposed to look like untouched?
Here is the LSPV from the behind.

This is the LSPV as the arm comes by the spare tire:

This is the LSPV arm connecting to the anchor:
 02-12-2015, 07:16 AM
#25

If it looks like it's been messed with, loosen it, readjust the rear brakes at the star adjusters, then tighten it until your park brake feels normal.
02-12-2015, 07:20 AM
#26
On your LSPV, the correct way to adjust it is to use pressure gauges. Perhaps some of these links will help.
https://www.yotatech.com/forums/f116...stions-146099/
https://www.yotatech.com/forums/f116...g-valve-84153/
https://www.yotatech.com/forums/f116...stions-146099/
https://www.yotatech.com/forums/f116...g-valve-84153/
02-12-2015, 09:05 AM
#27
Registered User
Thread Starter
As I sit here it occurs to me that the sensing arm is bent up and my LSPV is in the max rear brake mode. If I crawl under the truck and wiggle the arm at the LSPV I hear a clunk if I try to move it up (it is topped out.) And yet I have virtually no rear brakes. So the main task at hand is returning functionality of my rear brakes so when I stand on them they lock up on dirt road. Once I have rear brakes I can consider the LSPV.
I will take a look at the E-brake adjustment, thank you for the picture.
grey
I will take a look at the E-brake adjustment, thank you for the picture.
grey
02-12-2015, 11:26 AM
#28
Registered User
Thread Starter
It appears that the E brake cable has not been adjusted, it is adjusted to the middle of the adjustment.
On the backing plate the bell crank stopper has quite a gap from the backing plate. My manual tells me to tighten it down to take the play out and then back it off one turn. To do this requires me to run the bolt down to with in 1/4" of being all the way in. This is true on both side. Is there supposed to be a pad or stopper or something screwed on to the end of this bolt?
Right now I have the threaded end of the bolt against the backing plate. The first picture is the driver's side that I have not done anything with yet and the 2nd picture is the passenger's side that I have taken the bolt down to touch and then backed out one full turn. Is something missing here?
grey
02-12-2015, 06:39 PM
#29
Registered User
Thread Starter
I bled the MC like a bench bleed placing my thumbs over the brake line ports and during the process I discovered I have no pressure on the port for the rear wheels. So tomorrow I install a new master cylinder. I'll let you know what I find.
grey
grey
02-15-2015, 09:39 AM
#30
Registered User
Thread Starter
Installed new MC and bled system...
Installed new MC and bled system, but was really short on brake fluid so I could not bleed them as much as I would have liked. I can lock up all four wheels on the dirt road, but my pedal is not right yet. I still have way too much pedal travel. Seems like the brakes grab. The brakes are a lot more sensitive and has softer pedal then my 94 corolla.
grey
grey
02-18-2015, 08:49 PM
#31
Registered User
Thread Starter
Procedure to set the bellcrank stopper bolt?
What is the proper procedure to set the bellcrank stopper for the self adjusters? I am having a hard time getting them not to over tighten. My Haynes book says to screw in all the way in until there is no play in the linkage and back off one full turn. My Factory Service Manual for my 1985 2x4 says to leave a gap between .039" - .078" between adjustment bolt and backing plate. Problem is I am working on a 1987 4x4 and I don't have a manual for it.
These brakes are driving me nuts!!!! The previous owner couldn't get the rear brakes working so he bent the load sensing rod on the LSPV to utilize full rear brakes. He messed with the adjusters so I could pull the parking brake and adjust the rear brakes to the point that they locked the rear brakes solid! He also cranked the booster push-rod all the way in and cinched it so tight I thought it was going to shear off on me when I was trying to get it loose and adjust out. Turns out it was a bad master cylinder all a long!
grey
These brakes are driving me nuts!!!!
The previous owner couldn't get the rear brakes working so he bent the load sensing rod on the LSPV to utilize full rear brakes. He messed with the adjusters so I could pull the parking brake and adjust the rear brakes to the point that they locked the rear brakes solid! He also cranked the booster push-rod all the way in and cinched it so tight I thought it was going to shear off on me when I was trying to get it loose and adjust out. Turns out it was a bad master cylinder all a long!grey
Last edited by greyheadedguy; 04-26-2017 at 07:32 PM.
02-19-2015, 06:16 AM
#32
In this order...
1- Loosen the main parking brake cable adjuster
2- loosen the bellcrank adjusters
3- adjust rear brakes at starwheel so drum fits snugly but still turns by hand
4- adjust bellcrank adjusters
5- adjust main cable adjuster.
That should get the rears adjusted properly.
1- Loosen the main parking brake cable adjuster
2- loosen the bellcrank adjusters
3- adjust rear brakes at starwheel so drum fits snugly but still turns by hand
4- adjust bellcrank adjusters
5- adjust main cable adjuster.
That should get the rears adjusted properly.
Last edited by bswarm; 02-19-2015 at 06:50 AM.
02-19-2015, 02:30 PM
#33
Registered User
Thread Starter
In this order...
1- Loosen the main parking brake cable adjuster
2- loosen the bellcrank adjusters
3- adjust rear brakes at starwheel so drum fits snugly but still turns by hand
4- adjust bellcrank adjusters
5- adjust main cable adjuster.
That should get the rears adjusted properly.
1- Loosen the main parking brake cable adjuster
2- loosen the bellcrank adjusters
3- adjust rear brakes at starwheel so drum fits snugly but still turns by hand
4- adjust bellcrank adjusters
5- adjust main cable adjuster.
That should get the rears adjusted properly.
As much as this brake system is new to me (big difference between this and my old 85) lets bring it down to the level of "How to keep your Toyota alive for the complete idiot!" I have had a Toyota truck for over 15 years and I have never had this kind of trouble with brakes...
I get steps 1 - 3
1- Loosen the main parking brake cable adjuster
2- loosen the bellcrank adjusters
3- adjust rear brakes at starwheel so drum fits snugly but still turns by hand
Step 4 is where I have problems: How do I adjust the Bellcrank properly? Do I take it down to remove all the play or is there a set gap I should have and if so what is it?
Step 5 Adjust main cable adjuster. So I adjust this so my parking brake travels no more the 15 clicks and no less the 7, correct?
grey
 02-19-2015, 07:23 PM
#35
Registered User
Thread Starter
I have just learned something interesting. You cannot adjust the Bellcrank adjustment if the shoes are not close to being properly adjusted. Driver's side wheel was much warmer then the passenger's side after driving a ways. I've been checking them every time I get out of the truck after driving. Anyway I adjusted the Bellcrank to the spec given me and the backed off the brakes that were too tight. I reached over to the Bellcrank and wiggled it and it has a bunch of play in it compared to what it was prior loosening the brake shoes.
Tomorrow I'll do a complete going over, couldn't do that today.
Thanks for the help!
grey
Tomorrow I'll do a complete going over, couldn't do that today.
Thanks for the help!
grey
Last edited by greyheadedguy; 02-19-2015 at 07:29 PM.
02-24-2015, 08:58 PM
#36
Registered User
Thread Starter
Brakes still overtightening...
Okay, I thought I had it figured out. I am going to pull the wheels and the drums tomorrow and compare the two sides and see if I put something together wrong. I have the passenger side set right, but the driver's side is tightened all the way down and it is still over tightening. When I did the brakes I replaced all the springs since the ones on the passenger side was packed in sand and everything rusty. The centering nails were almost rusted through.
The driver's side was packed with sand and grease. I replaced both wheel cylinders also. The rest of the hardware looked as good as the passenger's side. I wonder if I got the cables on backwards. One is longer then the other one. Can't think of anything else it can be, unless the bellcrank is warn out and has too much play in it from being packed in grease and sand...
I'll let you know what I find, I'm staying on this because I found too many links that discussed this problem but never mentioned what they did to fix it other then one that replace the vehicle.
grey
Last edited by greyheadedguy; 03-23-2015 at 12:21 AM.
02-26-2015, 09:55 AM
#37
Registered User
Thread Starter
In this order...
1- Loosen the main parking brake cable adjuster
2- loosen the bellcrank adjusters
3- adjust rear brakes at starwheel so drum fits snugly but still turns by hand
4- adjust bellcrank adjusters
5- adjust main cable adjuster.
That should get the rears adjusted properly.
1- Loosen the main parking brake cable adjuster
2- loosen the bellcrank adjusters
3- adjust rear brakes at starwheel so drum fits snugly but still turns by hand
4- adjust bellcrank adjusters
5- adjust main cable adjuster.
That should get the rears adjusted properly.
Okay went through this and I think I may be closer, but I have a problem. The bellcrank on the passenger side is not returning back to the "set" position. I replaced all the springs when I replaced the brake shoes and wheel cylinders. Pulled both drums and checked and both side are put together the same way, but the passenger side will not return right. Any ideas?
03-09-2015, 09:37 PM
#38
Registered User
Thread Starter
I went completely through the brake adjusting set up that bswarm gave me. Somebody did over adjust the parking brake cable on this truck which compounded the problem with the over adjusting of the rear brakes. MY BRAKES ARE NO LONGER OVER TIGHTENING!!!  YEA!!! Thank you everybody that helped me through this pain in the butt.
For those searching, over tightening brakes, rear brakes lock up, rear brakes too tight. How ever you got here looking for help carefully review the steps I was given to adjust the parking brake cable and then adjust the Bellcrank on the backing plate of the rear wheels. This problem can be over come. Let us know if these posts were of any help to you. I know I would not have figured them out without this help.
grey
P.S. On to the next step of my project truck that was just supposed to need an engine, but turned into a project truck.
YEA!!! Thank you everybody that helped me through this pain in the butt.For those searching, over tightening brakes, rear brakes lock up, rear brakes too tight. How ever you got here looking for help carefully review the steps I was given to adjust the parking brake cable and then adjust the Bellcrank on the backing plate of the rear wheels. This problem can be over come. Let us know if these posts were of any help to you. I know I would not have figured them out without this help.
grey
P.S. On to the next step of my project truck that was just supposed to need an engine, but turned into a project truck.
03-23-2015, 12:31 AM
#39
Registered User
Thread Starter
I am now looking for a transmission for my 87 Toyota Pick 4X4 w/ 22R engine. I need a Manual 5 speed here in Tucson, AZ. I put my Transfer case in neutral and slipped the tranny in 1st and slipped out the clutch Fairly quiet, so I did the same in 2nd gear and still fairly quiet. I then went to 3rd and it started to get noisy. Forth gear even louder so finally I put it in 5th and it sounds bad! No way can I take this on the hiway with this tranny, which means I can't take the boys prospecting or myself prospecting until putting a trust worthy tranny in there!
grey
grey


