
I'm goin' in! - 3.0 Head Gasket -tips/tricks welcome
 08-21-2008, 09:24 AM
#1
Registered User
Thread Starter
Join Date: Jul 2007
Location: 26.3 road miles from the AT (VA)
Posts: 347
Likes: 0
Received 0 Likes
on
0 Posts
I'm goin' in! - 3.0 Head Gasket -tips/tricks welcome
Well..
It happened. The HG blew on my 3.0 @ 135K miles. I called Toyota Customer Care and was told my VIN did not qualify for the VO6. My local dealer said they would have covered it if it qualified. Oh well.
I'm fishing for tips and tricks....
So far I've got Friday-Sunday to finish up so barring something strange I should be ok. I've got a place to work, a good set of air/hand tools.
Here is a list of parts I've got so far - let me know if I'm missing something....
Head Gasket Full Set
Head Bolts
Water Pump
Timing Belt
Timing Belt "kit"
upper / lower gaskets for timing belt set
RTV for just in case
PB Blaster
masking tape / markers
white out
wire brush
gasket scraper
metric impact sockets
rounded bolt/nut pullers
digital camera
the "shoptop" pc w/ internet (for yotatech) and the FSM
4 finger wheel/pulley puller
torque wrench
Things left to purchase:
new breaker bar
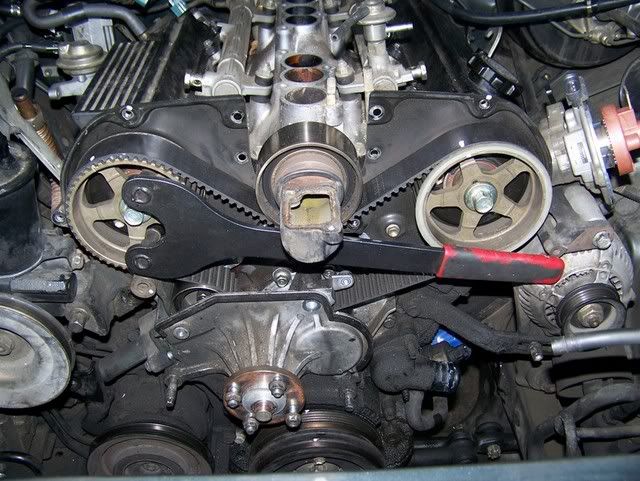
cam pulley holder- that handle looking thing (can I use this on the crank pulley too?)
new rags, oil antifreeze ect.
Anything else I need to buy that would make my life easier? Tips to make this easier? Anyone else take the hood off for this job?
It happened. The HG blew on my 3.0 @ 135K miles. I called Toyota Customer Care and was told my VIN did not qualify for the VO6. My local dealer said they would have covered it if it qualified. Oh well.
I'm fishing for tips and tricks....
So far I've got Friday-Sunday to finish up so barring something strange I should be ok. I've got a place to work, a good set of air/hand tools.
Here is a list of parts I've got so far - let me know if I'm missing something....
Head Gasket Full Set
Head Bolts
Water Pump
Timing Belt
Timing Belt "kit"
upper / lower gaskets for timing belt set
RTV for just in case
PB Blaster
masking tape / markers
white out
wire brush
gasket scraper
metric impact sockets
rounded bolt/nut pullers
digital camera
the "shoptop" pc w/ internet (for yotatech) and the FSM
4 finger wheel/pulley puller
torque wrench
Things left to purchase:
new breaker bar
cam pulley holder- that handle looking thing (can I use this on the crank pulley too?)
new rags, oil antifreeze ect.
Anything else I need to buy that would make my life easier? Tips to make this easier? Anyone else take the hood off for this job?
 08-21-2008, 09:25 AM
#2
Registered User
Toyota Red Coolant
Copper Spray
I haven't personally done a head gasket on the 4runner (*knocks on wood*) but you may want to check into the FSM to see if there is a certain way that you need to tighten down/torque the head studs like a certain pattern that needs to be followed. I know after a couple of trips around town you sometimes have to go back in and re-torque the head studs as well.
Last edited by BoostinChick; 08-21-2008 at 09:27 AM.
08-21-2008, 09:25 AM
#3
Registered User
Join Date: Mar 2008
Location: Chico, California
Posts: 3,870
Likes: 0
Received 0 Likes
on
0 Posts
Yea mine isn't under the recall so im hoping it doesn't blow. Sorry no tips from me, haven't done one yet
3.4 swap time? thats what i plan on doing eventually
3.4 swap time? thats what i plan on doing eventually
08-21-2008, 09:35 AM
#4
Registered User
Thread Starter
Join Date: Jul 2007
Location: 26.3 road miles from the AT (VA)
Posts: 347
Likes: 0
Received 0 Likes
on
0 Posts
3.4 swap time...don't I wish. I passed on a running wrecked 3rd Gen last month....too bad because all told parts are going to run close to $500 bucks. (gasket set, timing belt, timing kit, timing gaskets, plugs, cleaner, antifreeze, oil dumb stuff I forget....)
08-21-2008, 09:57 AM
#5
Well i can offer this- I don't know what the FSM says about disassembly, but I found that the pass side exhaust manifold nuts and the nuts for that side of the crossover are very hard to get at. Instead of messing with them, I left both the manifold and the crossover bolted to that head. If you pull the driver's side head first, you can get the passenger side head to come out with the manifold and crossover still attached. I never did remove them from the head, but it made manipulating it in order to clean the surface of the head a little harder. If you are sending the heads to a machine shop for any work, obviously you will want to remove them, but it is much easier on the workbench than in the vehicle.
Just be sure to take lots of pictures of the vac lines and label them before removing them from the intake manifold. Assembly is really pretty easy if you can refer to some good pictures.
I'm not sure what the cam pulley holder thing is, but I didn't use one and I was able to do the job just fine. The camshafts have a hex portion that can be used for a backup wrench when torqueing the pulley nuts. I'm not sure if that is what the tool is for, but I really don't think you need it. It is your project though, so do what you feel is right.
Last edited by zlathim; 08-21-2008 at 10:14 AM.
08-21-2008, 10:03 AM
#6
Toyota Red Coolant
Copper Spray
I haven't personally done a head gasket on the 4runner (*knocks on wood*) but you may want to check into the FSM to see if there is a certain way that you need to tighten down/torque the head studs like a certain pattern that needs to be followed. I know after a couple of trips around town you sometimes have to go back in and re-torque the head studs as well.
Copper Spray
I haven't personally done a head gasket on the 4runner (*knocks on wood*) but you may want to check into the FSM to see if there is a certain way that you need to tighten down/torque the head studs like a certain pattern that needs to be followed. I know after a couple of trips around town you sometimes have to go back in and re-torque the head studs as well.
08-21-2008, 10:42 AM
#7
Registered User
Thread Starter
Join Date: Jul 2007
Location: 26.3 road miles from the AT (VA)
Posts: 347
Likes: 0
Received 0 Likes
on
0 Posts
Trending Topics
08-21-2008, 10:58 AM
#8
Registered User
Thread Starter
Join Date: Jul 2007
Location: 26.3 road miles from the AT (VA)
Posts: 347
Likes: 0
Received 0 Likes
on
0 Posts
 08-21-2008, 11:17 AM
#9
Registered User
Last time I did a head (and again not on the 4runner) I used zip ties to line up the belt with the timing marks. That tool just looks like it holds it in place as you are to bolt the cam sprockets back on and to help with putting the belt back on.
08-21-2008, 11:48 AM
#10
I just used my impact to remove the cam gears, but if it makes you feel better to get the tool, by all means get it. I certainly don't want to persuade someone to do something other than the "right" way, but I'll tell you how I made it happen and you can decide from there.
Last edited by zlathim; 08-21-2008 at 12:05 PM.
08-21-2008, 12:11 PM
#11
Registered User
Thread Starter
Join Date: Jul 2007
Location: 26.3 road miles from the AT (VA)
Posts: 347
Likes: 0
Received 0 Likes
on
0 Posts
I just used my impact to remove the cam gears, but if it makes you feel better to get the tool, by all means get it. I certainly don't want to persuade someone to do something other than the "right" way, but I'll tell you how I made it happen and you can decide from there.
08-21-2008, 12:21 PM
#12
There are flats on the cam itself, between the lobes that you can apply a backer wrench to in order to hold it for torqueing. The tool that you posted a picture of is way easier for sure, but it can be done without it. This photo is of a 3RZFE, but it shows how I used a crescent and a piece of oak trim to hold the camshaft using the flats. The 3VZE has the same flats on the camshafts. It looks ghetto, but it worked just fine:
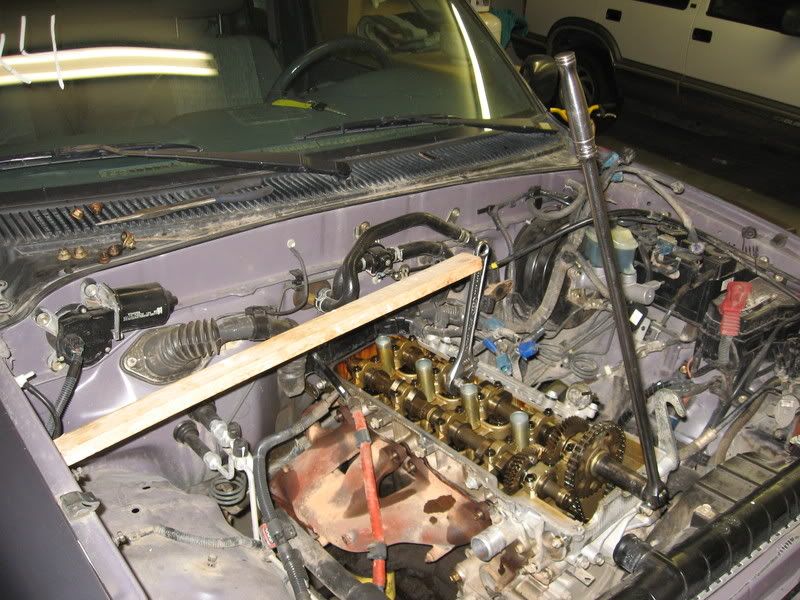
Last edited by zlathim; 08-21-2008 at 12:23 PM.
08-21-2008, 01:26 PM
#13
Registered User
The only other thing I can think of would be a word of caution. Be careful when loosening the cams. Try to get the tension off the lobes/valve buckets. If you don't, you run the risk of cracking the cam.
I know there's some details I'm missing here, but it seems there's a thread about it from long ago by the Wabbit. I'll see if I can find it.
I know there's some details I'm missing here, but it seems there's a thread about it from long ago by the Wabbit. I'll see if I can find it.
08-21-2008, 01:32 PM
#14
The only other thing I can think of would be a word of caution. Be careful when loosening the cams. Try to get the tension off the lobes/valve buckets. If you don't, you run the risk of cracking the cam.
I know there's some details I'm missing here, but it seems there's a thread about it from long ago by the Wabbit. I'll see if I can find it.
I know there's some details I'm missing here, but it seems there's a thread about it from long ago by the Wabbit. I'll see if I can find it.
08-21-2008, 02:13 PM
#15
Registered User
Well, I can't find the stinking thread. I suppose I'll have to contact Wabbit.
Anyway, the cam lobes are in contact with the valve buckets. So, you have to loosen the bearing caps with no tension on the cam. Myself and others have reported damage due to tension still being on the cam while loosening and cracking cam guides. I didn't do this myself, but the rebuilder/PO of my current 3.0 did. I had to replace them.
Engh....I guess this is caution enough. Just be careful.
Last edited by thook; 08-21-2008 at 02:15 PM.
08-21-2008, 02:51 PM
#16
Registered User
Join Date: Jul 2008
Location: EARTH
Posts: 26
Likes: 0
Received 0 Likes
on
0 Posts
tool
I made my tool but if its not a big deal i would get the tool ,dont just try and get by. i made my tool out of a moded puller i had in my shop,and have made many tools being a fabricator for 19 years. but i wish i had money to just buy it.this is a very easy fix used about a 1.5 ft extention with my 18 volt to remove the exaust as a member had said. its hard to get at label vac hoses draw pics whatever works if i were u i would look at 2 things that seem to go on there. fuel reg on the passenger side @ the bell housing,and replace all the injector seals o rings and cups in the manifold while you r there! TRUST ME...ooh i cant recall but i think u just need a simple puller for the crank pulley
08-21-2008, 06:56 PM
#17
Registered User

Join Date: Jul 2007
Location: Canmore AB Canada
Posts: 52
Likes: 0
Received 0 Likes
on
0 Posts
That special tool works 100% for holding both the cams and the crank.
Blast the manifold bolts with lots of PB blaster well in advance.
Make sure you get new injector gaskets/washers.
Also need new fuel rail washers - these didn't come with my kit and they are a mandatory replacement piece when removing rails. I think you need 6 if memory serves.
Assume the timing kit includes the pulleys too?
Consider replacing knock sensor wire - probably really brittle and ready to go by now.
Spend the extra $ and get the heads decked - well worth the peace of mind.
Label all the tiny hoses especially on the passenger side.
I found using little ziplock bags for smaller pieces were really handy.
The best tip i can think of, chase ALL bolt holes with thread chaser or lubed bolts before actually tightening down ANYTHING. Especially the head bolt holes. Take the time and blast them out with compressed air etc to make sure they're clean and will accept the bolts. Again, do this with everything - trust me, there's nothing worse than getting something almost installed realizing that the last bolt is stuck on a tiny piece of something. Speaking from frustrated experience here. LOL
Second best advice, when in doubt - log on to this forum. The guys here are amazing!
Last edited by snelson; 08-21-2008 at 07:07 PM.
08-21-2008, 07:07 PM
#18
Registered User
I realized why I can't find it. Search archives using my username will only let me go back 1k posts, it seems. That sucks. This thread in question dates back further than that. I will have to question Corey about this. That was good thread, too.
Oh, and Wabbit has no recollection of it, either. Says it wasn't him.
Oh, and Wabbit has no recollection of it, either. Says it wasn't him.
08-21-2008, 08:40 PM
#19
Registered User
Join Date: Apr 2006
Posts: 134
Likes: 0
Received 0 Likes
on
0 Posts
What about the dreaded 12 point socket for the headbolts? I think it's either 12 or 14, I'm leaning towards 14mm, but not sure. This was a real pita for me to find in my small town, and if it wasn't for my buddy going through the same thing a few years previous on his honda, I probably woulda been waiting a while to track one down.
I believe bearing caps as mentioned above should be loosened a small bit on each bolt (alternating bolts, obviously) at a time, and this prevents damage to cam. And when tightening back down, same thing, alternating bolts, tightening in small increments. I was using a 1/2" drive torque wrench that was way too big for the 20ft/lbs these require, and it led to me stripping the aluminum threads in my block, causing me to have to remove cam again to heli-coil; not sweet.
I would HIGHLY recommend getting fuel injectors cleaned, serviced, and flow tested, but if you are trying to do this all in a weekend, that might not be an option.
and x2 on knock sensor wire. When I got down to mine, it was cut in half. Good luck
08-22-2008, 05:35 AM
#20
I realized why I can't find it. Search archives using my username will only let me go back 1k posts, it seems. That sucks. This thread in question dates back further than that. I will have to question Corey about this. That was good thread, too.
Oh, and Wabbit has no recollection of it, either. Says it wasn't him.
Oh, and Wabbit has no recollection of it, either. Says it wasn't him.
It is a 12mm 12 point bolt head on the head bolts.


