When you click on links to various merchants on this site and make a purchase, this can result in this site earning a commission. Affiliate programs and affiliations include, but are not limited to, the eBay Partner Network.
So I just DIY'd some unmolded carpet into my rig and wanted to impart some lessons learned (the hard way!). I didn't see much about unmolded carpet other than "yes you can do it" and "no it's a bad idea", so here we go. This is a looonng writeup but I wanted to really get into the weeds for anyone looking at doing it.
FAQ
Can I install un-molded carpet into my rig? YES! How hard is it? Very easy, but its not a rush job. Will there be wrinkles? Not if you do it right and take your time. How long will it take? Plan on 4 hours if you want it to look good. Also your cab is going to smell like glue for about 48 hours so keep that in mind. You may want to leave it alone the next day. Can I use house/indoor carpet? NO. The backing won't hold up. Forget it.
Total cost of molded carpet (Stockinteriors.com): $130 incl. shipping
Total cost of unmolded carpet: $40 incl. all supplies
Vinyl floor. Loud as hell and not comfortable.
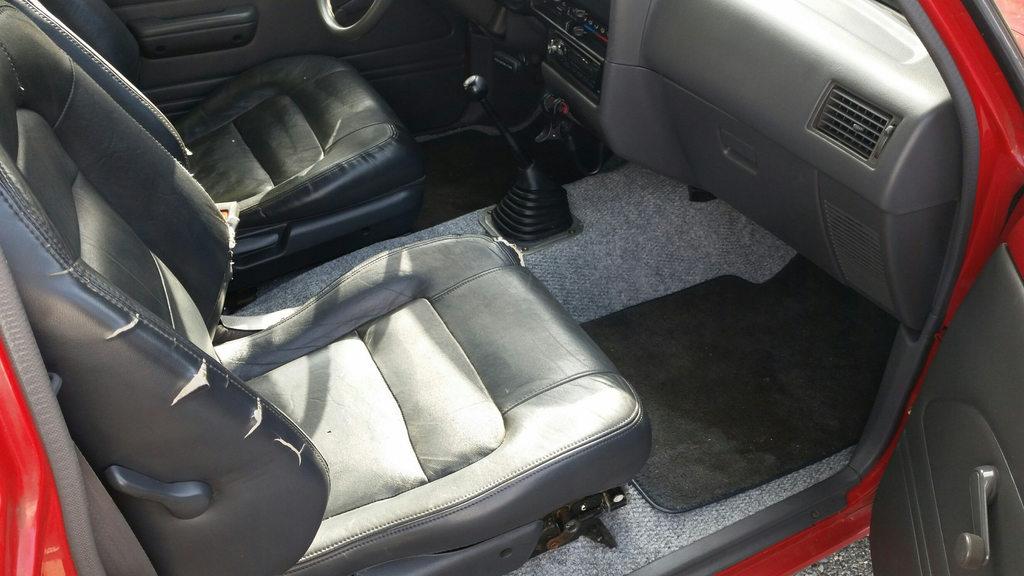
Final Product with OEM mats. Yes my seats are done!
Step 1: Carpet Selection
Go to your big home center of choice and find to the outdoor carpet section (I went to Home Depot). You will need 6'x6' for a standard cab pickup. You could probably get away with 6'x5' but it would be cutting it very close- leave room for mistakes. My particular carpet was $4 per linear foot and you could go cheaper than than, but don't go too cheap. Also grab 1 qt of DAP contact cement and a brush Get the cheap ones you can toss afterwards because they will be gunked up. Finally get some heavy duty shears because you are going to hate life trying to use a razor blade. They cost about $10.
Now some caveats: First, I got the wrong color. I was in a rush and this was all they had, other than Astroturf (tempting...) or the really thin stuff (avoid that). In the end it's grown on me and I dig the contrast now.
Also, I used regular carpet padding underneath my outdoor carpet but this is NOT recommended. My truck is a DD only and sees zero offroad use, plus Im using some nice rubber mats over the carpet, so the padding will not get very wet if at all. If you plan on getting the interior wet either forgo the pad or look at one with the plastic membrane on top. Otherwise it will never dry and either get moldy or rust out the floor, probably both.
Lets talk about sound dampening. Coming from an audio engineer's perspective, all of that peel and stick people put on their floors is really overkill. The carpet itself is going to absorb a lot of high frequency and cut down on any reflections inside the cab. And, since you are bonding it to the cab with glue, any harmonics will be reduced as well. Still, the thicker and denser the material the better so don't buy the really cheap $1 per foot stuff.
Step 2: Remove the Seats
OK, I'm not writing a friggin novel here- lets get to the install. Pull your seats, in my case ratty Craigslist seats I overpaid for. For a bench there will be 4 bolts (14mm?) that go straight through the floor to a welded nut. Go ahead and remove the seatbelt from the floor too, there should be 3 18mm bolts- two on the sides and one in the center. Put the unattached belt ends in the bed to get em out of your way.
Seats Removed
Dont forget all the free money! Thanks, previous owner.
Step 3: Remove Trim and Old Carpet
There are two kick plates in the door jamb and two covers for fuses you'll have to remove. The kick plates have 4 screws each and the covers have one plastic screw each. Unscrew then pry on them a little with a flathead and they'll pop right off. You are going to use these later to mechanically fasten the carpet in addition to hiding the edges.
Remove these....
And these...
Also, go ahead and remove the shift boot. Unscrew the knob. Then if you left the vinyl flooring in like I did just make a cut so you can get to the 4 screws that hold the metal boot retainer place. Be careful not to cut the inner boot! Slide that thing right off.
I hate destroying factory stuff but the vinyl is done for.
Now here's where your install may vary. My truck had vinyl flooring, which I opted to leave in place since A) It will act as extra sound dampener and B) that sucker was glued in there pretty good. You can contact cement right over it with no problems. If you have carpet its probably going to be a lot more work to pull that out and then scrape all that glue from the factory but it shouldnt take too long.
Step 4: Prep
Vacuum out the cab. I know, you've never done that before, but it's going to be ok . Now grab a bucket of warm soapy water and a scrub pad and go to town on the floor. A flexible paint scraper helps here too to get the old glue and crud up. It doesn't have to be perfect but you want to get all the oil and gunk off so the glue can bond to the floor itself and not just dirt. You don't have to scuff up any metal if you don't want to and it will work just fine, just get it decently clean. Wipe down with a rag and let it dry for 30 mins. It must be dry for the glue to work!
This is as far as I cleaned it. Not spotless.
Step 5: Dry Fit
This part is a PITA but essential. It would help if you had another set of hands for sure. Get your carpet of choice into the truck and lay it out as best as possible. It will be a wrinkled mess, but we are going to do some cutting to alleviate that.
First, push the carpet as far forward towards the firewall as you can. You may need to cut the front corners at a 45 first to get it in there. Then square up the carpet to the truck as best as possible. Now, if you follow the 'hump' in the middle of the cab all the way to the firewall you'll notice theres a U shaped vent - trace around that with a sharpie and cut. Push the carpet up until it bunches, then cut out the U area some more. Do it a couple times slowly so as to not cut too much material out and pretty soon it will fit nice and snug up there. Don't go too far forward or you'll interfere with clutch and brake pedals, just enough so no one can see.
Jam that sucker in there. Keep everything square.
Now, the shifter. First, ensure the carpet is squared up. Then mark the location of the shifter with a sharpie. Next, grab a phillips screwdriver and a torch and heat the screwdriver for about 20-30 seconds. When it's pretty hot, carefully push it through the carpet until a hole is formed. This will effectively cauterize the wound if you will and stop any fraying. Now, using scissors, cut a + into the material around that hole so the shifter can fit. Widen if necessary. This makes it easy to remove just a little carpet at a time later on. Also, I used the metal plate that retains the boot over top of the carpet. I found this helped center everything and reduced the amount of precision cutting needed. Plus I kinda like the look.
Smooth out the carpet from the firewall to the shifter. Try and get it to conform to the curves of the floor.
Square up the carpet again.
Now cut your sides. Use the bottom of the scissors as a guide and ride them in the seam between the floor and the wall of the cab. TAKE YOUR TIME. I went too fast on one side and it looks like ****. My fault. Your kick plates and fuse box covers are going to cover up the edges of the carpet where people can see them, make sure to leave enough material.
Dry fit complete. Looks terrible... dont worry!
Step 6: Glue Up
Now comes the moment of truth. Some tips here: Once the floor and carpet have contact cement applied and it sets up they are never coming apart. Because of this glue in thirds- Start at the front of the cab and work your way back. If you try and do it all at once it's going to look like total garbage because once those two pieces mate up you can't adjust anything.
Also, you don't have to glue every square inch. In fact its preferable not to because it will be easier. I glued up by the firewall, the edges, and the walls of the hump in the cab. Basically anything not flat you want to glue, and anything flatish can be left alone. This saves glue, time, and reduces the chance of wrinkles, IMO.
If you have a J-roller, use it, if not you can get by without one just fine. Keep in mind you need about 80lbs of force between the two parts for proper adhesion. And old paint roller will work as well.
The actual process of gluing is pretty straight forward- slather contact cement on the floor. Slather glue on your carpet. Keep the two parts away from each other until the glue has set up (about 10 mins), then carefully lay the carpet down like its a vinyl sticker. Very easy. The key is fitting everything correctly before applying glue.
Step 7: Reassemble
Speaks for itself but before you do so, use the screwdriver and torch trick to make holes for the bolts. It's far easier to do it from underneath the truck so you can see where the bolts used to be. Be careful: contact cement fumes are highly flammable! Keep the torch away anddon't lose your eyebrows.
All in all, unmolded carpet probably isn't much harder than the molded stuff, but its far cheaper. If you're on a tight budget I'd highly recommend giving it a shot. My cab is probably about -6db quiter (which is a lot) plus my tools don't make a bunch of noise banging around and it looks better. Ride seems marginally softer too now that the seats have padding where they mount up. Overall, very worth it.
Or... you could just do what I did and go to a wrecking yard and pull some from a later model in good shape. I got some for $7.50 at a local wrecking yard on their half price day. Not a perfect fit, but a lot cheaper and a whole lot less work... Quick, simple and cheap!
I hope what I said didn't come across as disapproving. I was merely trying to offer another quick simple cheap alternative. I think you did a great job and it was very clearly written and very informative and with great pictures. 😊

 07-20-2016, 09:31 AM


 . Now grab a bucket of warm soapy water and a scrub pad and go to town on the floor. A flexible paint scraper helps here too to get the old glue and crud up. It doesn't have to be perfect but you want to get all the oil and gunk off so the glue can bond to the floor itself and not just dirt. You don't have to scuff up any metal if you don't want to and it will work just fine, just get it decently clean. Wipe down with a rag and let it dry for 30 mins. It must be dry for the glue to work!