How to I get this !@#$ rotor off?!!
 08-29-2008, 05:16 PM
#1
Registered User
Thread Starter
Join Date: Sep 2005
Location: Charlotte, North Carolina
Posts: 19
Likes: 0
Received 0 Likes
on
0 Posts
How to I get this !@#$ rotor off?!!
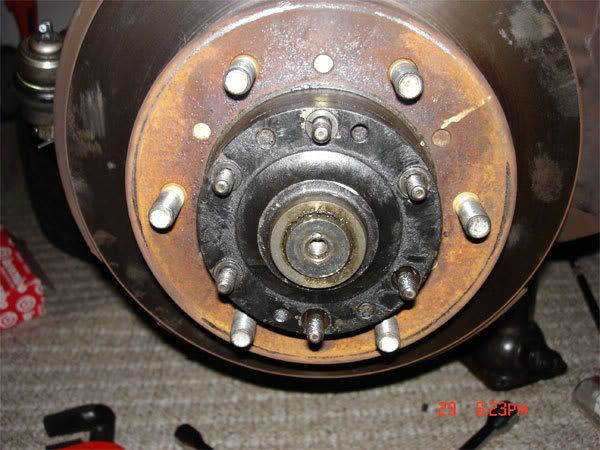
I'm trying to replace the rotor and cv joint, but I am stuck. What do I do next to get this black thing off? (see below)
 08-29-2008, 05:31 PM
#2
Look online under repair info at Autozone. Diagrams and textual instructions.
http://www.autozone.com/addVehicleId...00c1528004d8da

http://www.autozone.com/addVehicleId...00c1528004d8da
Last edited by waskillywabbit; 08-30-2008 at 05:48 AM.
08-29-2008, 05:46 PM
#4
Registered User

Join Date: Jan 2006
Posts: 6
Likes: 0
Received 0 Likes
on
0 Posts
Hammer!
Penetrating oil on those cone washers around those studs. Hit the housing w/ a hammer at the side right where the cone washer is inserted and it will pop right out. Keep your eye on them as some realy do pop right off. Two are already out it looks like so repeat 3 more times. Try not to deform the metal too much. I see a little deformation on the one at the top so they've likely been off before. Good luck.
08-29-2008, 06:00 PM
#5
Penetrating oil on those cone washers around those studs. Hit the housing w/ a hammer at the side right where the cone washer is inserted and it will pop right out. Keep your eye on them as some realy do pop right off. Two are already out it looks like so repeat 3 more times. Try not to deform the metal too much. I see a little deformation on the one at the top so they've likely been off before. Good luck.
Use a brass drift on the stud and tap the brass with a hammer and they'll pop right off up to the brass drift.
08-29-2008, 06:25 PM
#6
Registered User
Join Date: Nov 2007
Location: chippawa niagara falls ontario
Posts: 3,278
Likes: 0
Received 2 Likes
on
2 Posts
heat the cone washers up with a torch propane works for 20 seconds then tap the side of add flange with a hammer lightly and they will pop like hot pop corn
08-29-2008, 06:33 PM
#7
Registered User
Join Date: Oct 2007
Location: Bismarck, ND
Posts: 296
Likes: 0
Received 0 Likes
on
0 Posts
I used a brass drift on either the end of the studs of on the split of the conical washer. hit each one of them. some with pop off others will just loosen to the point where you can wiggle the rotor off easily
Trending Topics
08-29-2008, 08:41 PM
#8
Registered User

Join Date: Dec 2007
Location: Kingston, Washington
Posts: 169
Likes: 0
Received 0 Likes
on
0 Posts
Sometimes you can tap a small straight blade screwdriver into the split in the cone washer and pull it out. I do that on class 8 trucks, same cone washer on the drivers.
08-29-2008, 08:58 PM
#9
Registered User
There are 2 threaded holes on the black thing with nothing in them. Find 2 bolts that fit, I think I used 2 of my hood bolts since I had it off anyways. Tighten the 2 bolts in the holes, alternate between them and you will see the black thing start to move. You don't need to loosen it too far. About 1/8" gap will be enough. Then simply remove the bolts again. The cone washers will fly off so watch your eyes. You might have to tap a couple but nothing difficult at all. There is no need for a torch or anything like that. I didn't even have to use penetrating spray.
Good luck,
Jason
Good luck,
Jason
08-30-2008, 04:51 AM
#11
Registered User
Thread Starter
Join Date: Sep 2005
Location: Charlotte, North Carolina
Posts: 19
Likes: 0
Received 0 Likes
on
0 Posts
There are 2 threaded holes on the black thing with nothing in them. Find 2 bolts that fit, I think I used 2 of my hood bolts since I had it off anyways. Tighten the 2 bolts in the holes, alternate between them and you will see the black thing start to move. You don't need to loosen it too far. About 1/8" gap will be enough. Then simply remove the bolts again. The cone washers will fly off so watch your eyes. You might have to tap a couple but nothing difficult at all. There is no need for a torch or anything like that. I didn't even have to use penetrating spray.
Good luck,
Jason
Good luck,
Jason
Thanks everyone for the replies so far.
Chris
Charlotte, NC
08-30-2008, 01:18 PM
#14
Registered User
Or if you need an excuse to play with your torch then do that. But why would Toyota put those handy little threaded holes there if they didn't intend for you to use them???
Jason
09-03-2008, 10:10 AM
#15
Registered User

Join Date: Sep 2008
Location: Sharpsburg GA
Posts: 1
Likes: 0
Received 0 Likes
on
0 Posts
I have a question to go with that.. after you get it off how do you seperate the rotor from the hub housing and whatever else that is that holds the bearing and seal on the back side of the rotor???
 09-03-2008, 02:32 PM
#18
Contributing Member
09-07-2008, 09:20 AM
#19
Registered User
Thread Starter
Join Date: Sep 2005
Location: Charlotte, North Carolina
Posts: 19
Likes: 0
Received 0 Likes
on
0 Posts
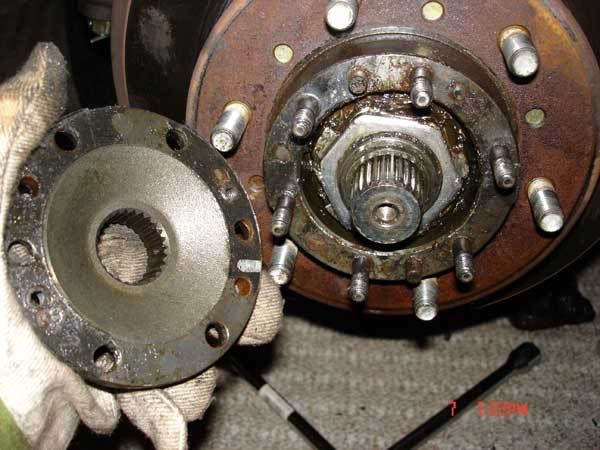
Great success in getting that part off. You can see it on the left there, removed. Two questions now:
a) I noticed a rubber seal on that part I removed. What is it called, and where can I get a replacement seal?
b) The next step, I believe, is to removed that large nut in the center. I think it is 54mm, can anyone confirm that?
a) I noticed a rubber seal on that part I removed. What is it called, and where can I get a replacement seal?
b) The next step, I believe, is to removed that large nut in the center. I think it is 54mm, can anyone confirm that?
09-07-2008, 09:43 AM
#20
Registered User
as for the seal, i do not know. yes the nut is a 54mm or 2 1/8 standard socket. i just bought one for mine at sears $28 and they are 3/4 in drive so make sure you have a 3/4" rachet or a step down from 3/4 to 1/2. i believe on yours there will be 2 54mm nuts with a washer in b/w that has tabs to fold down over the front and rear nut.
good luck
good luck


