
How To: Clean, Factory Looking LSPV Delete
 08-11-2012, 12:35 PM
#1
Registered User
Thread Starter
iTrader: (8)
Join Date: May 2011
Location: Southeast Virginia
Posts: 1,510
Likes: 0
Received 346 Likes
on
215 Posts
How To: Clean, Factory Looking LSPV Delete
My LSPV has been leaking since I bought my 4Runner. With 322,000 miles, I’m not surprised that whatever seals it has don’t work anymore. It was never dangerous; the reservoir would go from max to min over the course of about 3 months. But I wanted to make sure it would stay at max all the time. Buying a new LSPV is out of the question, a used one might be worse than what I have, and the FSM has no information on the internal workings of the LSPV, only how to attach and adjust the arm. So the only other option was to remove the LSPV and install a manual proportioning valve.
When I did this upgrade, I also replaced many other brake components. I upgraded to the V6 calipers from Trail Gear, LCE drilled and slotted rotors, 1990 Land Cruiser wheel cylinders, 1990 V6 4Runner master cylinder, 1990 V6 4Runner dual diaphragm brake booster (it was faulty and I currently have the stock single diaphragm brake booster), and LCE stainless braided lines. I’ll let you decide what you want to do with your Yota, but this write-up will specifically show you how to do the LSPV delete. There are some things you could do without, or do more easily, but I wanted my setup to look clean and close to factory. You could skip making fancy bracket, and you can skip the special brake fitting bracket in the right wheel well, but I went the extra mile to keep everything nice looking.
For the LSPV delete you will need:
1x LCE proportioning valve
2x LCE swageloc fitting
2x Brake fitting bracket from 86-95 P/U or 4Runner (located in right wheel well)
The first thing is to take one of the brake fitting brackets and cut the T fitting off. Then cut the L fitting off the other bracket. Now weld the L fitting to the first bracket and you have a bracket with two L fittings. Paint it up nice.
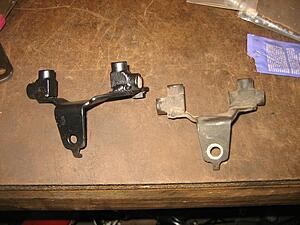
Now go into the right wheel well and remove the stock brake fitting bracket. Don’t install the new one yet, let the fluid drip into a container. Cut the L fitting off your original bracket.
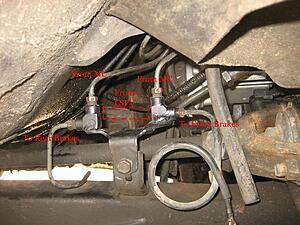
Now go to the rear axle and disconnect the proportioning valve arm. Disconnect the 3 lines going to the LSPV and leave them dripping into a container. Unbolt the LSPV from the frame and remove the assembly.
The LSPV senses how much weight is on the truck and then vents extra pressure to the front brakes. A proportioning valve cannot add pressure, only reduce it. So the MC sends way more pressure than needed to the rear, and the LSPV bleeds off extra pressure to the front brakes. Since we are deleting the LSPV, you don’t need the pressure return line. You need to figure out which line at the rear is the pressure return line. The return line is the line that connected to the rear-most plug on the T fitting in the front wheel well. You need to find which line is the return line so you don’t connect anything to it. I did this by blowing air into the front of the return line and seeing where fluid sprayed out at the rear.
Now you can start reassembling. Take the L fitting that you cut off your original brake fitting and plug the two lines into it at the rear where the LSPV was. You will end up with a line left over; this is the pressure return line that used to feed extra pressure from the LSPV to the front brakes.

Now go to the right wheel well. Install your new fancy brake fitting bracket. All lines will go back to where they used to go except for the pressure return line that came from the LSPV. It will be open at both ends. You can opt to leave it open at both ends, or remove it all together. I removed as much as I could by cutting sections out but ended up leaving the piece that goes over the gas tank since it is difficult to access. If I ever have the tank dropped I’ll remove the last bit of line then.
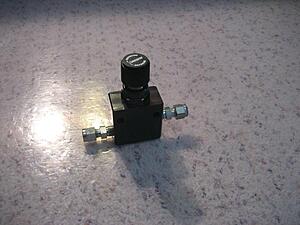
Now you need to prep the new proportioning valve. Remove the brass fittings that come with the proportioning valve. They will not be needed. Now get the swagelocs and apply a bit of red LocTite to the male threads. Not too much, you don’t want LocTite to get into the fine workings of the proportioning valve. Install the swagelocs into the proportioning valve and tighten them up. Not too tight, the female threads are aluminum. Let the LocTite cure for 24 hours before it touches brake fluid.
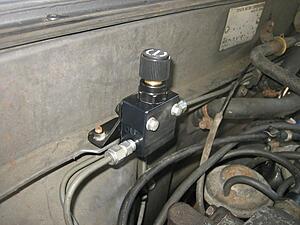
Now you need to figure out where you want the proportioning valve. I put it on the firewall about where the passenger side washer fluid nozzle is in the hood. I built a nice fancy bracket to hold it in place. I didn’t do it on purpose but it ended up being too close and when the hood is closed it kinks the hose for the windshield washer. I had to zip tie the windshield washer hose out of the way. So plan ahead.
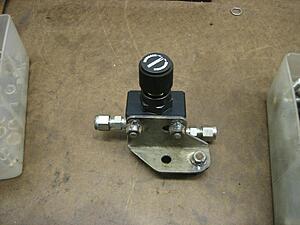
Once you have figured out a place for the proportioning valve, you’ll need to cut out a length of brake line. Figure out exactly how much you need to remove so when the lines are inserted into the proportioning valve they aren’t being stretched or pushed at all compared to where they were before. Then make sure everything is clean, insert the brake lines into the swagelocs, and tighten down. I wasn’t sure how tight they needed to be, but I didn’t want to strip them. I decided to not tighten them as much as I wanted to, and if they leaked I would tighten them a bit more, this way I wouldn’t accidentally strip them. I was happy that they didn’t leak and I never had to tighten them.
Once the red LocTite has cured, you can top off the brake fluid reservoir and bleed the brakes. Then find a parking lot and dial in the proportioning valve so the front brakes lock up just before the rear brakes. You’re done!
Hopefully my directions are easy to follow. I also made a small video overview of my entire brake system. Hopefully between this write-up and the video you’ll understand what needs to be done. Check out my other videos too, you might see something you like. Comments and ideas are welcome.
www.youtube.com/watch?v=Cs56YzyP3mc
When I did this upgrade, I also replaced many other brake components. I upgraded to the V6 calipers from Trail Gear, LCE drilled and slotted rotors, 1990 Land Cruiser wheel cylinders, 1990 V6 4Runner master cylinder, 1990 V6 4Runner dual diaphragm brake booster (it was faulty and I currently have the stock single diaphragm brake booster), and LCE stainless braided lines. I’ll let you decide what you want to do with your Yota, but this write-up will specifically show you how to do the LSPV delete. There are some things you could do without, or do more easily, but I wanted my setup to look clean and close to factory. You could skip making fancy bracket, and you can skip the special brake fitting bracket in the right wheel well, but I went the extra mile to keep everything nice looking.
For the LSPV delete you will need:
1x LCE proportioning valve
2x LCE swageloc fitting
2x Brake fitting bracket from 86-95 P/U or 4Runner (located in right wheel well)
The first thing is to take one of the brake fitting brackets and cut the T fitting off. Then cut the L fitting off the other bracket. Now weld the L fitting to the first bracket and you have a bracket with two L fittings. Paint it up nice.

Now go into the right wheel well and remove the stock brake fitting bracket. Don’t install the new one yet, let the fluid drip into a container. Cut the L fitting off your original bracket.
Now go to the rear axle and disconnect the proportioning valve arm. Disconnect the 3 lines going to the LSPV and leave them dripping into a container. Unbolt the LSPV from the frame and remove the assembly.
The LSPV senses how much weight is on the truck and then vents extra pressure to the front brakes. A proportioning valve cannot add pressure, only reduce it. So the MC sends way more pressure than needed to the rear, and the LSPV bleeds off extra pressure to the front brakes. Since we are deleting the LSPV, you don’t need the pressure return line. You need to figure out which line at the rear is the pressure return line. The return line is the line that connected to the rear-most plug on the T fitting in the front wheel well. You need to find which line is the return line so you don’t connect anything to it. I did this by blowing air into the front of the return line and seeing where fluid sprayed out at the rear.
Now you can start reassembling. Take the L fitting that you cut off your original brake fitting and plug the two lines into it at the rear where the LSPV was. You will end up with a line left over; this is the pressure return line that used to feed extra pressure from the LSPV to the front brakes.

Now go to the right wheel well. Install your new fancy brake fitting bracket. All lines will go back to where they used to go except for the pressure return line that came from the LSPV. It will be open at both ends. You can opt to leave it open at both ends, or remove it all together. I removed as much as I could by cutting sections out but ended up leaving the piece that goes over the gas tank since it is difficult to access. If I ever have the tank dropped I’ll remove the last bit of line then.

Now you need to prep the new proportioning valve. Remove the brass fittings that come with the proportioning valve. They will not be needed. Now get the swagelocs and apply a bit of red LocTite to the male threads. Not too much, you don’t want LocTite to get into the fine workings of the proportioning valve. Install the swagelocs into the proportioning valve and tighten them up. Not too tight, the female threads are aluminum. Let the LocTite cure for 24 hours before it touches brake fluid.

Now you need to figure out where you want the proportioning valve. I put it on the firewall about where the passenger side washer fluid nozzle is in the hood. I built a nice fancy bracket to hold it in place. I didn’t do it on purpose but it ended up being too close and when the hood is closed it kinks the hose for the windshield washer. I had to zip tie the windshield washer hose out of the way. So plan ahead.

Once you have figured out a place for the proportioning valve, you’ll need to cut out a length of brake line. Figure out exactly how much you need to remove so when the lines are inserted into the proportioning valve they aren’t being stretched or pushed at all compared to where they were before. Then make sure everything is clean, insert the brake lines into the swagelocs, and tighten down. I wasn’t sure how tight they needed to be, but I didn’t want to strip them. I decided to not tighten them as much as I wanted to, and if they leaked I would tighten them a bit more, this way I wouldn’t accidentally strip them. I was happy that they didn’t leak and I never had to tighten them.

Once the red LocTite has cured, you can top off the brake fluid reservoir and bleed the brakes. Then find a parking lot and dial in the proportioning valve so the front brakes lock up just before the rear brakes. You’re done!
Hopefully my directions are easy to follow. I also made a small video overview of my entire brake system. Hopefully between this write-up and the video you’ll understand what needs to be done. Check out my other videos too, you might see something you like. Comments and ideas are welcome.
www.youtube.com/watch?v=Cs56YzyP3mc
 08-11-2012, 01:30 PM
#2
There's plenty of info around fully detailing the inner workings and functions of the LSPV(which you've described incorrectly BTW...see LSPBV for what you were attempting to describe). But that probably wouldn't help as far as trying to repair one anyway, if that was the type of info you were after. Since I don't know that it's even possible to do so, or where you'd get the parts and/or specifications needed even if you could.
http://autoshop101.com/forms/brake08.pdf
And if you're expecting the fluid level in the brake MC to stay at max all the time without having to top it off occasionally...forget about it. Not gonna happen. As the brakes wear, the fluid level will lower.
Good job on your conversion though. However dangerous and/or ill-advised it may be. Sorry, not a big fan of this mod. The BV in LSPBV is a safety feature, providing fail-safe operation of the rear brakes if the front brake circuit fails, which you've also deleted. As well as the loss of the LSP function. Deleting either or both functions from the system can be very hazardous. Never a really good idea to mess with a stock braking system, unless upgrading or improving it. Neither of which have you achieved by deleting the LSPBV.
Last edited by MudHippy; 08-11-2012 at 02:18 PM.
08-11-2012, 06:08 PM
#3
Registered User
Thread Starter
iTrader: (8)
Join Date: May 2011
Location: Southeast Virginia
Posts: 1,510
Likes: 0
Received 346 Likes
on
215 Posts
I know the brake fluid level will drop as pads wear. I suppose I could have worded it better by saying I don't want any brake fluid to leave the system.
I'm actually interested in how I described the function of the LSPV wrong. Could you explain it better? And what is the difference between an LSPV and a LSPBV?
I understand that a manual proportioning valve is not as good as the stock LSPV since the stock system is constantly adjusting, but short of finding a used one in good condition, I saw no other option.
 08-11-2012, 08:46 PM
#5
1. Your description of the proportioning valve venting pressure to the front brakes is entirely wrong.
a. Because, as you said, a proportioning valve can only reduce pressure. Meaning, it can only limit, or control, pressure from the MC to the brake circuits.
b. Due to the design of the LSPV or LSPBV, it can only limit, or control, pressure to the rear brake circuit. So, the pressure in the front brake circuit is only limited, or controlled, by pressure directly transmitted from the MC. Meaning, an LSPV or LSPBV can have no effect on the pressure in the front brake circuit at any time.
2. There is no return line from the rear brake circuit, and/or LSPBV, to the MC.
a. The second line going to the LSPBV is part of a hydraulic sensing circuit for the BV(bypass valve). Which happens to be the difference between an LSPV and an LSPBV. An LSPV is an LSPBV without the bypass valve(and/or hydraulic sensing circuit which controls the bypass valve). Meaning, an LSPV does not have the second line going to it(since there is no need for a hydraulic sensing circuit without a bypass valve to be controlled by it).
b. The hydraulic sensing circuit's function requires the second line as a pressure transmission circuit. Which is actually plumbed directly into the front brake circuit. Meaning, the pressure in the second line going to the LSPBV matches the pressure in the front brake circuit at any given time.
c. The sole purpose of transmitting front brake line pressure via a hydraulic sensing circuit to the rear brake circuit's LSPBV is to actuate(control) the BV.
3. Through transmission of pressure via the hydraulic sensing circuit from the front brake circuit, the BV senses the actual pressure from the front brake circuit.
a. When the BV senses that the front brake circuit's pressure reaches zero, and the rear brake circuit's pressure is anything above zero, this actuates the BV(due to the pressure differential releasing pressure on the spring-loaded bypassing valve that opens the bypass circuit). And a bypass circuit to the rear brakes is completed(without the pressure differential, pressure on the spring-loaded bypassing valve keeps the bypass circuit closed).
b. The reason it's called a bypass valve, is that it bypasses the proportioning valve(creating the bypass circuit).
c. With the BV actuated, and the proportioning valve bypassed, all pressure from the MC is transmitted directly to the rear brake circuit. Meaning, the front brake circuit is no longer receiving pressure proportional to the pressure transmitted to the rear brake circuit. And, in fact, is receiving no pressure at all(and is now fully inoperative).
d. EDIT: Because what's also happening when the BV is actuated, is the isolation of the front brake circuit from the rear brake circuit hydraulically. This function of the MC preserves whatever fluid is left in the brake system, or rather the remainder of the system. The remaining braking system consisting of just the rear brake circuit, with the proportioning valve bypassed. This is because the condition causing there to be zero pressure in the front brake circuit, while the rear circuit is still receiving pressure, was caused by a fluid leak somewhere in the front brake circuit. Meaning, what's really being sensed by the BV, and the MC, is a loss of fluid in the front brake circuit(be it a partial or complete loss of fluid).
4. The bypassing of the proportioning valve assures that the pressure in the rear brake circuit is not able to be reduced by it.
a. The intended effect of bypassing the proportioning valve(or creating a bypass circuit) is to provide fully unlimited, uncontrolled, pressure transmission from the MC to the rear brake circuit.
b. EDIT: Since the front brake circuit has been rendered inoperative(caused by a fluid leak/loss which actuated the BV, and enabled the hydraulic isolation of the front and rear circuits from each other by the MC), it's important that the rear brakes receive full pressure transmission from the MC under those conditions. So that the vehicle will still have as much braking functionality as can be allowed by the operation of just the rear brakes.
5. I really think that the .pdf describes the functions of an LSPV or LSPBV much better than I have here. But...I tried.

Last edited by MudHippy; 08-13-2012 at 09:38 AM.
08-12-2012, 03:51 AM
#6
Registered User
Thread Starter
iTrader: (8)
Join Date: May 2011
Location: Southeast Virginia
Posts: 1,510
Likes: 0
Received 346 Likes
on
215 Posts
I read both the PDF and your description and between both of them I believe I have a better understanding of what's going on.
Hypothetically speaking, what would happen if the rear brakes lost pressure? It seems the system is very worried about losing front brake pressure but not at all about the rear.
My LSPV was leaking. If it continued on leaking in the same manner forever, it wouldn't have been dangerous. But no one can be sure it won't let go and start pissing brake fluid at any time. I don't know how they work and perhaps that isn't likely or possible due to design, but it holds brake pressure from both brake circuits so I wouldn't want that to happen.
08-12-2012, 10:14 AM
#7
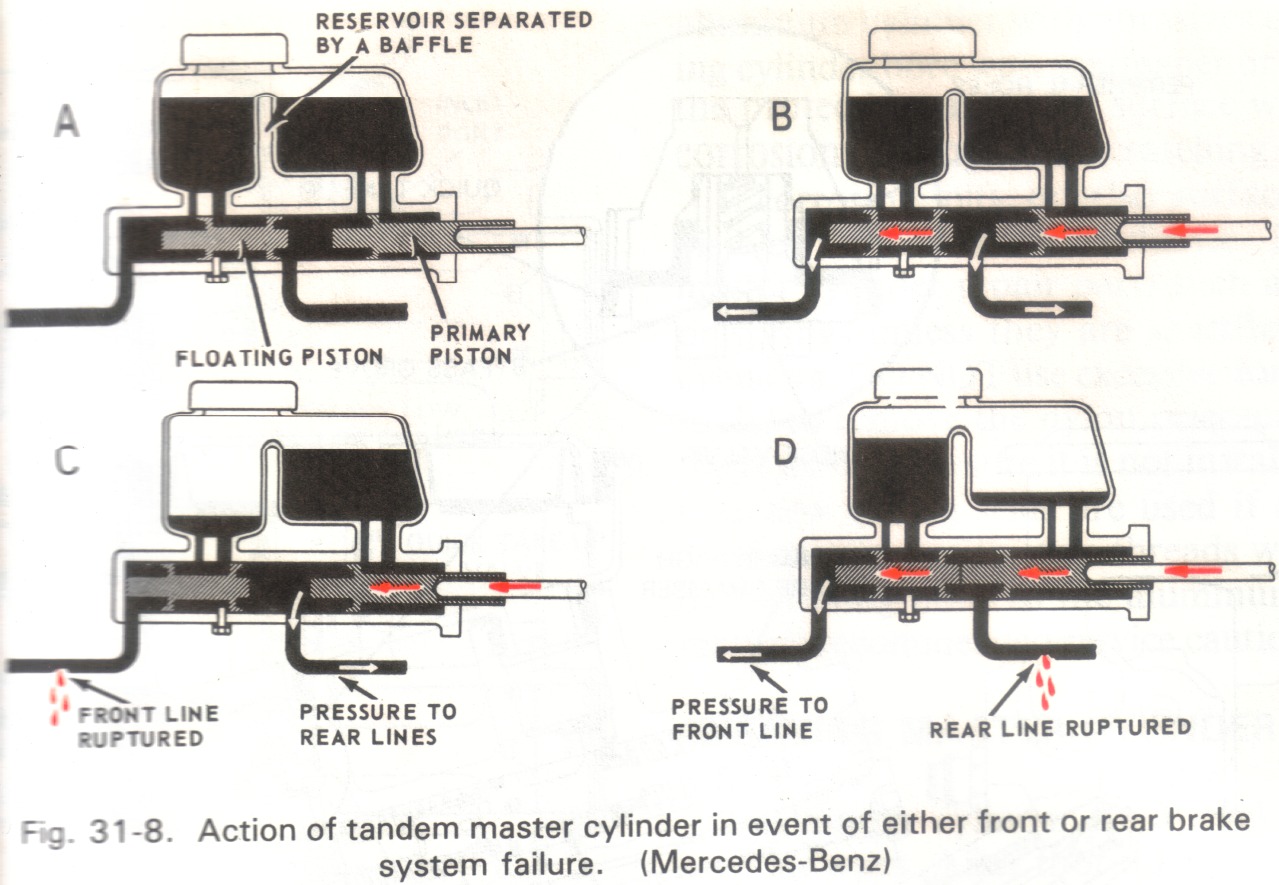
I wasn't sure I should even mention the fact that the hydraulic isolation of the front and rear circuits from each other was also happening when the BV was actuated(which was very poorly worded, my bad). Because to explain how that was occuring would require an even longer explanation the entire braking system. As trying to describe how a tandem piston MC works isn't simple, and/or would be hard to simplify. And I'm still a little apprehensive about even attempting it. However, I've found that an illustration gives a fairly good understanding. So I'll try to avoid putting it into words, and give you this illustration demonstrating the functions of a tandem piston MC to look at instead(sorry, not a Toyota design, but similar enough to serve the purpose).
And, in all fairness, the use of the term fail-safe is probably a little misleading. I'm not sure I should have used it, without also explaining what was meant by it. It was intended to mean "you're safer, in the event that the front brake circuit fails, if you have a functional (LSP)BV installed, than if you had an LSPV or MPV installed". If that makes any sense.
Though in reality, depending on the setting of the MPV, you might be safer(or equally safe) with it installed than with either an LSPV or LSPBV instead. But how that's possible is also fairly complicated to explain in full. I just hope that I don't have to. I'll just add that the way that you are most likely to set the MPV would, potentially, only allow for more safety than if you had an LSPV installed. And could only ever be equally as safe as(and never safer than) having an LSPBV installed, regardless of how the MPV is set(meaning, ONLY if you were to set it to equally proportion braking power from front to rear, which would negate its usefulness, and merely mimic a system with no PV, could it ever be equally as safe). But that would ONLY be in the event of the front brake circuit failing, and not during other driving/braking conditions where an LSPV or LSPBV would provide load sensing proportioning of the braking power from front to rear(since an MPV isn't designed to do so). As load sensing proportioning of the braking power from front to rear is also a safety feature. And is designed to prevent rear wheel lock up based on the effective weight load that's being carried by the rear wheels at any given time. You would have to be constantly adjusting the MPV, based on the same principle, while driving/braking to equal that level of safety. Which is hardly feasible(or dare I say...impossible, since your ability to sense the weight load on the rear wheels would need to be superhuman, barring the use of some other type of load sensing technology, and/or based on your ability/inability to multi-task with extremely high efficiency).
Side-note: Wow! Sometimes it even amazes me the things I know...

Last edited by MudHippy; 08-12-2012 at 12:50 PM.
Trending Topics
08-12-2012, 01:14 PM
#8
Registered User
Thread Starter
iTrader: (8)
Join Date: May 2011
Location: Southeast Virginia
Posts: 1,510
Likes: 0
Received 346 Likes
on
215 Posts
Interesting read. It was my understanding that the Toyota (Aisin) master cylinder would provide brake pressure to front and rear brakes under normal conditions, and if one or the other failed, the master cylinder would still provide pressure to the other system. You seem to have confirmed that.
08-12-2012, 07:49 PM
#9
Registered User
Join Date: Mar 2008
Location: Temecula Valley, CA
Posts: 12,723
Likes: 0
Received 4 Likes
on
4 Posts
My 88 4Runner has a single brake fluid reservoir with a little hose to the front section of the master cylinder:

It should be grossly obvious a catastrophic failure in the brake system leading to fluid loss would give me maybe 1 or 2 brake pedal applications before hydraulic brakes would become completely inoperative leaving me with only the hand brake to work with- which ironically only works the rear brakes.
I will admit that locking up the rear's is a bad thing, but that is better than limiting how much braking the rears can do through a manual valve that can't be adjusted when you need it. My foot works pretty well as a proportioning valve. If the rears lock up, I can let off a bit and counter-steer to correct for drift but if I can't get enough pressure to them to stop the vehicle because of a valve on the firewall I can't reach and adjust when I really need more brakes... sorry, I won't install this on my truck.
If people would refer to the LSP-BV correctly- Load Sensing Proportioning and Bypass Valve, maybe it would be more obvious what the thing does. It adjusts the brake pressure to the rear brakes based on the weight over the rear axle and gives you full rear brake pressure if the front brakes fail.
In a world where people are asking for more control over things, I don't see why one would install something that takes away control.
And if people would pay as much attention to their vehicles as they do to their other less life-threatening objects, like their iPhone or whatever, stuck LSP-BV's wouldn't be an issue for debate.
Last edited by abecedarian; 08-12-2012 at 07:58 PM.
08-12-2012, 08:28 PM
#11
Registered User
Join Date: Mar 2008
Location: Temecula Valley, CA
Posts: 12,723
Likes: 0
Received 4 Likes
on
4 Posts
I read both the PDF and your description and between both of them I believe I have a better understanding of what's going on.
Hypothetically speaking, what would happen if the rear brakes lost pressure? It seems the system is very worried about losing front brake pressure but not at all about the rear.
>snip<
Hypothetically speaking, what would happen if the rear brakes lost pressure? It seems the system is very worried about losing front brake pressure but not at all about the rear.
>snip<
Drum brakes, strictly speaking, are more efficient than disc brakes: they have more contact area than discs and can bring a similar mass to rest faster than discs. Their downfall is that they can't shed heat as quickly as discs.
Disc brakes have much a much smaller "contact" patch when compared to drums. However discs are able radiate heat into the air more rapidly than drums which is part of their saving grace: discs cool off quicker than drums. They also offer more "linear" response to pedal pressure than drums, which tend to be more "exponential" and thus harder to modulate.
Which leads us to why there's a propotioning valve on the Toyotas. We already know that the front brakes do most of the work, and the tendancy to need replacing the front pads more often than the rear shoes bears that out. And I've explained, somewhat, the inherent imbalance between discs and drums.
The front brakes handle at more than 50% of the braking requirements all the time, and if you must have wheels lock up when braking, the front's should lock before the rear's. So, there's why the 'yota engineers didn't worry much about the rear brakes failing, but cared a lot about the front brakes failing.
Last edited by abecedarian; 08-12-2012 at 08:34 PM.
05-03-2018, 01:45 PM
#14
Registered User
yotarover,
drum brakes are not "better"... they are more efficient, meaning they only require about 250-300 psi to LOCK up on ANY surface. Disc brakes (rotary brakes) require about 3000 psi or more to lock up, depending on load and conditions. The higher pressure range can be equated to more control range and less pressure, obviously less control range. Drum brakes work very well with HEAVY vehicles because they are very efficient. Rotor brakes work well on lighter vehicles that are more mobile, nimble, change speed and direction frequently. Ever seen drum brakes on a bicycle? No, they all have rotor or rotor "type" systems because it's a light vehicle and more control works better. The reason/s people swap out the back drums for rotors is this: 1. drum brakes were put on the rear of most trucks because they are less expensive for the vehicle manufacturer, and you don't need much braking power in the rear as all the weight is up front (unless you load up the back by towing, carrying, etc). Most "wheelers/off-roaders" never carry a "load" and more controllable braking can be achieved with all rotor brakes. 2. On old toyotas there is a device called the LSPV (load sensing proportional valve) which almost never works as these trucks are old and crusty, people also put large lifts on these trucks which makes mounting the LSPV rod assembly and accurately placing it in the correct position proves to be difficult. The large lift also provides more total range of travel which makes the LSPV work incorrectly/inefficiently. Instead of fixing the LSPV, or fabricating a really dialed in bracket to compensate for the lift and difference in travel, people tend to eliminate it when converting the rear to rotors. 3. By switching to all rotor brakes and because they require much more pressure to lock up, the brake line system can be simplified (by removing a few lines) and all run on the same pressure. The stock system is very complicated with several different pressures that change during operation, IF your old truck's braking system is all working properly, which it's likely not. NOTE: I would also recommend installing a safety switch if you convert the rear to rotors. They are inexpensive and if one end of the truck's braking fails (due to a severed line, rock tears it off, etc), the safety switch will block off that end and you will still have the other end for braking. If you do NOT install a safety switch, if ANYTHING happens to ANY part of the braking system and you lose pressure, you will have NO BRAKES.... Many people also install steel braided brake lines as they are far more durable off-road than the tiny, thin pot-metal lines that came stock. Many also install a proportioning valve (really it's a pressure reducing valve) that is manually adjusted to give the rear brakes (rotors now) LESS pressure. I think it's unneeded as long as you don't mash as hard as you can on the brake pedal every time you need to slow down a bit. You just have to understand that by having the whole system at the same pressure (un-bias braking system/pressure), the rear brakes WILL lock up before the back, and that will lead to spin outs. Hope this info helps.
drum brakes are not "better"... they are more efficient, meaning they only require about 250-300 psi to LOCK up on ANY surface. Disc brakes (rotary brakes) require about 3000 psi or more to lock up, depending on load and conditions. The higher pressure range can be equated to more control range and less pressure, obviously less control range. Drum brakes work very well with HEAVY vehicles because they are very efficient. Rotor brakes work well on lighter vehicles that are more mobile, nimble, change speed and direction frequently. Ever seen drum brakes on a bicycle? No, they all have rotor or rotor "type" systems because it's a light vehicle and more control works better. The reason/s people swap out the back drums for rotors is this: 1. drum brakes were put on the rear of most trucks because they are less expensive for the vehicle manufacturer, and you don't need much braking power in the rear as all the weight is up front (unless you load up the back by towing, carrying, etc). Most "wheelers/off-roaders" never carry a "load" and more controllable braking can be achieved with all rotor brakes. 2. On old toyotas there is a device called the LSPV (load sensing proportional valve) which almost never works as these trucks are old and crusty, people also put large lifts on these trucks which makes mounting the LSPV rod assembly and accurately placing it in the correct position proves to be difficult. The large lift also provides more total range of travel which makes the LSPV work incorrectly/inefficiently. Instead of fixing the LSPV, or fabricating a really dialed in bracket to compensate for the lift and difference in travel, people tend to eliminate it when converting the rear to rotors. 3. By switching to all rotor brakes and because they require much more pressure to lock up, the brake line system can be simplified (by removing a few lines) and all run on the same pressure. The stock system is very complicated with several different pressures that change during operation, IF your old truck's braking system is all working properly, which it's likely not. NOTE: I would also recommend installing a safety switch if you convert the rear to rotors. They are inexpensive and if one end of the truck's braking fails (due to a severed line, rock tears it off, etc), the safety switch will block off that end and you will still have the other end for braking. If you do NOT install a safety switch, if ANYTHING happens to ANY part of the braking system and you lose pressure, you will have NO BRAKES.... Many people also install steel braided brake lines as they are far more durable off-road than the tiny, thin pot-metal lines that came stock. Many also install a proportioning valve (really it's a pressure reducing valve) that is manually adjusted to give the rear brakes (rotors now) LESS pressure. I think it's unneeded as long as you don't mash as hard as you can on the brake pedal every time you need to slow down a bit. You just have to understand that by having the whole system at the same pressure (un-bias braking system/pressure), the rear brakes WILL lock up before the back, and that will lead to spin outs. Hope this info helps.
05-03-2018, 08:31 PM
#16
Registered User
Pretty standard, just trying to help out and I get wrecked for posting. Clearly new to yotatech as I haven't posted much and didn't realize the question was from 6 years ago. Thank you for the input, will be my last post on yotatech forums.
05-03-2018, 11:20 PM
#18
Wow thin skin !! Oh Well
If that is your being wrecked most likely not a good fit
I think we all answered a question that was years old I know I have dozens
Till I started looking at the dates .
Though seeing a bunch of names that have not been around in years is a good sign
If that is your being wrecked most likely not a good fit
I think we all answered a question that was years old I know I have dozens
Till I started looking at the dates .
Though seeing a bunch of names that have not been around in years is a good sign
Last edited by wyoming9; 05-03-2018 at 11:22 PM.
05-04-2018, 04:51 AM
#19
Registered User
Thread Starter
iTrader: (8)
Join Date: May 2011
Location: Southeast Virginia
Posts: 1,510
Likes: 0
Received 346 Likes
on
215 Posts
Just as an update to my original post. I bought a new LSPV from Toyota. P/N: 47910-35090. Price ranges from $122 to $176. Nothing works as good as the LSPV. Keep it stock and keep it working right and it'll be the best setup possible. No manual valve will ever be as good as the constantly adjusting LSPV. By the time you add up the proportioning valve and correct adapters, you're approaching the cost of a new LSPV.
I no longer recommend deleting the LSPV.
I no longer recommend deleting the LSPV.
05-04-2018, 05:49 AM
#20
Registered User
Just as an update to my original post. I bought a new LSPV from Toyota. P/N: 47910-35090. Price ranges from $122 to $176. Nothing works as good as the LSPV. Keep it stock and keep it working right and it'll be the best setup possible. No manual valve will ever be as good as the constantly adjusting LSPV. By the time you add up the proportioning valve and correct adapters, you're approaching the cost of a new LSPV.
I no longer recommend deleting the LSPV.
I no longer recommend deleting the LSPV.
Thanks for updating us!


