When you click on links to various merchants on this site and make a purchase, this can result in this site earning a commission. Affiliate programs and affiliations include, but are not limited to, the eBay Partner Network.
I know this is an old post, but I've got a question about the uppers. The nuts on the cross shaft are seized up on mine pretty bad and I was just gonna grind/cut them off, but I wanted to know what the size/pitch was of the thread so I can get new nuts. Also is it a standard rotation or is one side left handed (like a bicycle vs a steering arm)?
BTW, they're not my original arms either. I bought another set off craigslist to rebuild before I tear my truck apart. The previous owner used it as a mud truck before torching everything off to SAS, so I have no idea of the history, but I can tell you these things aren't gonna budge...
CanTheWhales, The bolts seized when trying to take apart the upper control arm and remove the cross shaft so I can replace the bushings. It finally got to the point where I went to a breaker bar extension and put all 225 lbs. of me into it. I knew at that point I was going to need a new part. Unfortunately, what I didn't know is that the bar shaft alone is just not easy to find. I've search high and low and can't find one. Every time I find a diagram from Toyota that has the part, it turns out that the part I am referencing is actually a full upper control arm assembly.
The part # should be 04485-35060. It comes with the 2 bushings, 2 washers, and 2 nuts.
I just went thru this myself, when removing the nuts from the driver side shaft they stripped the threads on the shaft and I made sure to unstake them first. I could not find the shaft alone, only in combo with the bushings, washers, and nuts.
Did you unstake the nuts before trying to remove them??? If not they will be extremely difficult to remove. Best way I found to do the job on the drivers side is to remove the arm from the truck, unstake the nuts then bolt the arm back on the truck and break the nuts loose. Remove the arm, remove or burn out the control arm bushings, depending on if you are using stock type bushings or poly. Install new bushings, mount arm back on truck and torque new nuts. Remove arm from truck and stake the nuts. Reinstall arm on truck.
The passenger side was a little different. I could not slide the torsion bar back far enough to get my breaker bar on the rear facing nut and there were numerous brake lines in the way. I could not get my breaker bar on the front nut either because of a wire loom that was in the way. So, had to figure out a way to hold the arm so I could break the nuts loose. In my case I did not have a vise large enough. What I did in the end was use an old tree stump and 3 large lag bolts and bolted it to the stump. Used it for removing the nuts and torqueing the new ones on.
What you maybe able to to though if you cannot get to the nuts on the passenger side is bolt it on upside on the drivers side to remove them and install new nuts. I did not try that because I already had the drivers side back together.
I strongly suggest using new nuts on the upper control arm shafts. If you are buying a new shaft it will come with 2 new nuts so you will only need to acquire 2 more nuts. I believe the part number on the nuts are 90179-18004. Will change if I find out different in the morn when I get home.
Andy, Great information! Thanks for the detailed response. One nut was not properly staked to start with. The other was kind of damaged. I think somebody tried to work on it before. I'm guessing they gave up because the bushings seem to be original.
I will reference the part number you gave. I had seen something similar, but was surprised at the $115ish price for that part. I couldn't ever find anything that definitively said what was in the assembly. That part number helps. I guess with the bushings, etc and being Toyota parts it is to be expected.
Thanks for the info on the passenger side as well. I will start that one in the next few days.
I can't see paying $110 for this shaft. I'm going to grind it down where the threads have been destroyed and then screw on a new nut. It will probably have 85% thread contact. However, after I get is all in place, I'm going to weld that bolt on. Won't be fund for next time it needs to be done, but I'll cross that road when I get there.
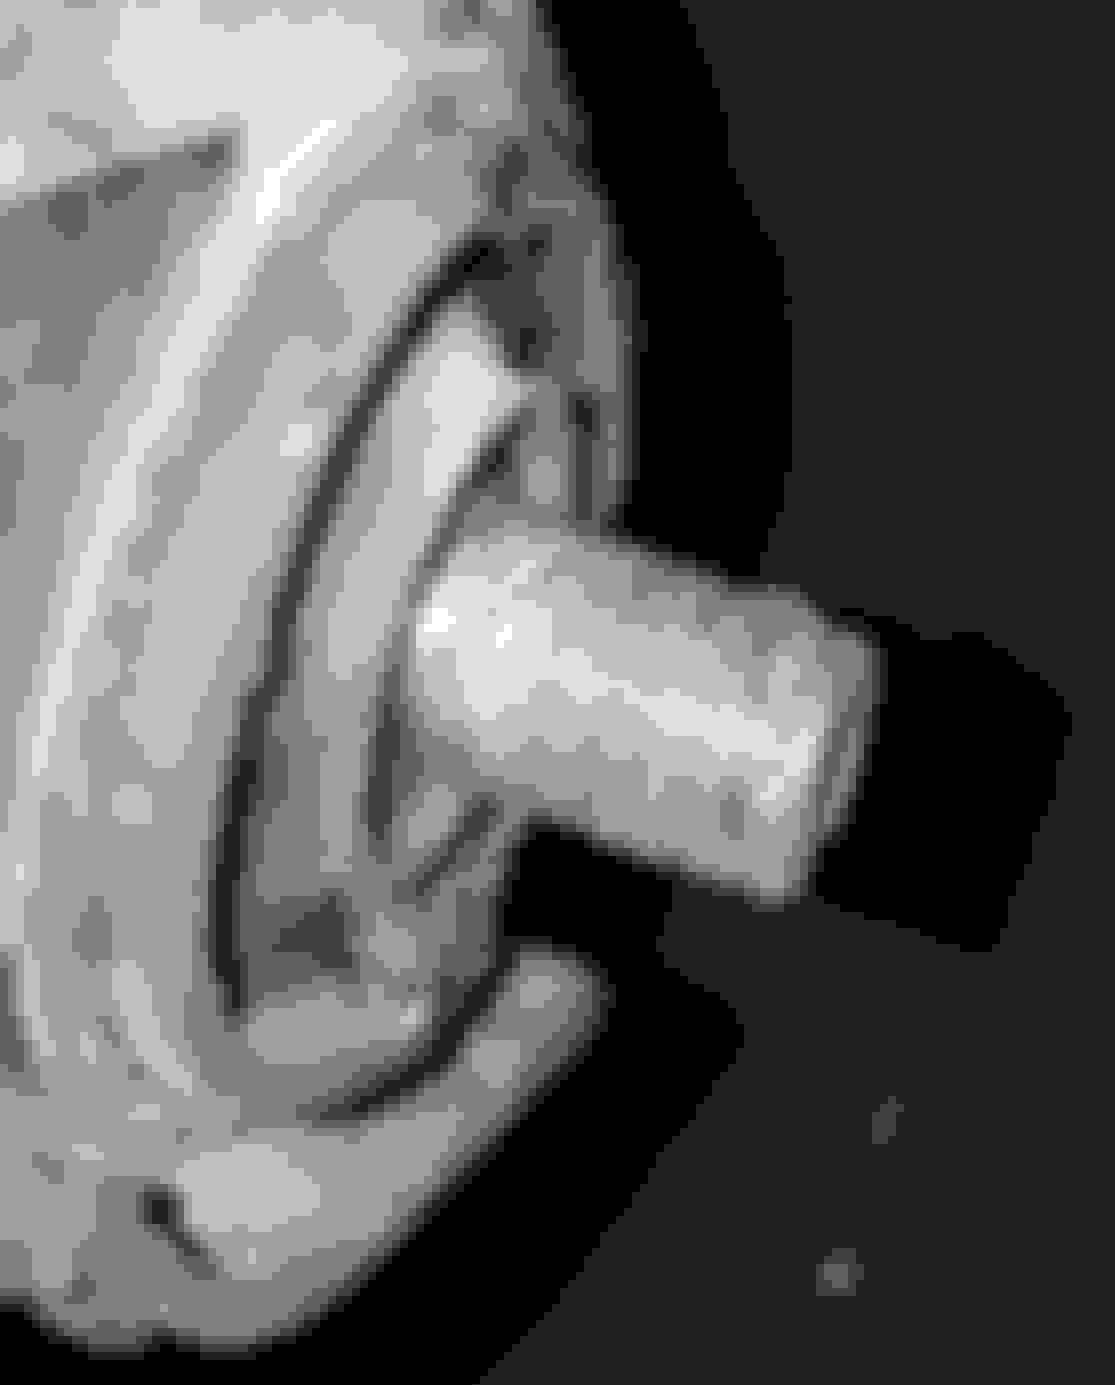
Yours does not look to bad Alan, mine really got chewed up. Pic above is mine.
Do you have any dies, I would try and just clean that up. That way you could still just stake the new nuts.
Understand where your coming from on the price of the arm. Got to do what you got to do. I just felt more peace of mind in forking over the cash. 100 dollar lesson learned. DOH!!!!
Are you replacing with polyurethane or stock type bushings?
P.S. use new nuts regardless......... part number I posted for them is correct. 4 or 5 bucks each.
Andy, wish i would have reread your original response. I didn't recognize that you posted the bolt part number. I probably spent 2 hours trying to find that again, but was unsuccessful so luckily I just got this post and I now have 4 on order. So thanks for that!
Regarding the threads on my arm shaft...the picture I took is actually the good side (underside of the bolt). I had just applied heat to the sleeve to remove the old bushing so that's the part that was on top when I took the picture and I didn't have anything on me to flip the hot part. The other side is mangled and has a protrusion that sticks out about 2MM. It looks like somebody hit it with an arc welder.
The only ones I have installed so far are for the front sway arm. The sheer number of bushing in that kit tells me I have a lot of work ahead. Of course, getting all bushing in front control arms will knock a good portion of them out.
Keep us posted on how things go, always good to know the multiple ways of completing tasks.
Are you 4 Runner or truck?
You probably already know most of this but......
Clean your bushings shells and bushing eyes really good. A good stiff wire wheel will work great. Get rid of all rubber remnants. Clean them good after wire wheeling them with a good solvent.
Once you have the shells and bushing eyes good and clean you are ready to grease everything really well and start putting things back together.
The grease is really sticky and is tough to wash off your hands so some rubber gloves come in handy
Grease inside of shells and shoulder
Outside of bushings & inside
Press in the big one first. Torsion bar side. Can be done by hand.
Grease the outside of the bushing eye
Press eye into bushing
Insert the A arm shaft into the bushing
Grease the face of the bushing which faces the washer & nut
Grease the inside face of the washer
Put washer on shaft
Thread on nut, does not need to be tightened yet
Press in the already greased smaller bushing
Grease the outside of the bushing eye
Press eye into bushing
Grease the face of the bushing which faces the washer & nut
Grease the inside face of the washer
Put washer on shaft
Thread on nut, does not need to be tightened yet
Your now ready to mount the arm either back onto the truck, big vise, etc and torque them nuts down.
If you need any help with the lowers feel free to ask. To me they were much easier than the uppers.
I finally had a chance to work on this. I ground down the damaged threads and them reassembled and welded that nut on. See pics. I have that side todltally reassembled. I didn't get a picture of post-weld, but I know damn sure that it's not coming off!
im about to do this soon my question is how did you go about the torsion bars do you have to wind them down or is it as simple as unbolting the 2 nuts that connect to the bar for the upper control arm
Oh yeah, have to take the tension off the torsion bars. I found it best to remove the anchor bolts, then when you remove the 2 bolts that attach the flange to the control arm it allows you enough room to side the whole torsion bar assembly back.
Andy, I pounded through it and have the front and rear done. Have an electrical problem so I haven't been able to get it aligned yet, but it looks good to me...
I recently wrecked an upper control arm cross shaft trying to replace my bushings as well. The cross shaft material is a softer metal than one would expect.
I unstaked both nuts. The first came off almost completely before it destroyed a few threads. The other side, not so much. It came off about 3/4 of the way before it completely welded itself to the stud, and this was using my electric impact. Now, I'm used to unstaking a nut on say, an axle shaft, and impacting it back and forth until it lets go, with relatively little damage. The cast cross shafts, though, aren't nearly as hard as an axle shaft. Now I'm waiting on a set of replacement upper control arms.
In the end, I decided that the only way to do it without damaging the threads is to use a Dremel or similar rotary tool and literally cut out the staked portion of the nut. It worked for me when I tried it on my second control arm. If you're going to use new nuts anyways, then you might as well do as little damage to the cross shaft as you can.
The whole process took about an hour just make sure you pre soak torsion bolts days in advance so you don't snap them that was the only problem I had
Out here in the Rust Belt
We dont (or I dont) bother to soak em
There is an access hole in the torsion bar hold down bracket / frame.
Insert a sawzall
Insert a block of wood above, between the top of the torsion bar nut and the body
Insert and lower the truck to capture a "pipe" to keep the bolt from careening into your face
I'm curious to hear what tricks you guys pulled to actually get the old bushings out of the UCAs. Did you drill them out? On these the rubber isn't bonded to the outer and inner rings like it is on the LCAs is it?
I'm curious to hear what tricks you guys pulled to actually get the old bushings out of the UCAs. Did you drill them out? On these the rubber isn't bonded to the outer and inner rings like it is on the LCAs is it?
The rubber in the uppers is bonded to the shells just like the lowers. I burned them out using a propane torch on both the upper and lowers. Messy but effective. I used polyurethane replacements, so I needed to keep the shells intact. I would not recommend drilling them out if using poly as a replacement as the drill bit can scar the inside of the shells, you want the inside of the shells as smooth as possible.
The rubber in the uppers is bonded to the shells just like the lowers. I burned them out using a propane torch on both the upper and lowers. Messy but effective. I used polyurethane replacements, so I needed to keep the shells intact. I would not recommend drilling them out if using poly as a replacement as the drill bit can scar the inside of the shells, you want the inside of the shells as smooth as possible.
Cheers
In Crawling4Runner's pics above, it looks like he pushed out the one at least on the end opposite he nut. I don't see how that is possible though?
Also a buddy of mine who is an old Toyota tech thought that outer metal ring the bushing is in actually comes out (e.g. it's a metal cinylinder pressed into a thinner metal ring sleeve in the arm). I'm not sure that's right though? It looks like only the bushing part could come out.
I used the drilling method to get out my LCAs. Messy and time consuming but it worked. I hear you on scoring the cross shaft though, but it's pretty cold here still and I don't want to torth those things indoors...

 04-13-2014, 03:41 AM