Fix that driver's seat blowout!
 11-26-2009, 11:50 AM
#1
Registered User
Thread Starter
Fix that driver's seat blowout!
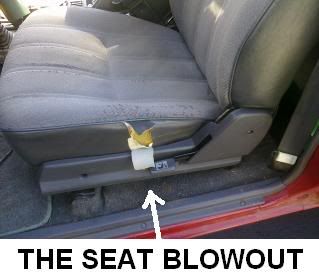
I don't think i've seen a 4Runner/pickup from 84-88 that didn't have the vinyl blown out on the left side of the bottom seat cushion. Its an eye sore, first thing to irritate me when I open the door. But, i'm in no market for obtaining new seats worth attempting to install, that will give me the cool slidey effect the passenger side has, and enough cushion for bouncing on trails.
So the other day it dawned on me that if I could swap seats, I may have my solution right in front of my eyes. So I pulled both seats and started dissassembly. Turns out, the bottom cushions are identical and interchangeable! So here's some step-by-step if you'd like to try this super cheap (aka FREE) seat repair.
Here's the task at hand:
Pull the driver's seat by removing the 4 bolts that hold it to the floor. It's a 14mm socket and an extension is pretty much required.
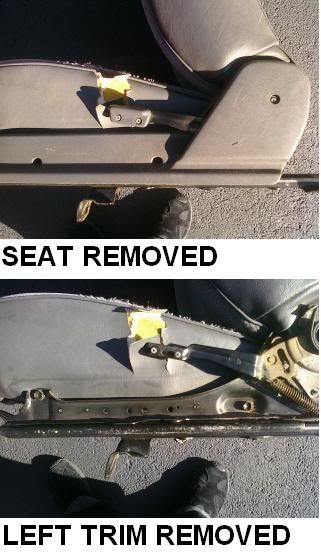
Remove the trim on each side of the seat rails by pulling 3 philips on each side. The one near the seat back hinges is a shorty, don't mix 'em up.
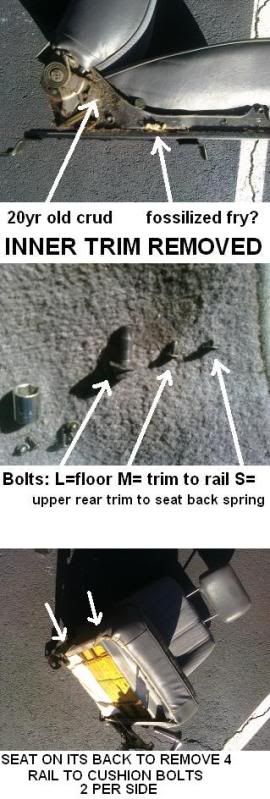
You'll find 20 yrs of crud in there. I used a rag to wipe it out. If you want to get all detailey, break out some armor all and a toothbrush. I don't recommend breathing this funk, it may have asbestos in it. I think they made everything with asbestos back then. Also, watch out for lost foodies. They may be hosting a colony of some new life form.
There are 2 12mm bolts on each side which hold the bottom cushion inside the rails. Turn the seat on its back when you remove these, so the rails don't slide and risk snapping the cable which actuates with the lever.
When you remove the passenger side seat, there will be an extra trim piece on the floor, which comes off before removing the seat bolts. On the inside rear should be a black plastic fastener, the two-piece kind that spreads when you push the middle pin in. Try not to break it as you fight to get it out with a philips head and your finger nail.
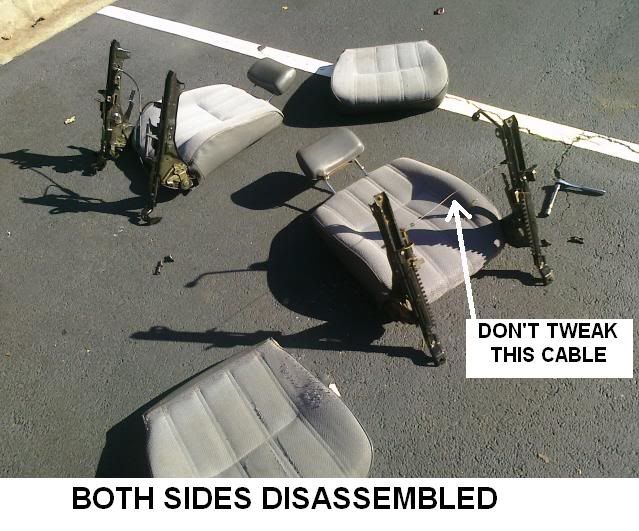
Same thing over here, put it on its back, pull the 12mm cushion bolts and be careful not to stress the Y cable which activates with the foot pedal and seatback lever. Now you should have a mess like this:
NOW IT'S REPAIR TIME!
Use some light duty solvent, I used heavy rubbing alcohol, to remove armor-all, dirt, goo, from the vinyl side that is blown out. Let it dry and repeat if necessary. You don't want your repair failing later because of poor adhesion.
I put a little piece of tape to hold my torn pieces together, so I could lay the repair together without them being a hassle.
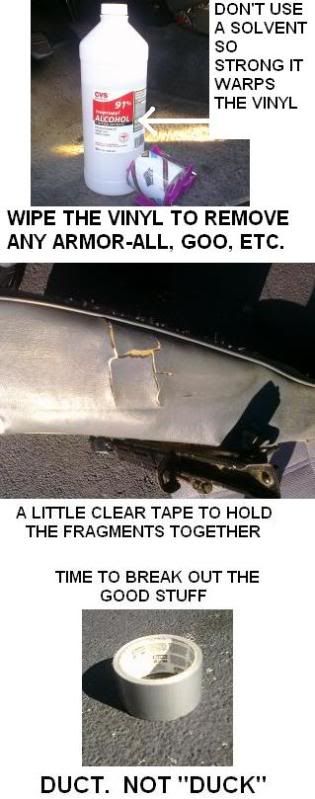
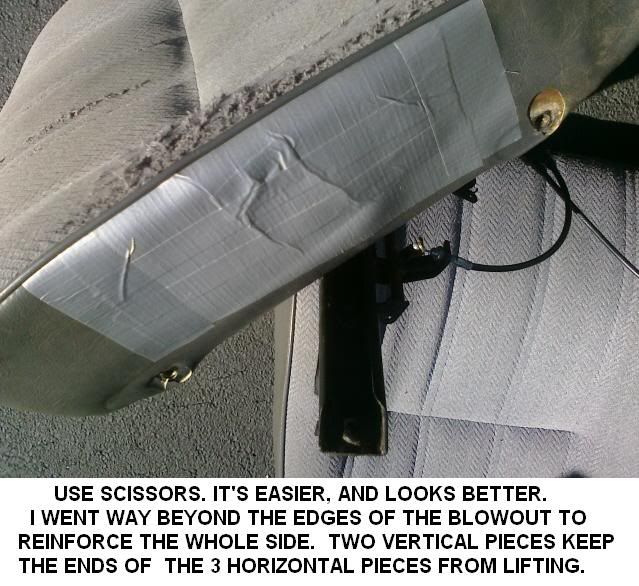
Then I broke out the best repair kit on earth: the DUCT TAPE ROLL. I use Scotch, not brand X. And I cut it with scissors, I don't try to tear it. (that's emergency method only) If you don't have a tool bag in your truck, I recommend a multi bit screwdriver, a pair of needle nose visegrips, and a roll of duct tape as the absolute minimum. I'm pretty sure you can rebuild a 22re with just that.
I laid 3 pieces horizontal, then two vertical strips at the end. We all know duct tape does start to slip a little, sometimes the corners peel up over time. I'd rather that happen to these two end pieces, so I can cut them back without getting into the main pieces holding the repair. When I apply tape, whether its packing tape on a box, or in this application, I go over every square inch with the back of my fingernail, to really press in a good bond. Give the adhesive a chance to do its job. (I also hold double sided tape for the full 30 seconds. It makes a difference)
Now it's just a matter of reassembly. Again, if you're a details person, now would be the best time to vacuum. I checked my pockets but didn't have one on me, so I just used a rag to brush out the majority of the crud. You may also want to peek under the front/rear carpet break to see what harnesses are right there. On the driver's side is the plug for the 02 sensor; mine ('88) is a 4 wire. On the passenger side is another rubber plugged penetration, so if you ever need to run wires to the back of the truck, these are good places to poke through.
Ok, put those trim pieces back on, don't overtighten the seatback recline handles, because it's that more brittle plastic, lube your seat rails with white lithium spray, and bolt it all up. Another good idea is a gob of axle grease on the underside where the seat bolts penetrate the floor to prevent rust.
Step back and enjoy that vision of beauty: no more hole!
Reinstall the passenger side seat, same method. Now check out your handy work. The worn edge from you climbing in is now on the inside, where it will most likely have low stress for the remainder of its lifetime. The duct tape repair is concealed in the console where only you will know of its existence.
Now jump in, readjust your seats to preference, and see if you notice the difference. I didn't notice a thing, because they're the same dang seat! But I do notice when I get in and out, it looks good, and that's one more reason to smile everytime i get in the 'runner.

Tj
(p.s. mods: i didn't think this was "tech" enough to put in the forum for tech write-ups, but if you think it should be moved or YT pic hosted, please do what you feel is necessary)
So the other day it dawned on me that if I could swap seats, I may have my solution right in front of my eyes. So I pulled both seats and started dissassembly. Turns out, the bottom cushions are identical and interchangeable! So here's some step-by-step if you'd like to try this super cheap (aka FREE) seat repair.
Here's the task at hand:
Pull the driver's seat by removing the 4 bolts that hold it to the floor. It's a 14mm socket and an extension is pretty much required.
Remove the trim on each side of the seat rails by pulling 3 philips on each side. The one near the seat back hinges is a shorty, don't mix 'em up.
You'll find 20 yrs of crud in there. I used a rag to wipe it out. If you want to get all detailey, break out some armor all and a toothbrush. I don't recommend breathing this funk, it may have asbestos in it. I think they made everything with asbestos back then. Also, watch out for lost foodies. They may be hosting a colony of some new life form.
There are 2 12mm bolts on each side which hold the bottom cushion inside the rails. Turn the seat on its back when you remove these, so the rails don't slide and risk snapping the cable which actuates with the lever.
When you remove the passenger side seat, there will be an extra trim piece on the floor, which comes off before removing the seat bolts. On the inside rear should be a black plastic fastener, the two-piece kind that spreads when you push the middle pin in. Try not to break it as you fight to get it out with a philips head and your finger nail.
Same thing over here, put it on its back, pull the 12mm cushion bolts and be careful not to stress the Y cable which activates with the foot pedal and seatback lever. Now you should have a mess like this:
NOW IT'S REPAIR TIME!
Use some light duty solvent, I used heavy rubbing alcohol, to remove armor-all, dirt, goo, from the vinyl side that is blown out. Let it dry and repeat if necessary. You don't want your repair failing later because of poor adhesion.
I put a little piece of tape to hold my torn pieces together, so I could lay the repair together without them being a hassle.
Then I broke out the best repair kit on earth: the DUCT TAPE ROLL. I use Scotch, not brand X. And I cut it with scissors, I don't try to tear it. (that's emergency method only) If you don't have a tool bag in your truck, I recommend a multi bit screwdriver, a pair of needle nose visegrips, and a roll of duct tape as the absolute minimum. I'm pretty sure you can rebuild a 22re with just that.
I laid 3 pieces horizontal, then two vertical strips at the end. We all know duct tape does start to slip a little, sometimes the corners peel up over time. I'd rather that happen to these two end pieces, so I can cut them back without getting into the main pieces holding the repair. When I apply tape, whether its packing tape on a box, or in this application, I go over every square inch with the back of my fingernail, to really press in a good bond. Give the adhesive a chance to do its job. (I also hold double sided tape for the full 30 seconds. It makes a difference)
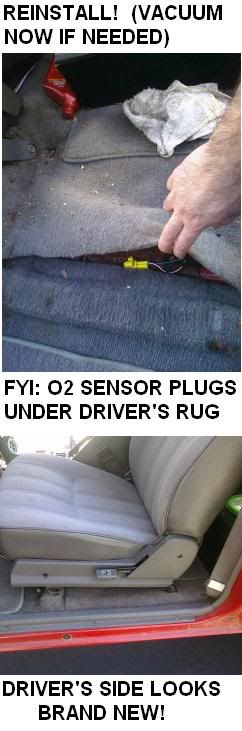
Now it's just a matter of reassembly. Again, if you're a details person, now would be the best time to vacuum. I checked my pockets but didn't have one on me, so I just used a rag to brush out the majority of the crud. You may also want to peek under the front/rear carpet break to see what harnesses are right there. On the driver's side is the plug for the 02 sensor; mine ('88) is a 4 wire. On the passenger side is another rubber plugged penetration, so if you ever need to run wires to the back of the truck, these are good places to poke through.
Ok, put those trim pieces back on, don't overtighten the seatback recline handles, because it's that more brittle plastic, lube your seat rails with white lithium spray, and bolt it all up. Another good idea is a gob of axle grease on the underside where the seat bolts penetrate the floor to prevent rust.
Step back and enjoy that vision of beauty: no more hole!
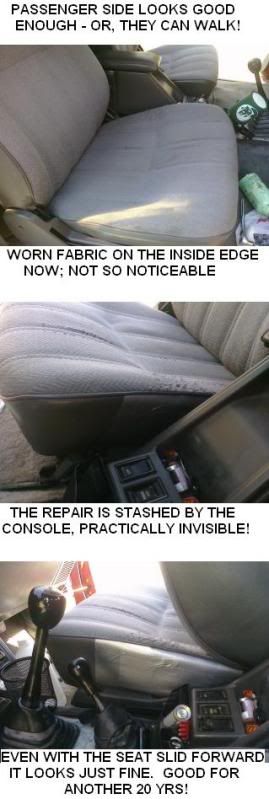
Reinstall the passenger side seat, same method. Now check out your handy work. The worn edge from you climbing in is now on the inside, where it will most likely have low stress for the remainder of its lifetime. The duct tape repair is concealed in the console where only you will know of its existence.
Now jump in, readjust your seats to preference, and see if you notice the difference. I didn't notice a thing, because they're the same dang seat! But I do notice when I get in and out, it looks good, and that's one more reason to smile everytime i get in the 'runner.
Tj
(p.s. mods: i didn't think this was "tech" enough to put in the forum for tech write-ups, but if you think it should be moved or YT pic hosted, please do what you feel is necessary)
Last edited by tj884Rdlx; 11-26-2009 at 11:58 AM.

 02-23-2010, 02:33 PM
#5
Here's what this guy did. A little bit of a sloppy job but the general idea is sound. I think if someone took their time it could turn out to look just like the factory seat.http://www.pandin.net/seat.htm. I think this is out of a 95-2000 Tacoma.
02-24-2010, 02:29 AM
#6
Registered User
I got near perfect condition '94 4runner limited seats for $50 (25 ea) .. a year later my buddy went back to the same yard and got the same seats (plus an extra tare hehe) for same deal.
They bolted right into pre-existing holes in my 87 single cab. Best 50 bucks ever! replaced a standard extremely worn out bench.
nice job tho =)
They bolted right into pre-existing holes in my 87 single cab. Best 50 bucks ever! replaced a standard extremely worn out bench.
nice job tho =)
02-24-2010, 06:42 AM
#7
Registered User
iTrader: (2)
Join Date: Dec 2009
Location: Pleasanton, CA - SF Bay Area
Posts: 2,159
Likes: 0
Received 7 Likes
on
5 Posts
Awesome posting - I've been looking for a DIY like this for years.
My SR5 passener seat is mint, and I've already replaced my drivers side with a crappy worn seat from another 4runner....I've love to swap the "soft stuff" on both seats.
Now....can you also swap the top part of the seats when taking this all apart, or just the bottoms, as outlined in this DIY?
I've also heard the 2nd gen (90-95?) bolt right in but require 1 new hole to be drilled on the seat rails to fit....
Phil
Trending Topics
02-24-2010, 06:17 PM
#8
Contributing Member
Join Date: Feb 2007
Location: maple ridge, British Columbia, Canada
Posts: 9,055
Likes: 0
Received 9 Likes
on
5 Posts
Yes you can swap the top peice, but you have to almost completely remove the cover. There is 2-3 bolts on each side holding the center to the frame. its tight...
I just swapped in a new $25 bucket instead of trying to fix mine.
I just swapped in a new $25 bucket instead of trying to fix mine.
02-24-2010, 06:56 PM
#9

 02-24-2010, 09:55 PM
#12
Registered User
haha, I just put duct tape on the drivers side, then some rubberized clear tape over that, I think its earned rips.. it has 450,000km on it, damn good seats if you ask me. Only taped over it because it keeps spitting foam out and poking my ass when I wear board shorts.
02-25-2010, 05:49 AM
#13
Registered User
iTrader: (2)
Join Date: Dec 2009
Location: Pleasanton, CA - SF Bay Area
Posts: 2,159
Likes: 0
Received 7 Likes
on
5 Posts
All that work when you could have just done this and swapped in another right hand lower and both looking new?
but isn't it pretty much the same thing the OP here did (but with more photos)?
I'm going to try this over the weekend I think, before my long roadtrip
 My passenger side SR5 seat is MINT!
02-25-2010, 03:34 PM
My passenger side SR5 seat is MINT!
02-25-2010, 03:34 PM
#14
Registered User
iTrader: (2)
Join Date: Dec 2009
Location: Pleasanton, CA - SF Bay Area
Posts: 2,159
Likes: 0
Received 7 Likes
on
5 Posts
So, I couldn't wait to try this out and had some extra time today - check out my photo packed DIY guide I just posted up:
https://www.yotatech.com/forums/f116.../#post51376569
https://www.yotatech.com/forums/f116.../#post51376569

Thread
Thread Starter
Forum
Replies
Last Post
jasonty
Pre 84 Trucks (Build-Up Section)
41
12-23-2018 01:00 PM
terminator
Misc Stuff (Vehicle Related)
3
07-27-2015 07:13 PM
CanRunner
95.5-2004 Tacomas & 96-2002 4Runners
6
07-20-2015 01:29 PM
icentropy
86-95 Trucks & 4Runners
4
07-09-2015 02:12 PM
FS[SouthEast]: 1st Gen 4Runner Slider Window, Driver Side
coryc85
Misc Stuff (Vehicle Related)
0
07-06-2015 04:07 AM


