EB Street RV *check* 261 Cam *check* 22re blown HG *check*
 06-20-2011, 08:13 PM
#1
Registered User
Thread Starter
EB Street RV *check* 261 Cam *check* 22re blown HG *check*
Well, 6 months ago my 95 started consuming coolant and I parked it before anything really bad happened. Drained the coolant, changed the oil and have started it once a month or so to keep it from totally sitting. It still runs great sans coolant haha, but I haven't dared drive it anywhere.
Well, I finally saved up some money to and have the time to spend fixing it. This is my first time tearing into an engine at all, so bear with me. Going to need some tips and a kick in the butt, I'm sure. I've read 92 Toy's thread several times now and finally got it in my head that I can tackle this project
Finally pulled the trigger on EB Street RV head, 261 Cam, EB Complete gasket set, ARP studs, going to pickup a Toyota HG I think. I recently had the timing chain and water pump done by a toyota mechanic who also worked out of his garage on weekends (20k miles ago). I'm going to have a look at it before I decide if it needs replacing again or if he actually did the job and didn't just take my money and run . I will also be upgrading to T100 Calipers and Rotors as my rotors are shot and the calipers are being used on my 81s solid axle.
So hopefully I will be back on the road and better than new soon.
Well, I finally saved up some money to and have the time to spend fixing it. This is my first time tearing into an engine at all, so bear with me. Going to need some tips and a kick in the butt, I'm sure. I've read 92 Toy's thread several times now and finally got it in my head that I can tackle this project
Finally pulled the trigger on EB Street RV head, 261 Cam, EB Complete gasket set, ARP studs, going to pickup a Toyota HG I think. I recently had the timing chain and water pump done by a toyota mechanic who also worked out of his garage on weekends (20k miles ago). I'm going to have a look at it before I decide if it needs replacing again or if he actually did the job and didn't just take my money and run
. I will also be upgrading to T100 Calipers and Rotors as my rotors are shot and the calipers are being used on my 81s solid axle.So hopefully I will be back on the road and better than new soon.
 06-20-2011, 08:22 PM
#2
Registered User
Thread Starter
Oh, also will be attempting to weld my cracked exhaust manifold as headers are not in the budget right now.
Also, does anyone have the power steering tension adjusting bracket and the pulley that bolts onto the crankshaft pulley, I cannibalized them during my power steering conversion on the 81.
Also, does anyone have the power steering tension adjusting bracket and the pulley that bolts onto the crankshaft pulley, I cannibalized them during my power steering conversion on the 81.
Last edited by SCToy; 06-20-2011 at 08:37 PM.
06-21-2011, 06:58 AM
#3
Registered User

Join Date: Aug 2005
Posts: 183
Likes: 0
Received 0 Likes
on
0 Posts
exh manifolds are cheap,dont waste time trying to weld.you can measure wear on the chain and guide,but I would upgrade to steel rail kit.If you keep the chain,you can use melling guides for a 20r and modify them to work{thats all DOA does for $100,my anus still stings}.check you block deck.I think thats the reason so many people have head gasket issues.cant use a flat head on a warped block.I used a rock gasket whn I put on my EB head,because everyone on this board said they were the best.Now everyone says they blow,but I have 20k on mine so far.I would use a MLs type headgasket from victor or comedic if I was doing it again.If I were you I would save a few more bucks and go throught the whole motor.Enginequest makes the nicest timing cover out there but it doesnt come with oil pump dowels.Good luck with your motor, its the simplest you will ever build.
06-21-2011, 07:12 AM
#4
Registered User
Thread Starter
The exhaust manifold I am more just curious to try my hand with cast iron than anything else, so why not. The whole exhaust system is trashed, before the cat. Was repaired by a buncha monkeys who didn't know how to weld, it's sad it's so bad. I will just replace it with a header before I waste and money on it.
Supposedly the Toyota mechanic I had do the chain last year replaced the timing chain with an OEM kit with steel guides, new Aisin water pump (or he cleaned the hell out of the one i had haha, but I know he is a toyota stealership mechanic, so he probably gets the parts dirt cheap). I'm waiting to find out what it looks like on the inside, but it should have a brand OEM cover as well. If not, I will be calling him and getting my parts. I know where he lives As far as getting the rest of the motor checked, I don't have the tools to pull the motor, so was planning to do it all in the truck. I know everyone says pull it, but I don't have a hoist or a stand, and have spent just about my budget so far.
Supposedly the Toyota mechanic I had do the chain last year replaced the timing chain with an OEM kit with steel guides, new Aisin water pump (or he cleaned the hell out of the one i had haha, but I know he is a toyota stealership mechanic, so he probably gets the parts dirt cheap). I'm waiting to find out what it looks like on the inside, but it should have a brand OEM cover as well. If not, I will be calling him and getting my parts. I know where he lives
As far as getting the rest of the motor checked, I don't have the tools to pull the motor, so was planning to do it all in the truck. I know everyone says pull it, but I don't have a hoist or a stand, and have spent just about my budget so far.
06-21-2011, 09:20 AM
#5
Registered User
Join Date: Aug 2005
Posts: 183
Likes: 0
Received 0 Likes
on
0 Posts
cast is very tough too weld completly.it will usually crack next to where you weld after it heats up.but your results may be better than mine.the oem guides for the chain are plastic.aftermarket is only place to go for steel,unless you have a 20r motor.
06-28-2011, 07:56 AM
#6
Registered User
Join Date: Aug 2009
Location: Sandy Eggo
Posts: 299
Likes: 0
Received 0 Likes
on
0 Posts
Cast is not hard, it's just specialized.
Standard welding guidelines apply, plus below.
1. pre-heat the work area to at least 300 degrees using a torch
2. use NiRod wire or rod (5% is what I used, IIRC)
3. Post-heat the work to cool it over at least 10-20 minutes depending on thickness
I took a Chevy 6.5 turbo manifold, capped the regular turbo outlet, chopped a hole in the side, and built an adapter for the turbo so it would fit under the floor of my class A motorhome. 6.2 NA to 6.2 turbo is very good for performance.
Trussed a Dana 30 like that too. Much better than brazing.
07-13-2011, 11:36 AM
#7
Registered User
Thread Starter
Well, I've finally gotten started and began to tear down. I've gotten to the distributor and TDC. I pulled the front most spark plug, which I was under the impression is number 1. I felt air being pushed out of it and was confident I had found it. Is this where the rotor is supposed to be pointing? I read on 92Toys thread that it was supposed to point towards the head, so am I 180 degrees off then?
Thanks
Thanks
Trending Topics
07-13-2011, 01:50 PM
#8
Hey Buddy, ..... I'll read back, but just to be clear.... You're doing a 'top end replace and full gasket set W/OUT lower end rebuild' ???
I think so, and if so, YES, that's TDC-Compression stroke #1 and #4 at the top. The dizzy dial goes from 1-3-4-2(IIRC). But in a row, from front to back, the HOLES are 1-2-3-4. You can look in there and usually see that #1 is at the tippy top, as well as #4(while it's harder to see if you're doing it with the motor still in there.) When you look in 2 and 3 holes, you'll see 'BLACK HOLE', lol... Those pistons on TDC-Compression should be at the bottom/lowest part of their stroke/on the downstroke.
Far as doing it in the truck, ..yeah, you can do it, sure. Just makes things MUCH easier, especially the clutch kit, etc., if you're doing so, to have it out.
Just some tips.....
1. When I pull the plenum off, I leave most EVERY HOSE attached, but mark them all for ease of install(You're going to want to THOROUGHLY clean out the plenum, throttle body{remove TPS first!}, all the vacuum ports and EGR while you have it all off, so you'll need to remove the hoses, etc. I just taped off each one in 3 spots on the first rebuild(vacuum port, vacuum hose and other end of vacuum connection/usually the rail or a VSV or something)
2. I don't have anything against the Head Studs/vs./bolts, ...but if you're not doing a FULL rebuild with performance mods, ....why? it's a cost you could use to rent a cherry picker and probably buy a stand from HFreight. (You could even have the bolts cleaned up, use a healthy one to chase all the holes, and you'd definitely avoid the possibility of a stud not hitting bottom and then causing vcover clearance issues.... Thread going right now where the studs are not clearing the cover... I KNOW, not that common, but again, 'why?')
3. Replace the Fuel Filter!
4. Have your injectors serviced by witchhunter.com
5. Check with Death Cougar or someone like that who has(?) connections with NIX99(a yard network) to find your pulley's, etc. Or hit a pick-u-part, and you just might find it, even CHEAPER~!
6. Have lots of engine bright and brake clean on hand, then also get a large can(think it's a half gallon) of Parts and Carb Cleaner(most every parts store has them.... can't thin of the name, but DAYUM that stuff helped with using the basket in there to clean all the bolts, etc.)
7. MAKE A TEMPLATE FOR THE TIMING COVER! 4crawler(google 4crawler, cheap tricks, timing cover). Print out the template and then match the bolts to that. Also, hit the parts store for some of the studs for the water pump.... almost every time, I've snapped at least one off. You can get them cheap from Napa/Autozone, and I mean the studs that go into the cover, not the ones that come with the new water pump. There are 3.
8. READ CAREFULLY and make notes, regarding the timing cover install. MANY bolts are different(reason for the template) and then therein, there are even 3 diff. torque values on the oil pump to cover mounting, they all need to be right to avoid tweaking the oil pump o-ring. Then, the torque values of the cover are all 9# and 29#. When it says "#9 for 8MM and 29# for 10mm, they're talking about the width of the threaded portion, not the head. So, the smaller ones get 9#(12mm head) and larger ones get 29#(14mm head). Make sure you have your AC bracket ready. Make sure you have a plan for install of the water pipes to the back of the timing cover ready. DON'T USE LOTS OF SEALANT! just a VERY thin film!
9. Install the oil pump to the cover when the cover is off, same with H20 pump(don't forget to prime the oil pump)
10. Install the lower intake and then very quickly install the IACV with the hoses already attached to the front and back. Also have the thermostat already installed, as well as the weird shaped coolant bypass hose(in other words, ...have all the hoses that are fairly hidden already hooked up, the one that hook to the Plenum, throttle body, IACV, etc.)
11. Get new exhaust studs(Especially with a new head)
12. What are you doing about the oil pan, since you are removing the t-cover AND head? (IOW, are you dropping the pan off completely and cleaning it up, cleaning it out and cleaning out the oil pick up tube, etc.? Sorry if I missed something... I thought you said you were doing the timing chain w/steel guide replacment) Also, be TOTALLY PREPARED when it's time to put it back on..... Even with the Diff dropped down, it's STILL TIGHT! I used Toyota FIPG and did a pretty good job, but that sealant wound up everywhere, even though I'd thought I'd planned it all out. (One example.... you have to get the pan up in there, THEN install the oil pick up tube, if you're doing it with the motor still in the truck....There's just NO ROOM to maneuver the pan up and over things with the pick up tube already installed....and even if there was, it'd be almost impossible not to smear that sealant all over the place!) Some have done this work w/out removing the pan, .....you could check into that too. I just wasn't comfortable trying that.
13. If you are doing the t-chain, FOLLOW THE INSTRUCTIONS given by engnbldr, ie."Don't overtorque the tensioner", "Make SURE that you seal the upper oil pump timing cover bolt and be sure it's not sticking out the back of the cover", etc. Also follow 4crawlers timing chain replacement to the tee. once it's buttoned up, you can't be saying, "Hmmm, did I do that?" right? lol.
14. Wish you were closer, you could borrow my stand, my hands, and even bring it here and do it so we could use my neighbors killer hoist! Dang, I'd head there if it wasn't so far, man!
PS> CLEAN THE BLOCK DECK VERY WELL! Don't scrape any scratches in it, but you CAN use a razor carfully(at a hard angle, etc.), scouring pads and acetone and alcohol to finish before you slap a new replacement HG on there. Even clean the EB head with Alcohol very well, ..... it might have oil on it or residue. #1 Cause for premature HG failure is CRAP LEFT OVER ON THE BLOCK/HEAD! lol.
07-13-2011, 01:54 PM
#9
PSS> Don't freak out if the new chain and sprocket wont just slide up over the CAM, even with the tensioner still depressed..... there are tricks that help to get it to slide up on there and in place.....AND DON'T FORGET THE HIDDEN BOLT that goes through the head into the timing cover! lol.
07-13-2011, 07:00 PM
#10
Registered User
Thread Starter
Hey Chef, so I am freshening up the top end basically. Once I get a look at the inside and pull the oil pan I will be able to get a better idea of the shape of the bottom end. If it is really that bad I will rebuild it all.
It ran great before blowing the head gasket, and still ran great when I parked it. I'm pretty sure I was having cooling problems due to a faulty radiator cap, but didn't figure that out until too late.
About 15k miles ago I had a Toyota dealership mechanic, who also worked out of his own garage on weekends replace the timing chain and water pump. Definitely had a shiny new AISIN water pump when I got it back from him. Who knows if he really replaced the chain and guides/cover like he said. What can I say, it was my first experience dealing with mechanics and since then I've done all my own wrenching Before I gave it to him it didn't leak a drop of oil, but in the 15k miles since then, I have had oil leaks that just got worse and worse.
I went from a spotless engine to this mess
So, as of now the plan is tear it down, replace the head gasket and head, pull it apart and replace all the seals and inspect the timing chain (replace if necessary). I am also dropping the oil pan as it looks like it's leaking where it meets the head and I am sure he didn't clean any of the broken guide bits out of the pan (I haven't decided if I am going to drop the diff, or unbolt the motor mounts and jack it up to pull the pan). Replacing the oil pump while I have it apart for good measure. I have a fuel filter as well. I will definitely service the injectors through Witch Hunter!
As far as the ARP studs, I have to do all of this myself and I just have a general gripe with bolts vs studs in general. Ever try to put a wheel back on a BMW where the hub wants to spin and you have to line up the damn wheel bolts For the 120 bucks, I figured it was just worth not having to deal with lining everything up by myself.
I cannot pull the motor because I parked the truck at my parents and it drives them nuts when I tear things apart at their house. If I pull the motor they will make me take it to my house (they don't know I can pull the motor out hehehe). I have absolutely no workspace that is flat. It's all dirt and I live in a yurt, so no useable work space inside either. Also, I live 45 minutes from the nearest store, and they live 10 minutes from a hardware store, which is really handy when you need random unforeseen things. So basically, pulling the motor will make the job harder, oddly enough.
I've got the 4crawler writeup printed out as well as the FSM timing chain and head disassembly books PDFs. Been following his directions, but it's all new to me!
Thanks for all the tips, will print them out too!
It ran great before blowing the head gasket, and still ran great when I parked it. I'm pretty sure I was having cooling problems due to a faulty radiator cap, but didn't figure that out until too late.
About 15k miles ago I had a Toyota dealership mechanic, who also worked out of his own garage on weekends replace the timing chain and water pump. Definitely had a shiny new AISIN water pump when I got it back from him. Who knows if he really replaced the chain and guides/cover like he said. What can I say, it was my first experience dealing with mechanics and since then I've done all my own wrenching
Before I gave it to him it didn't leak a drop of oil, but in the 15k miles since then, I have had oil leaks that just got worse and worse.I went from a spotless engine to this mess
So, as of now the plan is tear it down, replace the head gasket and head, pull it apart and replace all the seals and inspect the timing chain (replace if necessary). I am also dropping the oil pan as it looks like it's leaking where it meets the head and I am sure he didn't clean any of the broken guide bits out of the pan (I haven't decided if I am going to drop the diff, or unbolt the motor mounts and jack it up to pull the pan). Replacing the oil pump while I have it apart for good measure. I have a fuel filter as well. I will definitely service the injectors through Witch Hunter!
As far as the ARP studs, I have to do all of this myself and I just have a general gripe with bolts vs studs in general. Ever try to put a wheel back on a BMW where the hub wants to spin and you have to line up the damn wheel bolts
For the 120 bucks, I figured it was just worth not having to deal with lining everything up by myself.I cannot pull the motor because I parked the truck at my parents and it drives them nuts when I tear things apart at their house. If I pull the motor they will make me take it to my house (they don't know I can pull the motor out hehehe). I have absolutely no workspace that is flat. It's all dirt and I live in a yurt, so no useable work space inside either. Also, I live 45 minutes from the nearest store, and they live 10 minutes from a hardware store, which is really handy when you need random unforeseen things. So basically, pulling the motor will make the job harder, oddly enough.
I've got the 4crawler writeup printed out as well as the FSM timing chain and head disassembly books PDFs. Been following his directions, but it's all new to me!
Thanks for all the tips, will print them out too!
 07-13-2011, 08:07 PM
#12
Hey man, I hear ya, ...
First off, I hear ya on the studs, and LIKE I SAID, lol... "NOT SAYING THEY'RE BAD", .....but 'keeping everything in line'? There are two dowels on the block that will hold the HG and then head right in place while you put the rocker assembly on and then head bolts. But again, IT'S YOUR BUILD, you do what makes you comfy! I totally get that, I've done things myself that some saw as silly(and I'M NOT saying it's silly! lol... just trying to save you some cabbage! lol)
Far as that leaky MESS, ..... from the pooling oil I see, it looks to me like he pinched the corners of the HG putting the t-cover back on, and/or forgot a lil bead of sealant there as well. Maybe I missed something like "I cracked the cover forgetting the Hidden bolt" or something, ....dont' think so, ..hmmmm, lol.
I would also use 4crawlers page to VERIFY that the dude even put the timing cover bolts back in the right place, whether he sealed the 'bolt that get's sealant' bolt, lol... and whether he cut away the sealant from the timing cover on the bottom/from the pan, and then pulled it straight out. If so, if he didn't drop the pan or pull the head, it's VERY possible he pinched the HG, thus, SOME OF your leaks. lol.
Far as the "Oil pan or lift the motor?" question? Well, I wish I'd lifted the motor the time before this last one, ... when I had it OUT, on a stand,.... but I didn't, and just dropping the diff with no lift was still pretty tight. So, to be honest, I wish I'd done both! lol. It was only an hour or so my first time to drop the diff, letting it hang by the CV's, SC...... and considering all the work you're doing, .....don't you want it to be as 'EASY AS POSSIBLE', by only adding another hour or two of work to the plan? Just MHOpinion.
Personally, I would start steaming the crap out of that thing, NOW! Or, engine bright and water, whatever, but you don't HAVE TO get so filthy that you're honey wont touch you, EVEN AFTER YOU BATHE! lol.
When you're ready to get strippin it down, ....pull the steering pump from the brace and hang it out of the way with bungie chord(to the wheel well or something). Pull the AC compressor off to the side and hang it there as well, out of the way, and then pull the bracket for cleaning/necessity! lol. 4bolts hold that compressor to the brace, PO-Cake, lol. Pretty sure you can use the steering brace that bolts to the head for leverage when pulling that head off. Don't forget the alternator bracket(UPPER) and swing the oil dip stick tube brace out of your way as well. (I see your steer pulley is still on the pump.... Need to remove that to remove one of the mounting bolts of pump-to-brace....Best to do that when the belts are on, but that's ok.... Get vice grips and an old belt, get the belt tight around the pulley with the vice grips and crack that bolt using a breaker bar and...19MM is it?.... An impact would be best, but You wouldn't wanna freeze that up on there by rounding it, ya know? Be careful if you go that route... DON'T KEEP TRYING if it aint budging, ya know? lol. Also, don't forget the head-to-firewall ground.... I DID, and almost screwed things up! LOL. I was like "Yeah, it's coming right off, 'OOPS'" , tugged against me and almost dropped it! EEEEK! lol
Taking pics of all the vacuum stuffs is GREAT work ethic! lol. But it's not enough. You REALLY need to label those well, ok? lOOKS LIKE YOU ARE! Pull the steering ones off the plenum and leave them on the steering pump, no need to remove them from that side(before you hang the pump over to the side you'll need to anyway).
Another thing, pull the throttle linkage as a unit, leaving as much attached as you can and tape the bolt of the linkage that bolts to the plenum to the actual hole it goes in. (I did this with the VSV's, etc., too.... kept them all in place). I also left the VSV's with as much vacuum still attached to them as possible, then pulled the valve cover with them still on there. I also pulled the EGR modulator bolt, taped IT to the modulator frame hole again like the others and folded it back out of the way, leaving it attached to the rail but disconnected from the EGR. When I took the rail off last time it had almost every hose still on it and the modulator hanging from it too! lol.) When the time comes, I'll remind you , "HEY, SC, DON'T FORGET THE VACUUM RAIL BEFORE SNUGGING THAT INTAKE DOWN!" lol. It goes under intake mounts(one bolt and over one stud that a nut holds down)
OH, and if none of your coolant pipes leak, DO NOT CLEAN THEM TO POLISHED ALUMINUM FINISH! I did, reassembled and developed leaks where it would leak RIGHT THOUGH THE METAL! Ask my homies! lol. I had to tear down the intake again. SUCKED! lol. Just clean the mating surfaces to the timing cover and pipes pretty well, but not TOO WELL! lol.
OH, and PS>... two guys with STRONG ratchet straps, a 2x4 or two and some step ladders could yoink a short block out of there WITHOUT a hoist, no problem! One guy? Hmmmm, yeah, that COULD get ugly, ...but 2 guys? FOR SURE! 120# maybe?(that's with EVERYTHING stripped off of it.
I admire you doing a "Jerry"! His build amazed me, and I REALLY admire that guys "never give up" spirit!
First off, I hear ya on the studs, and LIKE I SAID, lol... "NOT SAYING THEY'RE BAD", .....but 'keeping everything in line'? There are two dowels on the block that will hold the HG and then head right in place while you put the rocker assembly on and then head bolts. But again, IT'S YOUR BUILD, you do what makes you comfy! I totally get that, I've done things myself that some saw as silly(and I'M NOT saying it's silly! lol... just trying to save you some cabbage! lol)
Far as that leaky MESS, ..... from the pooling oil I see, it looks to me like he pinched the corners of the HG putting the t-cover back on, and/or forgot a lil bead of sealant there as well. Maybe I missed something like "I cracked the cover forgetting the Hidden bolt" or something, ....dont' think so, ..hmmmm, lol.
I would also use 4crawlers page to VERIFY that the dude even put the timing cover bolts back in the right place, whether he sealed the 'bolt that get's sealant' bolt, lol... and whether he cut away the sealant from the timing cover on the bottom/from the pan, and then pulled it straight out. If so, if he didn't drop the pan or pull the head, it's VERY possible he pinched the HG, thus, SOME OF your leaks. lol.
Far as the "Oil pan or lift the motor?" question? Well, I wish I'd lifted the motor the time before this last one, ... when I had it OUT, on a stand,.... but I didn't, and just dropping the diff with no lift was still pretty tight. So, to be honest, I wish I'd done both! lol. It was only an hour or so my first time to drop the diff, letting it hang by the CV's, SC...... and considering all the work you're doing, .....don't you want it to be as 'EASY AS POSSIBLE', by only adding another hour or two of work to the plan? Just MHOpinion.
Personally, I would start steaming the crap out of that thing, NOW! Or, engine bright and water, whatever, but you don't HAVE TO get so filthy that you're honey wont touch you, EVEN AFTER YOU BATHE! lol.
When you're ready to get strippin it down, ....pull the steering pump from the brace and hang it out of the way with bungie chord(to the wheel well or something). Pull the AC compressor off to the side and hang it there as well, out of the way, and then pull the bracket for cleaning/necessity! lol. 4bolts hold that compressor to the brace, PO-Cake, lol. Pretty sure you can use the steering brace that bolts to the head for leverage when pulling that head off. Don't forget the alternator bracket(UPPER) and swing the oil dip stick tube brace out of your way as well. (I see your steer pulley is still on the pump.... Need to remove that to remove one of the mounting bolts of pump-to-brace....Best to do that when the belts are on, but that's ok.... Get vice grips and an old belt, get the belt tight around the pulley with the vice grips and crack that bolt using a breaker bar and...19MM is it?.... An impact would be best, but You wouldn't wanna freeze that up on there by rounding it, ya know? Be careful if you go that route... DON'T KEEP TRYING if it aint budging, ya know? lol. Also, don't forget the head-to-firewall ground.... I DID, and almost screwed things up! LOL. I was like "Yeah, it's coming right off, 'OOPS'" , tugged against me and almost dropped it! EEEEK! lol
Taking pics of all the vacuum stuffs is GREAT work ethic! lol. But it's not enough. You REALLY need to label those well, ok? lOOKS LIKE YOU ARE!
Pull the steering ones off the plenum and leave them on the steering pump, no need to remove them from that side(before you hang the pump over to the side you'll need to anyway). Another thing, pull the throttle linkage as a unit, leaving as much attached as you can and tape the bolt of the linkage that bolts to the plenum to the actual hole it goes in. (I did this with the VSV's, etc., too.... kept them all in place). I also left the VSV's with as much vacuum still attached to them as possible, then pulled the valve cover with them still on there. I also pulled the EGR modulator bolt, taped IT to the modulator frame hole again like the others and folded it back out of the way, leaving it attached to the rail but disconnected from the EGR. When I took the rail off last time it had almost every hose still on it and the modulator hanging from it too! lol.) When the time comes, I'll remind you , "HEY, SC, DON'T FORGET THE VACUUM RAIL BEFORE SNUGGING THAT INTAKE DOWN!" lol. It goes under intake mounts(one bolt and over one stud that a nut holds down)
OH, and if none of your coolant pipes leak, DO NOT CLEAN THEM TO POLISHED ALUMINUM FINISH! I did, reassembled and developed leaks where it would leak RIGHT THOUGH THE METAL! Ask my homies! lol. I had to tear down the intake again. SUCKED! lol. Just clean the mating surfaces to the timing cover and pipes pretty well, but not TOO WELL! lol.
OH, and PS>... two guys with STRONG ratchet straps, a 2x4 or two and some step ladders could yoink a short block out of there WITHOUT a hoist, no problem! One guy? Hmmmm, yeah, that COULD get ugly, ...but 2 guys? FOR SURE! 120# maybe?(that's with EVERYTHING stripped off of it.
I admire you doing a "Jerry"! His build amazed me, and I REALLY admire that guys "never give up" spirit!
Last edited by ChefYota4x4; 07-13-2011 at 08:11 PM.
07-14-2011, 10:27 AM
#13

I'm about to reassemble my engine, as you disassemble yours can you say how the leaking items the out of his garage Toyota mechanic did on the timing set replacement what he used to seal those components, oil pump, water pump, did he use new redesigned crank seal in the oil pump cover, what kind of sealer if any on the timing cover side gaskets, what type or color of the sealer on the 4 corners of the timing cover on the head and oil pan. The front of the engine should not have looked like that from a Toyota mechanic doing it for a living, That info would be great for me and others, Thanks
07-14-2011, 11:38 AM
#14
John,
I know you're waiting to see what SC finds, .....
1. O-RING ONLY for the oil pump, no modifications necessary, period, ever!(However, 3 Diff. torque values on 5 oil pump mounting bolts and 'sealant on the one bolts threads?>> very important)
2. VERYYYYYYYYYYYYY light coat of sealant on the timing cover gaskets. And, in the corners, where the head meet the timing cover, cover meets block-face, a LIL bit goes there, NOT A BIG WAD, ...but enough to ''seal the corners''. (Just like with the half moons, you wanna seal not only the bottom but ON TOP, on the 'corners', where each side of the flat portion of the half moon meet the head/valve cover. )
3. Far as 'what type' on the corners, ...... PERSONALLY, i still think that Toyota FIPG(dealer) is the best for timing cover, oil pan(WHOLE oil pan, not just the corners) AND the corners. It works REALLY well, but dries PRETTY fast, .....not 2 minutes or anything, ...just quicker than some, lol. A couple others that I've used that seem to be holding really well(and many 'reviews' of assemblers seem to agree) is "The Right Stuff" by Napa..... But MANY will just say "NO, use Ultra Gray" or "NO, use Ultra Black and you'll be fine".... and they're mostly right... it's MOSTLY in the application, quickness and evenness of it's application.....especially 'within the time limit' on the quickness end. DON'T rush till you splatter things everywhere, lol... but yeah, helps to get it at least while it's still BARELY tacky!
PS> Most machinists I've spoken to have told me, "Nah, don't need ANY sealant on the H20 Pump".... But I've always used the "Blue Water Pump Sealant", A SUPERRRRRRRRRRRRRRRR thin film, just like paint, literally. And on both, the timing cover and water pump on it's own, you don't want sealant oozing out the side, AT ALL, and it shouldn't be if it's done right. Far as the oil pump assembly, to minimize risk, the best way is to install it while the cover is off(ONLY IF YOU'RE ALREADY REMOVING IT, of course! lol), torque down the three different values, in increments, and make sure the oil pump o-ring's recess and the o-ring itself are FREE OF DEBRIS..............
Soooooooooo, .......best luck to both of you guys!
07-14-2011, 11:55 AM
#15
Registered User
Thread Starter
Hey John, I will definitely picture everything, I think for the most part the oil is all coming from where the timing cover meets the head and the oil pan meets the timing cover. It's just been flung all over by moving parts. I think he must have pinched the head gasket by not removing the head to save time. We'll see when I get it all apart though. Sorry, attention split between two projects at the moment. I'm buying an E36 328is BMW to DD that was built by my friend. It's got a load of custom parts, and we're going over everything and retorquing everything before we sign the paperwork.
I should be able to pick up the pace and keep you all posted as soon as we finish doing that. Unfortunately, he's also the one who I used to wrench with, so that means my second set of hands will no longer be around as of this weekend =(
Again, thank you Chef for your knowledge, you along with 92Toy's thread have been a tremendous help and motivation that I can get this thing fixed!
07-14-2011, 02:08 PM
#16
Registered User
Thread Starter
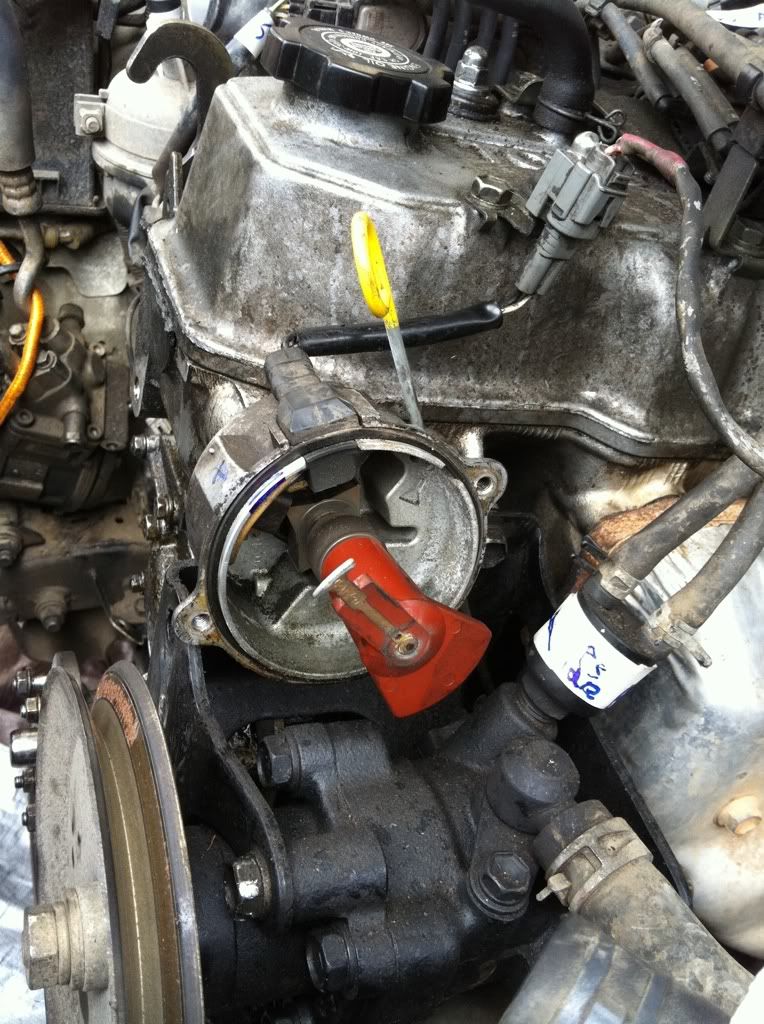
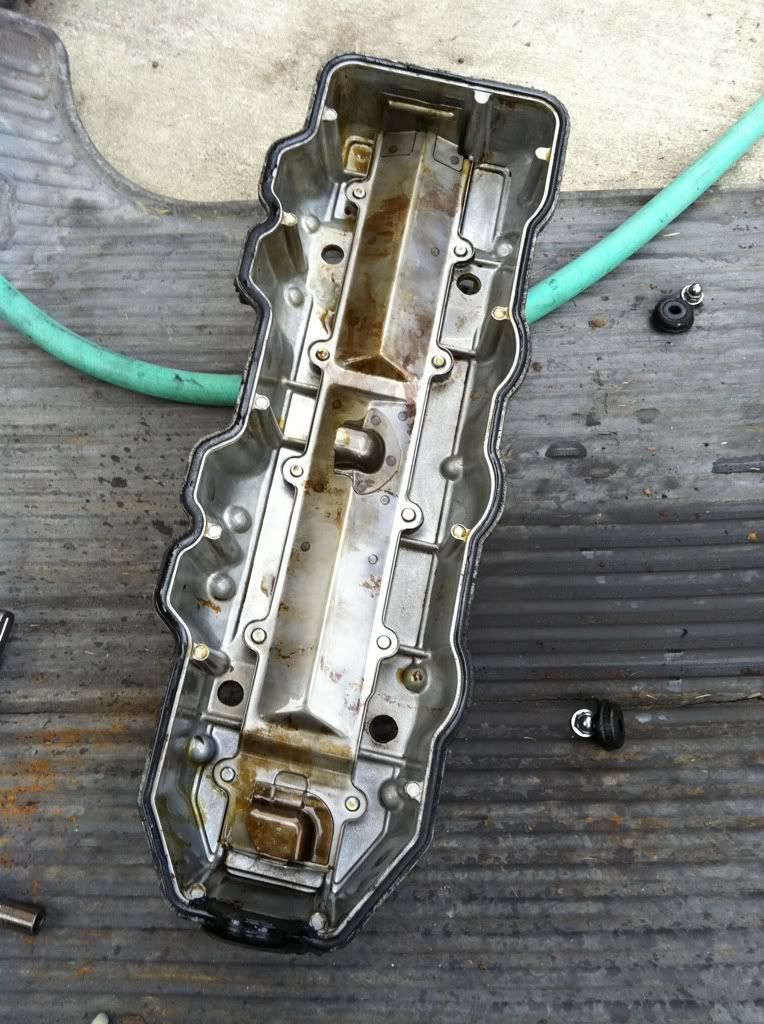
Well, I got some stuff done this afternoon. Been following 4crawler's list and just got the valve cover off.
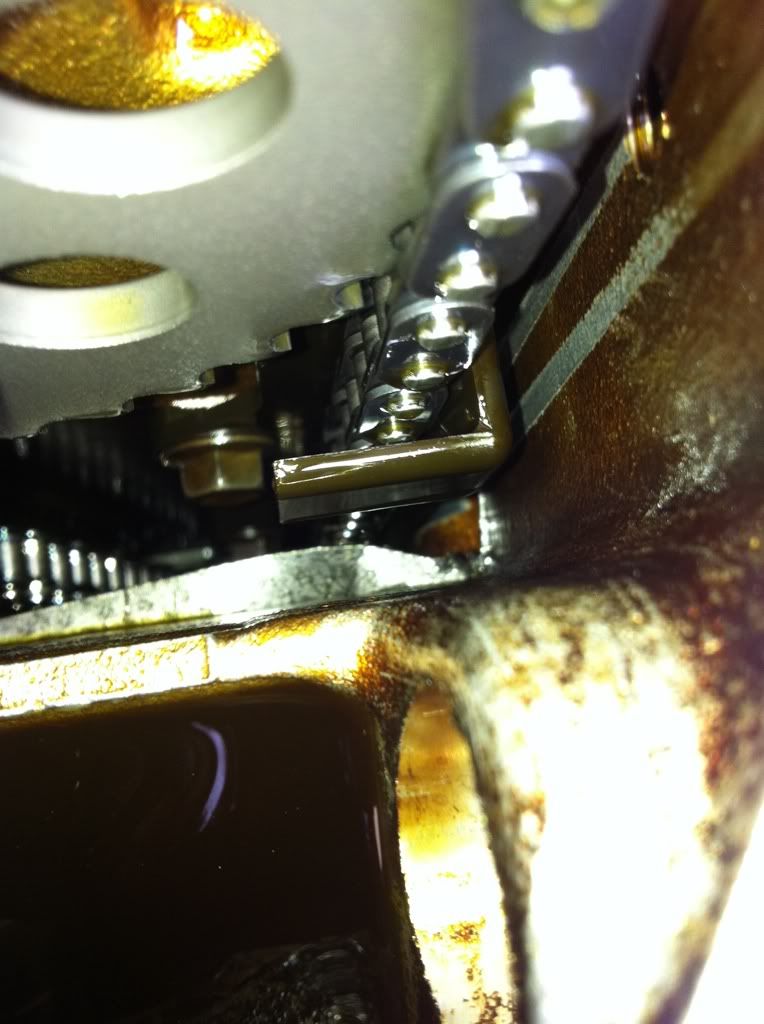
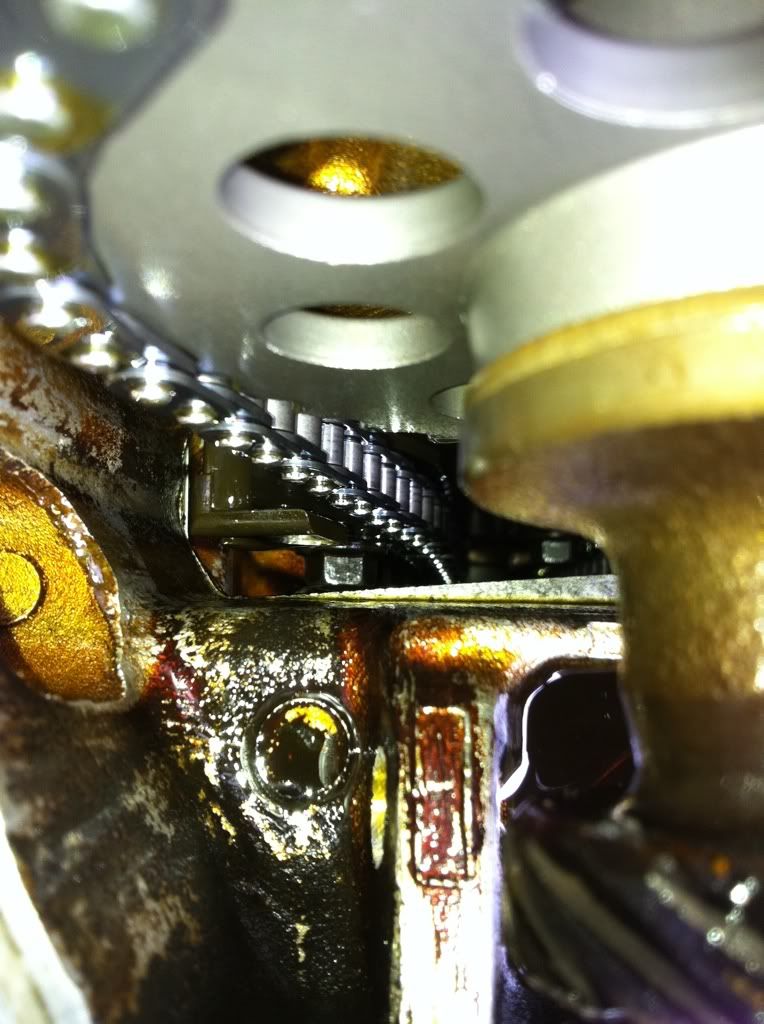
It looks like a new timing set, but he definitely ripped me on the timing cover because it's got a pretty good rail road going down it, so there is most definitely bits of the guide down in the oil pan.
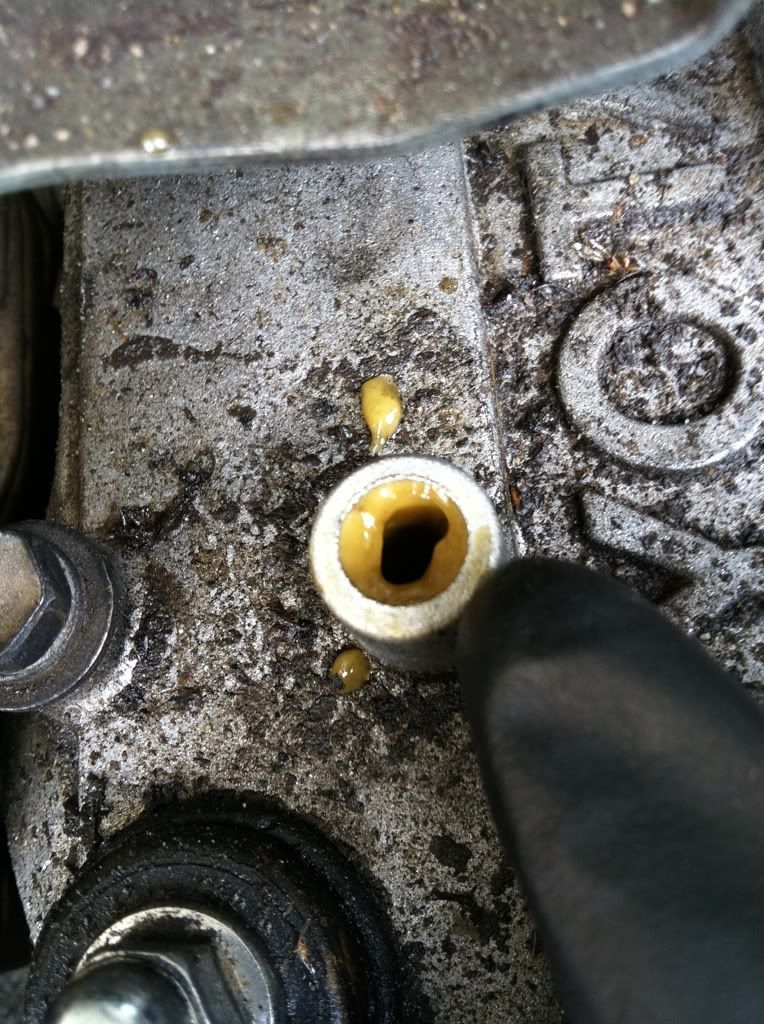
Is this Yellowish goo in this normal? It's where the large hose attaches to the valve cover on the left side of the VC.
Also, it looks as if there is no bright link lined up on the cam gear.
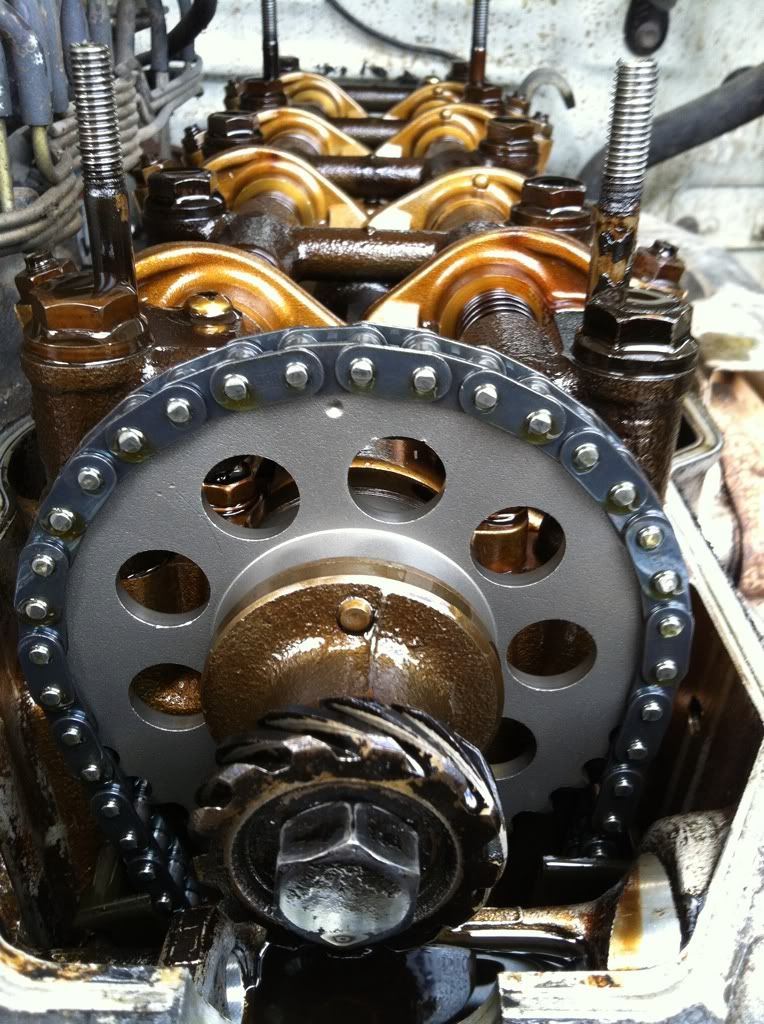
It looks like a new timing set, but he definitely ripped me on the timing cover because it's got a pretty good rail road going down it, so there is most definitely bits of the guide down in the oil pan.
Is this Yellowish goo in this normal? It's where the large hose attaches to the valve cover on the left side of the VC.
Also, it looks as if there is no bright link lined up on the cam gear.
 07-14-2011, 02:46 PM
#18
I just wanted to hear what an off hours off the clock toyota mechanic and how he does repairs, wheather it's the same as in shop, I figure he cut corners, or damaged head gasket or forgot to put sealant on upper oil pump bolt, I just don't want any leaks, wishful thinking heh? ;}LOL
When I took mine all apart, oil pump on mine has black sealant around the edges including the rubber gasket ring.
I believe front seal wasn't replaced, they replaced the timing cover (new used) and timing assembly (Don't know brand, elcheapo I assume) just before I bought the truck, water pump had paper gasket and so did timing cover, the paper gaskets were moist, so I don't know if they had a sealant or just from the surrounding fluid (water/coolant and oil)
I'm glad I decided to redo some of the motor, If I had $2140 I'd get new factory assembled short block (maybe later) and also the 2 tensionor bolts were loose as a goose and oil pan had black sealant and snakes inside the pan, put to much on I believe, pick up screen was clogged and pan was full of plastic guide pieces big and tiny. I got head and 268 cam and 4 piece front ala cart and bolts from engnbldr and gasket kit from Auto Zone for way to much money but need valve seats to redo old head but flow check found a crack welded between intake and exhaust on #2 that made head scrap aluminum, get gasket kit from engnblder for 1/2 the cost...Putting redesigned factory seal on front and back and other factory gasket not included in the auto zone gasket kit, 2 air injection and one egr behind intake plenum that say EFI... So much info, hard to keep it all straight ;}LOL
Last edited by john4wd; 07-14-2011 at 03:55 PM. Reason: edit
07-14-2011, 03:17 PM
#19
Registered User
Join Date: Mar 2010
Location: Fresno, California
Posts: 594
Likes: 0
Received 0 Likes
on
0 Posts
that yellow goo is just oil and coolant mixed from the head gasket failure. timing set looks newer those are the OEM plastic guides!! Have fun with the build. its not that hard just take your time and research here if you have questions!
07-14-2011, 08:20 PM
#20
Ps. Auto Zone sells steel backed rubber coated guide they call a damper on there site seporatly for $12.99 for the left hand straight one.
http://www.autozone.com/autozone/par.../N-j02mdZ8znm2
I bought one to use with the new set previous owner put on to replace that plastic one, but decided to go with a new set all together from engnbldr and now keeping other guide/damper as a spare and the newer plastic one I took off from previous owner as a spares spare ;}LOL, YOU NEVER KNOW!!!!
Part Number: 7133S
Warranty: 3 MO
Notes:
Left hand


