Crankshaft and Camshaft Bolt Removal Tool

 03-31-2010, 08:36 AM
#22
Registered User
Join Date: Jul 2008
Location: Nashville TN. I can help you if you're close BUT NOBODY CAN HELP YOU IF YOU DON'T FILL YOUR LOCATION IN!
Posts: 1,818
Likes: 0
Received 4 Likes
on
4 Posts
yeah, same in reverse...? No fab and special tools required...
I learned the hard way to leave belts on while you break the bolts...
Damn 22R power steering pump pulleys...
Last edited by tried4x2signN; 03-31-2010 at 08:38 AM.
03-31-2010, 06:14 PM
#23
Registered User
Thread Starter
Great idea!!
I just made this tool, and improved upon the design slightly. Where you drilled the 2 x 9/16" holes I drilled 2x smaller holes. Just large enough for the 8mm x 1.25 x 40mm bolts for the crank pully. This should help with the bending. I drilled the holes for the 7/16" about 1/2" inward.
Thanks for the idea!
03-31-2010, 07:11 PM
#24
Registered User
Join Date: Jul 2007
Location: Yotatech, because Pirate is too expensive. NorCal.
Posts: 1,705
Likes: 0
Received 10 Likes
on
5 Posts
If you take the belts off save them. You can put it around the pulley and put a pair of vice-grips pinching the belt as close to the pulley as possible. Have someone hold the other loop or put it around something. Thats done it for me a few times but don't do it if you want to re-use your belt.
03-31-2010, 07:25 PM
#25
Registered User
I plan to fab this tool up in the next few days. FYI, here is an online source for the bolts that is fairly inexpensive.
http://www.boltdepot.com/
http://www.boltdepot.com/
04-01-2010, 03:54 AM
#26
Registered User

Join Date: Mar 2010
Location: Austin, TX
Posts: 35
Likes: 0
Received 0 Likes
on
0 Posts
I plan to fab this tool up in the next few days. FYI, here is an online source for the bolts that is fairly inexpensive.
http://www.boltdepot.com/
http://www.boltdepot.com/
02-21-2011, 01:06 PM
#27
Registered User

Join Date: Feb 2011
Posts: 2
Likes: 0
Received 0 Likes
on
0 Posts
I'd love to know if any of you happen to live in the Las Vegas area and have one of these great tools I could borrow???
Or, happen to know where I could obtain one?
I've tried the starter bumping technique and the Socket & Breaker Bar keep slipping off and the bolt head is on the verge of stripping. I have also tried placing the manual Transmission in 5th gear and using a 6 foot, 3/4" diameter pipe to break it free and no such luck!!!
I'm only moderately mechanically inclined and low on funds to purchase the materials for this tool, much less fabricating the tool...
ANY HELP WILL BE GREATLY APPRECIATED!!!
Jason Colvin
1993 Toyota Pickup, 4 Cylinder, (22R/ RE?), 4WD, Manual Trans, AC, etc. etc...
02-21-2011, 08:10 PM
#29
Registered User
Thread Starter
Making the tool only requires a hack saw and a drill. It can be made for only about $15 and it makes the job easy. I'd also get a new crank bolt from Toyota since yours is either way overtorqued or corroded. Well worth the $5 or $10 that it costs.
02-21-2011, 08:28 PM
#30
Registered User

Join Date: Sep 2010
Posts: 29
Likes: 0
Received 0 Likes
on
0 Posts
Thanks this tool really helped me. but it started to flex and bend when i tried to use it on my cam sprockets. here is another idea.
3 foot of 2" wide by 1/4" thick metal stock. at one end drill 3 holes. 2 for the large bolts and a 1" hole in the middle of thoes to reach the cam sprocket bolt.
3 foot of 2" wide by 1/4" thick metal stock. at one end drill 3 holes. 2 for the large bolts and a 1" hole in the middle of thoes to reach the cam sprocket bolt.
02-25-2011, 09:19 AM
#31
Registered User
Join Date: Feb 2011
Posts: 2
Likes: 0
Received 0 Likes
on
0 Posts
Thanks all... I ended up forcing a 3/4" impact type socket w/ 1/2" drive breaker bar braced under the passenger side frame rail.
Instead of just a quick "bump", I gave it a generous "bump", about a second and a half and it broke free.
I will take your advice though and purchase the new bolt as I easily put over a couple hundred pounds of force on that thing using a 4 foot pipe with the breaker bar and socket!!!
Instead of just a quick "bump", I gave it a generous "bump", about a second and a half and it broke free.
I will take your advice though and purchase the new bolt as I easily put over a couple hundred pounds of force on that thing using a 4 foot pipe with the breaker bar and socket!!!
10-30-2012, 06:00 PM
#33
Contributing Member
Join Date: Dec 2005
Location: Los Osos, CA (we can't agree on crap!)
Posts: 2,124
Likes: 0
Received 0 Likes
on
0 Posts
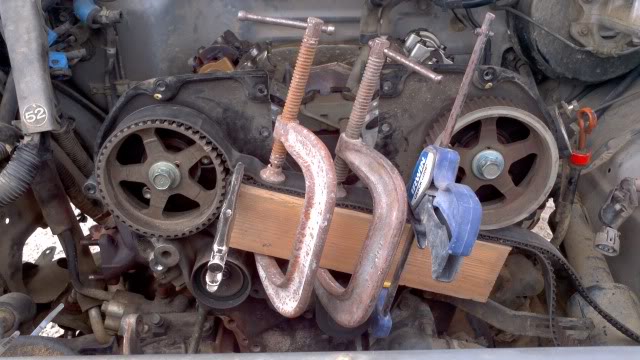
Since I referenced this thread many times while trying to get my bolts off, I thought I would post the "tool" that I made.
My 1/2" impact wouldn't budge them (can't remember if I tried it before takeing the belt off), and adding heat with the impact didn't work either. I was going to try to make a tool like was made here, but didn't have the materials on hand. I decided to try to make my own strap wrench using a 2x3, clamps, and the old timing belt.
Worked like a charm! A 3' cheater pipe on a 1/2" breaker bar loosened them right up! YOu have to use some good metal clamps that you can tighten down really tight. I first used two speed clamps and they started to slip, but then the good metal clamps bit into it more and held perfect.
10-31-2012, 11:59 PM
#34
Registered User

Join Date: Sep 2011
Posts: 83
Likes: 0
Received 0 Likes
on
0 Posts
Nice job getting those off! I would have never thought of that one. That works in a pinch, but you should also invest in this tool. Buying the bar stock is a little spendy, but I've used it so many times now. Truly multipurpose. Works on both my 3vze and 22re, great for cams and cranks, awesome for flywheel bolts.
Last edited by cambob; 11-01-2012 at 12:00 AM.
11-01-2012, 06:39 PM
#36
Registered User

Join Date: Sep 2007
Location: San Francisco East Bay
Posts: 8,252
Likes: 0
Received 820 Likes
on
648 Posts
Just so you know: the cams have a 27mm hex cast into the middle; you can put a wrench on that and not worry about damaging the sprockets etc. Also, you'll be putting the torque right where it will loosen the bolt, rather than trying to push that torque through the "knock pins" that keep the sprockets from rotating on the cam shaft. You don't want that wrench to lean on the aluminum head, but I had no trouble leaning it on a 2x4 that contacted the edge of the engine bay. 27mm is not a common wrench size in the US, but 1-1/16" is easy to find and will work just as well.
06-04-2013, 12:09 PM
#37
Registered User

Join Date: May 2013
Posts: 3
Likes: 0
Received 0 Likes
on
0 Posts
Thanks
Big thank you to Bugs 1961 for posting his tool design.  I have a 22RE 2 X 4, that I had to modify the design a little in order to use it. I didn't have enough clearance with the 3' length so I changed it to 2'. Worked just fine. Don't know who installed the crank pulley bolt before, but luckily when it fell off it was laying in my driveway where I just happened to spot it before I drove off.
I have a 22RE 2 X 4, that I had to modify the design a little in order to use it. I didn't have enough clearance with the 3' length so I changed it to 2'. Worked just fine. Don't know who installed the crank pulley bolt before, but luckily when it fell off it was laying in my driveway where I just happened to spot it before I drove off.


