
Cracked Seat Belt Fix
 03-31-2015, 05:55 PM
#1
Registered User
Thread Starter
Join Date: Feb 2013
Location: Bellingham, WA
Posts: 141
Likes: 0
Received 0 Likes
on
0 Posts
Cracked Seat Belt Fix
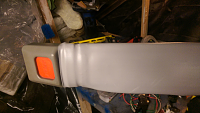
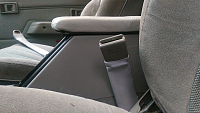
In my everlasting attempt at restoring my interior, the cracked seat belt receivers and my OCD got the best of me. I've not had much luck finding, at least the drivers side, receiver that isn't all busted up at the top. I tried fabric glue which as expected didn't hold for long. Then I used zip ties which looked like zip ties. Then it came to me. Shrink tube. I figured out that 1 1/2" tubing would fit snuggly over the receiver. I ordered 4' of grey tubing so I could mess up once or twice. Little heat gun action and a nice easy fix.
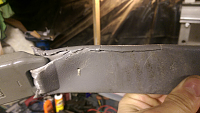
This is what I started with.
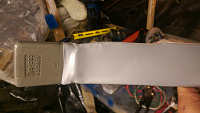
And that's what I ended up with.

This is what I started with.


And that's what I ended up with.
 03-31-2015, 06:03 PM
#2
Registered User
Join Date: Feb 2015
Location: Michigan
Posts: 7
Likes: 0
Received 0 Likes
on
0 Posts
Awesome, I've been looking for a solution to this problem for a long time! Where did you find 1.5" heat shrink tubing, EBay? I see the seller FlexRLLC has it but not in my required brown/tan color.
Last edited by DKirk; 03-31-2015 at 06:10 PM.
03-31-2015, 06:11 PM
#3
Registered User
Thread Starter
Join Date: Feb 2013
Location: Bellingham, WA
Posts: 141
Likes: 0
Received 0 Likes
on
0 Posts
There is a local hardware store here in Bellingham that has everything. They carry shrink tube up to 3". I took one of the receivers in to test sizes. They unfortunately didn't have grey though. But at least I knew the size I needed. After searching online I found a website http://www.electriduct.com/ which had the size and color. The product is just what I was looking for. It seems pretty tough so I would expect it to last a while. It was a couple bucks a foot however the shipping was steep. I wish I would've had the patience to call them and haggle for a better shipping rate. I am happy with the product though.
03-31-2015, 06:21 PM
#4

Cool. I cut the plastic sheath off my belts when I did my bench to bucket swap to get rid of the middle belt, but now the belts are hard to reach for. Your trick may work out great.
03-31-2015, 06:30 PM
#5
Registered User
Thread Starter
Join Date: Feb 2013
Location: Bellingham, WA
Posts: 141
Likes: 0
Received 0 Likes
on
0 Posts
You could even take some thin plastic from an old container or something and cut it to fit inside the shrink tube to increase the rigidity. The shrink tube will still give a decent finish look.
03-31-2015, 06:38 PM
#6
Registered User
Join Date: Feb 2015
Location: Michigan
Posts: 7
Likes: 0
Received 0 Likes
on
0 Posts
found a website http://www.electriduct.com/ which had the size and color
Again, THANKS for the tip!

Trending Topics
 03-31-2015, 07:17 PM
#10
hah! Did the heat-shrink approach on mine, a year ago. Works well 
However, I still need to rig the passenger side so seat it does not snag/drag it when sliding back.
However, I still need to rig the passenger side so seat it does not snag/drag it when sliding back.
03-31-2015, 07:22 PM
#12
Registered User
Thread Starter
Join Date: Feb 2013
Location: Bellingham, WA
Posts: 141
Likes: 0
Received 0 Likes
on
0 Posts
hah! Did the heat-shrink approach on mine, a year ago. Works well
However, I still need to rig the passenger side so seat it does not snag/drag it when sliding back.
That is annoying isn't it. Short of pinning it to the console I can't think of anything.
However, I still need to rig the passenger side so seat it does not snag/drag it when sliding back.
That is annoying isn't it. Short of pinning it to the console I can't think of anything.
Last edited by Gargoyle_Runner; 03-31-2015 at 07:23 PM.
03-31-2015, 08:30 PM
#13
yep. Already have an idea. Will tie with a shockcord around the actual girth of the console, underneath the facade. Just been to busy to take care of it. Will post pics when done.

Thread
Thread Starter
Forum
Replies
Last Post
jasonty
Pre 84 Trucks (Build-Up Section)
41
12-23-2018 01:00 PM
WellsR
95.5-2004 Tacomas & 96-2002 4Runners
12
07-31-2015 03:27 PM
britishdudes2dr
86-95 Trucks & 4Runners
0
07-25-2015 06:47 AM
icentropy
86-95 Trucks & 4Runners
4
07-09-2015 02:12 PM


