Chopping Stock Top to Make a Soft Top
 03-26-2013, 01:49 PM
#1
Registered User
Thread Starter
Chopping Stock Top to Make a Soft Top
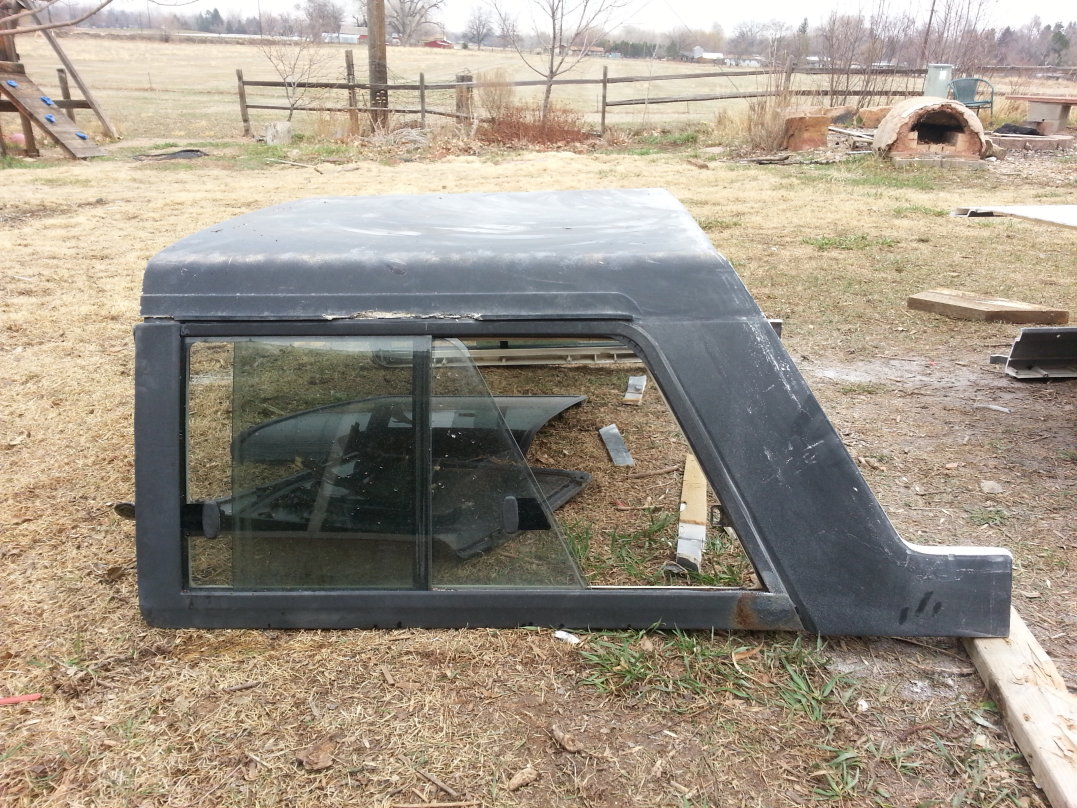
I have scored a nice spare top for my '87 4Runner  from a dude who had his truck stolen while she was topless
I'm hoping to cut up my old, trashed top to use as a frame for a semi-soft top. My vision is to remove all the glass, and cut a large oval or "squircle" out of the roof that I'll top with a snap-on section of canvas. But I might remove additional material from the sides, or even cut off the rear arch and slope the roof from the roll bar down to the tailgate, depending.
I'm wondering if anybody has any ideas or advice before I start cuttin'. Specifically:
from a dude who had his truck stolen while she was topless I'm hoping to cut up my old, trashed top to use as a frame for a semi-soft top. My vision is to remove all the glass, and cut a large oval or "squircle" out of the roof that I'll top with a snap-on section of canvas. But I might remove additional material from the sides, or even cut off the rear arch and slope the roof from the roll bar down to the tailgate, depending.
I'm wondering if anybody has any ideas or advice before I start cuttin'. Specifically:
- Best way to cut the fiberglass? Sawzall? Router? Steak knife?
- Design ideas? What features do you really like/dislike about your soft top that I should try to duplicate or avoid?
- Materials? I'm thinking of doing Sunbrella (which I can get locally at Rockywoods Fabrics) but I'm not too proud to use poly tarp on the prototype while I get the design right

- Structural considerations? Will cutting up the top compromise the structure so much that the result won't be worth anything? Anyone actually done this? (I want it to still be strong enough to carry my canoe on a roof rack.)
- Anything else I'm missing?
 03-26-2013, 02:20 PM
#3
Registered User
iTrader: (4)
Join Date: May 2010
Location: People's Republic of California
Posts: 720
Likes: 0
Received 15 Likes
on
12 Posts
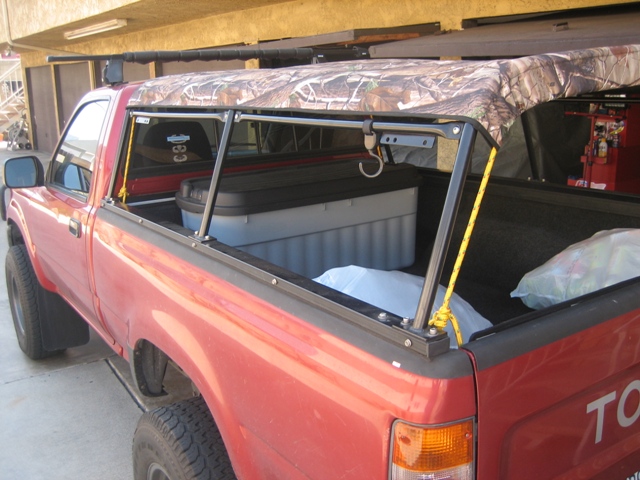
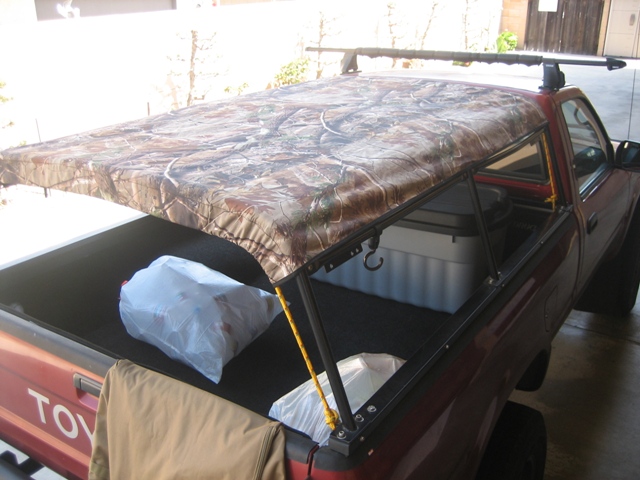
You can play with some less expensive material. I'm using this stuff treated with 303 aerospace fabric guard to see how it holds up. I think it was around $10 a yard. "Realtree APG" AP 60" Wide Denier Urethane Coated Cordura, Waterproof - Outdoor.
I already have a sunbrella canvas top that came with the canback, so I wanted to try something different and I like the camo pattern. It's significantly thinner than the sunbrella stuff, and I don't have enough experience (time) to say how well or how long it will hold.
For your final product I would recommend sunbrella material treated with 303 aerospace fabric guard.
There is also sunbrella edging material, there's a specific name for it but forgot. I would recommend using that stuff also so it doesn't fray. You can see I used it below (it's the black edge stuff sewn around the whole thing)
Last edited by Grego92; 03-26-2013 at 02:27 PM.
03-26-2013, 02:35 PM
#4

Specifically:
- Best way to cut the fiberglass? Sawzall? Router? Steak knife?
- Design ideas? What features do you really like/dislike about your soft top that I should try to duplicate or avoid?
- Materials? I'm thinking of doing Sunbrella (which I can get locally at Rockywoods Fabrics) but I'm not too proud to use poly tarp on the prototype while I get the design right
- Structural considerations? Will cutting up the top compromise the structure so much that the result won't be worth anything? Anyone actually done this? (I want it to still be strong enough to carry my canoe on a roof rack.)
- Anything else I'm missing?
Sunbrella is a good choice, there is also the open weave breathable stuff they use on dumptrucks I don't recall the brand names off hand. Fabric shop should be able to find it.
I can't visualize what your planing to cut except the rear section triming, I think i've seen that before. Depending ho much you remove from the roof area you'll want to put bracing straps across it to keep it from bowing out. (Photo link) You'll need to reseal the cuts so water doesn't migrate into the glass, and to keep the fractures made during cutting together. You can look for some U-channel to cap off the cuts, this will hide imperfections in the cut and add a bit to the rigidness.
 Post up some sketchs so we get a sense of what your aiming for
03-28-2013, 02:18 PM
Post up some sketchs so we get a sense of what your aiming for
03-28-2013, 02:18 PM
#5
Registered User
Thread Starter
Jigsaw makes perfect sense, thanks, Co_94_PU. Not sure why I didn't think of that. And I've done a little amateur boatbuilding, so I get what you mean about sealing the cut edge of the fiberglass. I think I've got the stuff & skills to do that.
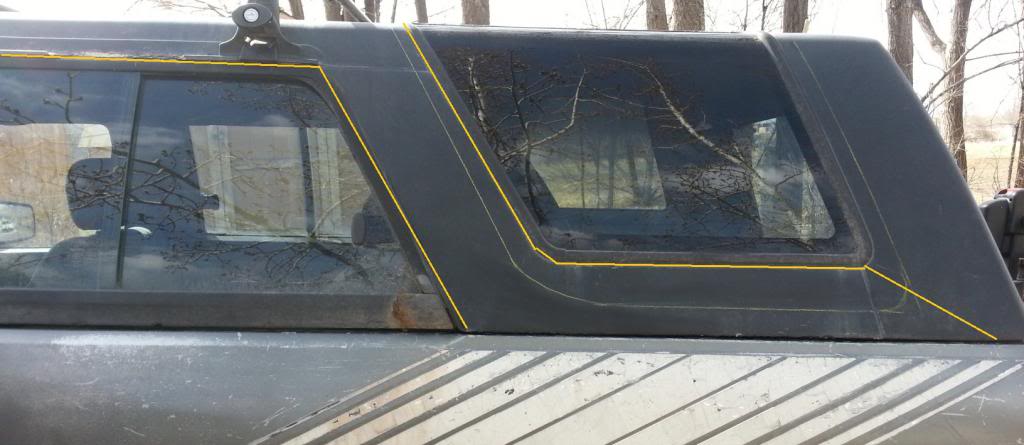
Got some pics today. I'm playing with two different ideas:

Here's one version of #2:

And here's a view of the roof with both short & long sunroof ideas roughly sketched in:

Of the two ideas, I like #1 more, because it's removing significantly more weight than #2 does, and it's still long enough to use the roof rack. I haven't looked at the shape of the underside much to see what structural ribs are there that I should consider. I like the idea of reinforcing the cut areas with flat or angle stock to keep it from flexing too much.
Grego, your truck looks sharp! Thanks for the tip on that fabric.
Got some pics today. I'm playing with two different ideas:
- chop the top just behind the opening for the slider windows so that it's a half-top, and cut a medium-big sunroof in the part I keep; or
- just cut a gigantic sunroof in the top but keep most of the fiberglass on the sides and remove the windows.
Here's one version of #2:
And here's a view of the roof with both short & long sunroof ideas roughly sketched in:
Of the two ideas, I like #1 more, because it's removing significantly more weight than #2 does, and it's still long enough to use the roof rack. I haven't looked at the shape of the underside much to see what structural ribs are there that I should consider. I like the idea of reinforcing the cut areas with flat or angle stock to keep it from flexing too much.
Grego, your truck looks sharp! Thanks for the tip on that fabric.
03-28-2013, 03:38 PM
#6
Registered User
Just purchased an old top, and cut it up for summer top ( I call it ). I used skill saw and jig saw with great results from both, although I would recommend doing it outside with a dust mask. I also added a flat piece of steel across underside of top. I used spray foam to fill in voids and glassed over foam. still have not painted hopefully this weekend. plan on using Rustoleum bed liner. I,ll post some pics soon. I like the sunroof idea. Good luck and happy glassing.
Last edited by 1quickbabydill; 03-28-2013 at 03:40 PM.
03-28-2013, 03:46 PM
#7
#2 has an interesting T-top look to it, but i prefer #1.
#1 is less fab work to make it reattachable, and allows the most cargo room. I'd center the cut in the first photo for symmetry and mounting reasons(more roome for a flange and clips).
For the "sun roof" you might want to consider using the size and shape of the fixed body one, this way you can go glass easy. Maybe poke around at the salvage yard for one a little larger.
If you extend the cut in #2 down to the bed frame you could fab a rear wall that would allow rear passengers not to bang thier heads(I think).
Anyways just one guys ramblings Keep us posted, looking forward to the progress.
#1 is less fab work to make it reattachable, and allows the most cargo room. I'd center the cut in the first photo for symmetry and mounting reasons(more roome for a flange and clips).
For the "sun roof" you might want to consider using the size and shape of the fixed body one, this way you can go glass easy. Maybe poke around at the salvage yard for one a little larger.
If you extend the cut in #2 down to the bed frame you could fab a rear wall that would allow rear passengers not to bang thier heads(I think).
Anyways just one guys ramblings
Keep us posted, looking forward to the progress.
Trending Topics
03-28-2013, 04:29 PM
#8
Registered User
iTrader: (2)
Join Date: Dec 2009
Location: Pleasanton, CA - SF Bay Area
Posts: 2,159
Likes: 0
Received 7 Likes
on
5 Posts
#1 is my vote too. I feel like I've seen that done before and it looked GOOD (but with no sunroof). maybe start with that, and no sunroof, and see if you even need one - just try it out....
Good luck!
Good luck!
03-28-2013, 06:53 PM
#11
Registered User
Thread Starter
Wow, Ratlab's version is ambitious and would be great to have! But I doubt I would do it as well as he did I do think I'll steal his targa sunroof idea, though.
Thinking further, I decided to go with a more refined version #1. I'd rather use the existing line of the rear windows as my guide for the cut. That leaves a little more material aft of the side window opening, which will be stronger. Plus, using the existing line means less cutting, less edge sealing, and less fiberglass dust.
I pulled the original top and put my fancy new one on tonight, which means I could start cutting as early as this weekend. In the process, I noted where the mounting holes are. Turns out that the closest mounting hole is a bit aft of where I was going to cut it. I'll have to curve back to it after I'm clear of the window holes. Here's a pic with the latest thinking diagrammed in:

My vision is to have fabric that snaps on to the top, a nice flat piece that follows the line of the cut. Once it reaches the bed, it'll turn into a bed cover for the part of the bed behind the top.
I'm also thinking about taking the tailgate off when it's in summer configuration, and using one of those netting replacement tailgates instead. More weight savings, which drops the CG and boosts MPGs in the mountains.
I do think I'll steal his targa sunroof idea, though.Thinking further, I decided to go with a more refined version #1. I'd rather use the existing line of the rear windows as my guide for the cut. That leaves a little more material aft of the side window opening, which will be stronger. Plus, using the existing line means less cutting, less edge sealing, and less fiberglass dust.
I pulled the original top and put my fancy new one on tonight, which means I could start cutting as early as this weekend. In the process, I noted where the mounting holes are. Turns out that the closest mounting hole is a bit aft of where I was going to cut it. I'll have to curve back to it after I'm clear of the window holes. Here's a pic with the latest thinking diagrammed in:
My vision is to have fabric that snaps on to the top, a nice flat piece that follows the line of the cut. Once it reaches the bed, it'll turn into a bed cover for the part of the bed behind the top.
I'm also thinking about taking the tailgate off when it's in summer configuration, and using one of those netting replacement tailgates instead. More weight savings, which drops the CG and boosts MPGs in the mountains.
04-02-2013, 10:27 AM
#12
Registered User
Thread Starter
Cutting for the initial chop is about done. I'll post pictures as soon as I'm able. I've followed the lines in that last picture, more or less.
One thing I'm stuck on is how to remove the slider windows. The frames appear to be screwed into the fiberglass, but the fasteners are not exposed. Can anybody advise?
One thing I'm stuck on is how to remove the slider windows. The frames appear to be screwed into the fiberglass, but the fasteners are not exposed. Can anybody advise?
 04-02-2013, 02:19 PM
#16
Registered User
Thread Starter
BO-33 in the FSM. Sorry it doesn't go into details on this. Looks like most ofthe work is from the inside judging from the images provided there.
04-02-2013, 03:40 PM
#19
Registered User
Thread Starter
Thanks, guys! @derockus, I was just in your neighborhood, bleeding the clutch in the parking lot of the Glenwood Springs Qdoba on the way back from Moab a couple weeks ago. Had to cut a section of hose off my Camelbak for bleed tube. Good times....
04-03-2013, 09:51 AM
#20
Registered User
Thread Starter
Process pics are here...
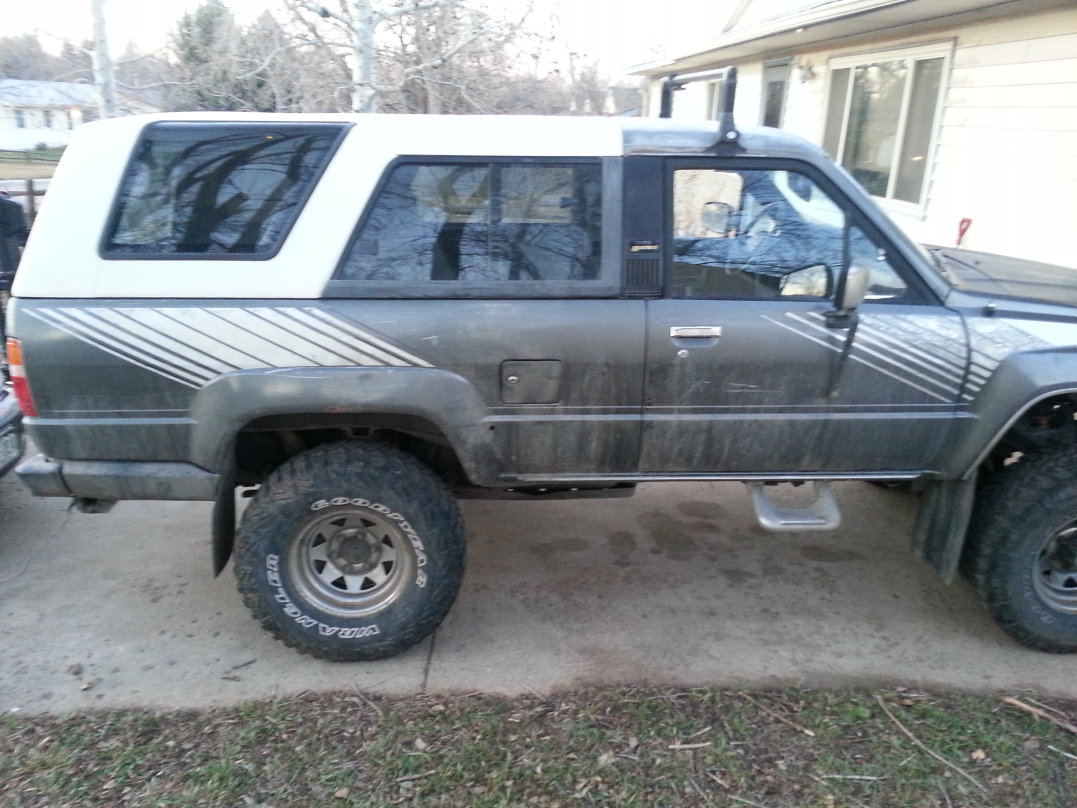
First of all, here's my Runner with the new white top on it:
Removing the fixed windows, first removed all of the plastic hex nuts/bolts from the inside:
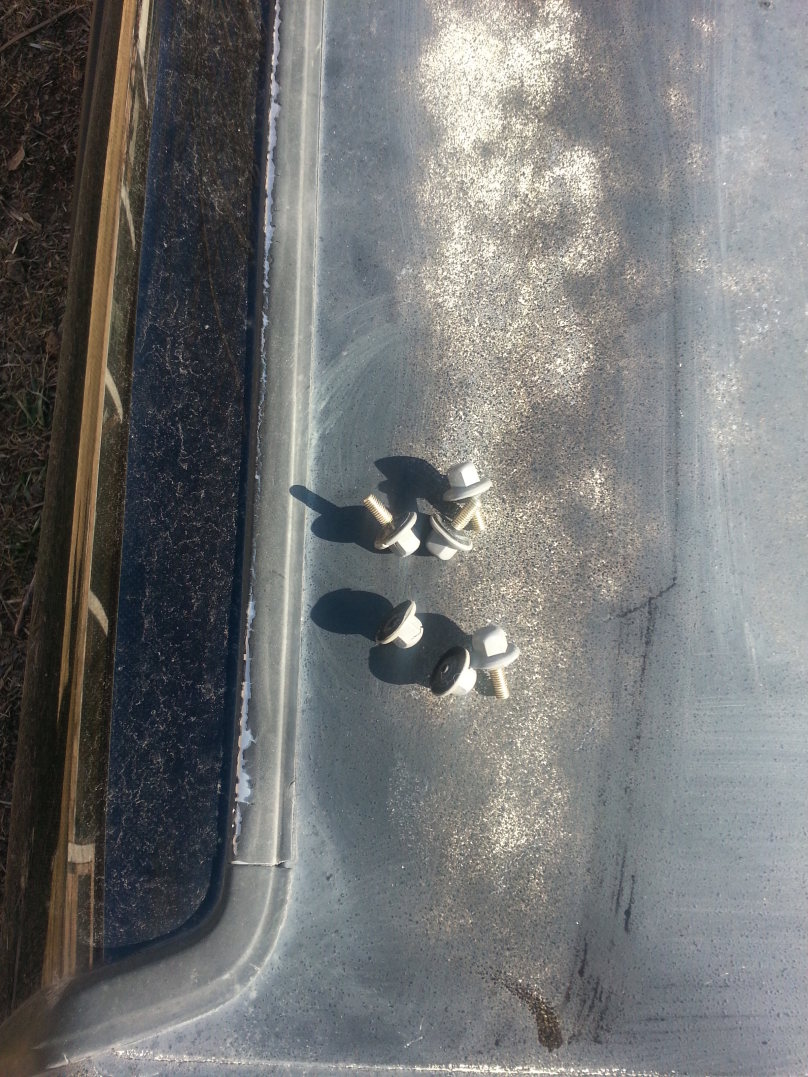
Three per window - two on top edge, one bottom center - are nuts, rather than bolts.
Cut the adhesive foam that holds the window in place:
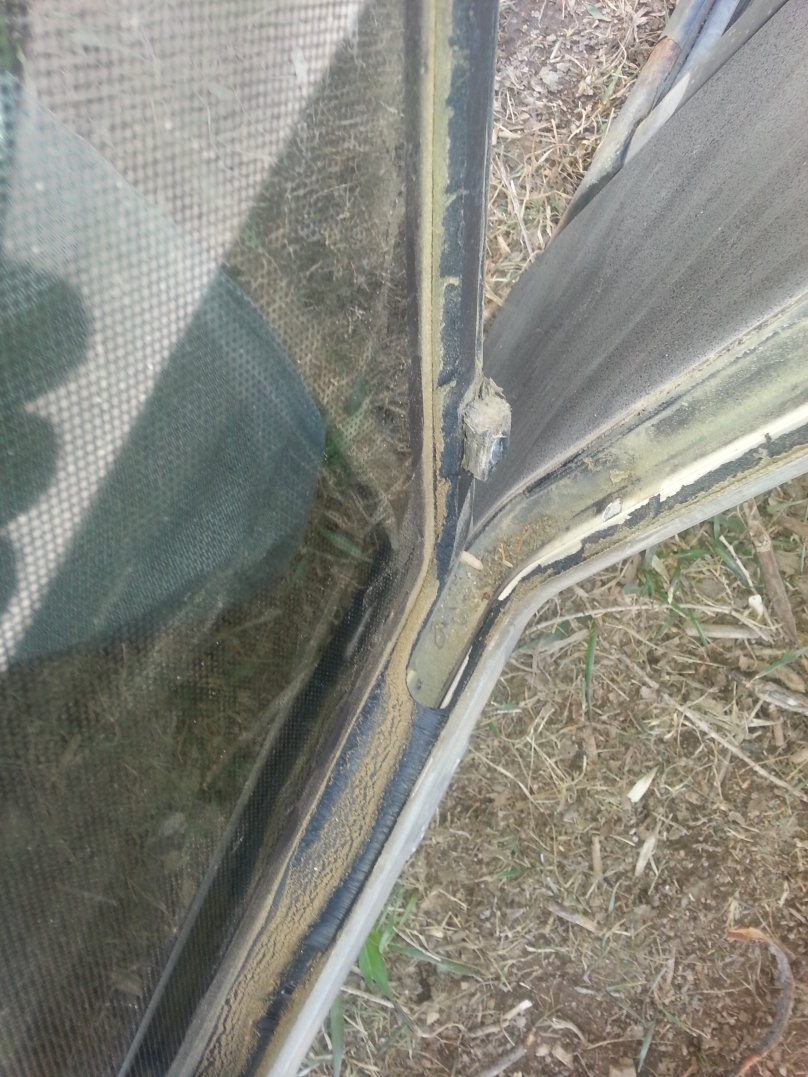
This can be done without destroying the trim. Or, you know, not, if you're impatient.
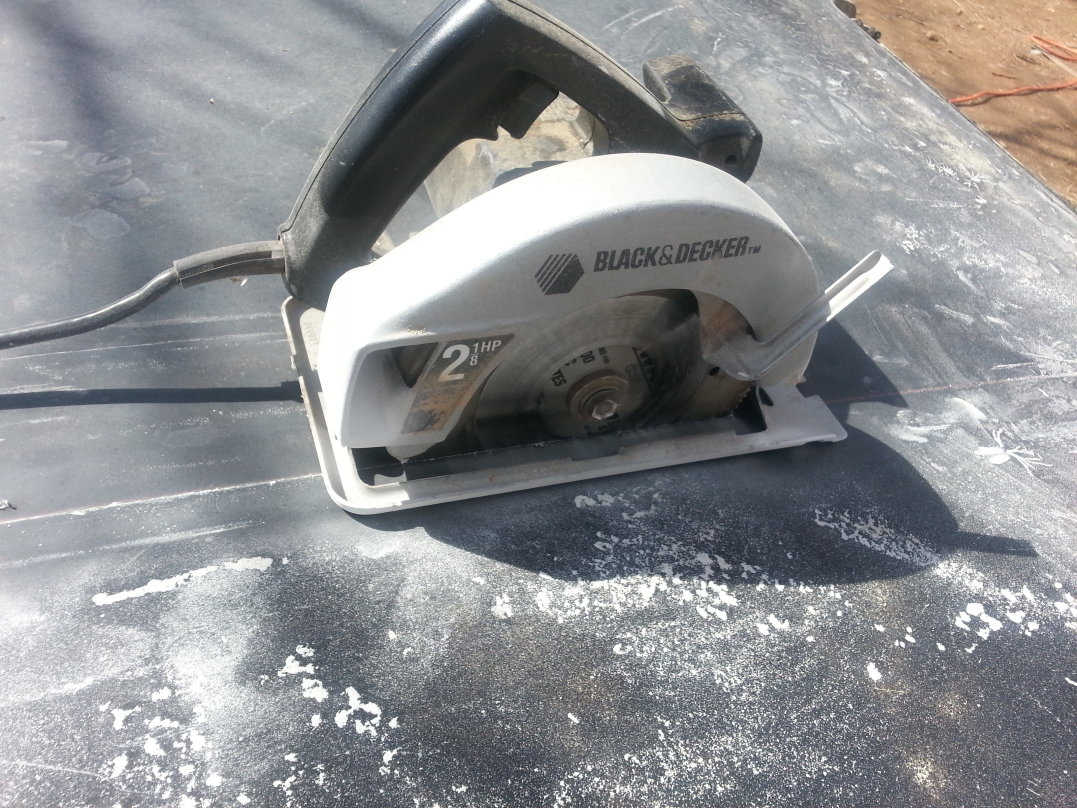
Window out, preparation for cutting. I decided to use a jigsaw for the curvy work, and a circular saw with a plywood/laminate blade for the long, straight cuts:

This would cut great for a few inches, and then start binding. It took me a while to realize that I had the blade depth set too deep - the center of the blade is thicker than the cutting edge, and that was why it was binding. Once I fixed that problem, this blade worked like a charm and allowed me to do much straighter cuts than I could with my jigsaw.
I lined up the first cut to leave a bit extra so that I could do the finish cut without the weight of the back half of the cap interfering:
The dust wasn't that bad, but it merited a dust mask. Because the cut came out pretty clean, I didn't get much of that itchy fiberglass splinter feeling you get from working with insulation and such.
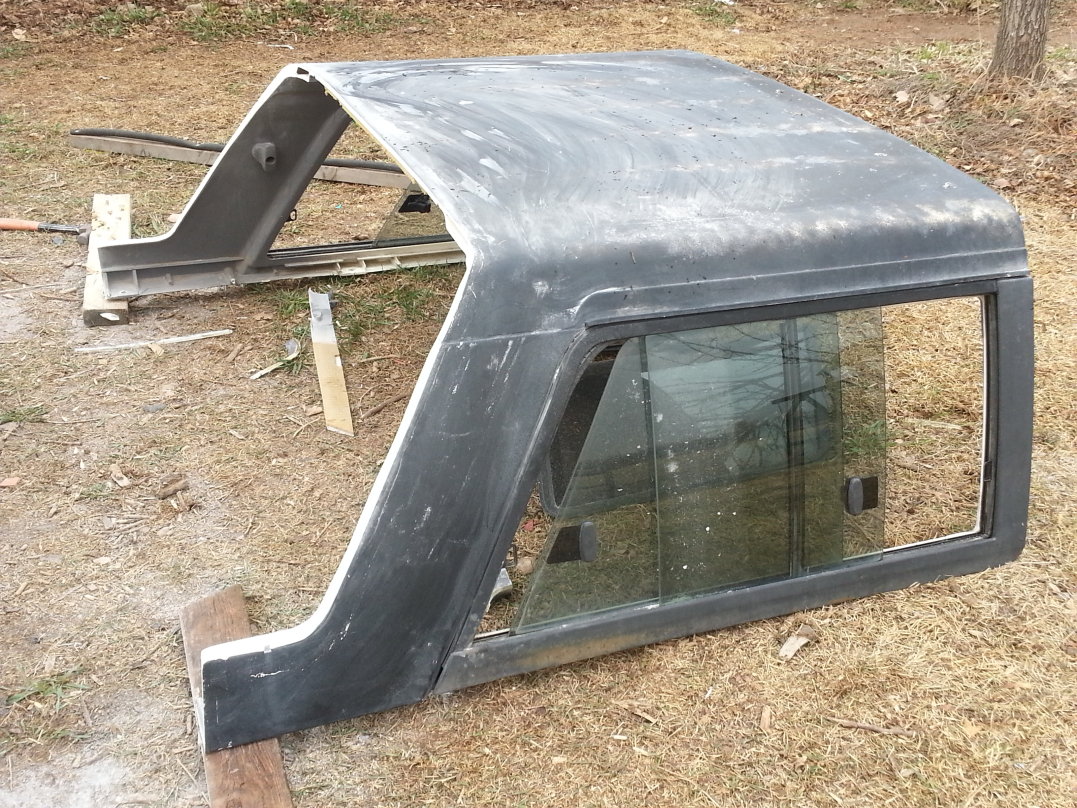
Once that cut was made, you could kind of start to see the shape I'll end up with:
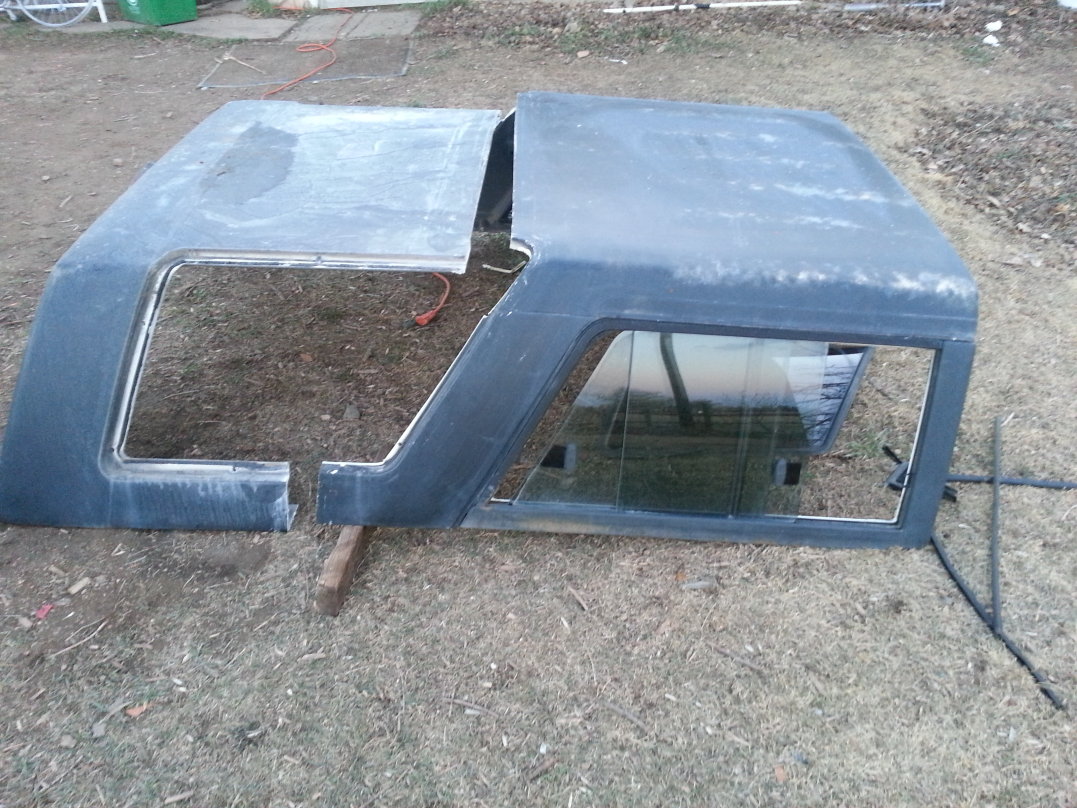
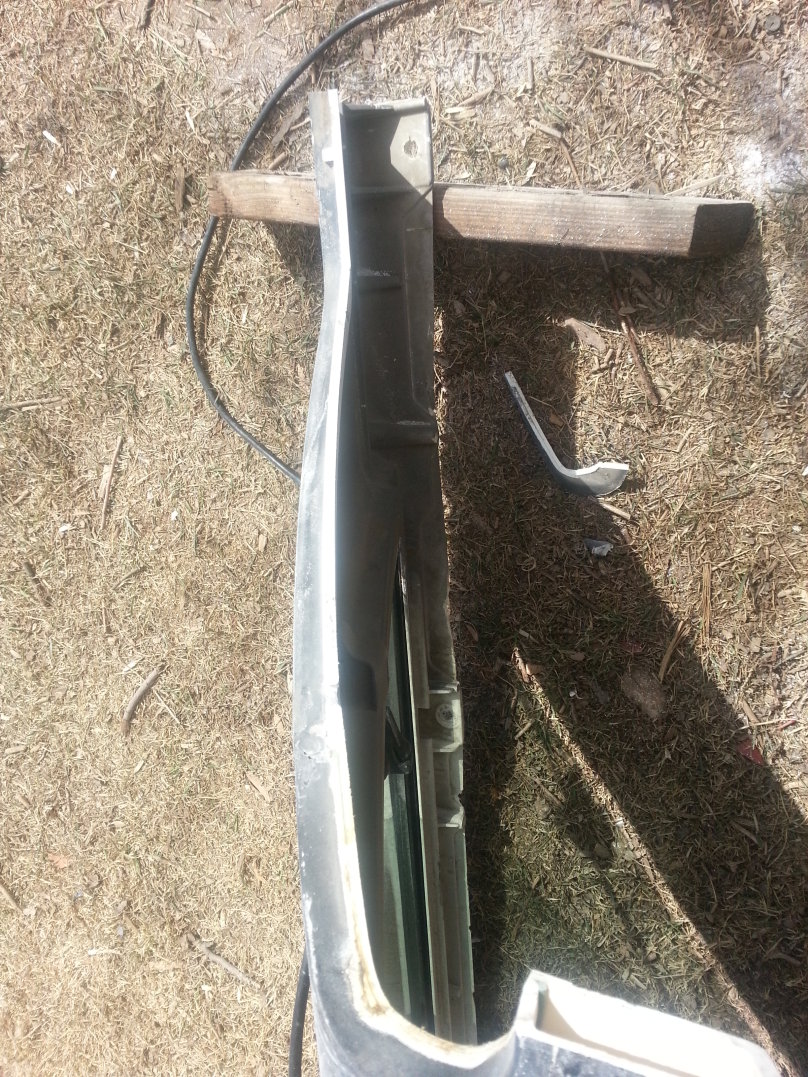
You also see the structure of the top:
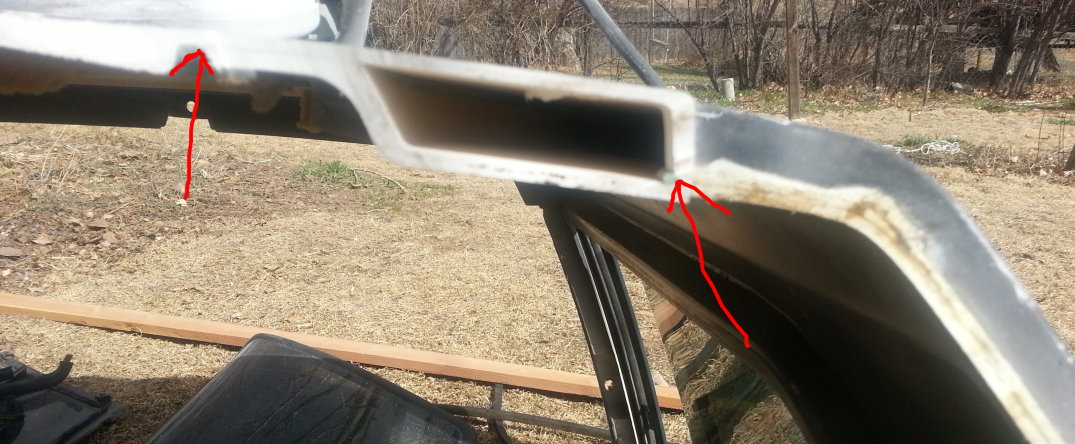
The front end of the cap is bonded together out of a center section and two side walls. The overlap where they're bonded creates a rectangular channel, which has got to be a big reason the caps are so rigid. Bond seams indicated with red arrows.
Note that one of these seams is coming apart on the old top, on the front edge where the cap bolts onto the back of the cab. I'm not sure if it was already happening, or if it's begun because of all the handling it's been subject to during this process. I'd strongly recommend bolting the top to some scrap lumber to help it hold its shape if you're going to do this yourself.
The channel shape also complicates my plans for the fabric. I had intended to put the snaps for the fabric on the interior surface of the cap, so that rain and wind wouldn't have an easy path beneath the fabric. But having the channel there means I'm snapping onto a complex shape. Need to ponder that problem a bit.
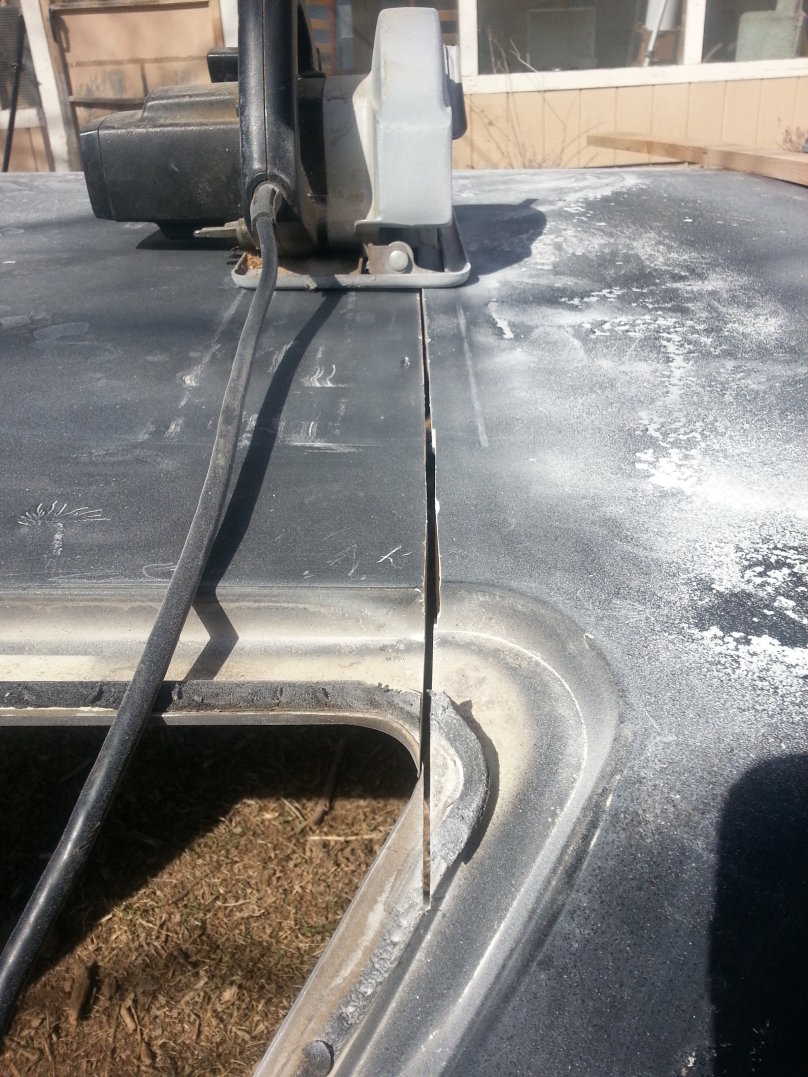
Here's a top view pic showing where I cut the bottom - just after the rib behind the eye, trying to keep as much rigidity as possible:
This creates another trouble spot for the fabric. How to handle that 5" drop from the cap to the bed side? Hmmm....
Anyway, once I got the back half off, I did the more careful cut across the top. Clamped a flexible straight edge onto it so I could draw a careful line:
I had to start the cut with the jigsaw to create enough space to get the circular saw in there. Finished the cut, then cut the window mounting flanges off as well, and ran over all of the cut edges and corners with a 100-grit disc on my random orbit sander.
Next up, I'll be removing the slider windows, sealing the cut edges, capping the channels, and trying to come up with a solution to the interior snap location. And I'll start to mock up the fabric with some black plastic sheeting I have lying around.
First of all, here's my Runner with the new white top on it:
Removing the fixed windows, first removed all of the plastic hex nuts/bolts from the inside:
Three per window - two on top edge, one bottom center - are nuts, rather than bolts.
Cut the adhesive foam that holds the window in place:
This can be done without destroying the trim. Or, you know, not, if you're impatient.
Window out, preparation for cutting. I decided to use a jigsaw for the curvy work, and a circular saw with a plywood/laminate blade for the long, straight cuts:
This would cut great for a few inches, and then start binding. It took me a while to realize that I had the blade depth set too deep - the center of the blade is thicker than the cutting edge, and that was why it was binding. Once I fixed that problem, this blade worked like a charm and allowed me to do much straighter cuts than I could with my jigsaw.
I lined up the first cut to leave a bit extra so that I could do the finish cut without the weight of the back half of the cap interfering:
The dust wasn't that bad, but it merited a dust mask. Because the cut came out pretty clean, I didn't get much of that itchy fiberglass splinter feeling you get from working with insulation and such.
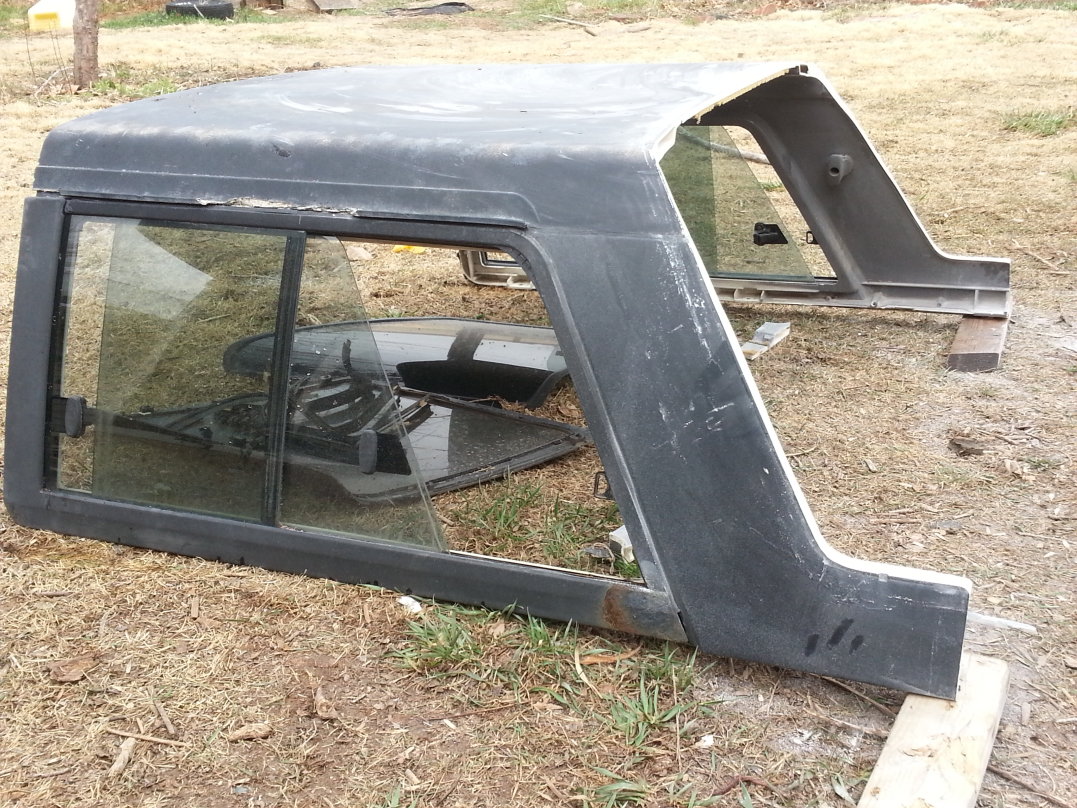
Once that cut was made, you could kind of start to see the shape I'll end up with:
You also see the structure of the top:
The front end of the cap is bonded together out of a center section and two side walls. The overlap where they're bonded creates a rectangular channel, which has got to be a big reason the caps are so rigid. Bond seams indicated with red arrows.
Note that one of these seams is coming apart on the old top, on the front edge where the cap bolts onto the back of the cab. I'm not sure if it was already happening, or if it's begun because of all the handling it's been subject to during this process. I'd strongly recommend bolting the top to some scrap lumber to help it hold its shape if you're going to do this yourself.
The channel shape also complicates my plans for the fabric. I had intended to put the snaps for the fabric on the interior surface of the cap, so that rain and wind wouldn't have an easy path beneath the fabric. But having the channel there means I'm snapping onto a complex shape. Need to ponder that problem a bit.
Here's a top view pic showing where I cut the bottom - just after the rib behind the eye, trying to keep as much rigidity as possible:
This creates another trouble spot for the fabric. How to handle that 5" drop from the cap to the bed side? Hmmm....
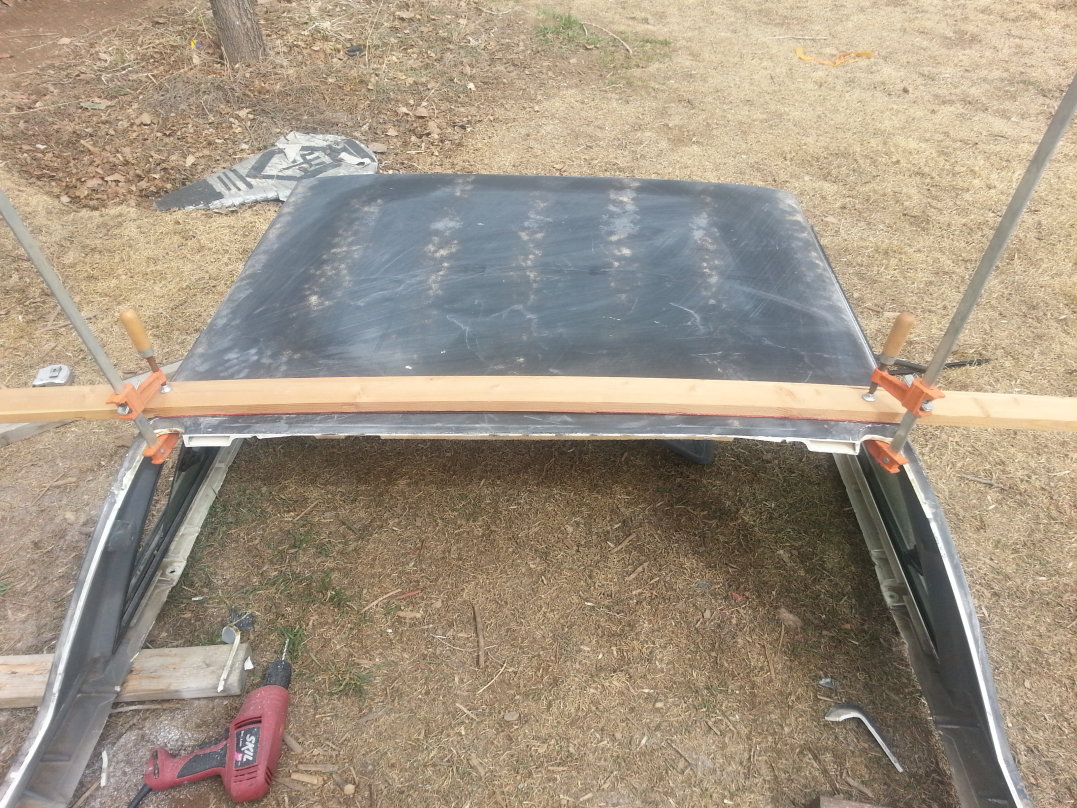
Anyway, once I got the back half off, I did the more careful cut across the top. Clamped a flexible straight edge onto it so I could draw a careful line:
I had to start the cut with the jigsaw to create enough space to get the circular saw in there. Finished the cut, then cut the window mounting flanges off as well, and ran over all of the cut edges and corners with a 100-grit disc on my random orbit sander.
Next up, I'll be removing the slider windows, sealing the cut edges, capping the channels, and trying to come up with a solution to the interior snap location. And I'll start to mock up the fabric with some black plastic sheeting I have lying around.


