
Best way to weld toyota sheet metal?
 09-09-2016, 12:44 PM
#1
Registered User
Thread Starter
iTrader: (1)
Join Date: Jun 2014
Posts: 133
Likes: 0
Received 0 Likes
on
0 Posts
Best way to weld toyota sheet metal?
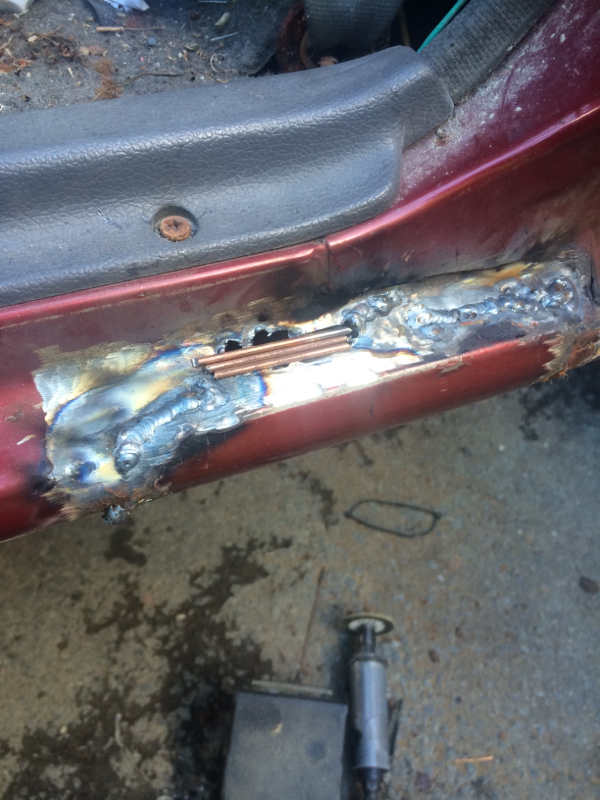
So I have been doing some rust repair on my 1990 pickup standard cab and I keep burning holes in this sheet metal like no tomorrow. I don't know if it's my welder being set up wrong or just my mig ability being extremely poor. I tac in a patch and go to weld it all up and I just keep chasing holes all around. Eventualy had to break out the tig to close up my massive hole. Any pointers on how to weld this extremely poor quality metal?

 09-09-2016, 01:09 PM
#2
Registered User
What welder are you using? Does it have stepped controls or infinite? Stepped you'll probably just have to tack all around and wait for it to cool instead of running a solid bead. Infinite controls you might try backing down the amperage and wire speed so yo don't build up too big of a pool.
09-09-2016, 01:22 PM
#3
Registered User
Thread Starter
iTrader: (1)
Join Date: Jun 2014
Posts: 133
Likes: 0
Received 0 Likes
on
0 Posts
A Lincoln weldpac. It has stepped amperage but infinate wire speed. Unless the welder is on setting 3 out of 4 it does really noting but ammass a pile. Even the tig on 20 amps ripps holes as soon as I tap the pedal unless I strike on the filler and melt that into the hole wich really doesn't fuse together and when I grind it the hole comes back. I'm trying to repair a rocker using little to no bondo as I already have the bondo bedside wich looks like crap
09-09-2016, 01:36 PM
#4
Registered User
Join Date: Jul 2009
Location: Rocky Mtn. House AB, Canada
Posts: 727
Likes: 0
Received 1 Like
on
1 Post
its not bad sheet metal, if all of your rust is cut out its all in how you're welding. Take what you want out of this but I am a Journeyman body man and know what I'm talking about.
Butt welding it is a bad idea. Cut strips of 2" sheet metal (around 20 gauge) and plug weld it on the inside of your rocker so 1 Inch of it is showing all the way around your hole. have about a 1/8 gap between the rocker and your patch.
You can't use a solid bead to weld sheet metal. You will burn through every time. Use spot welds aimed in the gap to weld all 3 pieces together. Start with one spot weld, then a second spot weld 2-3 inches away, then a 3rd 2-3 inches from that until you're at the end of your patch, then put another spot weld right beside your first one, then another weld right beside your second and so on until your patch is fully welded in. You WILL warp the metal if you don't allow your area to cool down between welds. If you can't touch it with your bare hands...its not cool enough yet. Don't use compressed air to cool down your welds, let them cool off naturally. Cool it too fast and it will shrink the metal and nothing will be straight.
when you're done it should be a nice neat row of spot welds with even heat effect zone and minimal grinding before applying a fiberglass filler. Don't put normal polyester filler over welds. It absorbs water so if you have a pin hole in one of your welds it will absorb moisture and start rusting and you wasted your time. One coat of fiberglass filler roughly sanded with 40 grit will fill the un even spots and your pin holes then your poly filler over that.
09-09-2016, 01:38 PM
#5
Registered User
Join Date: Jul 2009
Location: Rocky Mtn. House AB, Canada
Posts: 727
Likes: 0
Received 1 Like
on
1 Post
since you can't get a backing behind it now, use the mig to fill your holes. little spot welds, one at a time. start at the edge and slowly work you're way in. at least 10 seconds between welds. If you're holding the trigger for more than a second it will get too much heat and keep blowing holes.
09-09-2016, 01:49 PM
#6
Registered User
Join Date: Jul 2009
Location: Rocky Mtn. House AB, Canada
Posts: 727
Likes: 0
Received 1 Like
on
1 Post
This article is a good example. I like it all except they didn't use a backing. Using a backing is more forgiving because it soaks up lots of the heat and you get less warpage which means less body filler. But they were working on an old Ford Box that was curved so you would have a hard time noticing any warpage since its a heavily rounded panel.
http://www.speedhunters.com/2014/03/...1-how-to-weld/
http://www.speedhunters.com/2014/03/...1-how-to-weld/
Last edited by nothingbetter; 09-13-2016 at 11:33 AM.
Trending Topics
09-09-2016, 03:36 PM
#8
Registered User
Thread Starter
iTrader: (1)
Join Date: Jun 2014
Posts: 133
Likes: 0
Received 0 Likes
on
0 Posts
I didn't do a butt weld because I knew that was going to be just hole after hole. I did a lap joint. On the sides and bottom and I had to butt weld it on the top. The strip backing is an awesome idea it feel like body work is a lot like doing drywall in a open area ply wood backers and then screw the drywall to it and putty it up sand it down and paint.
09-10-2016, 11:47 PM
#10
Just curious you are using .023 hard wire not self shielded ??
Sheet metal and self shielded don`t play well together .
Looking at your picture that area saw way to much heat input.
For a year I welded Mack Truck cabs doing warranty repair.
It comes down to the correct process and technique and of course experience
Sheet metal and self shielded don`t play well together .
Looking at your picture that area saw way to much heat input.
For a year I welded Mack Truck cabs doing warranty repair.
It comes down to the correct process and technique and of course experience
09-11-2016, 04:22 AM
#11
Registered User
Thread Starter
iTrader: (1)
Join Date: Jun 2014
Posts: 133
Likes: 0
Received 0 Likes
on
0 Posts
Yea in using hard wire and gas. That coloring is from tig welding and is completely normal. Although the heat affected zone is quite large I cannot turn my welder down any less it's at 10 amps
 09-14-2016, 12:08 AM
#14
Your using DC straight Polarity with Straight Argon ??
Your prep work is perfect In Tig you can never get it to clean .
Poor fit up will ruin any Tigweld
Just not enough experience !!
Your HAZ in Tig should be smaller then all other processes
What size Tungsten ?? Is it to big for the material your welding
This is to much like work I go through this at least twice a day
09-14-2016, 03:45 AM
#15
If you cannot fix that consider cutting it out and starting over. Quick, small spot welds. The less you weld, the more resistant to rust the repair will be, especially if you are using a galvanized patch.
Last edited by 89fourrunner; 09-14-2016 at 03:46 AM.
09-14-2016, 11:05 AM
#16
Registered User
Thread Starter
iTrader: (1)
Join Date: Jun 2014
Posts: 133
Likes: 0
Received 0 Likes
on
0 Posts
Your using DC straight Polarity with Straight Argon ?? Your prep work is perfect In Tig you can never get it to clean . Poor fit up will ruin any Tigweld Just not enough experience !! Your HAZ in Tig should be smaller then all other processes What size Tungsten ?? Is it to big for the material your welding This is to much like work I go through this at least twice a day
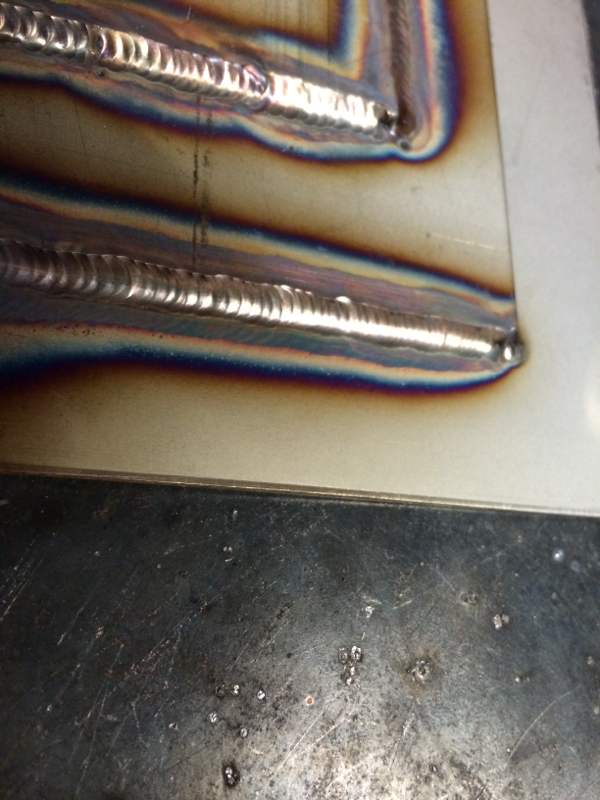
3/32 tungsten ground vertically and sanded smooth
Was thinking of trying to do it like they weld razor blades together on dc+. Not dc-
09-16-2016, 07:45 AM
#19
The following article is quite relevant considering the scenario:
http://www.popsci.com/diy/article/20...t-get-careless
http://www.popsci.com/diy/article/20...t-get-careless


