
88 3VZE no timing marks...help
 08-09-2010, 08:53 AM
#1
Registered User
Thread Starter
88 3VZE no timing marks...help
This weekend i picked up a new to me 4Runner,and she has some issues to get sorted. First is to sort the loping or looping issue with the idle, BTW its a remanned 3VZ. I pull the codes and get:
21 Oxygen Signal Failure (the o2 is physically bent, not sure if this is the issue)
22 Water Temperature Sensor Fault
41 TPS Fault
52 Knock Sensor fault
So i break out the timing gun to make sure timing is right or close before i tinker with other bits....but....seems the jackhole that installed the engine(not the PO) didn't think the bottom timing cover was important. I have never owned a 3.slo, but i am guessing the timing marks are on my MIA cam belt/timing belt cover....right?
anyone have any suggestions on how to set or find timing without taking the crank pully off and installing a cover. I can probably locate a cover in the next few weeks....sucks.
I haven't been able to find an answer on all the internets...according to Google.
Thanks
RB
 08-09-2010, 12:02 PM
#2
Registered User
Damn, that is sloppy work.
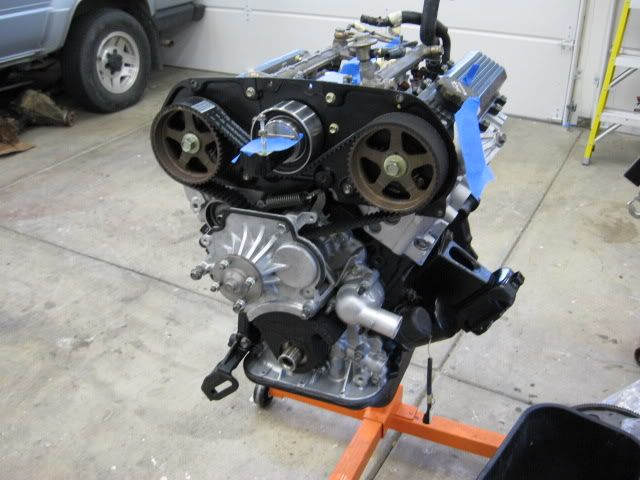
Yes, the timing marks are on the lower timing belt cover. It is also a necessary thing to have on there to keep a lot of the dirt and road grime out of the timing belt.
Pic of the lower timing cover, installed, you can see the timing marks on the plastic:
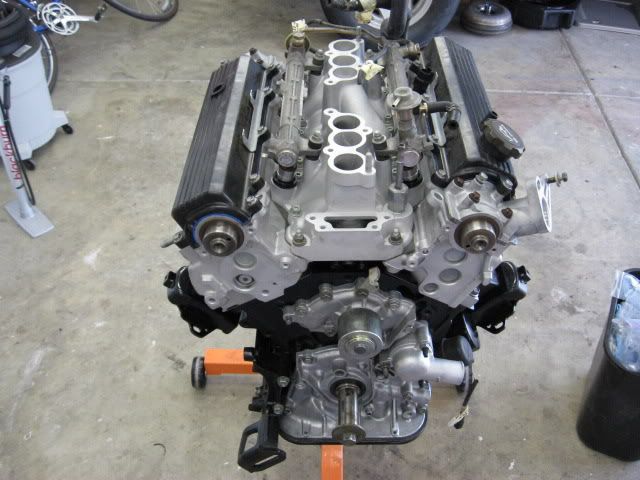
There is a mark cast into the oil pump housing that indicates top dead center. It is hard to see and does not have any of the degree marks for advancing or retarding, but you might be able to get in there, put some paint on it, and possibly see it with the light and then advance the timing a bit and guestimate where it is.
Pic of the front of the motor without the timing cover. You can barely see the cast in mark on the oil pump housing right above the timing belt gear:

The O2 sensor is most likely broken if it is bent.
The knock sensor error is usually due to the pigtail that jumps from under the intake manifold to the wiring harness. It requires you to remove the plenum, the fuel rails, and the intake manifold to fix that pigtail. Since the upper timing belt idler pulley is bolted to the intake manifold, you are going to rip the timing belt off anyway to do the knock sensor pigtail, so you can install the lower belt cover at that time.
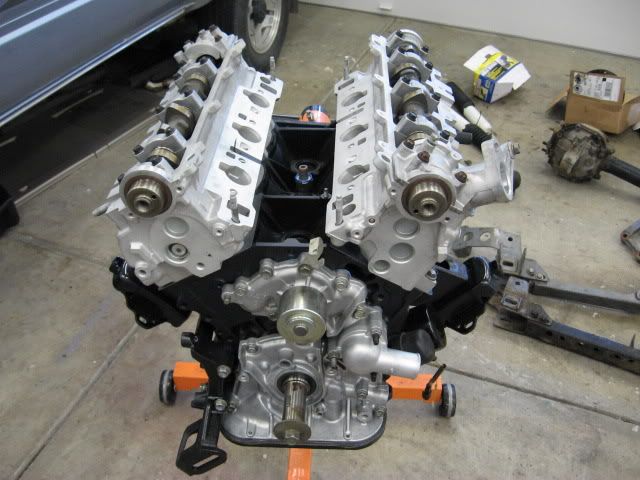
Pic of the motor intake with the fuel rails:
Pic of the knock sensor location, dead center between the heads, under the intake manifold, the pigtail exits to the driver's side head:
Good luck,
Mike
Yes, the timing marks are on the lower timing belt cover. It is also a necessary thing to have on there to keep a lot of the dirt and road grime out of the timing belt.
Pic of the lower timing cover, installed, you can see the timing marks on the plastic:
There is a mark cast into the oil pump housing that indicates top dead center. It is hard to see and does not have any of the degree marks for advancing or retarding, but you might be able to get in there, put some paint on it, and possibly see it with the light and then advance the timing a bit and guestimate where it is.
Pic of the front of the motor without the timing cover. You can barely see the cast in mark on the oil pump housing right above the timing belt gear:
The O2 sensor is most likely broken if it is bent.
The knock sensor error is usually due to the pigtail that jumps from under the intake manifold to the wiring harness. It requires you to remove the plenum, the fuel rails, and the intake manifold to fix that pigtail. Since the upper timing belt idler pulley is bolted to the intake manifold, you are going to rip the timing belt off anyway to do the knock sensor pigtail, so you can install the lower belt cover at that time.
Pic of the motor intake with the fuel rails:
Pic of the knock sensor location, dead center between the heads, under the intake manifold, the pigtail exits to the driver's side head:
Good luck,
Mike
08-09-2010, 12:12 PM
#3
Registered User
Might as well address the other two codes you have.
The water temp sensor is on the sensor block, on top of the motor, back of the intake manifold, almost underneath the plenum. It has to come off with the intake manifold to get to the knock sensor pigtail, so, you can address the sensor at that time with little effort. In the picture below you can see the sensors in the sensor block. The one you are having trouble with is not the one that the gage uses, it is one of the ones that the EFI uses. I have always been confused as to which one is which, but here is a picture of the sensors:
And, as for the TPS, it is usually and adjustment issue. 4crawler.com has a good tutorial on how to adjust it, as do many threads on this site. Since you are taking the plenum off to do all the rest, you can take the throttle body off of the plenum, clean out the coolant passageway in the bottom of it (flow soapy water through there in a sink), and adjust the TPS on a bench. This is much easier than on the Runner, as you can get easy access to the throttle stop for the feeler gages:
08-09-2010, 05:49 PM
#4
Registered User
Thread Starter
Mike...you rock!!!
Thanks for the pics, what a clean engine..wish mine was that fresh.
I used 4crawlers site to set the tps, but since i am tearing it down to fix all the sloppiness, might as well clean up the TB and set it on the bench.
Funny thing i noticed yesterday when trying to start the truck, after adjusting the TPS, was that the water temp gauge went up to about half way(operating temp) and the engine was cold. But you are telling me that the Temp sensor is not the one tied to the dash.
Since i really know nothing about this vehicles neglected history, i figure i am going to clear the codes first, and start over. I am guessing i will get the same codes back again. What do you think?
Also, what kind of gasket shopping list do i need to tear the plenum and intake off?
Plus i figure i'll give her a good cleaning while im in there.
Thanks again
RB
08-09-2010, 09:44 PM
#5
Registered User
Thanks,
The motor is not that clean anymore, but she sure was pretty when I put it back in four years ago. One nice thing is that it does not leak a drop of oil, so it stays pretty clean.
I would definitely clear the codes, drive it, and see what pops back in. Most likely the same codes, but, you never know.
As for gaskets, the throttle body gasket, the intake to plenum gasket, and the intake manifold to head gaskets are the big ones. You said the motor was a rebuild or reman, so you probably do not need to do the water pump. The upper idler pulley for the timing belt can be put back on with FIPG (form in place gasket). The sensor block can be put back on the intake with FIPG also, if you take it off.
Check to see if the valve cover gaskets have started leaking, or not. Also, since you have the plenum off, you might as well pop off the valve covers and check the valve clearances, since you are in there. Oh, replace the PCV and the PCV grommet while you are there, as the PCV is a major bear to get to with the plenum on.
If the motors is running strong and has good compression, then you probably just have some details to tidy up to get it back where it should be.
Good luck,
Mike
08-10-2010, 05:01 AM
#6
Registered User
Thread Starter
Mike,
Again, your help is greatly appreciated.
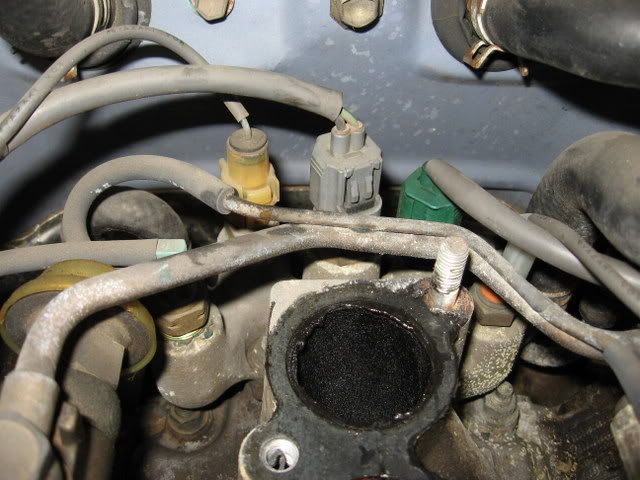
Since this is pretty involved, i plan on doing the ISR Mod while i have everything torn apart. Not to get off topic, (well it is my thread) but i am getting oil from the breather tube on top of the valve cover that enters right before the throttle body. Personally i would like to relocate this tube closer to the air-box, with a catch can...but i am figuring i am getting oil because the PCV is toast. does that sound right?
Thanks,
RB
Again, your help is greatly appreciated.
Since this is pretty involved, i plan on doing the ISR Mod while i have everything torn apart. Not to get off topic, (well it is my thread) but i am getting oil from the breather tube on top of the valve cover that enters right before the throttle body. Personally i would like to relocate this tube closer to the air-box, with a catch can...but i am figuring i am getting oil because the PCV is toast. does that sound right?
Thanks,
RB
08-10-2010, 06:43 AM
#7
Registered User
Join Date: Jul 2010
Location: Albuquerque, NM
Posts: 87
Likes: 0
Received 0 Likes
on
0 Posts
I gotta watch this. I have the same problem with the oil before the TB. I am in the process of re-assembling my engine after a valve job. I figure it is the PCV as well, but I am not sure. I am curious to see what everyone else says.
Nice Ducati. I have a 999.
Nice Ducati. I have a 999.
Trending Topics
08-10-2010, 06:57 AM
#8
Registered User
Thread Starter
^^^...nothing sounds like a Duc!
I thought about disconnecting the tube and putting on a check valve and filter....like the Duc mod for the crank breather(it eliminates the oil catchbox) some folks say the ventilation or vacuum created by the air-box draw connection is vital to keeping the engine seals from blowing. But i am not sure how this idea would affect the 3slo....my Monster doesn't seem to mind with over 25k miles on the clock.
I thought about disconnecting the tube and putting on a check valve and filter....like the Duc mod for the crank breather(it eliminates the oil catchbox) some folks say the ventilation or vacuum created by the air-box draw connection is vital to keeping the engine seals from blowing. But i am not sure how this idea would affect the 3slo....my Monster doesn't seem to mind with over 25k miles on the clock.
08-10-2010, 07:20 AM
#9
Registered User
Join Date: Jul 2010
Location: Albuquerque, NM
Posts: 87
Likes: 0
Received 0 Likes
on
0 Posts
There are only a few people on here that fully understand the way this 3.slow is "supposed" to work. OutlawMike really seems to know his stuff, so I am curious what he thinks about it.
With those new pipes, I'll bet your Duc sounds really good. I can't justify the new pipes for mine. The slip on is like $1500, because it is has the cat built-in under the seat. Yours looks pretty damn good all blacked out.
With those new pipes, I'll bet your Duc sounds really good. I can't justify the new pipes for mine. The slip on is like $1500, because it is has the cat built-in under the seat. Yours looks pretty damn good all blacked out.
Last edited by vital22re; 08-10-2010 at 01:06 PM.
08-10-2010, 08:03 AM
#10
Registered User
Thread Starter
The exhaust is just stock with a mid pipe($350 deletes the ball sack)and cored cans then all ceramic coated($200)...sounds good, but i am going to build a stainless set up..i don't like the way the exhaust hangs on the bike, im going to keep the original idea but tighten it up and let it flow with the bike lines better.
08-10-2010, 12:01 PM
#11
Registered User
Supposed to work? Well, in my experience with this motor, it is supposed to be a low power, poor gas mileage motor that makes you long for a 3.4 or a V8 swap....but it is not all that bad, I guess it is somewhat reliable, except for the dropped intake valve seat I had to deal with.
Anyway, as far as the PCV system goes, it is the usual design. The PCV valve is on the opposite valve cover from the breather tube. What is supposed to happen is the PCV will at all times allow at least a little bit of draw through the breather tube into the crankcase and then up and into the intake manifold. On the 3.0 the breather is in the flex tube that connects the throttle body to the AFM. As designed, the breather side is supposed to flow filtered/metered air into the driver's side valve cover, where it then flows down into the crankcase, and then back up to the passenger side valve cover. Along the way it picks up the blow-by gases and a bit of oil vapor and all of that goes into the plenum and then into the cylinders. Theoretically, there should not be much if any flow up through the breather into the throttle body, as there is usually lower vacuum in the plenum than on the front side of the throttle body. Wierd things happen at WOT, but, most motors don't spend much time at full throttle
If you are getting a lot of oil in the throttle body, most likely the PCV valve is malfunctioning or the valve cover baffles are clogged. I boiled my valve covers in a water/simple green solution on my turkey fryer, cleaned up those baffles in a hurry.
I would not recommend the small filter on the breather side for one reason. The air that would enter there would be a vacuum leak around the AFM. The air that is pulled through the breather in the stock design comes through the AFM, so it is metered air and taken into account in the EFI maps. If you suck air in on the breather side from the engine compartment that would constitute a vacuum leak.
But, a lot of people do it that way, and it is really a small amount of air.
Try getting the valve covers cleaned up and putting a new PCV in first. Also, make sure the tube from the plenum to the PCV is not clogged. If you still have a problem later, it is not that big of a deal to put a filter on the breather side, as it is right in the open on the driver's side valve cover.
Good luck,
Mike
08-10-2010, 12:46 PM
#12
Registered User
Thread Starter
On the intake side I was going to delete the tube that goes in before the tb. I get the point though and probably will leave it alone. Nice thing about putting an open air breather in is that when it gets really oily you need to check your PCV.
Thanks
Thanks
08-10-2010, 04:08 PM
#13
Registered User
Join Date: Jul 2010
Location: Albuquerque, NM
Posts: 87
Likes: 0
Received 0 Likes
on
0 Posts
I'll be taking that advice this weekend. I'll let you guys know how it goes.
The tricky part is going to be getting the oily valve covers into the pot and boiling before my girls says "what the heck are you doing with my pot!!??" Maybe I'll post some pics of the look on her face when she walks in the kitchen....
The tricky part is going to be getting the oily valve covers into the pot and boiling before my girls says "what the heck are you doing with my pot!!??" Maybe I'll post some pics of the look on her face when she walks in the kitchen....
08-10-2010, 10:08 PM
#14
Registered User
In the kitchen? Damn, that is going to smell to high heaven. I did it outside and my wife still gave me the look.
The funniest look I ever got from her was one day she came home and the dishwasher light was on. She opened it and found all of my sockets on the tines of the dishwasher, sparkly and clean. I put them all in there and did the heavy wash/pots/pans cycle. The easiest way to clean you sockets.
The funniest look I ever got from her was one day she came home and the dishwasher light was on. She opened it and found all of my sockets on the tines of the dishwasher, sparkly and clean. I put them all in there and did the heavy wash/pots/pans cycle. The easiest way to clean you sockets.
08-11-2010, 04:45 AM
#15
Registered User
Thread Starter
^^^ hahaha..you wear sparkly socks?!?! Why am i taking advice from a dude that wears sparkly socks...j/k!!
I try not to use kitchen tools in my shop...the wifey no likey. Although she did give me a stainless steel colander so i could use the mesh out of it for a bike project.
I try not to use kitchen tools in my shop...the wifey no likey. Although she did give me a stainless steel colander so i could use the mesh out of it for a bike project.
08-11-2010, 05:06 AM
#16
YotaTech Milestone-Two Millionth Post
hey guys...
still in the "i think i really want to do this" stage of my son's 88 4runner 3vze. have put about 15 miles on it since we bought it a year and a half ago.
limited mechanical experience with doing my "partial" rebuild (top and front end) of my 22re ( was my 1st mechanical endeavor) and it was complete success thank to YOTATECH.
our build will be a motor-out build since it's such a sloppy oily mess in there right now.
don't really have anything to contribute to you right now as far as tips or advice but will be staying tuned to this thread since i am going to definitely have more questions than answers for now.
for now..was just out there seeing where the crossover tube meets the downpipe for the purpose of unbolting it from the exhaust....looks semi-OK to do.....next up will be figuring how to separate the transmission to be ready to pull the motor (never, ever did this before).
looks like i picked the right thread for input. OUTLAWMIKE...love those pics!!
08-11-2010, 06:00 AM
#17
Registered User
Join Date: Jul 2010
Location: Albuquerque, NM
Posts: 87
Likes: 0
Received 0 Likes
on
0 Posts
That's fun as heck about the dishwasher. I'll probably just use the coleman stove, rather than stink up the kitchen. Actually, the way my girl cooks, it may improve the smell in the kitchen. hahahah.
I hope she doesn't read this.......
I hope she doesn't read this.......
08-11-2010, 02:45 PM
#18
Registered User
My wife teases me about some of the stuff I post on Y/T during the day, she searches for me from time to time. Keeps me on my toes...
You have to wash the sockets in the dishwasher, it is a great way to get a head shake out of the g/f. They were meant to go on all of those tines, they just drop right on, easy as you please.

Thread
Thread Starter
Forum
Replies
Last Post


