
3vze head gasket replacement : my turn
 07-08-2007, 06:45 PM
#81
Registered User
Thread Starter
Join Date: Mar 2007
Location: Orange, CA
Posts: 318
Likes: 0
Received 0 Likes
on
0 Posts
 07-08-2007, 06:58 PM
#82
Contributing Member

Join Date: Feb 2004
Posts: 2,518
Likes: 0
Received 0 Likes
on
0 Posts
2 and broke 2 bolts off when I was also torquing down the intake to the heads....that was fun drilling those bolts out...then my extractor broke off in the bolt that had broke off....i drilled that out within a few hours and helicoiled them too. Never had any problems and it still runs to this day. One thing I did was after tapping for my heli coil, I put thread lock inside then inserted my helicoil to make sure it stayed. After a few hours I then torqued everything down.
07-08-2007, 10:57 PM
#83
Registered User
Join Date: Jul 2004
Location: Gilroy, CA
Posts: 55
Likes: 0
Received 0 Likes
on
0 Posts
got the heads torqued on this afternoon. they went on well and the final two 90 degree rotations were very smooth (about 90-100 ft-lbs on the final turn).
of course this couldn't go smoothly though, right? i got the passenger size cam installed and torqued down and as i was doing the driver side cam caps, this is what happened with the driver side rear cam end cap bolt.
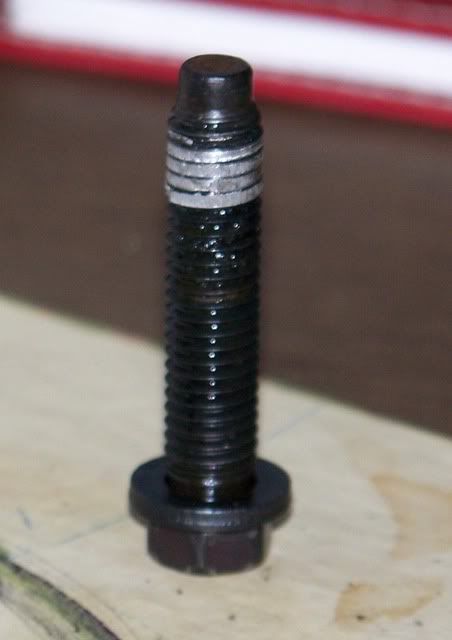
hopefully a chase with a helicoil will fix those threads or else i'm looking at having that hole in the head drilled and retapped to the next larger size, definitely NOT something i want to do.
i actually had problems with both bolts on that end cap. thankfully i was able to use a different bolt and get it on and properly torqued, no such luck with the other.
of course this couldn't go smoothly though, right? i got the passenger size cam installed and torqued down and as i was doing the driver side cam caps, this is what happened with the driver side rear cam end cap bolt.
hopefully a chase with a helicoil will fix those threads or else i'm looking at having that hole in the head drilled and retapped to the next larger size, definitely NOT something i want to do.
i actually had problems with both bolts on that end cap. thankfully i was able to use a different bolt and get it on and properly torqued, no such luck with the other.
You're right on with the Heli Coil idea. It worked like a charm for me.
I left the guide pin in the hole when drilling the helicoil hole. It helped with alignment. Then I pulled the guild pin out (I used the helicoil tap to get a good grip on it and then was able to yank it out.) I took 21 pictures of the process. Here's a link to my online album of 3vz pictures: http://picasaweb.google.com/kevin3vz/3VZ
07-08-2007, 11:58 PM
#84
Registered User
got the heads torqued on this afternoon. they went on well and the final two 90 degree rotations were very smooth (about 90-100 ft-lbs on the final turn).
of course this couldn't go smoothly though, right? i got the passenger size cam installed and torqued down and as i was doing the driver side cam caps, this is what happened with the driver side rear cam end cap bolt.
hopefully a chase with a helicoil will fix those threads or else i'm looking at having that hole in the head drilled and retapped to the next larger size, definitely NOT something i want to do.
i actually had problems with both bolts on that end cap. thankfully i was able to use a different bolt and get it on and properly torqued, no such luck with the other.
07-09-2007, 03:07 AM
#85
Registered User
Join Date: Mar 2004
Location: Salem,Oregon
Posts: 511
Likes: 0
Received 0 Likes
on
0 Posts
got the heads torqued on this afternoon. they went on well and the final two 90 degree rotations were very smooth (about 90-100 ft-lbs on the final turn).
of course this couldn't go smoothly though, right? i got the passenger size cam installed and torqued down and as i was doing the driver side cam caps, this is what happened with the driver side rear cam end cap bolt.
hopefully a chase with a helicoil will fix those threads or else i'm looking at having that hole in the head drilled and retapped to the next larger size, definitely NOT something i want to do.
i actually had problems with both bolts on that end cap. thankfully i was able to use a different bolt and get it on and properly torqued, no such luck with the other.
I replaced mine with studs bottomed out into the head. The small end caps have very little thread engagement so I replaced them with longer studs followed by a wave washer and a nut. I had to slot the one of the old bolts to chase the threads (Don't use a tap!) all the way down so I could get full engagement of the stud into the head. You can torque the studs all day long and not ever feel like they will pull out. In the future I should mention that this job is much easier with the whole engine on a stand. I'm Up to Head gasket job #4 or 5 now (not all mine) and I simply pull the motors now.
Last edited by Ganoid; 07-09-2007 at 03:09 AM.
07-09-2007, 07:55 AM
#86
Registered User
Thread Starter
Join Date: Mar 2007
Location: Orange, CA
Posts: 318
Likes: 0
Received 0 Likes
on
0 Posts
kevincal, that problematic cap is right over Cylinder #6, coincidence???  I think I'm going to try one of the longer bolts from the distributor-end cam cap. if it fits and feels secure, i'll go that route and order two more from the dealer. thanks for posting your pics, no doubt i'll use it for reference if I need to.
Ganoid, i'm not sure about the physics of the issue but wouldn't a bolt provide better clamping pressure than a nut? i like your idea though.
I think I'm going to try one of the longer bolts from the distributor-end cam cap. if it fits and feels secure, i'll go that route and order two more from the dealer. thanks for posting your pics, no doubt i'll use it for reference if I need to.Ganoid, i'm not sure about the physics of the issue but wouldn't a bolt provide better clamping pressure than a nut? i like your idea though.
07-09-2007, 02:29 PM
#87
Registered User
Join Date: Jul 2004
Location: Gilroy, CA
Posts: 55
Likes: 0
Received 0 Likes
on
0 Posts
I also ordered two more dealer distributer end longer cam cap bolts. However, the helicoil was the solution for a quick fix.. the bolts had to be special ordered and weren't going to be in for 2 days. If you happen to be near gilroy ca .. you can have the two bolts!
07-09-2007, 08:45 PM
#89
Registered User
Thread Starter
Join Date: Mar 2007
Location: Orange, CA
Posts: 318
Likes: 0
Received 0 Likes
on
0 Posts
hope this makes sense, i couldn't find a way to word it another way...
07-10-2007, 08:18 AM
#90
Registered User
Join Date: Jul 2004
Location: Gilroy, CA
Posts: 55
Likes: 0
Received 0 Likes
on
0 Posts
It makes sense... the answer is yes. I simply installed the heli coil (perma coil) and then reassembled the cam using the original M8 bolts. It torqued up very nicely too.
07-10-2007, 08:20 AM
#91
Registered User
Join Date: Jul 2004
Location: Gilroy, CA
Posts: 55
Likes: 0
Received 0 Likes
on
0 Posts
I should add.. the kit was ~$25 for the perma coils. It included 12 inserts, 1 tap and one installation tool. I had to buy a drill bit.. i think it was a 21/64". This drill bit fit nicely in through the hollow guide pin when I drilled.. and that helped line up the drill. There's pictures in the link I posted above.
08-02-2007, 08:43 PM
#93
Registered User
Thread Starter
Join Date: Mar 2007
Location: Orange, CA
Posts: 318
Likes: 0
Received 0 Likes
on
0 Posts
oh man, almost a month since my last update. i haven't had a lot of time to work on my truck lately, such a bummer, i miss driving it.
i've got the plenum back on and am in the process of connecting the tentacular mess of vacuum hoses. 5 of the 6 injector connector's broke when i was tearing the motor down. instead of replacing them i zip tied them to the fuel rail, here's a couple shots. i was pretty bummed at first because i didn't want to spend any more money on this project but the zip ties hold the connectors on pretty securely:

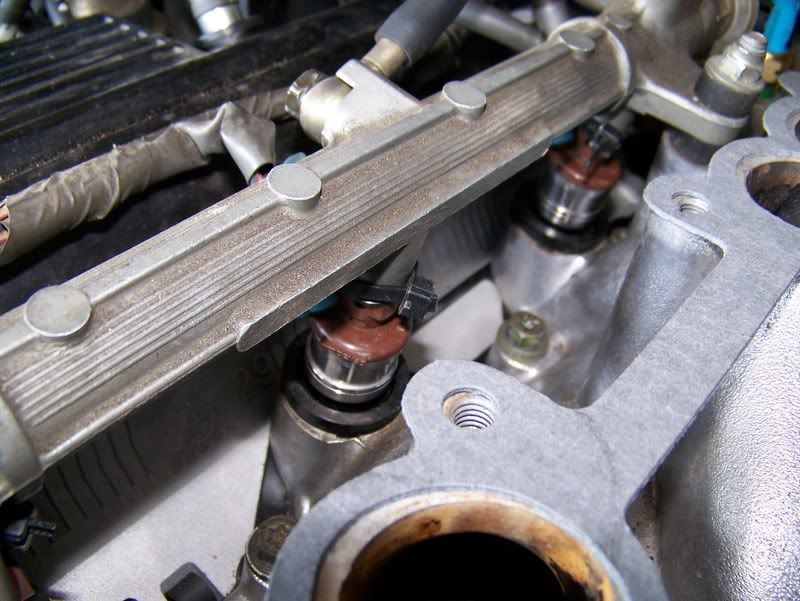
i've got the plenum back on and am in the process of connecting the tentacular mess of vacuum hoses. 5 of the 6 injector connector's broke when i was tearing the motor down. instead of replacing them i zip tied them to the fuel rail, here's a couple shots. i was pretty bummed at first because i didn't want to spend any more money on this project but the zip ties hold the connectors on pretty securely:
08-13-2007, 07:47 AM
#94
Registered User
Thread Starter
Join Date: Mar 2007
Location: Orange, CA
Posts: 318
Likes: 0
Received 0 Likes
on
0 Posts
awrite, yesterday I finished putting it all back together and pushed it out of the garage. turned the key and it fired right up! the idle varied a little (i expected that) but it didn't die and stayed steady. this was a big confidence booster for me because it proved i got the timing belt on correctly and the distributor properly lined up.
here's the bummer part...sweet white smoke . after about 30-45 seconds of idling, sweet white smoke started coming out of the exhaust pretty steadily. i think i remember reading from some of you that this is normal and it could smoke for a good 15 minutes or so but the real crusher is smoke started wafting up from the engine compartment. best i can tell it was coming from the cyl # 4-6 area.
i pulled all the plugs and none of them appeared to have any contact with coolant. i'm 99.9% sure i torqued the exhaust manifold bolts to spec and i used new gaskets so where could this come from? no oil in the radiator or coolant on the dipstick.
i basically have two problems here so far:
1. sweet white smoke out of the exhaust. my next troubleshoot attempt will be a compression test. if i have good compression, where else could the source of all the smoke be from?
2. an exhaust leak coming from somewhere on the rear, driver-side part of the motor. what's interesting about this is exhaust leaks are usually accompanied by hearing the exhaust leak, but not so in my case, just wafting sweet white smoke.
does anyone have any words of advice for me?
here's the bummer part...sweet white smoke
. after about 30-45 seconds of idling, sweet white smoke started coming out of the exhaust pretty steadily. i think i remember reading from some of you that this is normal and it could smoke for a good 15 minutes or so but the real crusher is smoke started wafting up from the engine compartment. best i can tell it was coming from the cyl # 4-6 area.i pulled all the plugs and none of them appeared to have any contact with coolant. i'm 99.9% sure i torqued the exhaust manifold bolts to spec and i used new gaskets so where could this come from? no oil in the radiator or coolant on the dipstick.
i basically have two problems here so far:
1. sweet white smoke out of the exhaust. my next troubleshoot attempt will be a compression test. if i have good compression, where else could the source of all the smoke be from?
2. an exhaust leak coming from somewhere on the rear, driver-side part of the motor. what's interesting about this is exhaust leaks are usually accompanied by hearing the exhaust leak, but not so in my case, just wafting sweet white smoke.
does anyone have any words of advice for me?
08-13-2007, 08:13 AM
#95
Registered User
Join Date: Oct 2005
Location: Berkeley, CA
Posts: 587
Likes: 0
Received 0 Likes
on
0 Posts
That sounds like a bummer with the white smoke. Don't know too much (yet) about the whole coolant circuit on the engine, but is there a way coolant can get into the exhaust after the cylinders? That way you probably won't see coolant in your oil or vice versa, but you will still get smoke.
08-13-2007, 08:46 AM
#96
Registered User
Thread Starter
Join Date: Mar 2007
Location: Orange, CA
Posts: 318
Likes: 0
Received 0 Likes
on
0 Posts
That sounds like a bummer with the white smoke. Don't know too much (yet) about the whole coolant circuit on the engine, but is there a way coolant can get into the exhaust after the cylinders? That way you probably won't see coolant in your oil or vice versa, but you will still get smoke.
the one thing I didn't check and I'm kicking myself for it, is if the block surface was warped. i don't have a precision straight edge or else i definitely would have. this frightens me because the gasket failed at cylinder 6 and that's where the smoke is coming from now
08-13-2007, 04:13 PM
#99
Registered User
Thread Starter
Join Date: Mar 2007
Location: Orange, CA
Posts: 318
Likes: 0
Received 0 Likes
on
0 Posts
since I started it for the first time? not yet. when the HG originally blew there was coolant all over the dip stick. i just checked it and it still looks clean. coolant in radiator looks great as well.
i have tomorrow off so first thing in the morning i'm going to check the water distribution block on the rear of the intake to see if there are any leaky hoses that could be dripping down onto the manifold. it is a longshot but the way the smoke was wafting up from the engine bay is more similar to coolant evaporating off of a hot surface than a leak coming from a bad exhaust seal.
anyone else with a thought?
08-13-2007, 04:14 PM
#100
Registered User
Join Date: Jul 2004
Location: Gilroy, CA
Posts: 55
Likes: 0
Received 0 Likes
on
0 Posts
From what I've read, the block is much less likely to warp than the heads. When i did my HG job at 210K, neither the block or heads were measureably warped. However, the machine shop that did my valves suggested that I have the heads resurfaced. Where the HG failed at Cyl#6 and #1, there was a small amout of chaffing damage to the head surface and this is what the machine shop pointed out to me. The Block did not have any percievable chaffing. When I started my truck, there was a small amount of steam .. commensurate with a nomal cold engine start and warm up. I believe a small amount of steam after starting is normal.. but not that thick fog machine smelly steam that you get from a HG allowing antifreeze into the combustion chamber.
TNR's question eludes to having coolant in the oil. Is there any chance that you have some residual coolant in block oil from either the HG work or from the original oil?
Another thought, did you use new intake manifold gaskets, particularly the ones between the intake and heads? If these are not sealing.. it may be possible for coolant to get into the intake.


