
3vze head gasket replacement : my turn

 06-10-2007, 01:08 PM
#42
Registered User
Blurr - When you go to take the camsproket bolt off for the drivers side use a 1/2" drive impact socket to do so.  You could also grab a 3/4" drive breaker bar and 17mm 3/4" (if they make em) and go to town. But looking at what you've broken thus far, I think you are going to need nothing but impact wrench stuff to take the abuse without breaking. You might also try PB Blaster overnight. If that fails to work, try heating the bolt a bit but be careful!!!
I LOVE that matco cam sproket holder! My Grade 5 9/16" bolts in square tube steel was most ghetto.
BTW - take the Harbour Freight breaker bar back to them and talk to the manager on duty. Obviously be nice, compliment his store if ya like it, and ask him if there is anything he can do to help you out with the broken breaker bar. Ill betcha he'll give ya a new one.
The craftsman stuff, sears had BETTER replace for free. lol
As far as getting the exhaust off; welcome to the bitch that is the 3vze!! First order of business is unbolting the bracket that affixes the downpipe to the tranny. 2 15mm bolts. Then loosen the 10mm bolt that clamps to the exhaust. This will allow you to slide the clamp down towards the cat and out of the way of the downpipe's 3 15mm bolts. Go to harbour freight and buy a 36" 1/2" extension, then from under the truck remove those 3 nuts off of the down pipe easy as pie.
Driver's side xover pipe to manifold nuts:
The top one you will need to access and remove from above in the engine bay. Really it shouldnt be that bad. Mine was and I literally had to grind it off. The bottom 2 nuts can both be accessed from the wheel well if you move one of the rubber guards from the wheel well. A great deal of patience is needed as well as a very cool wrench from harbour freight that I will post a pic of in a few minutes.
Now start removing the exhuast manifold nuts/studs that affix the manifold to the head on the passenger side. 99% of the time the nut is frozen to the stud so you kill 2 birds with one stone. Once you have accomplished this you can pull the passenger side head off of the block. The passenger side exhaust manifold is left bolted to the crossover and resting (quite loosely) on the block.
Now remove the drivers side head and have someone grab the crossover before it falls onyour battery and creates a giant shower of sparks....dont ask. lol
Whola everything removed and no crossover cut!
Be happy you dont have to do a bottom end rebuild like I have to do here shortly... But hey it should allow me to strengthen the bottom end with forged components, use headstuds, AND possibly a MLS HG. Or instead of the MLS, I could get the deck and the heads ringed and use a copper HG!
You could also grab a 3/4" drive breaker bar and 17mm 3/4" (if they make em) and go to town. But looking at what you've broken thus far, I think you are going to need nothing but impact wrench stuff to take the abuse without breaking. You might also try PB Blaster overnight. If that fails to work, try heating the bolt a bit but be careful!!!I LOVE that matco cam sproket holder! My Grade 5 9/16" bolts in square tube steel was most ghetto.
BTW - take the Harbour Freight breaker bar back to them and talk to the manager on duty. Obviously be nice, compliment his store if ya like it, and ask him if there is anything he can do to help you out with the broken breaker bar. Ill betcha he'll give ya a new one.
The craftsman stuff, sears had BETTER replace for free. lol
As far as getting the exhaust off; welcome to the bitch that is the 3vze!!
First order of business is unbolting the bracket that affixes the downpipe to the tranny. 2 15mm bolts. Then loosen the 10mm bolt that clamps to the exhaust. This will allow you to slide the clamp down towards the cat and out of the way of the downpipe's 3 15mm bolts. Go to harbour freight and buy a 36" 1/2" extension, then from under the truck remove those 3 nuts off of the down pipe easy as pie.Driver's side xover pipe to manifold nuts:
The top one you will need to access and remove from above in the engine bay. Really it shouldnt be that bad. Mine was and I literally had to grind it off. The bottom 2 nuts can both be accessed from the wheel well if you move one of the rubber guards from the wheel well. A great deal of patience is needed as well as a very cool wrench from harbour freight that I will post a pic of in a few minutes.
Now start removing the exhuast manifold nuts/studs that affix the manifold to the head on the passenger side. 99% of the time the nut is frozen to the stud so you kill 2 birds with one stone. Once you have accomplished this you can pull the passenger side head off of the block. The passenger side exhaust manifold is left bolted to the crossover and resting (quite loosely) on the block.
Now remove the drivers side head and have someone grab the crossover before it falls onyour battery and creates a giant shower of sparks....dont ask. lol
Whola everything removed and no crossover cut!
Be happy you dont have to do a bottom end rebuild like I have to do here shortly... But hey it should allow me to strengthen the bottom end with forged components, use headstuds, AND possibly a MLS HG.
Or instead of the MLS, I could get the deck and the heads ringed and use a copper HG!
Last edited by Bumpin' Yota; 06-10-2007 at 01:43 PM.
06-11-2007, 08:23 AM
#43
Registered User
Thread Starter
Join Date: Mar 2007
Location: Orange, CA
Posts: 318
Likes: 0
Received 0 Likes
on
0 Posts
Bumpin - that Matco tool was a Godsend, all i had to do was put a SERIOUS cheater bar on my 1/2" ratchet and basically do a pull up
I think i understand your head removal method, good tips. I'm going to grab the 36" 1/2" drive extension from HF this afternoon and see how those bolts stand up to my impact wrench.
do you have that pic of that HF tool? is it the wratchet that is kind of angled inward?
I think i understand your head removal method, good tips. I'm going to grab the 36" 1/2" drive extension from HF this afternoon and see how those bolts stand up to my impact wrench.
do you have that pic of that HF tool? is it the wratchet that is kind of angled inward?
 06-11-2007, 10:12 PM
#48
Registered User
Thread Starter
Join Date: Mar 2007
Location: Orange, CA
Posts: 318
Likes: 0
Received 0 Likes
on
0 Posts
thanks guys, i was able to get one of the downpipe bolts off tonight but the other two are being stubborn. cranking on borderline seized bolts isn't the best idea after a long, hard day at work , i'll give it another go later on this week.
, i'll give it another go later on this week.
06-12-2007, 06:16 AM
#50
Registered User
06-12-2007, 07:30 AM
#51
Registered User
Thread Starter
Join Date: Mar 2007
Location: Orange, CA
Posts: 318
Likes: 0
Received 0 Likes
on
0 Posts
06-22-2007, 08:56 AM
#52
Registered User
Thread Starter
Join Date: Mar 2007
Location: Orange, CA
Posts: 318
Likes: 0
Received 0 Likes
on
0 Posts
updates, hooray for updates:
i was able to remove the passenger side manifold and crossover bolts with the heads still on the motor. for the driver side, i was able to remove the crossover bolts so I disconnected the downpipe right before the cat, removed the head bolts then pulled the head+downpipe forward and up so I could get to the last manifold bolt and remove it. right now the driver side manifold is still attached to the downpipe by the one seized bolt. i'll have to get a die grinder to remove it, totally sucks because I didn't want to have to remove that stud. i might have to drill it out and re-tap it.
after work I'm going to take the heads to a local machine shop for a surfacing, pressure test and valve job. in the meantime I'm going to clean up the block surface and install new knock sensor/wire and clean up the front part of the block which has 14 years of grime built up on it.
slow going but it is going.
06-25-2007, 09:15 AM
#53
Registered User
Thread Starter
Join Date: Mar 2007
Location: Orange, CA
Posts: 318
Likes: 0
Received 0 Likes
on
0 Posts
QUIZ Time : Name these gaskets
Ok folks, I'm ready to start putting this beast back together. I have the engnbldr top end gasket kit and I want to be sure to use each one so can you help me identify where they go?
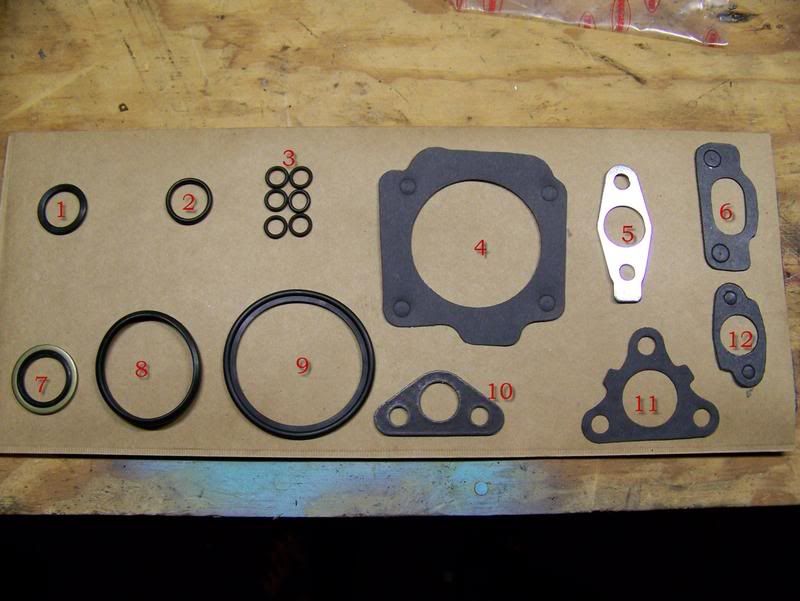
I assume gaskets #3 are for the fuel injectors, right?
I assume gaskets #3 are for the fuel injectors, right?
06-25-2007, 09:20 AM
#54
Contributing Member
Join Date: Apr 2006
Location: TENN Native Languishing in Virginia
Posts: 4,787
Likes: 0
Received 34 Likes
on
14 Posts
I believe #1, 2 & 7 all go inside the oil cooler; 1 & 7 for sure.
#4 looks like the throttle body gasket.
#8 is either thermostat or around the upper idler pulley gasket (closes off where the cover meets the water intake).
#5 is either EGR or Pair Reed Valve to exhaust manifold.
#6 looks like the rear water jacket gasket (where the three of four sensors & couple of coolant hoses are).
Last edited by TNRabbit; 06-25-2007 at 09:22 AM.


