
22RE timing cover - all bolts out, breaking it loose?
 04-06-2014, 01:41 PM
#1
Registered User
Thread Starter
Join Date: Feb 2014
Posts: 173
Likes: 0
Received 0 Likes
on
0 Posts
22RE timing cover - all bolts out, breaking it loose?
Hey guys!
I'm on one of the last steps of getting everything apart for the timing chain replacement on my 22RE 1990 4runner. Oil pan out, everything apart, all bolts out of the old timing cover. (EDIT: yes, including the infamous 'hidden' bolt!)


I'm a little past this:

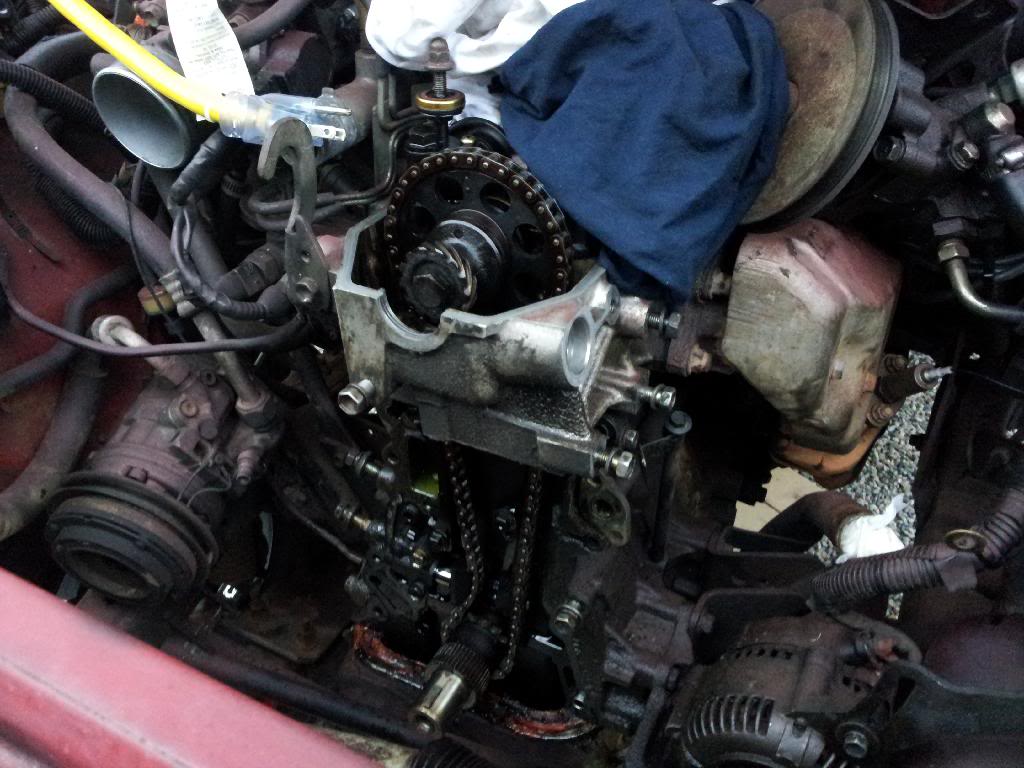
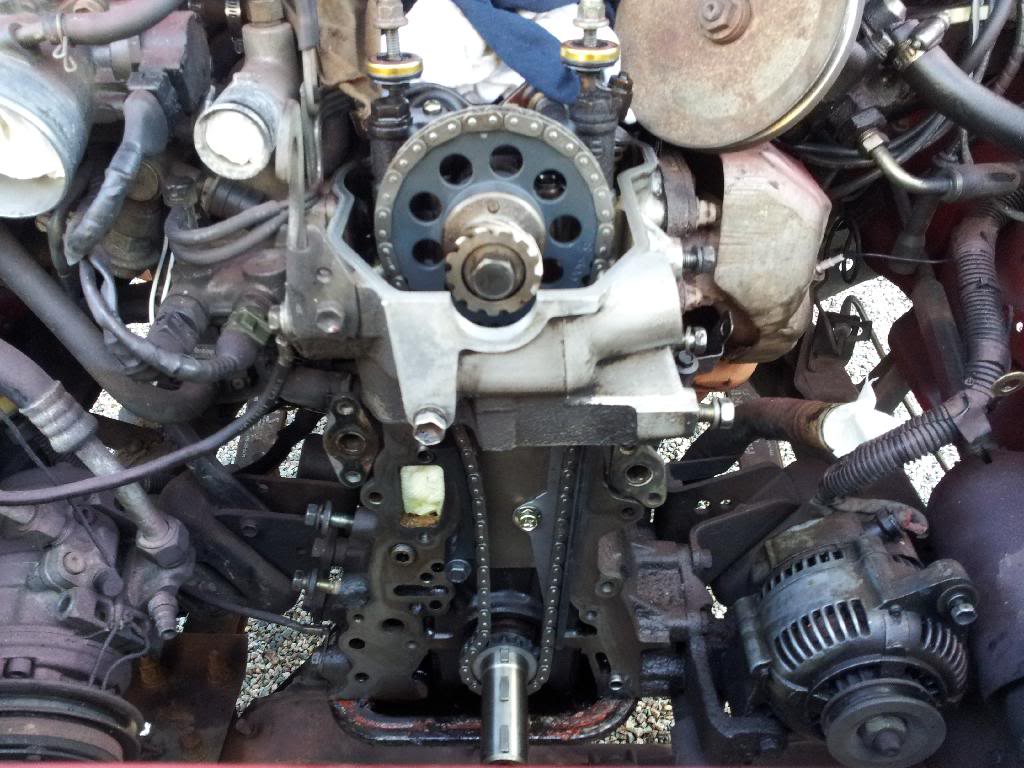
Any tips/thoughts on getting that sucker loose? I'd like to preserve the H/G if possible. I'm thinking maybe tapping on the bottom where I gained access from removing the oil pan, and slowly working it loose.
I've heard that there are 'channels' that this thing slides into, but not sure what that means nor how it affects or restricts its movement when on the block.
Any thoughts?
Yotatech has already saved my bacon in a few places on this thing already
Thanks!
I'm on one of the last steps of getting everything apart for the timing chain replacement on my 22RE 1990 4runner. Oil pan out, everything apart, all bolts out of the old timing cover. (EDIT: yes, including the infamous 'hidden' bolt!)
I'm a little past this:
Any tips/thoughts on getting that sucker loose? I'd like to preserve the H/G if possible. I'm thinking maybe tapping on the bottom where I gained access from removing the oil pan, and slowly working it loose.
I've heard that there are 'channels' that this thing slides into, but not sure what that means nor how it affects or restricts its movement when on the block.
Any thoughts?
Yotatech has already saved my bacon in a few places on this thing already
Thanks!
Last edited by Red Leader; 04-06-2014 at 02:09 PM.
 04-06-2014, 01:56 PM
#2
Registered User

Join Date: Feb 2014
Posts: 58
Likes: 0
Received 0 Likes
on
0 Posts
There is a bolt that goes through the bottom of the head and into the tol of the timing cover. You must remove the dizzy and drive gear to get to it. It should be under a puddle of oil right in the very front under the cam bolt.
04-06-2014, 02:14 PM
#3
Registered User
Thread Starter
Join Date: Feb 2014
Posts: 173
Likes: 0
Received 0 Likes
on
0 Posts
Sorry, my original post didn't include the above edit noting that I did pull that bolt. I got the driver side water tube bolts (on the backside of the timing cover) - there aren't any bolt on the back of the cover on the passenger side, are there?
04-06-2014, 04:54 PM
#4
Registered User
If you're sure you have all the bolts out then take a rubber mallet and start tappin away at it.
I also use a very thin putty knife to get between the cover and the block and just work it around till it comes loose.
I also use a very thin putty knife to get between the cover and the block and just work it around till it comes loose.
04-06-2014, 05:09 PM
#5
Registered User

Hey yours looks like mine right now!
Do yourself one last check to make sure you got every bolt that passes completely through the TC into the block. I did this by looking at the backside of the new cover. Any through hole meant that bolt could/did mount the TC to the block. You've gotten the tricky ones, and you've taken off your water and oil pump, so I bet you got them all.
IF (and only if) every bolt is out, get your rubber mallet and tap on the driver's side coolant tube - the one built into the housing. The passenger spot you can tap on is where the small coolant tube mounts to the TC, just be careful on that side not to get close to the HG.
Your idea for prying at the bottom is good, but could pinch the HG. By sliding the top of the TC away from the block first, you let it shear away from the HG which has a better shot of keeping it in tact than letting it pull/tear away from the HG. So be sure you break free from the HG up top first, and then you'll want to grab both top and bottom to start wiggling it toward you. That's kinda what I did and it looks like my HG remained undisturbed...I'll let you know in a few thousand miles.
The channels you're referring to are actually bosses - round pegs that stick out of the block to locate into round holes built into the TC. You can see one of the bosses best in the bottom right of this pic, just above the oil pan
I'm about 1.5 steps ahead of you on this same project, and it has taken me 2 weeks of little-here-and-there tinkering to get it this far. YT has been my saving grace so far, too - here's to hoping we both pull it off!
04-06-2014, 07:19 PM
#6
Registered User
Thread Starter
Join Date: Feb 2014
Posts: 173
Likes: 0
Received 0 Likes
on
0 Posts
FGZ,
Yeah, rock on man!
I've been at this for about that long as well. Its been in the garage and while it will hopefully be a daily driver, it is not a daily driver now, so there is thankfully not a ton of pressure. I got some good solid blocks of time this weekend and knocked a lot of it out then.
Good thoughts on the H/G - I'm tracking with you. Did you grab/tap on that coolant hose pipe sticking way out on the timing cover on the driver's side? I'm imagining that will put some leverage on it. I've been tapping here and there and noticed the tiniest of slits starting to open up at the bottom, but grabbing on to that t/c inlet (or outlet?) pipe, it doesn't budge.
Yeah, we can have a virtual timing chain replacement party! lol
lol
I think I'm going to start a build thread in the 86-95 section and I'll throw up a link on here. Would also love to see your progress as well!
Yeah, rock on man!
I've been at this for about that long as well. Its been in the garage and while it will hopefully be a daily driver, it is not a daily driver now, so there is thankfully not a ton of pressure. I got some good solid blocks of time this weekend and knocked a lot of it out then.
Good thoughts on the H/G - I'm tracking with you. Did you grab/tap on that coolant hose pipe sticking way out on the timing cover on the driver's side? I'm imagining that will put some leverage on it. I've been tapping here and there and noticed the tiniest of slits starting to open up at the bottom, but grabbing on to that t/c inlet (or outlet?) pipe, it doesn't budge.
Yeah, we can have a virtual timing chain replacement party!
lolI think I'm going to start a build thread in the 86-95 section and I'll throw up a link on here. Would also love to see your progress as well!
04-06-2014, 07:30 PM
#7
Registered User
Join Date: Feb 2014
Posts: 58
Likes: 0
Received 0 Likes
on
0 Posts
Sorry to thread jack. I keep hearing people talk about disturbing the head gasket, but I dont see the harm. The only part of that gasket that I could see getting damaged is the bit between the head and timing cover. Maybe someone can enlighten me about that as I damaged mine a little and I just smeared some sealant on in between them when I put it back together.
Trending Topics
04-06-2014, 08:02 PM
#8
Registered User
I've been at this for about that long as well. Its been in the garage and while it will hopefully be a daily driver, it is not a daily driver now, so there is thankfully not a ton of pressure. I got some good solid blocks of time this weekend and knocked a lot of it out then.
Good thoughts on the H/G - I'm tracking with you. Did you grab/tap on that coolant hose pipe sticking way out on the timing cover on the driver's side? I'm imagining that will put some leverage on it. I've been tapping here and there and noticed the tiniest of slits starting to open up at the bottom, but grabbing on to that t/c inlet (or outlet?) pipe, it doesn't budge.
Sorry to thread jack. I keep hearing people talk about disturbing the head gasket, but I dont see the harm. The only part of that gasket that I could see getting damaged is the bit between the head and timing cover. Maybe someone can enlighten me about that as I damaged mine a little and I just smeared some sealant on in between them when I put it back together.
The frontmost part of the HG that overhangs the block is only squeezed between the head and timing cover with that one hidden bolt. It can't be too critical. Of course, if you're building a motor the right way from the ground up, you'll already have the TC on when you put on the head, and that portion of the gasket will get a lot more clamping force than the one hidden bolt. But I digress - here's to hoping our shortcut works well enough!
04-06-2014, 08:53 PM
#9
Registered User
Thread Starter
Join Date: Feb 2014
Posts: 173
Likes: 0
Received 0 Likes
on
0 Posts
Yep the coolant pipe built in to the TC is what I tapped on. There isn't enough room to hit it hard, so I just used the handle of my harbor freight rubber mallet. Then I found a spot to do the same thing up high on the passenger side. I think I hit forward/down on the water pump, too, but yours isn't installed anymore. Do you have a dent puller or slide hammer? Use one of the water pump (or similar) bolt holes to slide hammer it out. Maybe not a good idea if you're trying to reuse this cover. In my case, my cover is nearly toast and shouldn't be reused. One more option is that since you're starting to see some progress down bottom, start working your way up with a thin putty knife as previously mentioned. I don't think you can go too terribly wrong if all your bolts are out.
Oh, and here is a link to the thread I just started on this runner - lots more pictures of the process there.
https://www.yotatech.com/forums/f199...thread-279484/
Did you need to drop your pan? If so, what was your process? I took out the 3 diff bolts, x-member bolts (only lowered it a bit), steering stabilizer bolt and sway bar. The unbolting of the sway bar made a big difference.
Last edited by Red Leader; 04-06-2014 at 08:55 PM.
04-07-2014, 07:15 AM
#10
Registered User
Uhh, not to rain on anyone's parade, but the Head Gasket is a non-reusable part. Removing the head and not replacing the gasket is increasing the chances of failing (you don't want to do it again do you?).
04-07-2014, 07:28 AM
#11
Registered User

 no one is removing the head. We're just removing the timing cover WITHOUT removing the head, which technically could disturb the head gasket. Like THIS GUY DID and 4Crawler did and many others. The tricky part is that it doesn't work 100% of the time, you COULD end up with HG issues.
04-07-2014, 07:32 AM
no one is removing the head. We're just removing the timing cover WITHOUT removing the head, which technically could disturb the head gasket. Like THIS GUY DID and 4Crawler did and many others. The tricky part is that it doesn't work 100% of the time, you COULD end up with HG issues.
04-07-2014, 07:32 AM
#12
Registered User
Yeah, that's what I mean. But I suppose everyone's a little different, I tend to do things by the book 'cause I hate having to re-do jobs lol! But I guess if you feel comfortable trying to save some time then it's all good.
04-07-2014, 10:40 AM
#13
Registered User
Thread Starter
Join Date: Feb 2014
Posts: 173
Likes: 0
Received 0 Likes
on
0 Posts
I am going to do it with the head still on.
Right now, the H/G on mine has full integrity and reading another thread on here where a guy did the full deal made it a much bigger operation (broken stud, etc).
I did ask Tod at Engnbldr about this and he emphasized that the timing cover portion of the head gasket is mainly just to keep an oil seal so while important, is not quite the same as the cylinder portion. He mentioned that some people have even cut out that part of the head gasket and just used rtv sealant in that space and that it has worked. While that makes me a little leery, I am going to try to preserve the h/g as best as possible, go slow, not use a lot of force.
As far as I know, the head has never come off this engine. While that might not be totally accurate (PO has had the vehicle since '93) and I have no way to ever fully know for sure, if it is the original factory H/G and build, I want to keep it that way as long as possible.
Hoping to get this cover off tonight! I'll let you guys know!
04-07-2014, 10:27 PM
#14
Registered User
Thread Starter
Join Date: Feb 2014
Posts: 173
Likes: 0
Received 0 Likes
on
0 Posts
Well, I got the timing cover off. Thanks for the tip about looking on the back of the new timing cover!
I missed a bolt - it was the 3rd bolt on the rear side, right under the two bolts that hold on that metal water inlet pipe to the back of the timing cover. After that she came off pretty nice.
I got a little degreaser down that top cover hole so I want to make sure and clean the head gasket really well, especially the area around that bolt between the head and gasket. I think some acetone down there should do the trick. The head gasket looks perfect!
Gonna get some acetone and will clean things up and soon it will be re-assembly time!
04-07-2014, 10:33 PM
#15
Registered User
Thread Starter
Join Date: Feb 2014
Posts: 173
Likes: 0
Received 0 Likes
on
0 Posts
dang you guys and your solid axle yotas!!!

Just kidding

I wish they made a 4 door back in 84-85. The 4 doors was a condition of the purchase, a request by my better half. With a manufacturer date of 5/89 on my 2nd gen, I got as close as I could
 04-08-2014, 03:34 AM
#16
Registered User
Well, I got the timing cover off. Thanks for the tip about looking on the back of the new timing cover!
I missed a bolt - it was the 3rd bolt on the rear side, right under the two bolts that hold on that metal water inlet pipe to the back of the timing cover. After that she came off pretty nice.
I got a little degreaser down that top cover hole so I want to make sure and clean the head gasket really well, especially the area around that bolt between the head and gasket. I think some acetone down there should do the trick. The head gasket looks perfect!
Gonna get some acetone and will clean things up and soon it will be re-assembly time!
I missed a bolt - it was the 3rd bolt on the rear side, right under the two bolts that hold on that metal water inlet pipe to the back of the timing cover. After that she came off pretty nice.
I got a little degreaser down that top cover hole so I want to make sure and clean the head gasket really well, especially the area around that bolt between the head and gasket. I think some acetone down there should do the trick. The head gasket looks perfect!
Gonna get some acetone and will clean things up and soon it will be re-assembly time!

A still-in-there-bolt was my hang-up too, so I'm right there with you.

I compromised the 4 doors to get the solid front axle and removable top. It's somewhat of a grand experiment that has been in the planning for a while and finally started 5 months ago: is there 1 vehicle I can drive that meets family needs while being "fun" enough to satisfy my knack. So far so good, as long as this timing set doesn't turn into something more.
I get a new oil pan in tomorrow, maybe I can get it running again around then. Old oil pan was in great shape but needed some paint to stave off New England salt rust, so my options were to do it myself and redo it in a few years, find someone else to do it right for ~$70(?), or get a brand new one for $73 with 1-day shipping. Yeah, new one please!
04-08-2014, 07:55 AM
#17
Registered User
Thread Starter
Join Date: Feb 2014
Posts: 173
Likes: 0
Received 0 Likes
on
0 Posts
Great!
A still-in-there-bolt was my hang-up too, so I'm right there with you.
I compromised the 4 doors to get the solid front axle and removable top. It's somewhat of a grand experiment that has been in the planning for a while and finally started 5 months ago: is there 1 vehicle I can drive that meets family needs while being "fun" enough to satisfy my knack. So far so good, as long as this timing set doesn't turn into something more.
I get a new oil pan in tomorrow, maybe I can get it running again around then. Old oil pan was in great shape but needed some paint to stave off New England salt rust, so my options were to do it myself and redo it in a few years, find someone else to do it right for ~$70(?), or get a brand new one for $73 with 1-day shipping. Yeah, new one please!
I was looking hard at the '84-'85s. There was a nice '85 runner on C/L that I had called on that was $1200 but after about the 4th of 5th conversation about the 2 door vs 4 door thing, I finally realized it wasn't going to happen and I would have been the worse to push it. Don't get me wrong I'm not complaining - heck the wife is letting 3 yotas sit at our house! I'm very blessed, she's awesome! After I told a buddy about the project runner, he whispered to me 'you are a hero to all men' lol. Maybe when the kids (2 1/2 and 4 months) get older I'll find a nice little solid axle project to work on with the kids and then they can monkey their way into the back and it won't be a problem, but for now this '90 is definitely scratching the itch. It really is a great vehicle. The more I tear into it the more I appreciate the simplicity (other than the emissions junk). I'd really like to get more into wheeling and exploring the trails. This will be a nice way to see that happen without messing with her runner or the daily drivers.
Here's hoping you get some nice weather to finish it off.
I wonder which one of us will finish first?

Fair warning - I'm slow!
Oh, one other question - did you use any locktite for the t/c guide bolts? I'm thinking about putting a little blue locktite on those - they were on good but literally as soon as I broke them loose they were loose as heck and would spin right out - the loosest bolts of the whole project. I recall heaing a story where one guy's bolts came loose and fell off and grenaded the inside after it fell out. Definitely don't want that happening!
Last edited by Red Leader; 04-08-2014 at 08:00 AM.
04-08-2014, 08:16 AM
#18
Registered User
Oh, one other question - did you use any locktite for the t/c guide bolts? I'm thinking about putting a little blue locktite on those - they were on good but literally as soon as I broke them loose they were loose as heck and would spin right out - the loosest bolts of the whole project. I recall heaing a story where one guy's bolts came loose and fell off and grenaded the inside after it fell out. Definitely don't want that happening!
04-08-2014, 05:56 PM
#19
Registered User
I'm deciding against the loc-tight. I haven't seen it in any of the write-ups, so I'm leery of trying it. Also, I think the driver's side guide bolts (the new short ones with the kit) might be the only bolts that can back completely out - all others are too long and would get trapped by the TC. But I'll likely re-check my torques, and if I use a dab of thread locker it will be on the driver's guide bolts.
Have you given any thought to the new oil seal and keeping it out of the crank pulley groove? THIS POST pointed me to THIS THREAD where I just updated it with my findings from checking my clearance. I barely miss the groove, but I still miss it so I'm going with it.
With some luck, I'm reassembling tomorrow.
04-08-2014, 07:13 PM
#20
Registered User
Thread Starter
Join Date: Feb 2014
Posts: 173
Likes: 0
Received 0 Likes
on
0 Posts
Have you given any thought to the new oil seal and keeping it out of the crank pulley groove? THIS POST pointed me to THIS THREAD where I just updated it with my findings from checking my clearance. I barely miss the groove, but I still miss it so I'm going with it.
With some luck, I'm reassembling tomorrow.
SHOOT I KNEW there was a question I was forgetting to ask Tod at Engnbldr
 I was gonna ask him if the front seal had different specs than the original so it put the pulley-to-seal mate up in a different spot that the original. Well, I'm asking him some other stuff so I'll just throw that in there as well I haven't gotten quite that far (oil seal/pulley) but it was on my mind. There are so many things on my mind I feel like I'd forget them all if I wasn't on Yotatech everyday trying to hammer all this stuff into my head. I even put a piece of tape on the steering wheel reminding me to MAKE SURE I fill it back up with oil and coolant before I try to start it I'm sure crazier things have happened!
I'll check out those links. I remember reading one that detailed the 15 or so iterations of the front oil seal - maybe its one of those links.
I'm still pondering the loctite. It would be the blue, which would just help keep things from backing out and not to freeze it in there forever. I'll do some dry fitting and see what it looks like.
Also, did you get the 4-piece kit or are you reusing your oil pump/water pump/ etc? I got the 4 piece but now I'm wondering if I really need to replace the oil pump. Since it is the original Aisin I'm kinda thinking maybe I should just reuse it.
Good luck man! Let me know how it goes! You're def gonna win


