
22R Rebuild
 12-22-2009, 06:32 PM
#201
Registered User
Thread Starter

I got the other two pistons in. The crank rotates fairly easily using a proper wrench. The shop "redid" 3 rod ends so standard size bearings would fit with the proper clearances. Looks like he did a good job with that. My manual says spec is .0010" to .0022", with a max of .0039":
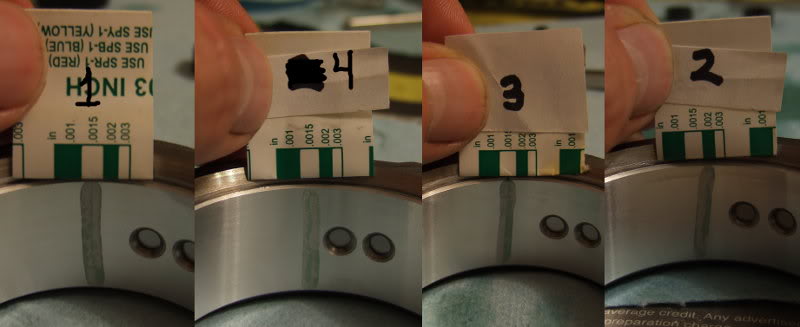
Thankfully, none of my pistons stick up too high. Measuring height isn't easy because they don't sit perfectly square to the deck all around. Laying the back of my calipers across from different directions and measuring with feeler gauges, I got approximately:
#4: dead even to +.003"
#3: approx -.006" to -.008"
#2: dead even to -.0025"
#1: ? to -.008"
Seems like quite a bit of variation. Is that normal? My original #4 piston stuck up frighteningly high (way too high), but maybe the carbon layer on it was thicker than it appeared.
The block was decked .009".
Last edited by flyingbrass; 12-22-2009 at 07:37 PM.
 12-22-2009, 07:39 PM
#202
Registered User

Join Date: Apr 2009
Location: Salt Lake City UT
Posts: 89
Likes: 0
Received 0 Likes
on
0 Posts
Good to see you got the dial indicator!
With out seeing your pistons in person I'd say they are rocking in the bore. This is normal to a point, and I don't see any huge readings that would lead me to believe that there is a problem. You have to remember that you have a lot of tolerances stacking up here. The crank, the big end of the rod, the small end of the rod, the piston to pin, and the piston/ring to bore.
It's also a cold fit right now. Aluminum grows faster and more than steel does. To give you a idea oh how this works, to change the bearings in the axle carrier on my 4 wheeler, you heat it in the oven and tap it on a 2x4 and the bearings fall right out. The carrier is aluminum, and the bearings are steel. They both sit in the oven for 20 minuets at 400* and the steel bearing slide right out. The tap is nothing more than help to get things moving.
Last edited by broncbob; 12-22-2009 at 08:02 PM.
12-22-2009, 07:44 PM
#203
Registered User
was the #4 the rod that was not "redone"? there was a thread on here or a reference to an article by ENGBLDR regarding decking and block and setting quench. I will have to see if I can find it. If I remember right you can go up to +.006 on piston height. not sure on the low end, but the lower you go the more chance you have of detonation/pre-ignition (pinging). If I am not mistaken the pistons from ENGBLDR are built so that they sit .003 lower than deck height mainly to compensate for head milling.
On a side note, when checking for quench, don't measure the pistons on the side of them measure from the rear edge on the diameter of the piston. This will remedy some of the piston rocking on the pins.
On a side note, when checking for quench, don't measure the pistons on the side of them measure from the rear edge on the diameter of the piston. This will remedy some of the piston rocking on the pins.
Last edited by xxxtreme22r; 12-22-2009 at 07:51 PM.
12-22-2009, 08:29 PM
#204
Registered User
Thread Starter
Broncbob, that makes sense. IIRC, my original #4 and #1 pistons also weren't exactly the same height all around.
My wrist pins wouldn't go in the pistons even with the pistons heated too hot to hold using a hair dryer, but the the pins dropped right in after dunking the pistons in boiling water. Amazing how much difference that extra 60 degrees or so made.
I don't know what it means, but my #2 rod was stamped B3 from the factory. The others were C3. So, I'm guessing the shop did whatever to 1,3 and 4.
I posted a link to Engnbldr's thread about quench somewhere in here earlier. Max piston height is +.006". He said aftermarket pistons are destroked by about .012" to account for decking. He didn't say how much height variation is acceptable or at what point below zero you encounter issues with pinging, power loss, etc.
I suppose I could take everything apart, have #4 and #2 rod journals turned down .010". That should drop those pistons .005". Take a bit more off the deck. Seems like a lot of expense and hassle for a street engine.
12-22-2009, 09:18 PM
#205
Registered User
Thread Starter
I don't know what I was thinking about turning journals affecting piston height. The bigger bearings would make up for that all around.
When in doubt, ask Ted. I pasted in my above posts and asked what he thinks.
------------------------
K...Remachining the crankshaft will have no affect at all on the assembled height. This is because the centerline stays in exactly the same place (I assume here the person machining the shaft knows what he/she is doing)
What will have an effect is resizing the rods, the upper half of the big end is clipped, then resized to correct the rod length. In your case, the block would need added decking, then the longer rods corrected. We see this quite a bit, the rods when resized end up slightly different lengths if the machinist is not extremely careful, that is a job for someone with very good hands.
You are correct, this is a bit much to try to correct for a street engine. The few thousandths variation you have there will cause little effect. What you are measuring is mostly factory variations, they are always there.
There are also always flaws, I have strived for perfection my entire life, particularly on very high dollar racing engines. There was always a varation in there, I could find and measure it.. I do not remember ever making one perfect, I doubt if anyone else has either although we can get darned close. The one in my own truck is very close, but I happen to know I have .00012 taper in two cylinders even though I spent 5 weeks of my spare time prepping and building her.
I personally like zero deck, and on an engine that is to be used in competition I will work very hard to hit that on all four. The reason has as much to do with port velocity variations and things like manifold reversions as it does with compression ratio.
Things like that really stack up when inches count on a race track, they are much less critical for normal daily driving.
The reason I don't give a specific amount of underdeck piston height and the point where pinging becomes a concern is there are too many variations.. I just try to keep the assembled height within plus/minus .004 or so. You are a bit past that, it is correctable but expensive from this point and I would think she will run just fine.
Ted
----------------------
When in doubt, ask Ted.
I pasted in my above posts and asked what he thinks.------------------------
K...Remachining the crankshaft will have no affect at all on the assembled height. This is because the centerline stays in exactly the same place (I assume here the person machining the shaft knows what he/she is doing)
What will have an effect is resizing the rods, the upper half of the big end is clipped, then resized to correct the rod length. In your case, the block would need added decking, then the longer rods corrected. We see this quite a bit, the rods when resized end up slightly different lengths if the machinist is not extremely careful, that is a job for someone with very good hands.
You are correct, this is a bit much to try to correct for a street engine. The few thousandths variation you have there will cause little effect. What you are measuring is mostly factory variations, they are always there.
There are also always flaws, I have strived for perfection my entire life, particularly on very high dollar racing engines. There was always a varation in there, I could find and measure it.. I do not remember ever making one perfect, I doubt if anyone else has either although we can get darned close. The one in my own truck is very close, but I happen to know I have .00012 taper in two cylinders even though I spent 5 weeks of my spare time prepping and building her.
I personally like zero deck, and on an engine that is to be used in competition I will work very hard to hit that on all four. The reason has as much to do with port velocity variations and things like manifold reversions as it does with compression ratio.
Things like that really stack up when inches count on a race track, they are much less critical for normal daily driving.
The reason I don't give a specific amount of underdeck piston height and the point where pinging becomes a concern is there are too many variations.. I just try to keep the assembled height within plus/minus .004 or so. You are a bit past that, it is correctable but expensive from this point and I would think she will run just fine.
Ted
----------------------
12-24-2009, 01:21 PM
#206
Registered User
Join Date: Sep 2009
Posts: 31
Likes: 0
Received 0 Likes
on
0 Posts
Thanks for the pic. For some reason I was trying to picture using a dial indicator right at the thrust bearing....
Looking forward to your final parts list. Especially curious about all the bolts you are replacing. I've kept, bagged and labeled all mine but have been wondering about reusing them. As far as I can tell the lock washers are all spent.
Just brought my engine into the machine shop a couple days ago, should get some word back after the new year. Hoping everything is in workable shape. I've already got to replace the header, found a crack in the original while I was cleaning gasket surfaces. Any recommendations out there on an affordable after-market header. Those LCE's look sweet but are out of my price range.
12-28-2009, 04:36 PM
#207
Registered User
Thread Starter
Had some delay. I need a few more bolts from Toyota, which of course the local dealer doesn't have in stock.
I'm using new exhaust studs and nuts, as well as new intake studs and bolts. Otherwise, I'm just replacing bolts as necessary. Funny how in any given assembly or area some are pristine while others have varying degrees of corrosion. If it's only a little and light I'm cleaning it off. A wire wheel in the Dremel on low speed works a lot better than brushing by hand. I'm finally about done cleaning bolts.
Not rebuild related, but I borrowed a wheel puller and put in a new horn contact plunger yesterday. No battery yet, so I couldn't test, but the horn should work. The new plunger is a good .2" longer than the worn out one. Replacing the plunger is slightly more hassle than shimming the contact plate, but should last longer.
I notice some minor dripping from the rear transfer output seal. I'll add that to the list of things to be done after the engine is in.
I have new clutch master and slave cylinders. I also want to replace the hose between the hard lines. I would have ordered one from Toyota, but I wasn't sure of the part number. My truck was made 8/86, which seems to be a transition month. Found about 3 numbers and don't know which I need or what the differences are. I figured it better to buy locally instead of having to pay return shipping for the wrong part. Autozone can't get one. Checker can special order. I'll check at Napa tomorrow.
Last edited by flyingbrass; 12-28-2009 at 04:37 PM.
12-29-2009, 04:53 PM
#208
Registered User
Thread Starter
Toyota's EPC for my year shows 2 pictures of timing cover bolts but doesn't mention which each is supposed to be for. A bolt I wanted was a different part number on each, so I had the dealer order both. They are both wrong. I'll reuse the old bolt. It's not that bad, but I would have preferred a new one.
I got 3 new water pump bolts. One was rusted so bad it had to be replaced. A couple others were marginal.
Napa had the clutch hose for $20. If you know for sure the part number you need, they cost the same or even a bit less from an online Toyota dealer. Toyota doesn't always make you grab your heels.
After seeing Gnarly's posts about timing chain guide weaknesses I took a closer look at my old and new passenger side guides. They are the same design. The old one weighs more. I don't know how much of that is from the remaining oil and crud or if the plastic possibly absorbed some oil over the years. I suspect the old one is made from denser plastic.
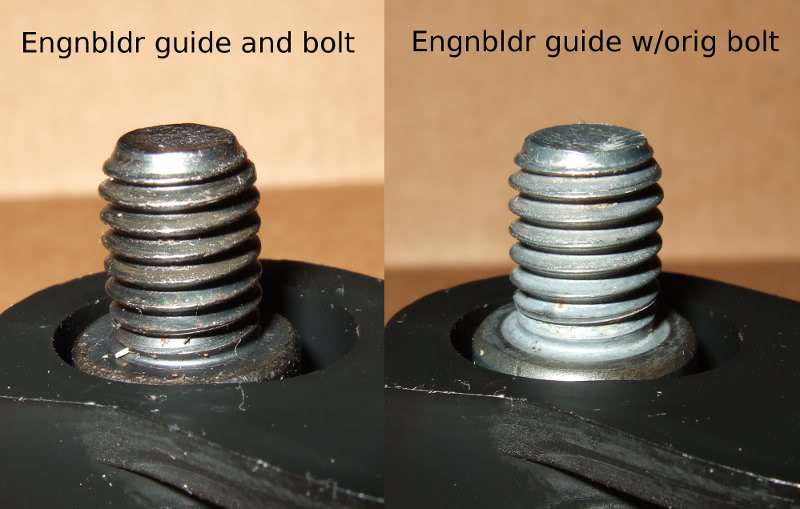
The bolts that hold the plastic guides are step bolts. The end of the step tightens against the block. The step length and guide thickness need to be pretty close to the same. The new bolts in Engnbldr's kit are slightly shorter, enough that either the step won't bottom when the bolt is fully tightened or the guide will be severely compressed, perhaps damaging it. The steps on my old bolts are a hair longer than the guide thickness, so I'll reuse them. If money wasn't an issue I'd buy an OEM guide and compare dimensions and weight with Engnbldr's.
I got 3 new water pump bolts. One was rusted so bad it had to be replaced. A couple others were marginal.
Napa had the clutch hose for $20. If you know for sure the part number you need, they cost the same or even a bit less from an online Toyota dealer. Toyota doesn't always make you grab your heels.
After seeing Gnarly's posts about timing chain guide weaknesses I took a closer look at my old and new passenger side guides. They are the same design. The old one weighs more. I don't know how much of that is from the remaining oil and crud or if the plastic possibly absorbed some oil over the years. I suspect the old one is made from denser plastic.
The bolts that hold the plastic guides are step bolts. The end of the step tightens against the block. The step length and guide thickness need to be pretty close to the same. The new bolts in Engnbldr's kit are slightly shorter, enough that either the step won't bottom when the bolt is fully tightened or the guide will be severely compressed, perhaps damaging it. The steps on my old bolts are a hair longer than the guide thickness, so I'll reuse them. If money wasn't an issue I'd buy an OEM guide and compare dimensions and weight with Engnbldr's.
01-01-2010, 04:31 PM
#209
Registered User
Thread Starter
Got the new clutch master cylinder installed. I'm fatter than last time and almost got stuck in front of the seat hooking the pedal back up. The new slave and hose are put together and waiting until the line stops dribbling to be attached.
I put the master cylinder on and ran a few reservoirs of fluid through the line to flush it out. The bottom hard line had all sorts of junk in it. I cleaned it out well with brake cleaner. I don't know if the rubber crud was from the hose disintegrating internally or the old seals in the slave, but I'm glad I'm replacing the hose.
My EGR valve is half cleaned. The pipe wasn't on very tight at all. After rotating the pipe a little the nut unscrewed by hand. I used some screwdrivers to clear out the biggest chunks, then a worn down cup brush in the Dremel as far in as it would reach. Gun bore cleaning brush for the straight pipe. It cleaned up easier than I would have thought.
The passages in the valve itself aren't so easy to reach. To open the valve (you'll want to clean it and its seat), attach a vacuum line to the top connector and draw a vacuum. Sucking on it works fine. A vacuum pump would be nicer, but I don't have one.
The delay in assembling the motor was because I hadn't decided what to use for my passenger side timing guide. Guess I'll use the old Toyota bolts with the Engnbldr guide. I'll probably get the timing stuff and head on this weekend.
I still need to get the gasket bits off that water bypass plate and the intake manifold. What a pain.
I need to replace my transmission input seal. The tranny is still in the truck. Will jacking the front up a few inches be enough to prevent oil running out when the cover is removed, or should I drain some?
01-02-2010, 11:37 AM
#211
Registered User
flyingbrass- just wanted to drop in and say GREAT WORK. Your attention to detail is awesome! I'm getting ready to dig into my '86 22r 5spd for the first time and having this thread as a learning tool/reference is very helpful. I doubt I'll get as deep as you with the rebuild, but I'm starting with the front mail seal and gonna check the timing chain. If that goes OK I'd like to get the street RV head and 268 cam from egnbldr. Heck I'm such a newbie at this stuff I gotta head to Sears and get some tools just to get started!!!
Keep up the good work! Any thank you for all the pics!!!
Keep up the good work! Any thank you for all the pics!!!
01-06-2010, 11:44 PM
#213
Registered User
Thread Starter
Thanks, 86 TOY.
I've been procrastinating installing the timing set and head, partly because I'm having a hard time deciding whether to put on the cover or the head first. The shop said the bolt holes in my cover barely line up and that I might not be able to get it on with the head already in place. But, I'd like to get a look at the timing parts fully assembled. Decisions...
I finally got that fricking gasket off the water bypass plate. I sprayed it with PB Blaster a few weeks ago and let it soak. That actually helped soften it, but only a little. It still took a lot of time. Spray on gasket remover, wait, scrape, repeat over and over.
My PAIR (reed) valve looked pretty good inside from what I could see. I decided not to take it apart.
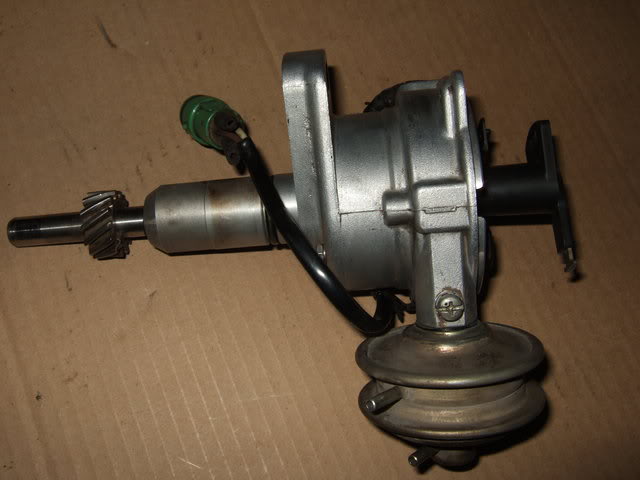
Distributor cleaning began by scraping off chunks with a screwdriver. It was filthy. I replaced the o-ring that the cap sits against. I think I saw a shaft o-ring in the gasket kit.
I should have snapped a before pic. I know this is only a boring picture of a distributor, but I had forgotten what they actually look like. For cleaning parts like this I'm thinking a small steam cleaner might work well and save considerable time.
My replacement oil pump didn't come with a front seal pre-installed. I used an old wood clamp/vise gizmo to seat it.
I wiped Vaseline into the oil pump gears but wasn't sure if the oil passage holes where it sits on the timing cover should also be filled. I put a little in, but if those holes/depressions are better off packed full, please speak up now.
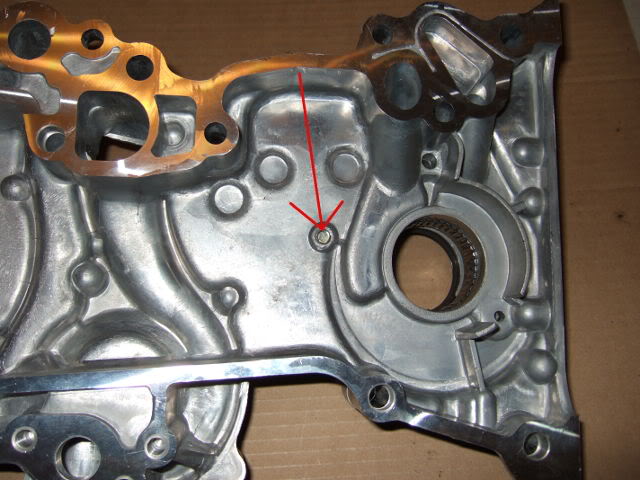
Here is a picture showing the top oil pump bolt from the back side. It's the one that needs some sealant on the threads. It's also the one you need to make sure isn't too long. Mine won't protrude past flush when fully tightened.
My chain tensioner bolts are on as close to 12 ft/lbs. as I can get them. My 3/8" torque wrench seems to run a pound or two low compared to a recently calibrated 1/2" wrench I borrowed and the inch-pound wrench I used for the tensioner bolts.
No torque values are provided for the original style guide bolts. I think I settled on somewhere around 24 ft/lbs. for the passenger guide, and I used blue Loctite. The guide isn't compressed by the bolt heads at all. It moves slightly with the bolts tightened.
I've been procrastinating installing the timing set and head, partly because I'm having a hard time deciding whether to put on the cover or the head first. The shop said the bolt holes in my cover barely line up and that I might not be able to get it on with the head already in place. But, I'd like to get a look at the timing parts fully assembled. Decisions...
I finally got that fricking gasket off the water bypass plate. I sprayed it with PB Blaster a few weeks ago and let it soak. That actually helped soften it, but only a little. It still took a lot of time. Spray on gasket remover, wait, scrape, repeat over and over.
My PAIR (reed) valve looked pretty good inside from what I could see. I decided not to take it apart.
Distributor cleaning began by scraping off chunks with a screwdriver. It was filthy. I replaced the o-ring that the cap sits against. I think I saw a shaft o-ring in the gasket kit.
I should have snapped a before pic. I know this is only a boring picture of a distributor, but I had forgotten what they actually look like. For cleaning parts like this I'm thinking a small steam cleaner might work well and save considerable time.
My replacement oil pump didn't come with a front seal pre-installed. I used an old wood clamp/vise gizmo to seat it.
I wiped Vaseline into the oil pump gears but wasn't sure if the oil passage holes where it sits on the timing cover should also be filled. I put a little in, but if those holes/depressions are better off packed full, please speak up now.
Here is a picture showing the top oil pump bolt from the back side. It's the one that needs some sealant on the threads. It's also the one you need to make sure isn't too long. Mine won't protrude past flush when fully tightened.
My chain tensioner bolts are on as close to 12 ft/lbs. as I can get them. My 3/8" torque wrench seems to run a pound or two low compared to a recently calibrated 1/2" wrench I borrowed and the inch-pound wrench I used for the tensioner bolts.
No torque values are provided for the original style guide bolts. I think I settled on somewhere around 24 ft/lbs. for the passenger guide, and I used blue Loctite. The guide isn't compressed by the bolt heads at all. It moves slightly with the bolts tightened.
Last edited by flyingbrass; 01-06-2010 at 11:49 PM.
01-07-2010, 06:02 PM
#215
Registered User
Join Date: Jan 2009
Location: Yuma, Az
Posts: 57
Likes: 0
Received 0 Likes
on
0 Posts
Thanks for the detail, brother. I've referred to your post several times for my rebuild on my '86 P/U and my brother's on his '81 Celica. The Celica is the one giving us grief. I't will fire off with starting fluid, but won't start. Fuel issue I guess. Ugh.
01-07-2010, 09:21 PM
#216
Registered User
Thread Starter
Good luck, guys. I'll be amazed if mine actually runs.
I was busy with other things today and didn't make much progress.
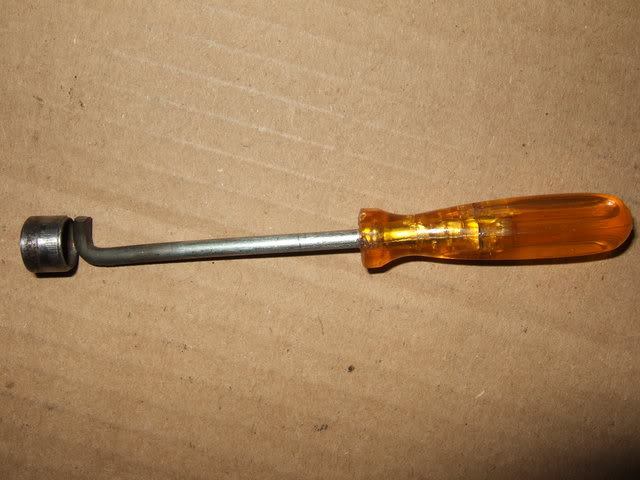
I noticed when test fitting the new cover that the block only had one timing cover locating dowel/sleeve/pin, whatever it's called. Sure enough, the other (top one) was stuck in my old cover. Really stuck. Its inside diameter is the same as the bolt hole, one of those PITA things to contend with. I haven't noticed anyone mentioning this when doing timing kit/cover replacements. Maybe it's rare.
I soaked the dowel with PB Blaster. I heated, bent and filed a small screwdriver into an L-shape so it would fit in the space under the dowel's bottom edge. It worked best coming in from the back and pounding on the screwdriver handle instead of rapping up on it like a slide hammer from the front. The end of the screwdriver bent a few times and finally broke off, but at least by then the dowel had started to move. I reformed the screwdriver and got it out undamaged.
I considered heating the cover around the hole and would have resorted to that if this didn't work, but it was covered with oily grunge and PB Blaster. I didn't want it to catch fire and/or potentially warp a cover that in a pinch could be reused.
How important are these locating dowels? I'm half afraid that if I put it back in the block my cover won't line up correctly.
I was busy with other things today and didn't make much progress.
I noticed when test fitting the new cover that the block only had one timing cover locating dowel/sleeve/pin, whatever it's called. Sure enough, the other (top one) was stuck in my old cover. Really stuck. Its inside diameter is the same as the bolt hole, one of those PITA things to contend with. I haven't noticed anyone mentioning this when doing timing kit/cover replacements. Maybe it's rare.
I soaked the dowel with PB Blaster. I heated, bent and filed a small screwdriver into an L-shape so it would fit in the space under the dowel's bottom edge. It worked best coming in from the back and pounding on the screwdriver handle instead of rapping up on it like a slide hammer from the front. The end of the screwdriver bent a few times and finally broke off, but at least by then the dowel had started to move. I reformed the screwdriver and got it out undamaged.
I considered heating the cover around the hole and would have resorted to that if this didn't work, but it was covered with oily grunge and PB Blaster. I didn't want it to catch fire and/or potentially warp a cover that in a pinch could be reused.
How important are these locating dowels? I'm half afraid that if I put it back in the block my cover won't line up correctly.
01-08-2010, 09:09 AM
#217
Registered User
Join Date: Jan 2009
Location: Yuma, Az
Posts: 57
Likes: 0
Received 0 Likes
on
0 Posts
I don't think theyre a mandatory Item. A lot of cars have them on either manifold and Just about every modern motorcycle runs them in various places, specifically between the bottom end and the cylinder head. Theyre great for lining up a gasket while mating it to a part, but so is gasket sealant. One thing I foun (possibly from this forum) Is to just spray some 3M on your gaskets and stick ' em on.
01-08-2010, 06:26 PM
#219
Registered User
Thread Starter
Some advocate liberal use of RTV on practically everything, while others warn against doing that. I'm leaning toward the latter camp.
I'm planning on using Permatex High Tack spray on the gaskets for the timing cover, water pump and the not-pre-coated sides of the water bypass plate gaskets on the bottom of the intake manifold. Probably do the same for the rear cover plate on the head.
I'm planning on using Permatex High Tack spray on the gaskets for the timing cover, water pump and the not-pre-coated sides of the water bypass plate gaskets on the bottom of the intake manifold. Probably do the same for the rear cover plate on the head.
01-08-2010, 10:30 PM
#220
Registered User

Join Date: Sep 2009
Posts: 61
Likes: 0
Received 0 Likes
on
0 Posts
I just rebuilt a small block 350 chevy for a guy in auto shop.he bought all the stuff for it and I was surprised how easy it was My first time and within six hours it when from short block to setting in the blazer.I want to re build my 22re before I get my license so I can have a fresh clean engine.Since it's my first truck I rebuild every thing to fit me and want to make sure it is in near perfect condition because i plan on driving it for a long time.


