
1st Gen Soft Top
 07-08-2008, 03:34 PM
#1
Registered User
Thread Starter
1st Gen Soft Top
So I recently purchased an FJ40 soft top, attempting to make my own for my 4Runner for cheap. However I'm not sure how to attach it to the cab?
Any clever ideas? Or anywhere I can buy the little rail thing the soft top slides into? That would be the easiest way...
Any clever ideas? Or anywhere I can buy the little rail thing the soft top slides into? That would be the easiest way...

 07-08-2008, 06:53 PM
#4
Contributing Member
Join Date: Jun 2007
Location: Denver, CO
Posts: 1,299
Likes: 0
Received 0 Likes
on
0 Posts
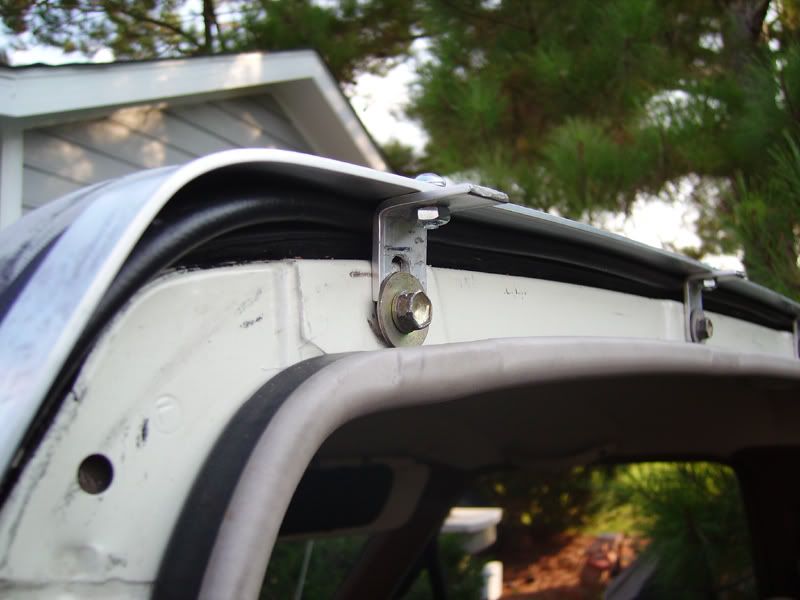
What I did was attach the aluminum bar to the cab with the hardware and bend the edges with pliers and a hammer. Here's my write up https://www.yotatech.com/forums/f116...riteup-147629/
07-09-2008, 08:23 PM
#5
Registered User
Join Date: Jan 2006
Location: Elbert, CO
Posts: 878
Likes: 0
Received 0 Likes
on
0 Posts
I bent mine up yesterday, and right before I began writing this post I fitted my bow to the truck after painting. I bend conduit at work all the time so mine looks perfect  . For the flat bar I just measured/eyeballed the length and cut it a bit long. I think it was 54" overall, and I trimmed the ends today to fit the bikini, which is 52" IIRC. To bend it I actually fit it to the weatherstripping on the cab, and just used my hands and the cab roof to gradually get the right angles, constantly test fitting it along the way. I probably have six hours total into the project - it wasn't fast by any means - but it looks great.
Here's a tip I did not see in either Djlarroc's or 4runnerx3's writeups. To get the bow mounted, one ideally uses the threaded holes in the rollbar intended for shoulder belts. 4runnerx3 has those shoulder belt units and used that existing bolt, but I could not find the correct bolt to fit those threads, and it would have been a rather large hole to drill in 1/2" conduit anyway. I ended up taking a 3 1/2" bolt, 3/8" hex head, and sliding it through the rollbar. It fits snugly and perfectly. I flattened the ends of the conduit and drilled a 3/8" hole through the flat parts, then used a nut and lock washer to mount it all together. I put flat washers on the rollbar on both sides, just for protection. I was able to tighten the bolts enough to hold the bow upright on its own, although I do have a retaining strap as well. So, parts list for that attachment method:
(2) 3/8" bolts, 3.5" long
(2) 3/8" nuts
(2) 3/8" lockwashers
(4) 3/8" flat washers
Pics:


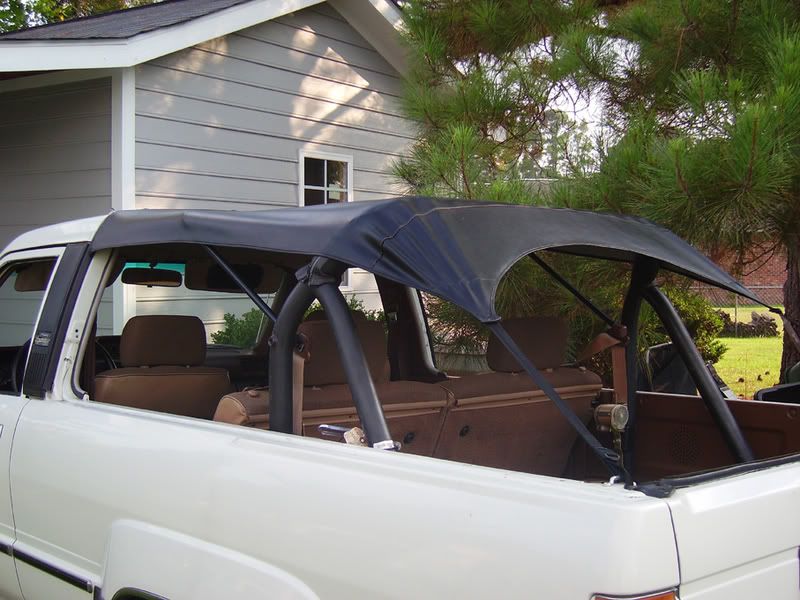
More detail of the way the top is rolled over against the weatherstripping:

It's taut! We'll see how it sounds on the highway now!

A good view of the bow angle. My uprights were about 17" long, as I did not want the bow sticking out too terribly far:

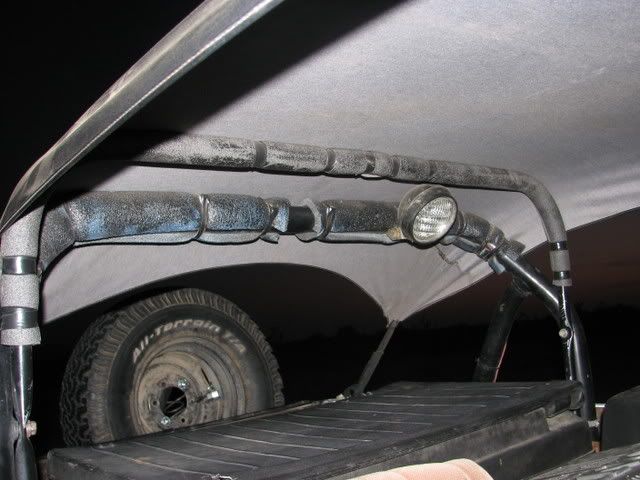
The underside, with velcro straps and pipe insulation (and plenum-rated zip ties from work )
)

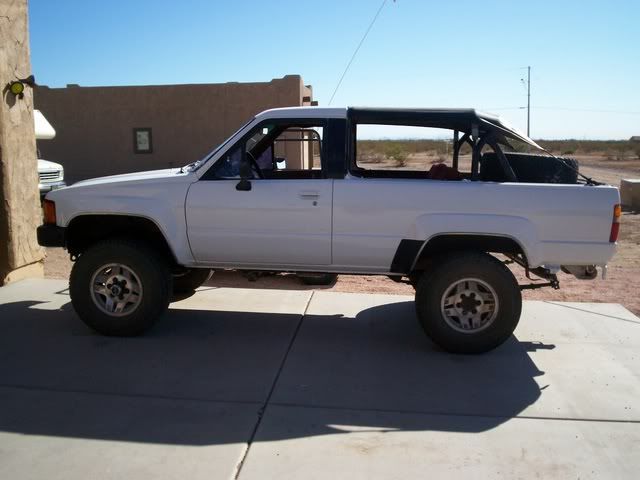
And my truck as it sits right now

. For the flat bar I just measured/eyeballed the length and cut it a bit long. I think it was 54" overall, and I trimmed the ends today to fit the bikini, which is 52" IIRC. To bend it I actually fit it to the weatherstripping on the cab, and just used my hands and the cab roof to gradually get the right angles, constantly test fitting it along the way. I probably have six hours total into the project - it wasn't fast by any means - but it looks great. Here's a tip I did not see in either Djlarroc's or 4runnerx3's writeups. To get the bow mounted, one ideally uses the threaded holes in the rollbar intended for shoulder belts. 4runnerx3 has those shoulder belt units and used that existing bolt, but I could not find the correct bolt to fit those threads, and it would have been a rather large hole to drill in 1/2" conduit anyway. I ended up taking a 3 1/2" bolt, 3/8" hex head, and sliding it through the rollbar. It fits snugly and perfectly. I flattened the ends of the conduit and drilled a 3/8" hole through the flat parts, then used a nut and lock washer to mount it all together. I put flat washers on the rollbar on both sides, just for protection. I was able to tighten the bolts enough to hold the bow upright on its own, although I do have a retaining strap as well. So, parts list for that attachment method:
(2) 3/8" bolts, 3.5" long
(2) 3/8" nuts
(2) 3/8" lockwashers
(4) 3/8" flat washers
Pics:
More detail of the way the top is rolled over against the weatherstripping:
It's taut! We'll see how it sounds on the highway now!
A good view of the bow angle. My uprights were about 17" long, as I did not want the bow sticking out too terribly far:
The underside, with velcro straps and pipe insulation (and plenum-rated zip ties from work
)And my truck as it sits right now
07-09-2008, 08:49 PM
#6
Contributing Member
Join Date: Jun 2007
Location: Denver, CO
Posts: 1,299
Likes: 0
Received 0 Likes
on
0 Posts
Nice job Brian, looks great. I did the same as you only I used 5/16" x 3.5" hardware from Home Depot. You prob went to Ace right?
It should hold up well. Mine did at 75mph, as good as my old Downey. Only thing is, once the sun loosens up your top after a few days, you'll probably have to retighten it.
It should hold up well. Mine did at 75mph, as good as my old Downey. Only thing is, once the sun loosens up your top after a few days, you'll probably have to retighten it.
07-09-2008, 09:18 PM
#7
Registered User
Join Date: Jan 2006
Location: Elbert, CO
Posts: 878
Likes: 0
Received 0 Likes
on
0 Posts
I actually went to Home Depot as well. Was about to use 5/16" but figured 3/8" would fill the hole a little better, and it fit perfectly with no looseness. Either way it works when you tighten it though.
That's another thing, no problem to tighten the straps now. I had to take the top off and take it to a tailor (Chinese lady, very little English lol) to shorten the straps. Folks, you're gonna want to take about 10" out of the strap before the buckle. If I could sew I probably would have cut a section out and sewed it back together where I wanted it, but I had the tailor just double it up to take the slack out and then stitch it together. Not a big deal, and much easier if you have access to/skills with a sewing machine.
Alex - if you want me to bend up a piece of conduit to move your bow out a bit, just let me know.
Trending Topics
07-10-2008, 05:31 AM
#8
Registered User
Asha'man, I bolted my conduit bar that way with a smaller bolt and nut. But when I put the front seat belts in the rear, the B-pillar bolt for the front seat belts will screw in the roll bar, same pitch/size. I didn't have to redrill the hole in the conduit, it was big enough. Your craftsmanship looks good.
07-10-2008, 09:22 PM
#9
Registered User
Join Date: Jul 2007
Location: Az
Posts: 149
Likes: 0
Received 0 Likes
on
0 Posts
i wanna post too :D
a friend and i just layed the alum. flatbar on the top and pushed on it and formed right to the shape of the top, if your worried about the paint you could lay down newspaper or something???
this is how mine turned out
i ran my bar straight up and down, different than most but ive found
its sturdy, i did 91 once with it haha. never again. fear a ticket.
i just bolted it on through the tapped holes where a shoulder belt
would go, and the bottom rest in the square hole thing at the bottom
of the "roll bar"
i have a photobucket http://s307.photobucket.com/albums/n...nner/Fj%20Top/ for more pics if you want to reference them.
i made a tie down for the strap that bolts into the factory hardtop hole, if
you dont want to drill into the body.
oh if your taking the top off so ppl can hop in thru the sides your door panel backing is gonna get screwed up, look at the link thing on the side called "door panel savers" they cover the top so the cardboard backing cant get broken, plus its like $8 and some paint. cheap door panel saver idea
idk, if anyone else looks at em id like some feed back. good or bad.
sorry bout the long post an big pics, hope i was a bit helpful.
just try some newspaper between the alum. flat bar and the top and
pretty much lean on it and it should just form around the top no prob.

Thread
Thread Starter
Forum
Replies
Last Post
vanion2
99+ Tundra, 00+ Sequoia, 98+ Land Cruiser/LX470
2
07-29-2015 06:17 PM
FS[SouthEast]: 1st Gen 4Runner Slider Window, Driver Side
coryc85
Misc Stuff (Vehicle Related)
0
07-06-2015 04:07 AM


