
1995 3vze Timing belt removal and replacement "With Lots Of Pics"
 12-11-2014, 03:09 PM
#141
Contributing Member
Join Date: Nov 2010
Location: Columbia River Gorge, Oregon...east side
Posts: 5,125
Likes: 0
Received 2 Likes
on
2 Posts
See page EG2-45 for retracting tensioner pin:
http://personal.utulsa.edu/~nathan-b...67timingbe.pdf
http://personal.utulsa.edu/~nathan-b...67timingbe.pdf
Last edited by rworegon; 12-11-2014 at 03:11 PM.
 12-12-2014, 07:47 AM
#142
Registered User

Join Date: Dec 2014
Location: Plymouth IN
Posts: 8
Likes: 0
Received 0 Likes
on
0 Posts
You'll need to pull the tensioner off and compress the pin with a vise, press, really big channel locks, etc. Once the pin is retracted, place a small hex wrench or stiff piece of wire in the hole to keep the pin retracted. Now, reinstall and once all bolted up pull the hex wrench/wire out.

 02-17-2016, 03:54 PM
#147
Registered User

Join Date: Aug 2011
Posts: 1
Likes: 0
Received 0 Likes
on
0 Posts
Great Job, Thanks. I see you posted this in 2006. I'm doing a 91' with 202,000 rt now February 2016. My point is, your post is still incredibly relevant. It helped me out tremendously.
Last edited by coupe; 02-17-2016 at 03:56 PM.
02-19-2016, 09:42 AM
#149
Thank you!
I'm so torn, not being able to be over here as much on yotatech anymore... I can barely even check in, but today, from the looks of it, I am going to totally go by your thread as to how to get this back together. I have done most of this budget rebuild without any extra expense except for headers, and exhaust obviously, but that will all go to a deserving owner when I do the 3.4 swap not too far from now. I was just going to ask, do you think since the timing was set and it was running fine, but he blew the head gasket, & I got it to TDC before I broke everything down, should I still pull the crank pulley and just start fresh with a new belt? Even though it's only got about six thousand miles on everything? I know the guy, and he just couldn't go on with all the plans, so I'm going ahead with it and I've done a blaze landlord travel, its on 33 s and sitting pretty... I'll post it quickly, but I just wanted to get your thoughts on that Karma as to whether I could just leave the belt on the crank at TDC and then still line everything up? I'm guessing that the easiest way would just to be to start with a new belt with Marks in the right place, ... and having removed the crank pulley obviously...? Even if you don't have time to answer me or you don't get this for a while, I really appreciate your write-up!
02-28-2016, 06:22 PM
#150
I'm gonna through in a thumbs up also, as this and a few other threads helped me get through my timing belt install.
tldr;
high idle-ecu had to re-learn idle
high temps-air in system, low coolant
small wooden dowel with 1" of small 'breather-hose tubing or windsheildwasher tubing for starting plug threads
hood off makes some things easier
fired up on first turn of key. high idle threw a few moments of doubt in my mind but after reading more threads on the yotatech and others, she just had to "relearn" engine idle speed, and the high temps were due to her needing to burp.
had a few questions about the install, naturally after everything went back in and was having those conditions, so i took off the TB(timing belt) cover to ref-verify cam marks and alignment. and to satisfy a curiosity,which i thought might be a dumb question but answered that one on sight.
starter trick works for crank removal, and home-brew or cam tool for cam wheels. cam wheels come off to replace cam seals as mentioned, and to clean up back there as needed.
plug insertion tool i used:
wooden dowel and one inch of tubing holds plug at those small hangles to start threads then pops off easily. #5 plug a couple minutes in and out.
i stuff a rag beneath the plug above the header pipe to avoid loosing stuff. #3 fell somewhere and it took longer to find and get it out its hiding place. of course i stuffed the rag only after the plug played 'haha come fine me'
another thing i did was remove the hood, that gave me more room. i TPV thing that was sitting around waiting to be put in, but it's not in a fun place.
bag and tag everything, saves time in the long run.
now to deal with a small hole in the radiator. 10-15% of the fins are done and collapsed scribbled up the with dying words of millions once wandering bees, evident only by their remaining wing and occasional compound eyeball.
tldr;
high idle-ecu had to re-learn idle
high temps-air in system, low coolant
small wooden dowel with 1" of small 'breather-hose tubing or windsheildwasher tubing for starting plug threads
hood off makes some things easier
fired up on first turn of key. high idle threw a few moments of doubt in my mind but after reading more threads on the yotatech and others, she just had to "relearn" engine idle speed, and the high temps were due to her needing to burp.
had a few questions about the install, naturally after everything went back in and was having those conditions, so i took off the TB(timing belt) cover to ref-verify cam marks and alignment. and to satisfy a curiosity,which i thought might be a dumb question but answered that one on sight.
starter trick works for crank removal, and home-brew or cam tool for cam wheels. cam wheels come off to replace cam seals as mentioned, and to clean up back there as needed.
plug insertion tool i used:


wooden dowel and one inch of tubing holds plug at those small hangles to start threads then pops off easily. #5 plug a couple minutes in and out.
i stuff a rag beneath the plug above the header pipe to avoid loosing stuff. #3 fell somewhere and it took longer to find and get it out its hiding place. of course i stuffed the rag only after the plug played 'haha come fine me'
another thing i did was remove the hood, that gave me more room. i TPV thing that was sitting around waiting to be put in, but it's not in a fun place.
bag and tag everything, saves time in the long run.
now to deal with a small hole in the radiator. 10-15% of the fins are done and collapsed scribbled up the with dying words of millions once wandering bees, evident only by their remaining wing and occasional compound eyeball.
06-28-2016, 07:26 AM
#151
Registered User

Join Date: May 2016
Posts: 3
Likes: 0
Received 0 Likes
on
0 Posts

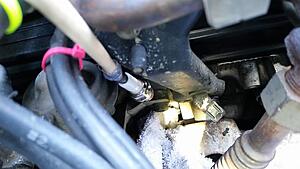
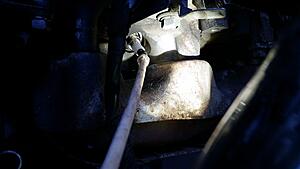
Passenger side bank

Drivers side bank

Crank
I was using this thread also. Very informative till I got to the alignment marks. Turned it over several times and my marks are still off to the drivers side at 0 TDC. This is how it was running and came to me. Should I put it back as it came or line it up to the book?
Any suggestions?
Thanks in advance.....
06-28-2016, 09:28 AM
#152
Registered User

Join Date: Sep 2007
Location: San Francisco East Bay
Posts: 8,254
Likes: 0
Received 822 Likes
on
649 Posts
Sure looks to me like you're off by one tooth on the crank.
But just to be sure, you ought to check that the crank is telling you the truth about TDC. Use a plastic straw or wooden chopstick through the spark plug hole to check. There are (plenty of) reports here of the annular rubber ring in the harmonic balancer failing, allowing the outer ring to shift. Usually not just by one tooth, but why not?
[why a straw and not a screwdriver? one slip and you could gouge the heck out of the piston or spark plug hole.]
 06-29-2016, 06:15 AM
#154
Registered User
Join Date: Sep 2007
Location: San Francisco East Bay
Posts: 8,254
Likes: 0
Received 822 Likes
on
649 Posts
Put another way, if you reinstalled the belt following the FSM, it would "end up" with all marks aligned.
Do you want to do that? Even though it's running "fine," according to the FSM your valve timing is a little off. If it were my truck, I'd try to put it back to factory spec (move the belt). Be sure to re-check ignition timing; you might be off on that too to partially accommodate the valve timing.
But it's your choice.

Thread
Thread Starter
Forum
Replies
Last Post
voiddweller
86-95 Trucks & 4Runners (Build-Up Section)
19
05-02-2016 09:10 PM
crazypaint
Buying & Selling Advice - Feeler/Gauging Interest
3
06-23-2015 03:27 AM


