1995 3vze Timing belt removal and replacement "With Lots Of Pics"
 05-12-2011, 02:26 AM
#81
Registered User
Thread Starter
Join Date: Jul 2008
Location: GA
Posts: 1,062
Likes: 0
Received 0 Likes
on
0 Posts

the cams are different from each other, one is left and one is right
they are different so the belt will stay on the cams


 07-27-2011, 03:01 PM
#84
Registered User
Thread Starter
Join Date: Jul 2008
Location: GA
Posts: 1,062
Likes: 0
Received 0 Likes
on
0 Posts
12-03-2011, 06:12 PM
#87
Registered User
What is the little pipe coming off the new water pump by the thermostat for? The old pump on my pickup didn't have it, and the new one does. I see yours has a hose the heads to the rear on it. Something for an automatic?
03-11-2012, 06:30 AM
#90
Registered User

Join Date: Mar 2012
Posts: 2
Likes: 0
Received 0 Likes
on
0 Posts
I know this thread is a little old, but I could use some help. I'm changing my timing belt for the first time and I accidentally turned the crank over after taking the old one off. I was wondering if that's a big deal, or if I just need to turn it back to the TDC mark and it will be fine?
04-18-2012, 06:53 PM
#95
Registered User

Join Date: Mar 2012
Location: North Idaho
Posts: 71
Likes: 0
Received 0 Likes
on
0 Posts
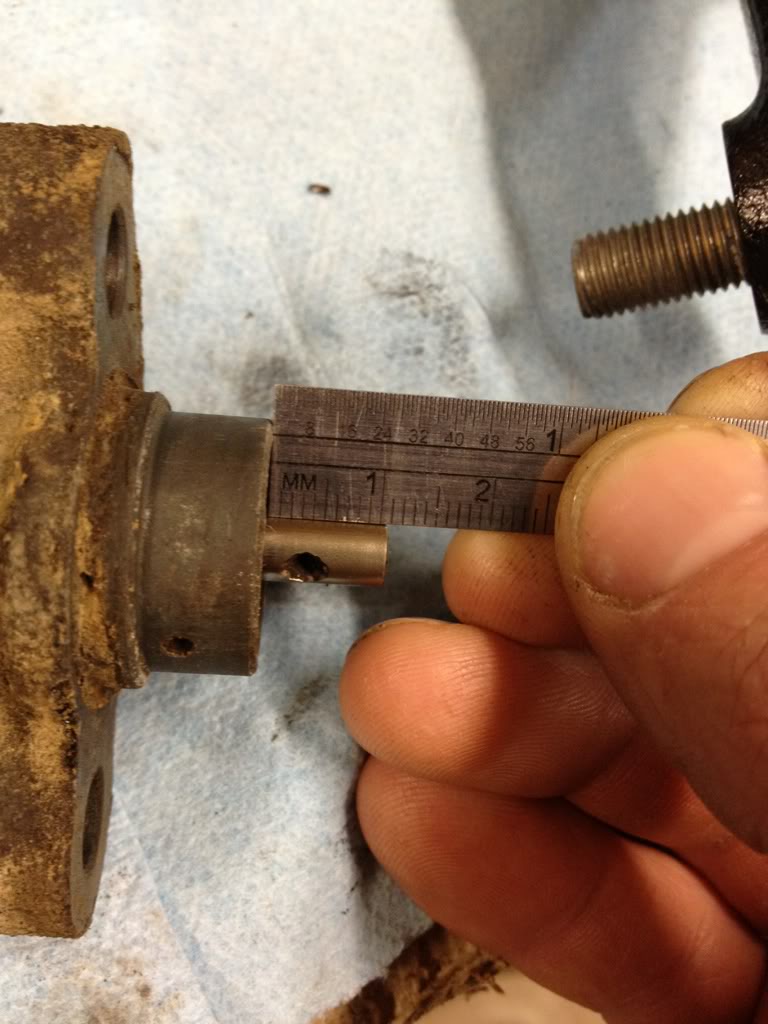
I have a question too. If my tensioner appears to be good except the shaft is maybe a touch too far out of the housing. The spec is 10 - 10.5 mm and mine might be 10.75 mm. Would you put a new one in?
04-29-2012, 06:30 AM
#98
Registered User
Join Date: Oct 2010
Location: Seattle WA
Posts: 27
Likes: 0
Received 0 Likes
on
0 Posts
I just did my timing belt on my 3vze yesterday with a good friend of mine, and would like to add a few things for those researching for many hours just as I had.
As far as problems we ran into while doing the timing belt, there was only one problem we had. getting the timing marks to line up after 2 full rotations. We must have done this a dozen times and every time the marks were off. We couldn't figure out what we were doing wrong. We fallowed the instructions in the Chilton manual. We fallowed instructions from the fsm. And even instructions here on yotatech and we still ended up with a tooth off.
Finally we turned to the Gates instructions that the belt came with, which said to take the sprockets off the cams. We had avoided this method because it was the only instructions I had seen that said you had to do this. But as several tries with other methods had failed we decided to give it a shot. to our surprise it worked perfect.
It is a very simple and helpful method that we had thought was unnecessary. The basic idea was that once you get the old timing belt off and all marks are aligned, you loosen the bolt from the cam and take the pin (key) out so that the cam sprocket can spin freely on the shaft with out moving the cam and valves. now you can put the new timing belt on. This makes it easier because the cams wont jump when in the exhaust and intake stroke. Again we saw it as unnecessary too but it really helped.
When putting the new belt on we learned that we could move the cams one tooth to the right without it trying to jump and skip teeth. we did this to compensate for the timing being one tooth off (to the left). Our problem was that as soon as we would attach the spring and let the tensioner do its thing, it would pull the cams one tooth back thus being on tooth off to the left. But with the cam sprockets rotating freely we could compensate without the cams jumping.
We then turned the crank 2 full rotations and aligned the mark on the oil pump, and BAM! dead perfect . From there all we had to do was put the pins back in because the cam was still aligned and hadnt moved. Installing the bolts back into the cams was easy from that point. just pUt it in 5th and torque em down.
Everything went back together smooth and fast. I would like to add one more thing however. People post lots of ideas and methods on how to get the crankshaft pully bolt out. some of them probably not the best idea. We spent about 15 second on it. Put it in 5th and loosen the bolt with a breaker bar. And as far as getting the actual pulley off, just use the right tool for the job. we installed a puller and the thing came off by hand.
There are many people with many methods out there. Some may not agree with my methods. My methods worked however and my truck is drivin down the road. So I hope this can help anybody out there looking for for some advice
As far as problems we ran into while doing the timing belt, there was only one problem we had. getting the timing marks to line up after 2 full rotations. We must have done this a dozen times and every time the marks were off. We couldn't figure out what we were doing wrong. We fallowed the instructions in the Chilton manual. We fallowed instructions from the fsm. And even instructions here on yotatech and we still ended up with a tooth off.
Finally we turned to the Gates instructions that the belt came with, which said to take the sprockets off the cams. We had avoided this method because it was the only instructions I had seen that said you had to do this. But as several tries with other methods had failed we decided to give it a shot. to our surprise it worked perfect.
It is a very simple and helpful method that we had thought was unnecessary. The basic idea was that once you get the old timing belt off and all marks are aligned, you loosen the bolt from the cam and take the pin (key) out so that the cam sprocket can spin freely on the shaft with out moving the cam and valves. now you can put the new timing belt on. This makes it easier because the cams wont jump when in the exhaust and intake stroke. Again we saw it as unnecessary too but it really helped.
When putting the new belt on we learned that we could move the cams one tooth to the right without it trying to jump and skip teeth. we did this to compensate for the timing being one tooth off (to the left). Our problem was that as soon as we would attach the spring and let the tensioner do its thing, it would pull the cams one tooth back thus being on tooth off to the left. But with the cam sprockets rotating freely we could compensate without the cams jumping.
We then turned the crank 2 full rotations and aligned the mark on the oil pump, and BAM! dead perfect
. From there all we had to do was put the pins back in because the cam was still aligned and hadnt moved. Installing the bolts back into the cams was easy from that point. just pUt it in 5th and torque em down.Everything went back together smooth and fast. I would like to add one more thing however. People post lots of ideas and methods on how to get the crankshaft pully bolt out. some of them probably not the best idea. We spent about 15 second on it. Put it in 5th and loosen the bolt with a breaker bar. And as far as getting the actual pulley off, just use the right tool for the job. we installed a puller and the thing came off by hand.
There are many people with many methods out there. Some may not agree with my methods. My methods worked however and my truck is drivin down the road. So I hope this can help anybody out there looking for for some advice
04-29-2012, 07:18 AM
#99
Contributing Member
Join Date: Nov 2010
Location: Columbia River Gorge, Oregon...east side
Posts: 5,125
Likes: 0
Received 2 Likes
on
2 Posts
As far as problems we ran into while doing the timing belt, there was only one problem we had. getting the timing marks to line up after 2 full rotations. We must have done this a dozen times and every time the marks were off. We couldn't figure out what we were doing wrong.
I ask beacuse after two rotations what is important is that the crank/cam marks come back to their TDC position. It may be many, many rotations before the painted belt marks line back up.....this is perfectly normal.
That said, some have experienced the jumping you describe and have tackled it in a similar fashion.
Last edited by rworegon; 04-29-2012 at 07:27 AM.
04-29-2012, 07:35 AM
#100
Registered User
Join Date: Oct 2010
Location: Seattle WA
Posts: 27
Likes: 0
Received 0 Likes
on
0 Posts
no not the marks on the belt just the one on the cam sprockets and crank shaft. after rotating the crank 2 times the left cam mark on the belt is somewhere near the top of the right cam which we expected.


