
1990 22re into 1987 4runner
 11-18-2014, 10:14 AM
#1
Registered User
Thread Starter

Join Date: Nov 2014
Posts: 17
Likes: 0
Received 0 Likes
on
0 Posts
1990 22re into 1987 4runner
I know this topic has been covered several times but most of the threads ended incomplete.
The 87 efi 22re in my 4runner is toast, and i bought a donor 22re from a 1990 4runner to replace it with.
I will be using the 1987 ecu, so i know i need to use my 87 fuel injectors and harness, and may have to swap some sensors around to make the plugs the same.
I'm basically looking for someone to tell me if im missing anything that needs to be done.
Heres the run down of what im going to do on thursday,
1) Im going to pull the 87 motor out of my 4runner and put it on an engine stand next to the 1990 motor.
2) Replace the 1990 exhaust manifold with the 1987 manifold to delete the air injection tube.
3) Replace the 1990 lower intake manifold and injectors/fuel rail with the 1987 so that the injectors will work with my ecu
4) Should i use the 1990 upper intake and throttle body since everyone seems to be doing that swap? Or use the 1987 upper to make it simple?
5) Replace the 1990 engine wiring harness with the 1987 harness and swap out any sensors that have different plugs.
What else am i missing?
The 1990 engine doesnt have a flywheel or clutch so i will be using the ones from my 1987, but i noticed the 1990 motor has a thin metal plate that goes between the engine and bellhousing with a hole for the starter, i dont have the 87 motor pulled yet so im not sure if it has one? I will be using the 1987 starter since im using the 87 flywheel, so do i use the spacer plate from the 90?
Please any input would be great, i know some of you are very experienced with these engines and i will only have my engine hoist for 1 day(rental) so i need to know exactly what im going to do so i can get it done
Thanks
Brian
 11-18-2014, 11:20 AM
#2
Registered User
Thread Starter
Join Date: Nov 2014
Posts: 17
Likes: 0
Received 0 Likes
on
0 Posts
maybe kep the whole 1990 intake manifold and just swap the injectors?
ok now i found this thread https://www.yotatech.com/forums/f116...estion-245455/
it is making me think i can use the full upper/lower 1990 intake and just swap the injectors and fuel rail for the ones on my 87 motor? i was under the impresion that the newer injectors and lower manifold had square ports and the older ones had round ports?
it is making me think i can use the full upper/lower 1990 intake and just swap the injectors and fuel rail for the ones on my 87 motor? i was under the impresion that the newer injectors and lower manifold had square ports and the older ones had round ports?
11-18-2014, 05:28 PM
#3
I'm doing something similar with the intake at the moment, putting a 89+ intake & TB on my 87 22re.
The best part about the 89+ is that the stupid idle air control valve is gone and startup idle is more reliable (my whole reason for doing it). The thing you have to watch out for is that you must adapt your current TPS to work with the newer throttle body if you want to keep using the 87 ECU.
There's a thread here all about it. I'm doing this mod tomorrow!
Things that I had to source for this conversion:
� 89+ upper intake
� 89+ TB
� part number 16264-35030 (89+ coolant hose #1)
� part number 16267-35030 (89+ coolant hose #2)
� part number 90404-51060 (union to adapt therm housing output to 89+ coolant hose)
� gaskets (TB, EGR, upper/lower gasket)
From what I can see in that thread the lower intake is nearly identical.
The procedure for adapting the TPS (courtesy of that thread)..
I'll let you know how it goes, seems straightforward enough!
The best part about the 89+ is that the stupid idle air control valve is gone and startup idle is more reliable (my whole reason for doing it). The thing you have to watch out for is that you must adapt your current TPS to work with the newer throttle body if you want to keep using the 87 ECU.
There's a thread here all about it. I'm doing this mod tomorrow!
Things that I had to source for this conversion:
� 89+ upper intake
� 89+ TB
� part number 16264-35030 (89+ coolant hose #1)
� part number 16267-35030 (89+ coolant hose #2)
� part number 90404-51060 (union to adapt therm housing output to 89+ coolant hose)
� gaskets (TB, EGR, upper/lower gasket)
From what I can see in that thread the lower intake is nearly identical.
The procedure for adapting the TPS (courtesy of that thread)..
- Remove both throttle bodies.
- Record the part numbers for the older TPS and the newer one (You will not be using the new one)
- Pull both TPS.
- Manually actuate the original TPS and check for binding; it's very common.
- Lay the old TPS on it's back and fill it with WD-40. Let it soak in and clean \ lube the wiper as you perform the next step. (Every used TPS I have pulled was sticky..)
- Inspect the "paddles" bolted to the butterfly by a single nut for alignment. Do not be surprised if they are clocked differently. My 86 was clocked at around 90, and the 92 was clocked at around 0.
- If they are clocked differently, carefully remove and mark the old paddle position on the circle area of the old TB, and set aside. A marker or pencil works well.
- Remove the butterfly from the "new" throttle body and swap the old in it's place. Made darn sure the clocking matches the old throttle body.
- Lube the throttle plate while you have it apart. You may want to replace the packing.
- Place loctite on the TB nut, and check for smooth actuation.
- Drain the WD from the TPS and test it with a ohm meter. If it checks out OK; install it. If not, replace it.
- Drop the TPS onto the mount ring and manually verify it properly mates with the butterfly paddles. You drop it on "Before" the paddles and rotate it into to place.
- Snug the screws, do not tighten them. Test for proper operation with a ohm meter
- Reattach the Throttle body.
- If your old TB had a vacuum pot touching the idle screw, move it over. It is designed to kick the idle up if the engine tries to die. Great for crawling. It will also shoot you in the foot when to either test for codes with the engine off; and when setting the TPS.
- You must defeat the vacuum dashpot when setting the TPS or reading codes. I used a spring. It must be pulled fully in to set TPS. With no vacuum on the dashpot, it extends the plunger for higher idle. This is enough to allow you to set it improperly and to throw codes with the engine off; or to foul up timing and idle when running.
11-18-2014, 05:37 PM
#4
11-19-2014, 06:25 PM
#5
Registered User
Thread Starter
Join Date: Nov 2014
Posts: 17
Likes: 0
Received 0 Likes
on
0 Posts
Thank a ton for all that info Jenny, really helpful. How did your swap go today?
I decided tomorrow I'm just going to swap the motor in with my full 87 intake on it since I don't know for sure that the motor runs yet.
I just don't want to be trouble shooting the intake while the motor is the problem.
Once I get it running I will start making sure I have all the parts for the upper intake swap, and then I will take the leap.
I'm so excited to have my 4Runner driving again, perfect timing before the snow too.
Hope your swap went well, check back in and let us know how it went, I will let you guys know how the motor swap goes, I'm hoping I can do it all tomorrow.
11-19-2014, 11:16 PM
#6
Good luck to you! I've never swapped an engine before. But, hopefully your day tomorrow goes as well as mine went today!
It's done and it works.. really dang well! Kinda can't believe the difference in throttle response. After a 20 min drive I am almost used to it. I wasn't expecting much of anything so I guess I am pleasantly surprised Perhaps it was more than the intake that improved the performance, I also overhauled my TPS which I discovered was binding a little bit.
I made a thread for the swap.. if you feel like checking it out. I took some photos, too- hopefully enough to be helpful to others.
https://www.yotatech.com/forums/f116...e-swap-284813/
It's done and it works.. really dang well! Kinda can't believe the difference in throttle response. After a 20 min drive I am almost used to it. I wasn't expecting much of anything so I guess I am pleasantly surprised
Perhaps it was more than the intake that improved the performance, I also overhauled my TPS which I discovered was binding a little bit.I made a thread for the swap.. if you feel like checking it out. I took some photos, too- hopefully enough to be helpful to others.
https://www.yotatech.com/forums/f116...e-swap-284813/
11-20-2014, 05:00 PM
#7
Registered User
Thread Starter
Join Date: Nov 2014
Posts: 17
Likes: 0
Received 0 Likes
on
0 Posts
Help!
I snapped a bolt and then snapped the damn easy out that I was using to remove the bolt!
I got my full 87 intake swapped onto the 90 motor, and then I was connecting the metal heter tube that bolts to the bottom of the lower intake and twisted the head right off of one of the two 10mm bolts. I was only using a 3/8 ratchet and right as it started to snug up it just twisted off almost effortlessly. So we drilled a hole in the broken bolt and tried to use one of those tapered left handed easy outs that looks kinda like a drill bit, and then it snapped in the broken bolt. I tried to drill it out but it is tracking over towards the threads and barely even making a dent in the easy out.
Does anyone know a good way to get this bolt out?
Now I'm wondering if it would be easier to swap the full 90 intake back onto the motor, or at least the 90 lower and use the 87 upper.
Will my 87 injectors plug into the 90 intake or are they different?
One thing I noticed is that the 90 intake has way more little electrical things that look like relays and are connected to a metal bracket that bolts onto the top of the valve cover.
Please any help would really be appreciated
Trending Topics
11-20-2014, 08:56 PM
#9
Registered User
Thread Starter
Join Date: Nov 2014
Posts: 17
Likes: 0
Received 0 Likes
on
0 Posts
Yes Jenny that is exactly what I was hoping to here.
Any idea why everyone does the upper intake swap instead of just doing a full intake swap?
It was pretty simple to remove the full intake, and looked way harder to pull apart the upper/lower and move around all the hoses/wires.
Well hopefully I don't snap another bolt trying to swap the 90 lower onto the motor haha
11-20-2014, 09:49 PM
#10
For me it was just a matter of cost, and because the parts are pretty much the same. I think there is one small difference but it is negligible.
Any reason you don't want to use the 90 upper intake and TB? The auxiliary air control valve is all mechanical and integrated into the TB- better than the electrical coil setup in the external IAC valve found in the 85-88 years.
Any reason you don't want to use the 90 upper intake and TB? The auxiliary air control valve is all mechanical and integrated into the TB- better than the electrical coil setup in the external IAC valve found in the 85-88 years.
11-21-2014, 06:10 PM
#11
Registered User
Thread Starter
Join Date: Nov 2014
Posts: 17
Likes: 0
Received 0 Likes
on
0 Posts
I was planning on doing the late model upper swap but I wanted to get the motor running with my 87 parts first, just to make sure it runs good before I start changing things around. I didn't want to be troubleshooting the intake swap when the motor is actually bad or vise versa.
But since I messed up the 87 lower I'm just going to do the full 1990 swap and see how it goes.
Of course I will be using my 87 ecu, wiring harness and injectors.
I am going to put the 90 intake on tomorrow night and will let you know how it goes, but I won't be installing the engine until Thursday.
11-21-2014, 08:44 PM
#12
That's cool, thanks for the update
Yeah just watch out for the TPS. You have to use the 87 TPS with the 87 ECU.
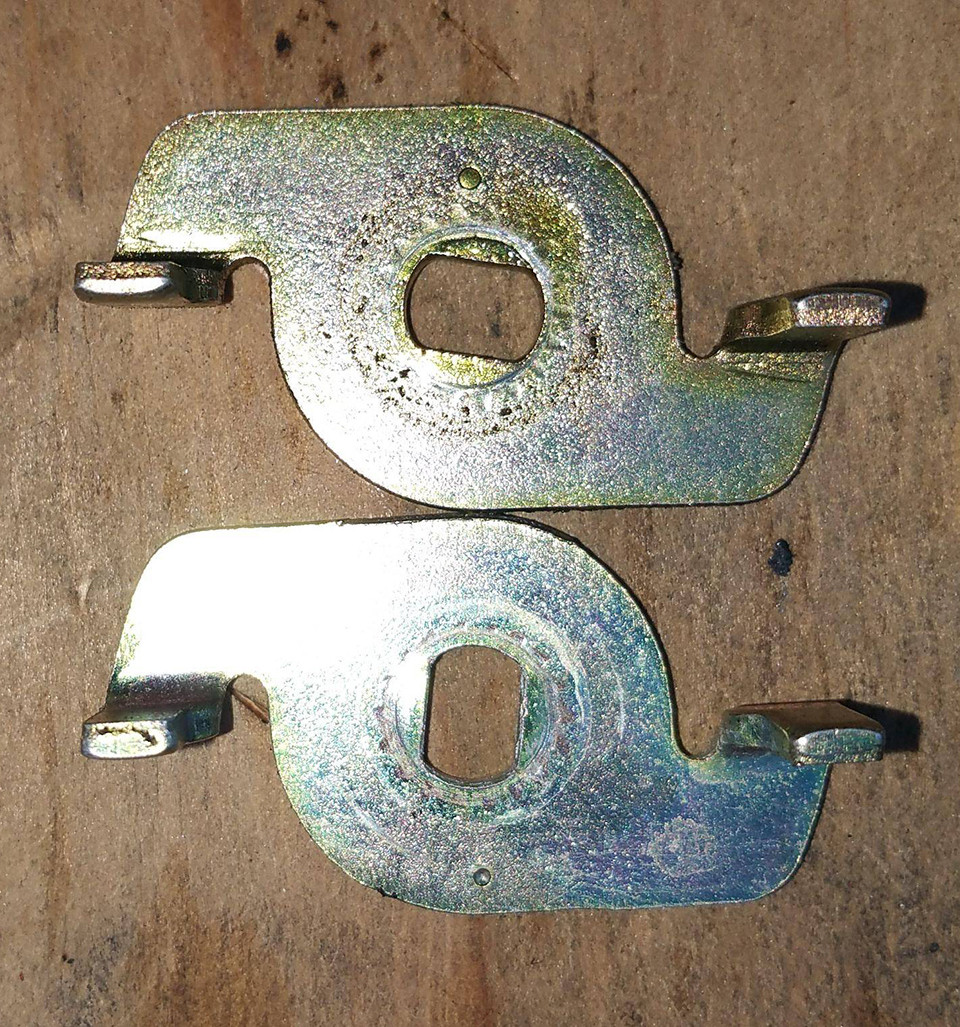
Swap the butterfly from your 87 TB over to the 90 and your 87 TPS will work without a hitch on the 90 TB.
Here's the piece you have to swap
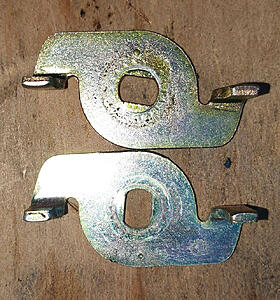
EDIT: forgot to add, use threadlock on the nut that holds that thing on.
Yeah just watch out for the TPS. You have to use the 87 TPS with the 87 ECU.
Swap the butterfly from your 87 TB over to the 90 and your 87 TPS will work without a hitch on the 90 TB.
Here's the piece you have to swap
EDIT: forgot to add, use threadlock on the nut that holds that thing on.
Last edited by jennygirl; 11-21-2014 at 08:46 PM.
12-11-2014, 07:47 AM
#13
Registered User
Thread Starter
Join Date: Nov 2014
Posts: 17
Likes: 0
Received 0 Likes
on
0 Posts
Sorry it's been so long, the last two weeks I have been doing written and skills finals for my EMT so I've been really preoccupied. Yester I finished the intake swap, I still have one mystery vacuum line but I downloaded printed some vaccum diagrams so hopefully I can figure it out.
On other threads I have read that the reason for swapping the old tps into the newer tb was that the connectors changed with the years. Well my 87 harness has the exact same 4 prong connector as the 90 tps, so I'm going to do a little test run and see if it works(I'm sure I'll just have to use the 87 tps but the 90 just looks way nicer so I imagine it is less sticky inside)
I'm going to rent the hoist again in a couple hours and then I need to put my new pilot bearing in, reattach my clutch and flywheel and finally get to set the new motor in.
Then it's just all the little crap like radiator etc.
The 4Runner should be back on the trails in no time!
12-15-2014, 11:15 AM
#14
Registered User
Thread Starter
Join Date: Nov 2014
Posts: 17
Likes: 0
Received 0 Likes
on
0 Posts
She lives!!!!!!!!
Finally started up the new motor and it runs great!!! Less of that 22re tick than my last motor even. Had a good scare with the smoke that was bellowing out of the exhaust for the first 20 minutes but then I remembered some coolant and power steering fluid got in there during the swap. I don't really notice a power difference with the late model intake manifold but Its been months since I've driven it, and I've been driving a v8 5spd mustang for the time being, so that makes sense. I didn't have to adjust a single thing, just a complete plug and play swap.
I had to swap out some sensors that had different connectors, and for some reason the lower 3 threaded holes on the motor(bell housing-engine) had no threads! I'm not sure if someone drilled them out or if the 1990 model just didn't have them to begin with, so I tossed in 3, 3/8", #8 through bolts with lock washers and they fit great. They were 2" long incase anyone else runs into the same problem.
And the 1990 TPS works great with my 1987 ecu. The connector was the same so I figured I'd try it out and it works fine. Started it up in the snow after it sat for months and it fired right up and idles great. So if your connector is the same, no need to swap sensors, although I'm sure it's a good idea to clean it using the steps jennygirl posted.
Had to tighten a few bolts to stop some leaks, and now I'm wishing I replaced every copper compression washer on the fuel system but that's something I can do later, the small metal tube going from the fuel rail to the cold start injector has such a small leak it doesn't drip but just always look damp. And the main fuel line to fuel filter banjo fitting has a very small drip. Nothing that stopped me from driving it to work today though(fire extinguisher on board)! I will pick up some new compression washers after work and kill the small leaks.
Oh and to everyone who has a leaking hot water pipe(wraps around the back of the head and connects to the bottom of the lower intake with 2 weak ass bolts) just get an o-ring, mine had the copper compression washer and that's why I snapped a bolt before, you barely have to put any torque on the oring for it to completely seal.
I tried to post some pics of the runner but sometimes I think I might be the least tech savy 24yo on the Internet, so those will come once I figure it out haha
Just wanted to say thanks to Jennygirl and uwabaseball for all the help along the way, you guys are awesome, if you live in SoCal we should meet up and go wheeling by my house(running springs), the manzanita flats-angelus oaks trail is pretty cool, nice and mellow but tons to look at, like the old hydro electric power plant and a giant sandstone cliff.
I'll try to get some pics up while I'm at work


Thread
Thread Starter
Forum
Replies
Last Post
MMA_Alex
86-95 Trucks & 4Runners (Build-Up Section)
25
04-18-2017 05:07 AM


