1990 22re 2wd pickup problems after tune up
 10-14-2014, 01:34 PM
#1
Registered User
Thread Starter

Join Date: Oct 2014
Posts: 3
Likes: 0
Received 0 Likes
on
0 Posts
1990 22re 2wd pickup problems after tune up
OK guys so this will be my first post on the site.
I recently purchased a 1990 2wd 4speed toyota pickup with 168xxx, at the time of purchase it felt as though the clutch was very worn and possibly close to the end of its life (the price was right so i picked it up anyway).
The first thing i did was change out the fluid in the
Tranny, differential, coolant and engine oil and air filter.
next I replaced the thermostat because it failed and was stuck open (at the advice of my local toyota mechanic) also it was running cold since the time of purchase.
Next after not being satisfied with the idle i replaced my aftermarket cap and rotor and wires with toyota parts from the dealer i had my mechanic adjust the valves hoping to clear up and any other idling issues (this was his idea due to excessive valve noise).
now it seems that immediately after that work my clutch began making friction noises and it became harder to get into gear at a dead stop.
I also noticed that the new plug wires had a hot glue looking liquid on the boot where the wire ends and boot begins (on the boot going onto the actual plugs).
I can drive it but shifting is hard and take offs are harder in first (sputters sometimes and others not so much) so its hard to tell if im feeling a dead clutch, because it feels like i have a loss of power, I have an appointment tomorrow to replace my clutch and i found a 5 speed transmission that i plan on swapping at that time....
but should i be feeling power loss as my clutch finally dies or do i need to look at my engine closer before i blow my budget on a tranny and clutch? Thankyou yotatech gurus!
 10-14-2014, 09:06 PM
#3
Sounds like someone "Discovered" Dielectric grease.
I just purchased a 91 and had to clean a lot of that stuff off. In my case I had to clean it off the tips of the plugs, both ends of the spark plug wire connectors and down inside the distributor cap. Some people think it's tune up in a can/tube but this is one area where a little goes a long way.
You might also want to check to see if they used an excessive amount of anti seize on the plugs, people tend to lather that stuff on there. IF people chose to use it they should apply it "lightly".
By lightly I mean when you remove them you almost can't tell it's been applied.
I don't use it much myself on aluminum heads as I'd rather stick to factory torque specifications and interchange schedules. The longer you leave them in there the higher the chance of carbon and gunk being on the bottom of the plug. When you remove a carboned up plug it can eat up or open the threads making the plug fit looser or if it's real bad take your threads out.
The online manual I found stated to torque to 13ft-lbs and made no mention of applying anti seize. Remember if you add liquid to any thread that didn't get if from the factory the factory specified torque value must be lowered.
(You should also check for oil residue in the threads in the head)
The question is how much?
To use anti seize or not to use it, there are different takes on it. Here is a quote from a different forum and there are more but ultimately the choice is yours.
"I've had technicians from every major automotive plug manufacturer tell me this.
"Here's the NGK bulletin on it:
http://webcache.googleusercontent.co...&ct=clnk&gl=us
Tech Bulletin - Anti-Seize Compounds on Spark Plug Threads
Topic
The use of anti-seize compounds on spark plug threads that have a metal shell plating (i.e. Zinc or Nickel plating).
Issue
Applying anti-seize to the threads of spark plugs that have a metal plating allows the installer to mistakenly over-tighten the spark plug in the cylinder head; This stretches and fatigues the threads of the spark plugs, causing a much higher probability that the plug will break during installation or in some cases upon removal.
Example of 10mm thread spark plug broken during installation due to the use of anti-seize leading to over-tightening. (Note that plug gasket has been completely compressed, anti-seize can be seen on threads, and the break is in the direction of tightening).
Solution
For spark plugs with special metal plating simply do not use anti-seize on initial Installation; All NGK Spark Plugs are manufactured with a special trivalent Zinc-chromate shell plating that is designed to prevent both corrosion and seizure to the cylinder head; Thus eliminating the need for any thread compounds or lubricants.
Additional Information
NGK recommends only using spark plugs with metal plating on all aluminum head applications to prevent damage to the head and plug. Metal shell plating acts as a �€œlubricant�€� which breaks away from the main body of the spark plug during removal, preventing damage to the spark plug and or threads in the cylinder head.
Summary
All spark plugs that have a blackened or dull appearance on the metal body offer no protection against seizing or bonding to the cylinder head and so it is with these spark plugs that anti-seize would be required. A spark plug that has a shiny silver appearance on the metal body usually indicates that the plug is manufactured with metal shell plating and therefore will not require anti-seize."
Last edited by Odin; 10-17-2014 at 01:49 PM.
10-15-2014, 08:55 AM
#4
Registered User
Thread Starter
Join Date: Oct 2014
Posts: 3
Likes: 0
Received 0 Likes
on
0 Posts
Help! You nailed it that's exactly what I did! Used anti seize on the plugs!
Is the fix as simple as removing the plugs and cleaning off the anti seize?
I'm swapping the tranny and clutch at a local shop today so luckly I've barely been driving with the new parts and it's in a great place to fix my mistakes today!
Thanks for the spot on advice I'll try to start posting pics soon.
10-15-2014, 05:12 PM
#5
<<<@!1!@>>>
You'll simply have to try it and find out. If it got on the plug anywhere but the threads it might cause a problem.
In my case it was a gross overuse of dielectric grease and anti seize that was causing a problem. I can say that most of the people I've met use anti seize on spark plugs. I'd wager that 99% of the people on this site also use it. I'm not saying it's good or bad since I'm not an expert and there are so many cases of "Well I always use it and it's never caused a problem".
I can only repeat what the spark plug manufacturers say, how the automotive factories do it, and leave it at that.
Let someone else argue about it and say they lost the threads in their head because of not using it, which they will say.
Reusing your plugs?
When a spark plug with a crush washer has been tightened with a torque wrench to OE specifications, or by the angle from seated the plug manufacturer specifies it estimates the crush washer to now be a certain thickness, naturally smaller than it was. If the plugs are removed and re-installed with the used crush washer they require a lower torque value because that crush washer now has less give (crush) left in it.
In the link below Denso specifies 1/12 of a turn from seated when re-using the crush washer.
If when tightening the plugs up with a used crush washer you feel it all of a sudden tighten up there is a strong chance that you have totally flattened out the crush washer and it has no give (crush) left. Most of the torque you continue to apply is going directly to the weak aluminum threads and it's beyond what the factory intended. Removing them the next time may not be a pleasant situation with some loss of material or a pulled/stripped thread.
Some manufacturers sell new crush washers so you can go back to using the factory torque specifications with a used plug but I've never purchased or used them.
Denso information
http://www.globaldenso.com/en/produc...ion/index.html
Here's another Spark Plug Bulletin about anti seize and other things
http://www.ngksparkplugs.com/pdf/dyk_5points.pdf
Some spark plug manufacturers also say that using anti seize "Slightly" changes the way the heat transfers from the head to the plug effecting the temperature the plug runs at.
Porsche used to recommend using anti seize on the spark plugs that went into their 911 engines. They have stopped recommending it because of grounding problems.
Wells VIDEO information on problems using anti seize on spark plugs
Last edited by Odin; 10-20-2014 at 02:55 AM.
10-16-2014, 12:09 PM
#6
Another thing about anti seize on spark plugs is that most people use whatever is handy and anti seize is anti seize right,.. wrong.
It's been reported under some conditions the mostly copper stuff can cause it's own set of problems with aluminum = Galvanic Corrosion. You might read about it happening around coastal towns or in areas where they salt the roads a lot.
There is also a lot of information that states Graphite is not good for Aluminum because it can weaken it over time. Just about every anti seize I've looked at has graphite in it.
The point is if you read enough about it you can see there is plenty of conflicting information about the proper use and application of anti seize on spark plugs.
Permatex recommends people use the #81343 for spark plugs which is made of both aluminum AND copper. http://www.permatex.com/products/pro...bricant-detail
Because of the price and size (not a lot of people want to have a big bottle laying around) I believe the 81343 product to be the one most people purchase and use.
Suggested Applications:
For easy removal of spark plugs, cylinder head and exhaust head bolts; apply to anchor pins on brake assemblies, u-bolts and spring bolts, hinges, gears, chain, sprockets and rollers.
Notice it makes no mention of ALUMINUM HEADS?
Now if you keep on looking through their products you will also see Permatex# 90128 Copper Anti Seize http://www.permatex.com/products-2/p...bricant-detail
Suggested Applications:
Spark plug threads installed in aluminum, exhaust manifold bolts, engine bolts, oxygen sensors, knock sensors, thermostat housing bolts (which apparently the 22RE has a problem with), and fuel filter fittings.
One smaller alternate to this product is Loctite# 37616 http://www.henkelna.com/product-sear...=8797932584961
But, but what about Galvanic Corrosion and copper, who and what is a person supposed to believe
Ford actually sells a nickel anti seize they want you to use on the spark plugs in some of their engines. As I understand it in their Technical Service Bulletin they only want you to use it on the lower electrode ground shield, NOT the plug threads.
Have a look at Page 2 http://www.aa1car.com/library/ford_tsb_08-7-6.pdf
If I was going to use anti seize on my plugs again I think I might opt for a very light application of the Nickel content anti seize simply because NGK and Denso plate their plugs with it and Ford recommends using it on part of their plugs installed in their problem child engines. Following that logic it probably isn't something that is going to eat my heads threads or cause galvanic corrosion problems with water unless I'm driving an actual boat.
Rectorseal Nickel-Rich uses a high temp grease compound instead of Graphite.
http://www.rectorseal.com/index.php/nickel-rich/
And if I'm actually boating there is specific marine grade anti seize.. but were looking at graphite again. Not to be left out there is also specific Aviation anti seize.
BG Mica Lubricant NON Metallic Anti Seize Compound is supposed to be some AWESOME STUFF, but I can't find out much about it
http://www.bgservice.com/57.html
Anti Seize- Damned if you do, Damned if you don't
Last edited by Odin; 10-26-2014 at 11:36 PM.
10-26-2014, 11:34 PM
#7
Since I went that far about anti seize and spark plugs I figured I'd go a little further about spark plugs and their fitment.
Hopefully this will remove the dread some people feel when they are faced with changing plugs in an aluminum head.
A couple things to watch for:
If you take a plug out and it comes out in a difficult manner with dark brown, black or silver stuff on the threads... (At some point one of these WILL happen)
If a plug goes in and starts to tighten up before the gasket is seated...
The problem:
The threads probably have crusted fuel deposits in them or someone has partially stripped the threads. This leads to an unsure, uneasy feeling when you're installing the plugs leading to incorrect torquing.
The cure:
You should really run a Spark Plug Thread "CHASER" through the threads to clean out the deposits.
You don't want a Thread Tap because a Tap is meant for cutting new threads and can actually remove a little material from the head, or if your slightly off it can begin cutting new threads that shouldn't be there.
All you're trying to do is clean out and straighten out the threads that are already there, that's the sole job of a Thread "Chaser".
Tool choice:
There are really three different types of thread chasers and one of them has dual sizes, say, 14mm on one end and 10mm on the other end. You have to drive that type with a deep socket.
Another type only offers a single size that again, will only allow you to use a deep socket to drive it.
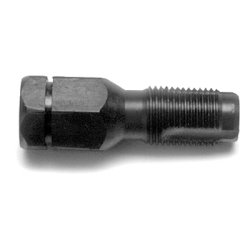
I like to use one that offers only one size__ but it allows you to directly attach a 3/8 extension bar.
The Wilmar (Performance Tool) W80537 or Lisle 20020 will allow this even though the picture doesn't show the opening.
I have both and I find the Lisle to be a little nicer tool but it's harder to find.
I like this style because because it allows you to insert an extension in the tool then stick a 3/8 drive screwdriver handle into that.
It allows you to feel exactly how much effort you are applying and how the thread is doing when you're turning the tool in. If it needs more force than your hands can supply then you can fit a 3/8 ratchet to provide that.
It better not be at the start or you probably have a cross thread situation.

The process:
Out of paranoia I make sure the piston is low in the cylinder and the tool isn't going to get anywhere near it.
Then I apply grease to the threads and cut out areas in the tool to catch the stuff I'm cleaning out because I don't want that falling into the cylinders.
I thread it in until the tool can't be turned any more and makes contact with the head as a spark plug would.
Normally it isn't as straight forward as that, only one of my cylinders proved to be that easy.
Usually there will be a spot where it starts to get difficult to turn. At that point it's good practice to back it off a little and thread it in a little, then back it off, then thread it in a little until it gets easier to turn.
Just be gentile,..
If it gets really difficult to turn- Back it all the way out, clean the tool thoroughly, and apply more grease and repeat the process until you are comfortable with it.
Why back it out? You don't want dry threads!
That difficulty you are feeling is either a dry tool being difficult or something in the threads that isn't supposed to be there. Under *Normal Situations* neither conditions are good but nothing to panic about.
I repeat the process until the "Chaser" goes all the way in and out smoothly a few times.
Cleaning the tool:
The idea here is to keep all foreign matter out and keep it out, not reintroduce it where it can do damage.
I make sure to clean the threads in the tool with carb cleaner or something of the sort and then wire brush it until no extra material is present before reinserting it, that's EVERY TIME folks.
A small metal pick or a thin screwdriver like what they use to work on eyeglasses with works quite well to dig out some of the harder to remove material, and there -WILL- be some.
I was so strict/obsessive about cleaning the tool and the end process of cleaning the threads in the head that I burned through 2 cans of electrical cleaner.
I then do whatever I need to do to prevent the engine from starting and I rotate the engine like I'm trying to start it a few times to help blow out any small particles.
I clean the grease out of the threads in the head by spraying electrical cleaner on a tooth brush and insert it straight into the hole then pulling on the brush a little turn it back out like I'm removing a plug.
After about three or four passes it will come out pretty clean. I clean it off by squirting it with electrical cleaner each time.
A good blast of compressed air would be good right about now if you think anything dropped into the cylinder.
Use common sense:
After this make sure the spark plug you're installing has nothing but clean threads. At times even plugs that have only been ran a few days will have deposits on the threads.
If you remove them and want to re-install them,.. Clean those plug threads or you will be putting that grime right back into those clean threads in your heads where some of it will stay!
That's part of why we're doing this in the first place...
Inserting your spark plugs and how it should feel:
Use a small piece of hose that fits snugly over the spark plug porcelain and insert the plug into the hole using the hose to guide it.
Thread it in by turning the hose and get at least a few -FULL- turns (around 8) being *Fully Confident* that the plug was started straight and true before even thinking about putting a socket on it.
I like to run the plug the rest of the way down by connecting a 3/8 extension fitted with a screwdriver handle.
When running the plug down you should now be able to feel exactly when the body of the plug puts pressure on the crush washer seating it against the head.
When it seats and starts to compress the gasket that's when *ideally* you install the ratchet or torque wrench and begin torquing it to specifications by N-m, ft-lbs or by using the torque angle method.
After all of this work you should now be confident when torquing the plugs in an aluminum head without that vague feeling that dirty threads give.
Removing spark plugs:
Lots of people have done damage to the last couple of threads in aluminum heads by using the socket and wrench to fully remove the plug.
The problem is they let the weight of the extension and ratchet to turn or pull the plug at a slight angle before it's all the way out, here's a better way.
After you have your plug loose remove your socket and install that snug fitting piece of hose around the porcelain and unscrew it by turning the hose and lifting it out. Yes it's that simple
If you've made it this far congratulations, you really do want to be proficient at changing your spark plugs! Either that or you really want to see just how far off my rocker and down the rabbit hole I am!

Hopefully this will remove the dread some people feel when they are faced with changing plugs in an aluminum head.
A couple things to watch for:
If you take a plug out and it comes out in a difficult manner with dark brown, black or silver stuff on the threads... (At some point one of these WILL happen)
If a plug goes in and starts to tighten up before the gasket is seated...
The problem:
The threads probably have crusted fuel deposits in them or someone has partially stripped the threads. This leads to an unsure, uneasy feeling when you're installing the plugs leading to incorrect torquing.
The cure:
You should really run a Spark Plug Thread "CHASER" through the threads to clean out the deposits.
You don't want a Thread Tap because a Tap is meant for cutting new threads and can actually remove a little material from the head, or if your slightly off it can begin cutting new threads that shouldn't be there.
All you're trying to do is clean out and straighten out the threads that are already there, that's the sole job of a Thread "Chaser".
Tool choice:
There are really three different types of thread chasers and one of them has dual sizes, say, 14mm on one end and 10mm on the other end. You have to drive that type with a deep socket.
Another type only offers a single size that again, will only allow you to use a deep socket to drive it.
I like to use one that offers only one size__ but it allows you to directly attach a 3/8 extension bar.
The Wilmar (Performance Tool) W80537 or Lisle 20020 will allow this even though the picture doesn't show the opening.
I have both and I find the Lisle to be a little nicer tool but it's harder to find.
I like this style because because it allows you to insert an extension in the tool then stick a 3/8 drive screwdriver handle into that.
It allows you to feel exactly how much effort you are applying and how the thread is doing when you're turning the tool in. If it needs more force than your hands can supply then you can fit a 3/8 ratchet to provide that.
It better not be at the start or you probably have a cross thread situation.
The process:
Out of paranoia I make sure the piston is low in the cylinder and the tool isn't going to get anywhere near it.
Then I apply grease to the threads and cut out areas in the tool to catch the stuff I'm cleaning out because I don't want that falling into the cylinders.
I thread it in until the tool can't be turned any more and makes contact with the head as a spark plug would.
Normally it isn't as straight forward as that, only one of my cylinders proved to be that easy.
Usually there will be a spot where it starts to get difficult to turn. At that point it's good practice to back it off a little and thread it in a little, then back it off, then thread it in a little until it gets easier to turn.
Just be gentile,..
If it gets really difficult to turn- Back it all the way out, clean the tool thoroughly, and apply more grease and repeat the process until you are comfortable with it.
Why back it out? You don't want dry threads!
That difficulty you are feeling is either a dry tool being difficult or something in the threads that isn't supposed to be there. Under *Normal Situations* neither conditions are good but nothing to panic about.
I repeat the process until the "Chaser" goes all the way in and out smoothly a few times.
Cleaning the tool:
The idea here is to keep all foreign matter out and keep it out, not reintroduce it where it can do damage.
I make sure to clean the threads in the tool with carb cleaner or something of the sort and then wire brush it until no extra material is present before reinserting it, that's EVERY TIME folks.
A small metal pick or a thin screwdriver like what they use to work on eyeglasses with works quite well to dig out some of the harder to remove material, and there -WILL- be some.
I was so strict/obsessive about cleaning the tool and the end process of cleaning the threads in the head that I burned through 2 cans of electrical cleaner.
I then do whatever I need to do to prevent the engine from starting and I rotate the engine like I'm trying to start it a few times to help blow out any small particles.
I clean the grease out of the threads in the head by spraying electrical cleaner on a tooth brush and insert it straight into the hole then pulling on the brush a little turn it back out like I'm removing a plug.
After about three or four passes it will come out pretty clean. I clean it off by squirting it with electrical cleaner each time.
A good blast of compressed air would be good right about now if you think anything dropped into the cylinder.
Use common sense:
After this make sure the spark plug you're installing has nothing but clean threads. At times even plugs that have only been ran a few days will have deposits on the threads.
If you remove them and want to re-install them,.. Clean those plug threads or you will be putting that grime right back into those clean threads in your heads where some of it will stay!
That's part of why we're doing this in the first place...
Inserting your spark plugs and how it should feel:
Use a small piece of hose that fits snugly over the spark plug porcelain and insert the plug into the hole using the hose to guide it.
Thread it in by turning the hose and get at least a few -FULL- turns (around 8) being *Fully Confident* that the plug was started straight and true before even thinking about putting a socket on it.
I like to run the plug the rest of the way down by connecting a 3/8 extension fitted with a screwdriver handle.
When running the plug down you should now be able to feel exactly when the body of the plug puts pressure on the crush washer seating it against the head.
When it seats and starts to compress the gasket that's when *ideally* you install the ratchet or torque wrench and begin torquing it to specifications by N-m, ft-lbs or by using the torque angle method.
After all of this work you should now be confident when torquing the plugs in an aluminum head without that vague feeling that dirty threads give.
Removing spark plugs:
Lots of people have done damage to the last couple of threads in aluminum heads by using the socket and wrench to fully remove the plug.
The problem is they let the weight of the extension and ratchet to turn or pull the plug at a slight angle before it's all the way out, here's a better way.
After you have your plug loose remove your socket and install that snug fitting piece of hose around the porcelain and unscrew it by turning the hose and lifting it out. Yes it's that simple
If you've made it this far congratulations, you really do want to be proficient at changing your spark plugs! Either that or you really want to see just how far off my rocker and down the rabbit hole I am!
Last edited by Odin; 12-05-2014 at 08:37 AM.
Trending Topics
10-27-2014, 01:03 PM
#8
[QUOTE]If you've made it this far congratulations, you really do want to be proficient at changing your spark plugs! Either that or you really want to see just how far off my rocker and down the rabbit hole I am! [/QUOTE
Last edited by Robert m; 10-27-2014 at 01:06 PM.


Thread
Thread Starter
Forum
Replies
Last Post
DacodaYota
Looking For A Mechanic/Fabricator/Shop
2
09-02-2015 02:13 PM
bigblue82
General Electrical & Lighting Related Topics
10
07-06-2015 08:27 AM


