22r head gasket replacement
 04-19-2012, 08:40 AM
#21
Registered User
Thread Starter

Join Date: Mar 2012
Location: Pittsburgh PA
Posts: 40
Likes: 0
Received 0 Likes
on
0 Posts
Some of the backstory to this truck: I bought it with my ex in 2007 in California. We moved to PA and when she split with me two years ago, she kept the truck. She pulled into her mechanic's shop this past October, the muffler fell off, and she was told the HG had blown. Rather than scrap it, she gave it back to me and now it's my project (which I'm actually thankful for!).
I get the feeling her mechanic was not so great. I found those threads in the water pump seal. He clearly never changed the main front crank oil seal, which was the biggest problem. He charged us $60 to determine that the HG had blown and he took the muffler and cat and wouldn't give them to me when I had the truck towed to my place.
Now, me being a total newb, I didn't check cylinder compression before taking the engine apart, and I didn't check the thermostat. I've got the engine mostly back together with the new head+valves and will start it today or tomorrow. But I found this while replacing the thermostat:

So, the old thermostat has no guts -- they're gone. I didn't find them in the old head. The passages out of the thermostat housing aren't very big. I didn't find anything in the intake manifold. Could some little metal pieces somehow be inside my block?
Or is this a case of thermastat sabotage?
Anyway, bought the fancy new 90916-03070 from toyotapart dot com (Kalamazoo MI).

I get the feeling her mechanic was not so great. I found those threads in the water pump seal. He clearly never changed the main front crank oil seal, which was the biggest problem. He charged us $60 to determine that the HG had blown and he took the muffler and cat and wouldn't give them to me when I had the truck towed to my place.
Now, me being a total newb, I didn't check cylinder compression before taking the engine apart, and I didn't check the thermostat. I've got the engine mostly back together with the new head+valves and will start it today or tomorrow. But I found this while replacing the thermostat:
So, the old thermostat has no guts -- they're gone. I didn't find them in the old head. The passages out of the thermostat housing aren't very big. I didn't find anything in the intake manifold. Could some little metal pieces somehow be inside my block?
Or is this a case of thermastat sabotage?
Anyway, bought the fancy new 90916-03070 from toyotapart dot com (Kalamazoo MI).
 04-20-2012, 05:32 PM
#22
Registered User
Thread Starter
Join Date: Mar 2012
Location: Pittsburgh PA
Posts: 40
Likes: 0
Received 0 Likes
on
0 Posts
Got it all back together. There's a coolant leak here:
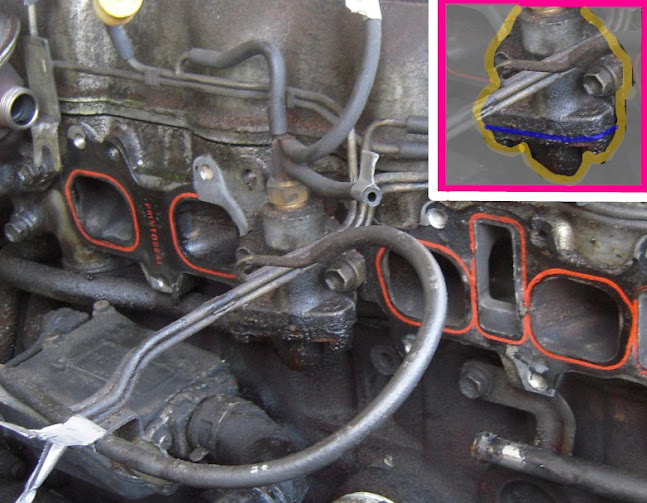
It's probably at the blue line, where there is probably a gasket. i might have forgotten to put a gasket in that joint, or there could be a crack in something. What is this component called? Obviously, it's buried behind the intake manifold and I'm going to have to take it off to get to this.
But, I wanted to just start the engine regardless of coolant leaks. I tried and it turned over, but I probably turned it over 30 times and couldn't get ignition, and the battery faded and is trickle charging right now. There are about 2 gallons of fresh gas in the tank and the distributor was set by sight on top of the #1 sparkplug lead with engine at 0*TDC, so it's not perfect but should be good enough. The valves/rockers are not gapped properly but they are where they were when I took it apart.
Saaaad
04-26-2012, 06:14 PM
#23
Registered User
Thread Starter
Join Date: Mar 2012
Location: Pittsburgh PA
Posts: 40
Likes: 0
Received 0 Likes
on
0 Posts
Charged the battery, fed the carb a little gasoline straight in, and sure enough, started up! Ran about 5 minutes and then turned it off because there's only about 1/2 coolant capacity right now. HOOOOO-RAY!
Plenty of problems left... first up, taking out and refitting gaskets. What requires RTV?
- Timing cover?
- Intake manifold?
- Cast iron plate on back of head?
- Anything related to carb?
I removed the carb from the intake manifold in my original dis-assembly, and have just reused the gasket between the two -- I should probably get an Autozone carb kit huh? Looks like THIS ONE.
04-26-2012, 07:55 PM
#24
Plenty of problems left... first up, taking out and refitting gaskets. What requires RTV?
- Timing cover? only on the top corners by the block, but just a dab. some people like to smear a thin layer on the gasket itself
- Intake manifold? none
- Cast iron plate on back of head? maybe... dunno.
- Anything related to carb? not my dept.
- Timing cover? only on the top corners by the block, but just a dab. some people like to smear a thin layer on the gasket itself
- Intake manifold? none
- Cast iron plate on back of head? maybe... dunno.
- Anything related to carb? not my dept.
 there's somethin' to get ya started
09-30-2012, 12:46 PM
there's somethin' to get ya started
09-30-2012, 12:46 PM
#25
Registered User
Thread Starter
Join Date: Mar 2012
Location: Pittsburgh PA
Posts: 40
Likes: 0
Received 0 Likes
on
0 Posts
Back working on this project. Removed carb and intake manifold to get at coolant leak, which looks like it was coming from the cover-to-head joint of the "thermostatic valve". I think I just didn't torque it to the specified 16ftlbs when I assembled it last time, quite a pain to get at.
This doesn't show that part, but the manifold and new hand-cut gaskets in progress:

This doesn't show that part, but the manifold and new hand-cut gaskets in progress:
09-30-2012, 03:43 PM
#26
May I recommend you spray those gaskets with Copper-spray-gasket by Permatex, I believe. I, at a minimum, spray all "dry" gaskets with this. Intake, even exhaust, everything. I use Ultra Black silicone instead of normal RTV, since it is oil resistant. It's the same as Toyota red FIPG, from what I have seen. Just a suggestion.
09-30-2012, 03:50 PM
#27
Registered User
Thread Starter
Join Date: Mar 2012
Location: Pittsburgh PA
Posts: 40
Likes: 0
Received 0 Likes
on
0 Posts
That sounds like a good idea, which I will probably put to use in the future. I just replaced the thermostatic valve, intake manifold, and carb, and for all the gaskets I spread a thin (as in, squeegeed on with a razor) coat of copper RTV. Would have been a lot faster to just use spray-on permatex!
Will let it sit for a day and then pressure test the coolant system again. Making one of these caps for that purpose:
Instructables: Make an Auto Radiator Pressure Tester
Will let it sit for a day and then pressure test the coolant system again. Making one of these caps for that purpose:
Instructables: Make an Auto Radiator Pressure Tester
10-02-2012, 02:28 PM
#29
Registered User
Thread Starter
Join Date: Mar 2012
Location: Pittsburgh PA
Posts: 40
Likes: 0
Received 0 Likes
on
0 Posts
Wow, I guess that sort of makes sense to use string... but then to leave it in?
Anyway, first bike pump pressure test of the coolant system showed no leaks. Today I tried to start it and... no go. Starter engaged and gave the engine a mild jolt, maybe turned the crankshaft 1/8, faded the next few tries, then nothing. Tried two different batteries and using a jump from another vehicle.
Started right up in May, then I let it sit all summer without a battery in it... aw jeez. Going to replace the battery ground wire -- if that's not the problem, then what?
10-03-2012, 02:50 PM
#33
Registered User
Thread Starter
Join Date: Mar 2012
Location: Pittsburgh PA
Posts: 40
Likes: 0
Received 0 Likes
on
0 Posts
Turned crank "by hand". Very hard to do with plugs in. With plugs out, doable but still took a little muscle. No crunching/scraping sounds! Seemed to require most force on downstroke, equally on 1/4 and 2/3 (just after piston begins descending from top of stoke). After about a dozen clockwise revolutions, became mildly easy to turn over with no more or less difficult stretches.
Tried starting. Sounded like it turned over a few times but couldn't see from inside cab. Then, seems the battery drained enough again so that it couldn't run the starter. Starter clicks but no sound of rotation. Battery voltage down to 11.70V. Switched to backup battery #2. Voltage at 13.05V. Nothing, not even clicking from starter. Voltage dropped to 12.85V. Try again, nothing. Voltage dropped to 12.78V.
Few minutes later, recheck voltage across battery #2: 12.85V. Check voltage from nut connector on starter to negative battery post, also 12.85V.
Compression tested each cylinder by turning over engine by hand up to 30psi. So, don't know if that helps at all, other than to say there is _some_ compression in each cylinder. Sounds that way from suction sounds.
I guess I'll take the starter off to test in isolation from key-start-ignition circuit... then what?
10-04-2012, 01:21 PM
#34
Registered User
Thread Starter
Join Date: Mar 2012
Location: Pittsburgh PA
Posts: 40
Likes: 0
Received 0 Likes
on
0 Posts
Welp, got it running... I think it was just that battery #1 is shot and battery #2 got drained trying to crank a seized engine. Rotating the crank manually seems to have freed it, and it starts up now with battery #2. Hooray!
Removed the starter and tested it using jumper cables and a battery. It worked. Flywheel teeth looked good, rotated crank to see them all (was dry to touch in there though, should the flywheel be bathed in transmission fluid?). Reassembled and tested without plugs and no belts on, turned over fine. Put the plugs in, still turned over fine. Put the water pump / alternator belt on and connected the plug wires, fed it a thimble of gas, and it started up! Idled fast for about five minutes and then settled down.
Still haven't gapped the valves properly, they clatter loudly. Going to set the timing next.
10-04-2012, 03:27 PM
#35
Registered User
Join Date: Jul 2008
Location: Southwest, MS
Posts: 82
Likes: 0
Received 0 Likes
on
0 Posts
There should not be any fluid in the bell housing..that is unless the front seal is leaking. Adjust the valves first and then set the timing. You should be good to go then.
10-06-2012, 04:04 PM
#36
Registered User
Thread Starter
Join Date: Mar 2012
Location: Pittsburgh PA
Posts: 40
Likes: 0
Received 0 Likes
on
0 Posts
I set each valve lash and timed the engine at idle to the "8" mark (sounds best at "8" -- what should it be set at though?). Haven't timed using a tach yet.
With the engine cold (55*F), I set intake valves to .008" and exhaust to .012". I know the FSM says to do it at "normal operating temperature". Feel like that must be a mistake. Next non-rainy day I'll get it hot, open it up, and see if the lash has changed from "cold" to "operating".
(((And now for my amateur treatise on valve lash:
The real test here seems to be, with the lash set cold to .008"/.012", what will it be hot? It should be .001"/.001" or more -- don't want the valve held constantly open at operating temperature, but there's no need for there to be a gap (or are we compensating for the travel time of the rockers on the cam lobe in some way?). So now, with my valves set as they are, I should be able to open the cover up after bringing the engine to operating temperature and see a .001" or greater lash, but no less, on any given valve. How I'm going to open the cover and measure the gap before the valve cools, I don't know (it will contract almost instantly from loss of heat to nearest heatsink -- the head). Could maybe pressurize #1cyl at TDC with the engine hot, using bike pump -- and then watch the gauge and see if there's any loss? If there's rapid loss, that means the valves are "open all the time", and if there's no loss, that confirms that the cold-set lash was adequate to allow full valve closure?)))
Last edited by AJ Tarnas; 10-06-2012 at 04:11 PM.
10-07-2012, 05:28 AM
#37
Registered User
Join Date: Jul 2008
Location: Southwest, MS
Posts: 82
Likes: 0
Received 0 Likes
on
0 Posts
I have always set them at 7 and 11 when cold with good results. When it gets hot they normally are right on target anytime that I have checked doing it like this.
10-09-2012, 03:36 PM
#38
Registered User
Thread Starter
Join Date: Mar 2012
Location: Pittsburgh PA
Posts: 40
Likes: 0
Received 0 Likes
on
0 Posts
Filled the power steering reservoir back up (do I have to bleed air out of this system somehow?). Put power steering belt and the fan back on. WORST PART of this whole experience, impossible to access fan bolts made me pretty angry.
Where do you think this 7" wire (I assume it's bonding something to something) is supposed to go? Does it have a name? Looks like 10mm eyelet on one end, 12mm or 14mm on the other.

Where do you think this 7" wire (I assume it's bonding something to something) is supposed to go? Does it have a name? Looks like 10mm eyelet on one end, 12mm or 14mm on the other.
10-09-2012, 04:26 PM
#39
Appears to possibly be a ground wire. Head/block to body or frame? As far as I know they can go on any unused threaded hole on the block/head to a bolt on the body or frame. I installed a ground wire from the frame to the body and also one from the body to the engine block. I went 8 gauge to ensure good conductivity.
But maybe someone else will chime in if it's something else...
But maybe someone else will chime in if it's something else...
10-09-2012, 07:31 PM
#40
Registered User
Join Date: Sep 2011
Location: Citrus Heights CA
Posts: 200
Likes: 0
Received 0 Likes
on
0 Posts
On my truck, an 82 w/ 22r, there's a ground strap from the passengers side of the engine block to the frame then from the frame to the fender well. I don't know if that's stock or not, but those straps are about that length. Maybe I can snag a picture to clarify for ya.


