dropzone's notebook of ideas, links, mods, misc BS
 03-17-2009, 11:56 AM
#21
Junkyard Bump Stop Alternatives
Found this and thought that it was well worth passing on:
My truck has been with out bump stops and a fresh coat of paint:p after the new axle install for too many trips. So before I head out to Pismo to put a hole in my oil pan I thought I would put on some bumps. Been toying with the idea of air bumps for along time now, but not sure if I am going to tube the front of my truck out yet when putting in the new LQ4, stay tuned, so putting all the work into mounting cans correctly is a wast of time rite now
A lot of guys in my club run Bravada bumps and swear by them.
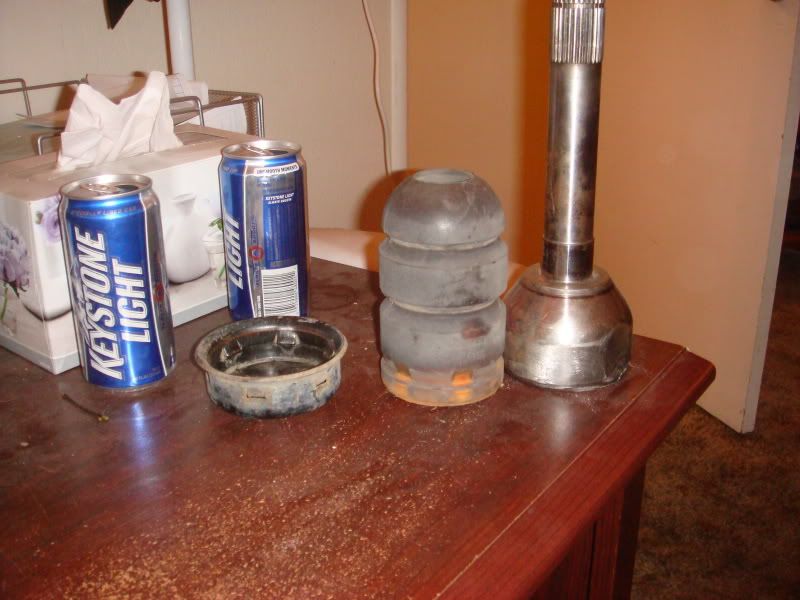
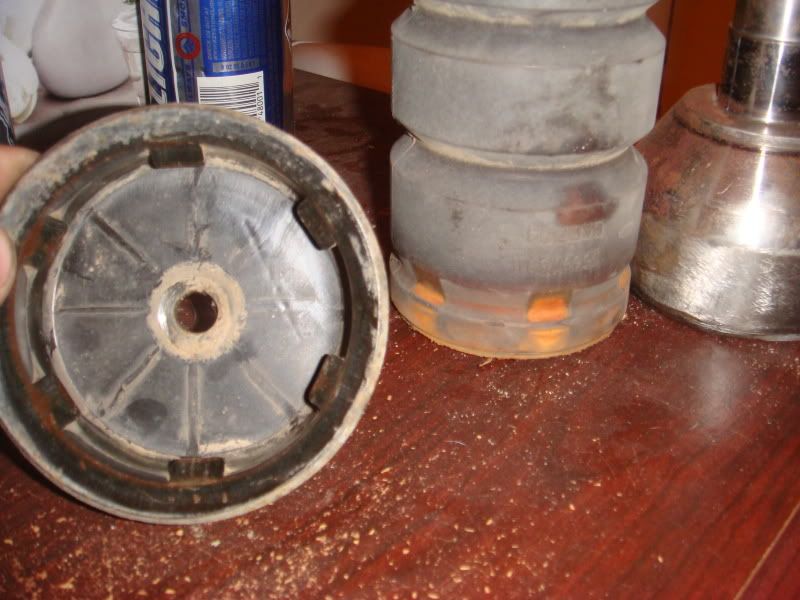
So I decided that I would head to the junk yard and find some Bravada bumps. They are super easy to pull, only bolt holding them on, and the "bump can" and bump and be easily separated to get to the bolt easier. the bump just pops into the can, also if you tear one, you just pop in new rubber. So while cruzing the JY I came across a Nissan Pathfinder and it had these perfect bumps, SUPER SOFT, I mean really soft. because of the huge holes in the pattern. So wanting to try something different I pulled them and put them on the truck hour before we left.
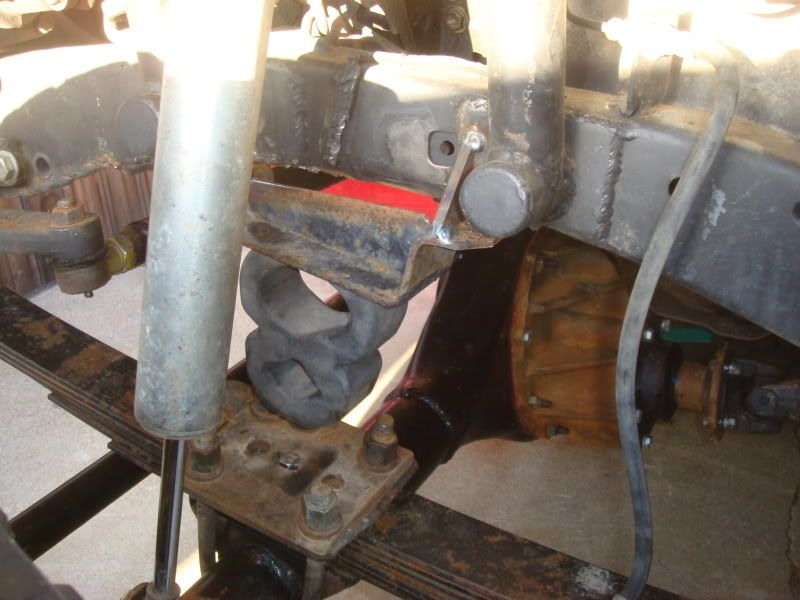
I was going to cut the factory mount and make my own to fit the curve of the frame, but the factory lean on the mount worked great for where my axle is( about 8-9" forward of stock).

They work awesome, really progressive, and can take a hard hit, have 5 1/2" of up travel, and these worked perfect for HARD bottom outs and jumps. I think they are better then Bravada bumps performance wise. but if i tear one, it will be PITA to fix rather then "just pop a new rubber on":grinpimp:
either way you go they are both great option for a cheap factory bump that's better then any of the poly after market ones I have used or seen used.
A lot of guys in my club run Bravada bumps and swear by them.
So I decided that I would head to the junk yard and find some Bravada bumps. They are super easy to pull, only bolt holding them on, and the "bump can" and bump and be easily separated to get to the bolt easier. the bump just pops into the can, also if you tear one, you just pop in new rubber. So while cruzing the JY I came across a Nissan Pathfinder and it had these perfect bumps, SUPER SOFT, I mean really soft. because of the huge holes in the pattern. So wanting to try something different I pulled them and put them on the truck hour before we left.
I was going to cut the factory mount and make my own to fit the curve of the frame, but the factory lean on the mount worked great for where my axle is( about 8-9" forward of stock).
They work awesome, really progressive, and can take a hard hit, have 5 1/2" of up travel, and these worked perfect for HARD bottom outs and jumps. I think they are better then Bravada bumps performance wise. but if i tear one, it will be PITA to fix rather then "just pop a new rubber on":grinpimp:
either way you go they are both great option for a cheap factory bump that's better then any of the poly after market ones I have used or seen used.
 03-22-2009, 06:53 AM
#22
Paint/Body info
Phildefino sent this to me, great info:
Originally Posted by phildelfino
For your tips and tricks, fix it thread to save yota info.
Here is a link for inexpensive paint jobs. I forgot I had it till these guys starting posting about their wishes for cheapo paint jobs. It is very informative. It is very long, about 50 pages. Everyone asks questions, gets responses, gives tips. It is the link that inspired me to go ahead and try to paint my 4 Runner.
I still would like to try to get Tremclad Paint for this, instead of using Rustoleum. I think it's just a little better and more forgiving, from what I read in this link.
Believe it or not, there are 3 such links, each of about 50 pages.
Phil
http://board.moparts.org/ubbthreads/...0&fpart=1&vc=1

 03-22-2009, 05:41 PM
#25
AfterMarket seat bracket installs
This comes from a Master call Crash over on Pirate;
some of the brackets I have seen for mounting aftermarket seats...he did a great job.
original thread: http://pirate4x4.com/forum/showthread.php?t=772248
much better than some of the crap I have seen done to mount seats (my own work included)
Other Alternatives:
Early 90's Acura Integra and Honda Civic seats work great in a 1st Gen truck.

These things are great, there is a second hole about 1.25" over from the stock front outside mounting hole that lined up just about right, enlarged it just a hair and was able to use the inside front stock mount:

just had to cut off about the lower .25" or so of the stock bracket to allow it to sit flat on the floor.
I think that being able to use the stock front holes makes the install much more stable and install went very fast...
outside rear mount came up with something similar to WSUWeston's brackets:


some of the brackets I have seen for mounting aftermarket seats...he did a great job.
original thread: http://pirate4x4.com/forum/showthread.php?t=772248
much better than some of the crap I have seen done to mount seats (my own work included)
I figured I would post this to give some guys some ideas for adding in aftermarket seats.
This is a rig I am almost done with. My buddy had purchased it and it needed some work. He found it was over his head so he dropping it off at the shop for me to fix. I am just getting it trail worthly.
In any case it only had a bent up POS driver seat (wasn't even bolted in when he got it). So he had purchased a pair of APC buckets with sliders for adjustment.
So first was remove the seat and make room to work.

So for the front portion of the mount I used some angle material (2x2) and drilled the holes in such that when bolted down it snugged up hard against that portion of the body. The outboard strip was easy since the rear outboard hole was pretty close to inline with the front and I also made it at a 5 degree slope.

This is a rig I am almost done with. My buddy had purchased it and it needed some work. He found it was over his head so he dropping it off at the shop for me to fix. I am just getting it trail worthly.
In any case it only had a bent up POS driver seat (wasn't even bolted in when he got it). So he had purchased a pair of APC buckets with sliders for adjustment.
So first was remove the seat and make room to work.
So for the front portion of the mount I used some angle material (2x2) and drilled the holes in such that when bolted down it snugged up hard against that portion of the body. The outboard strip was easy since the rear outboard hole was pretty close to inline with the front and I also made it at a 5 degree slope.
The inboard strip is a little tougher. The rear inboard hole is not inline with the front and the strip needs to be paralell with the outbaord strip due to how the seat has to mount. The floor pan has a slope right below the strip so a bolt in the center won't work due to the angle. I also didn't wan't a mounting tab next to the strip due to strength issues. So here is what I came up with.


As you can see, the upper bolt is the stock seat hole and the lower one is off to an angle but will work for what it needs to do.

This lets the strip land right in the middle of the part I made and puts it within 1/8" of being paralell to the outboard strip which works perfect.
So tached things into place, removed and welded them all together and then test fitted it.

As you can see, the upper bolt is the stock seat hole and the lower one is off to an angle but will work for what it needs to do.
This lets the strip land right in the middle of the part I made and puts it within 1/8" of being paralell to the outboard strip which works perfect.
So tached things into place, removed and welded them all together and then test fitted it.


Early 90's Acura Integra and Honda Civic seats work great in a 1st Gen truck.
These things are great, there is a second hole about 1.25" over from the stock front outside mounting hole that lined up just about right, enlarged it just a hair and was able to use the inside front stock mount:
just had to cut off about the lower .25" or so of the stock bracket to allow it to sit flat on the floor.
I think that being able to use the stock front holes makes the install much more stable and install went very fast...
outside rear mount came up with something similar to WSUWeston's brackets:
 03-24-2009, 08:33 AM
#27
Turn signal Moved to Parking light housing
Got the idea for this one from another forum:
Put the turn signal in with the parking light.
1) Remove the turnsignal and Headlight Bezel
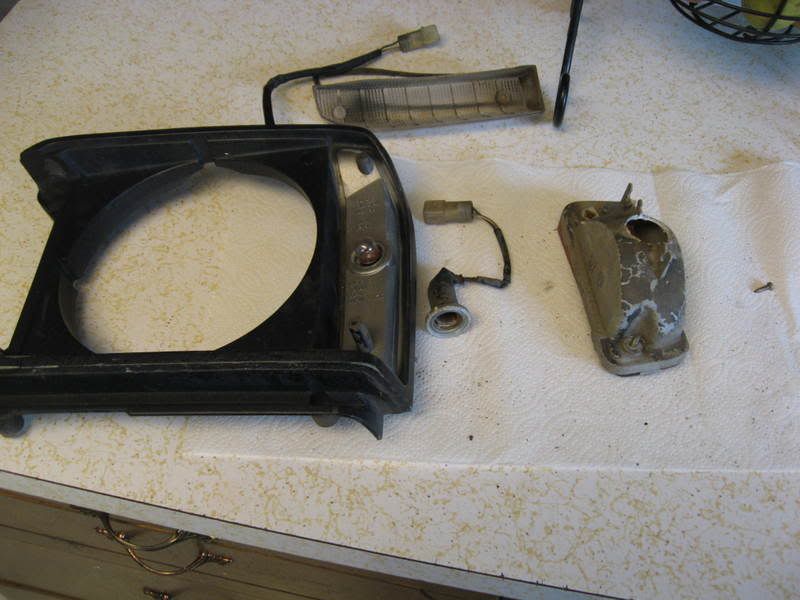
2) cut out the turnsignal bulb socket, I used a 1" butterfly bit to drill just under the parking light (drill slowly-this plastic is old and brittle)
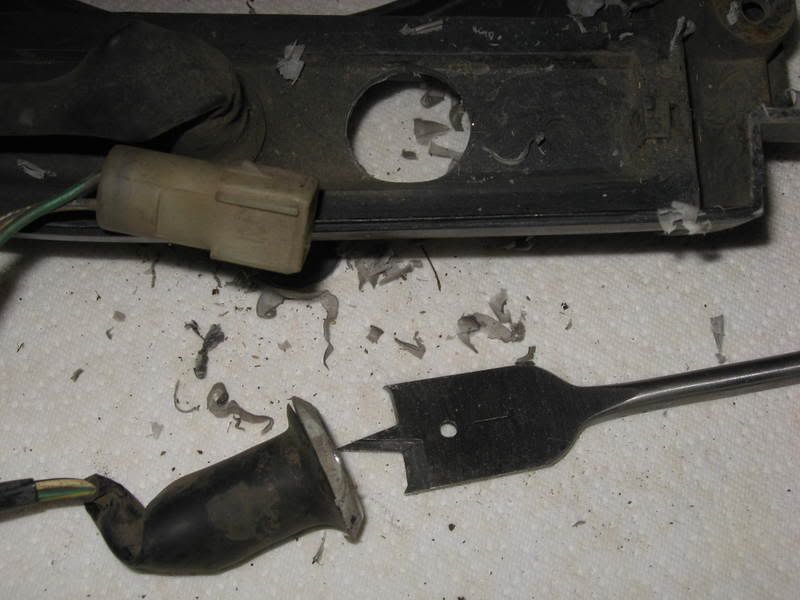
3) I ground down the sides to allow to fit in the edges of the bezel and left a lip to allow the plasti weld to bond to (clean all the old dirt and junk out) my lenses were due for a cleaning anyway
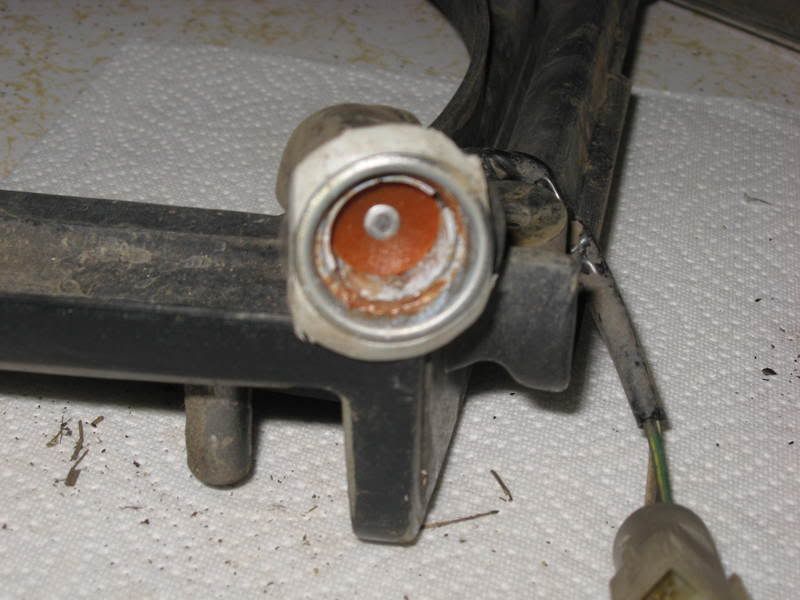
4) apply liberal amounts of plasti weld or epoxy:
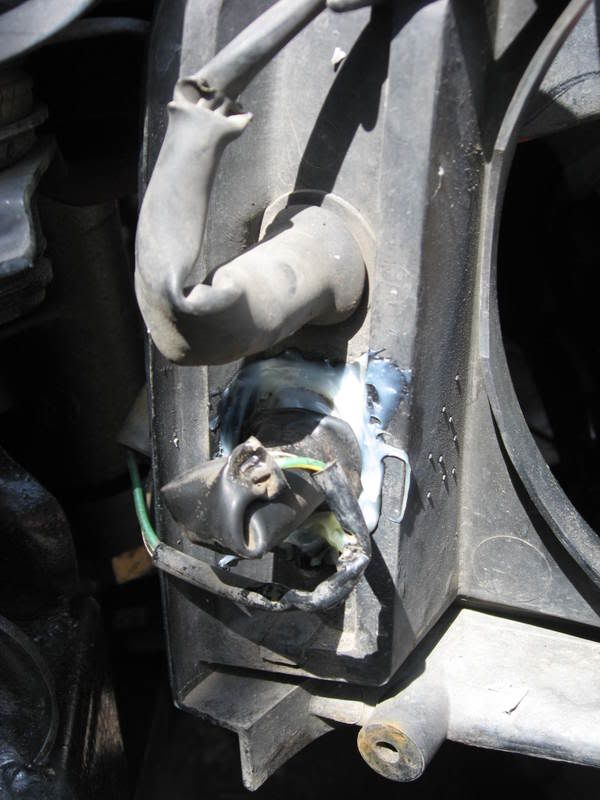
5) installed just replace the parking light lense:
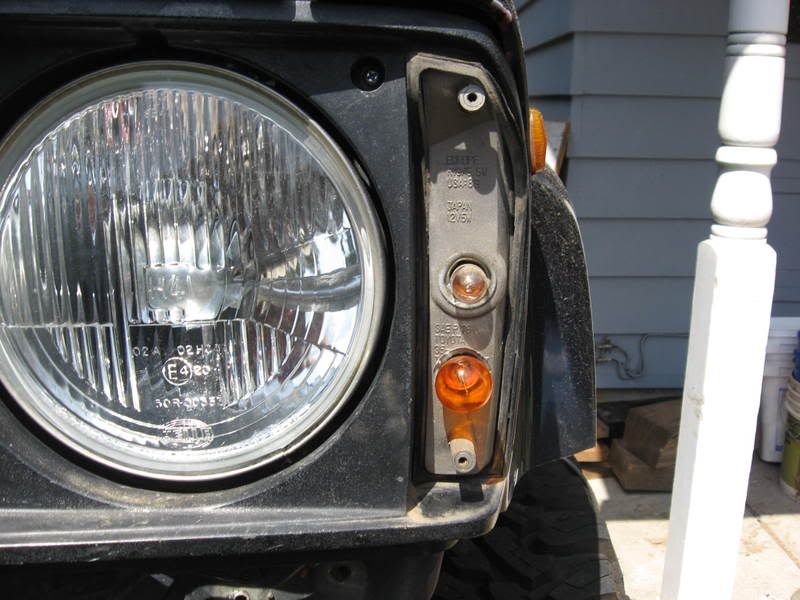
cheap easy and it actually allows the signal to be seen from the side.
Put the turn signal in with the parking light.
1) Remove the turnsignal and Headlight Bezel
2) cut out the turnsignal bulb socket, I used a 1" butterfly bit to drill just under the parking light (drill slowly-this plastic is old and brittle)
3) I ground down the sides to allow to fit in the edges of the bezel and left a lip to allow the plasti weld to bond to (clean all the old dirt and junk out) my lenses were due for a cleaning anyway
4) apply liberal amounts of plasti weld or epoxy:
5) installed just replace the parking light lense:
cheap easy and it actually allows the signal to be seen from the side.
 03-26-2009, 06:01 AM
#30
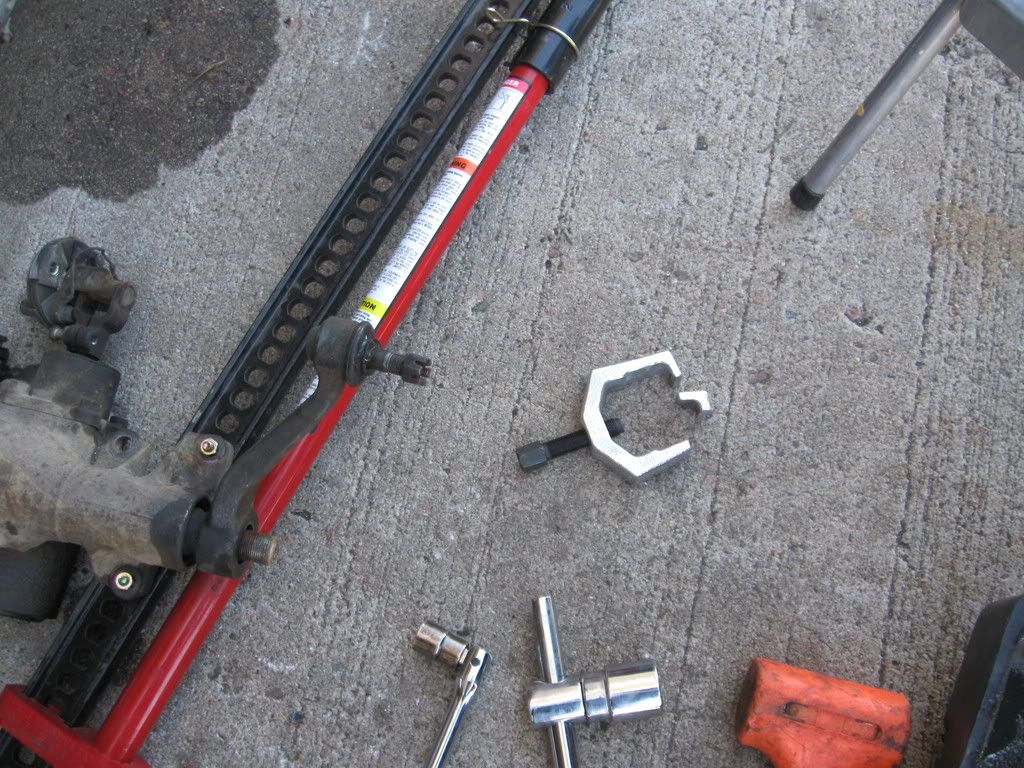
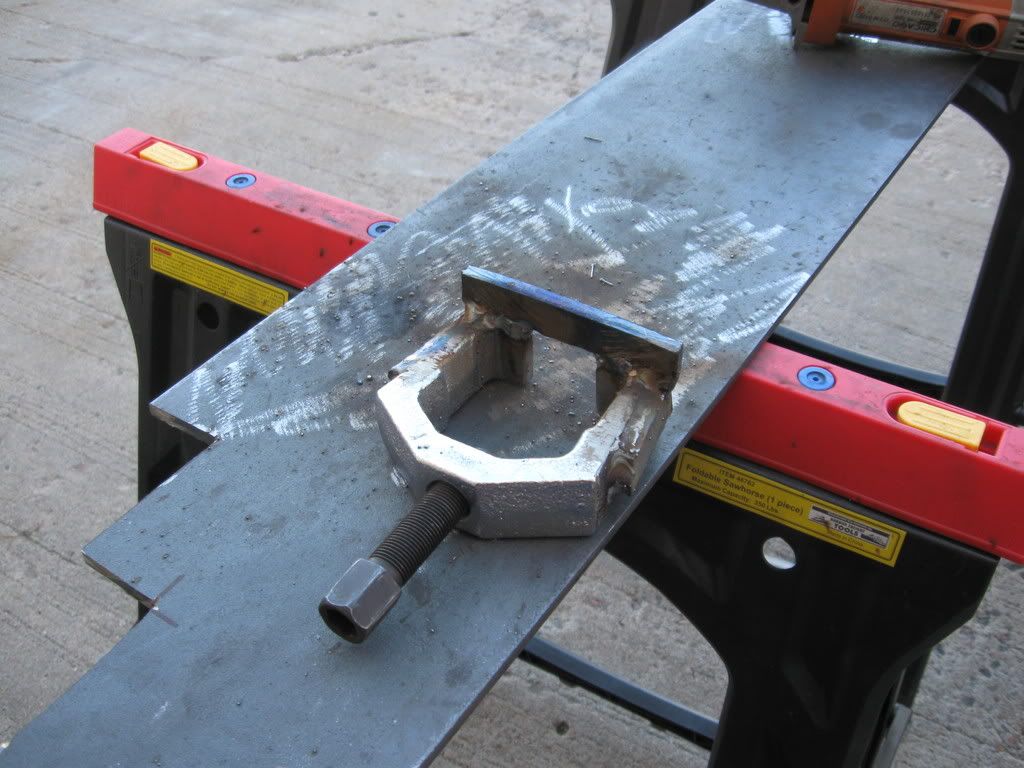
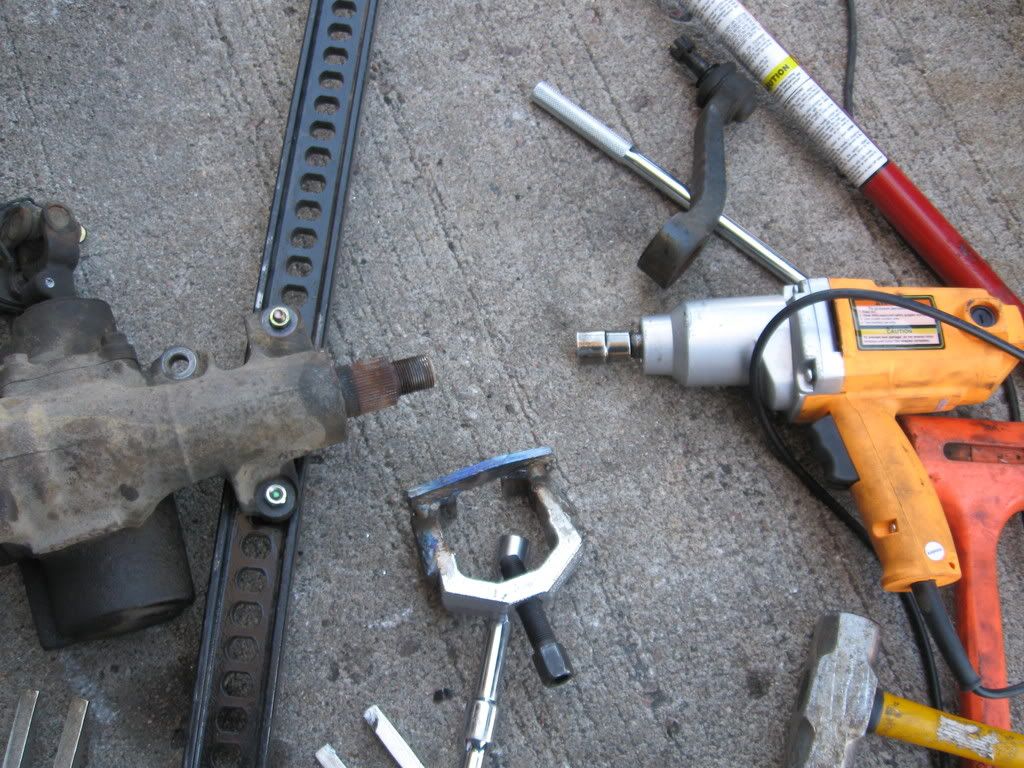
Fifth Stud Mod
stole from this thread: http://pirate4x4.com/forum/newreply....eply&p=9392419
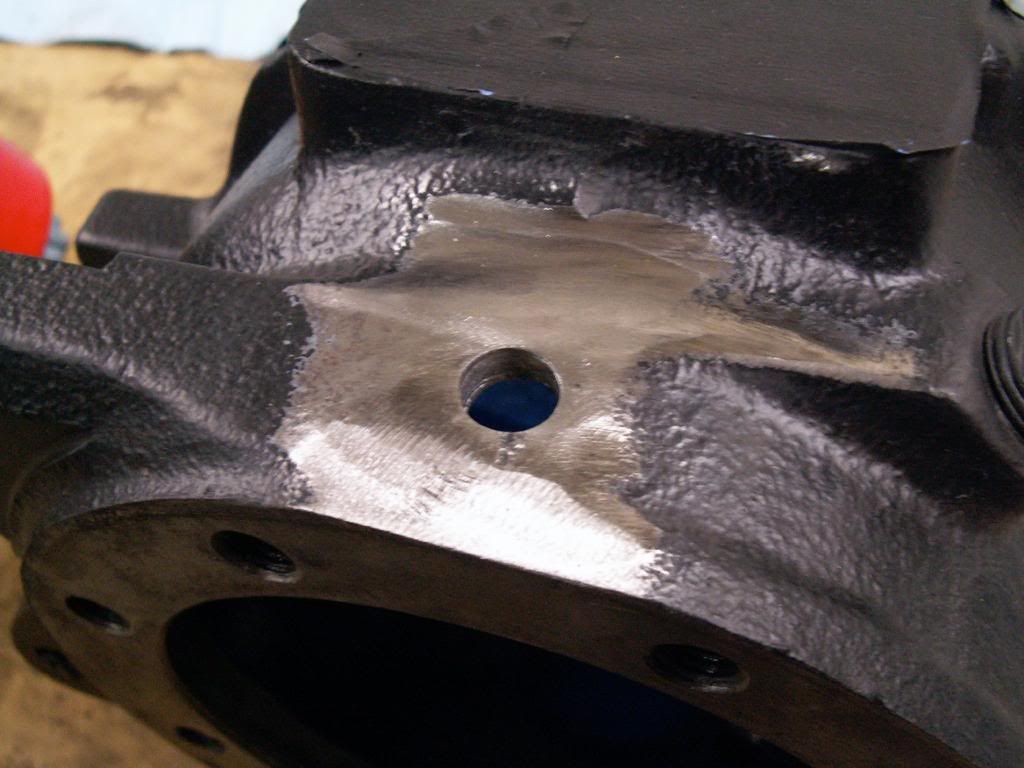
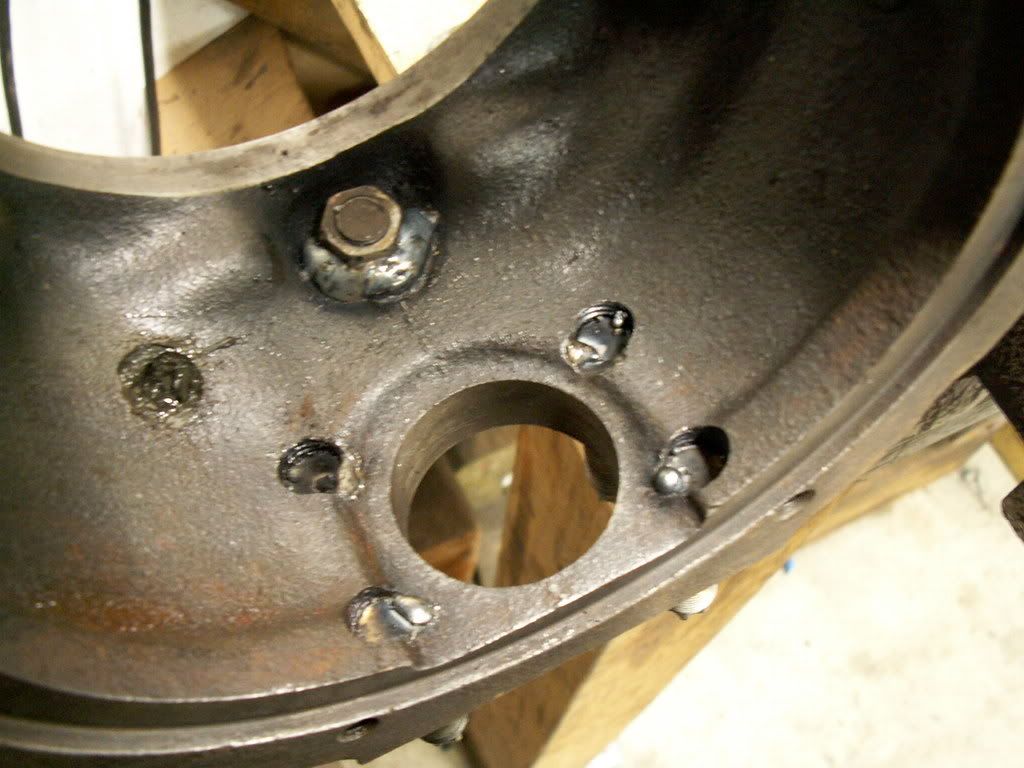
Then I started on the 5th stud mod. Bobby Long style.
This is the sweet spot to drill, dead center of the two casting lines.
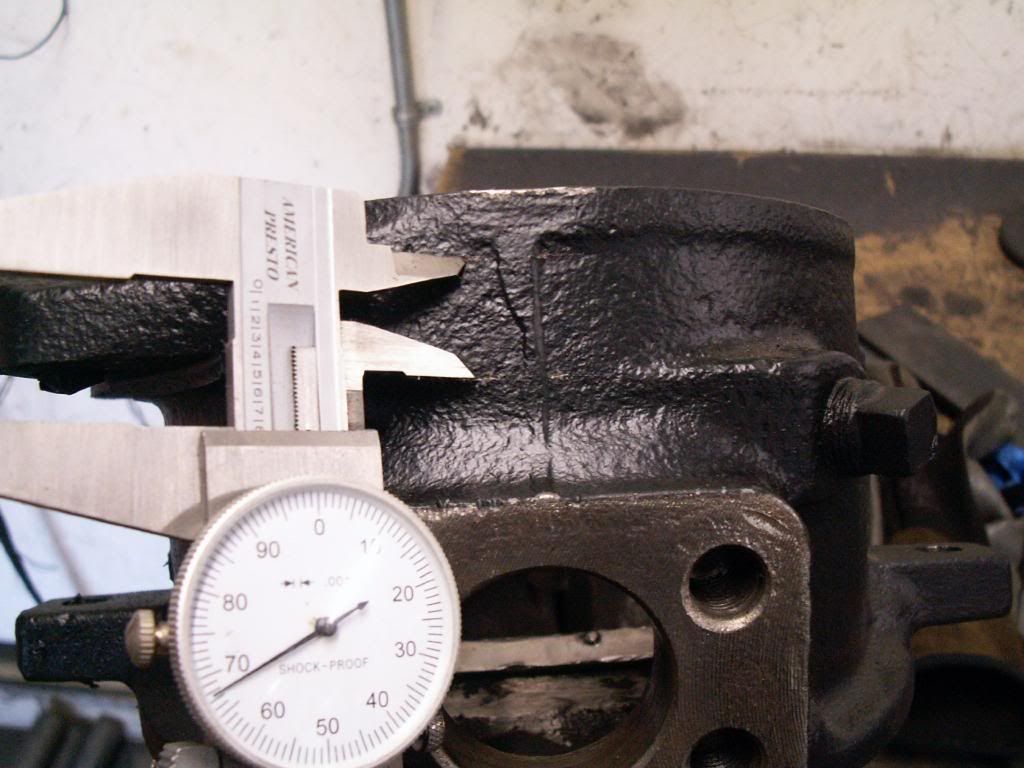
I had a lot of drive line bolts laying around and they turned out to be the perfect length with a piece of 1/4". Smoothed out the top of the knuckle for a good flat fit.
 Alternative to fifth stud kit:
Six shoot knuckles and high steer arms:

http://www.trail-gear.com/six-shooter-knuckles
The Fully Loaded Six Shooter Kit totally eliminates the problem of broken steering knuckles and studs. The addition of two studs in each arm effectively prevents the steering arm from becoming loose or shearing off the studs under extreme loads. The knuckle housing was designed with thicker than stock material and larger gussets have been added around the outside of the knuckle for extra strength. Precision CNC machined, each set of knuckles and steering arms are inspected and tested for the highest quality of products that Trail-Gear can deliver.
Then I started on the 5th stud mod. Bobby Long style.
This is the sweet spot to drill, dead center of the two casting lines.
I had a lot of drive line bolts laying around and they turned out to be the perfect length with a piece of 1/4". Smoothed out the top of the knuckle for a good flat fit.
Six shoot knuckles and high steer arms:
http://www.trail-gear.com/six-shooter-knuckles
The Fully Loaded Six Shooter Kit totally eliminates the problem of broken steering knuckles and studs. The addition of two studs in each arm effectively prevents the steering arm from becoming loose or shearing off the studs under extreme loads. The knuckle housing was designed with thicker than stock material and larger gussets have been added around the outside of the knuckle for extra strength. Precision CNC machined, each set of knuckles and steering arms are inspected and tested for the highest quality of products that Trail-Gear can deliver.
Last edited by dropzone; 10-27-2010 at 09:10 PM.
03-26-2009, 09:52 PM
#31
Transfer Case/ Dual Case
For dual Cases:
You will need:
-2 transfer cases, usually Top shift
-a Transfer case adapter-21 spline or 23 spline (stronger)
-a dual case crossmember
-shorten rear driveshaft and lengthen rear shaft
-cut a hole in the tunnel floor for the second TC lever
Transfer Case Info
Transfer Case Rebuilding FSM PDF
Trail-Gears TC Videos:
t-case: http://www.trail-gear.com/videos/toy-tcase.wmv
Dual case: http://www.trail-gear.com/videos/toydualcase.wmv
Transmission and other Transfer case info: http://www.4x4wire.com/toyota/faq/parts/
4.7 Gear install Pointer: THanks to Kiwipushrod:
(Kiwi found something the pro's were not aware of )
)
pretty cool when Marlin's kid notices your fix:
Convert Forward Shift Case to Top Shift Case
kits:
inchworm's kit
MARlin Crawler's conversion kit
from this Thread
for front case converting a Forward shift to top shift (front box)
another Forward Shift Case thread
You will need:
-2 transfer cases, usually Top shift
-a Transfer case adapter-21 spline or 23 spline (stronger)
-a dual case crossmember
-shorten rear driveshaft and lengthen rear shaft
-cut a hole in the tunnel floor for the second TC lever
Transfer Case Info
Transfer Case Rebuilding FSM PDF
Trail-Gears TC Videos:
t-case: http://www.trail-gear.com/videos/toy-tcase.wmv
Dual case: http://www.trail-gear.com/videos/toydualcase.wmv
Transmission and other Transfer case info: http://www.4x4wire.com/toyota/faq/parts/
4.7 Gear install Pointer: THanks to Kiwipushrod:
(Kiwi found something the pro's were not aware of
)So, I put some 4.7 gears in My single, forward shift, T-case yesterday. I've worked on lots of New Process cases but never a toyota case, so I actually read the directions..........that was My downfall.
When you read the directions, You dont really watch what's going on because You're depending on the step by step directions to guide You, plus looking at the cool pictures.
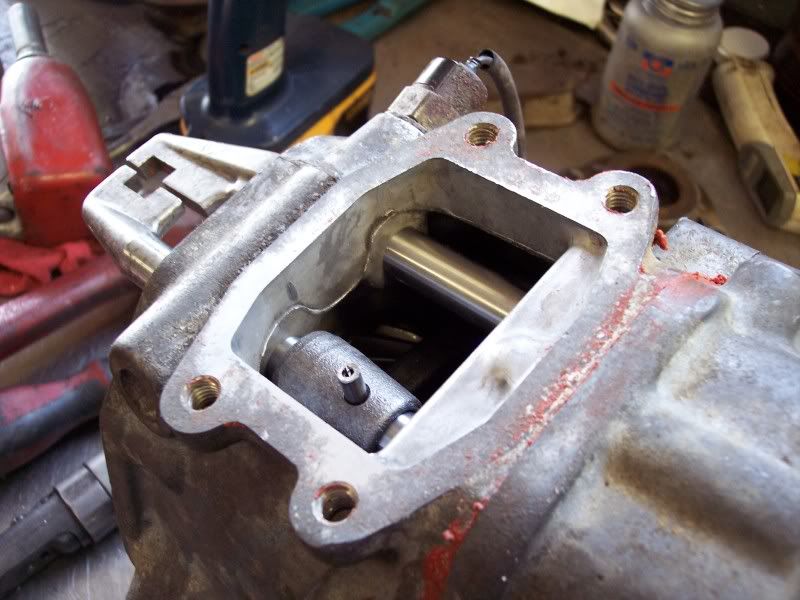
So I clearanced the case for the new oversized gear. I fit the gear in place and all looked good

I also clearanced the shift fork/dog for Low gear, just like the pictures tell You to do.
I put the whole thing back together, and thats when I found out that as soon as I put the case in low gear on the bench, that it locked up.
So, of course I just added some more force to fix the problem. Well, when I did that it would make a ty noise and then would jump out of low gear. WTF.
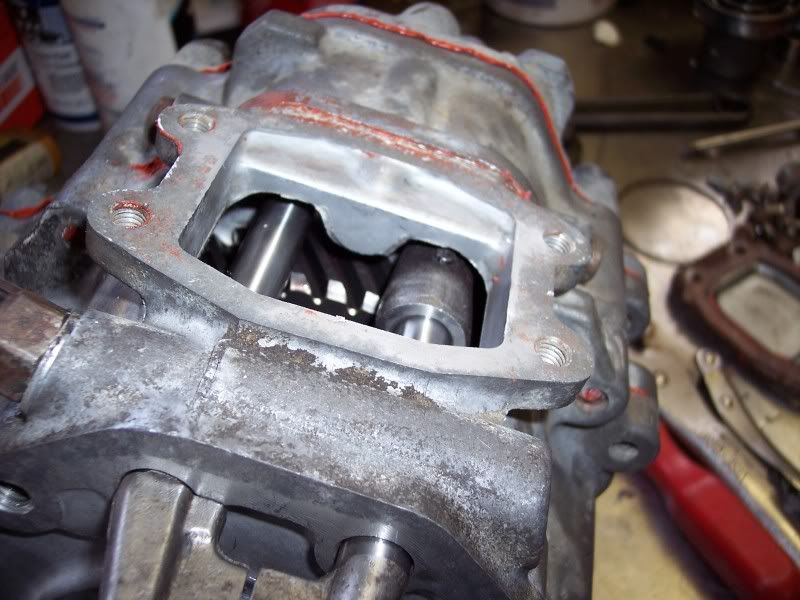
I pull the whole thing apart to trace the problem down. And now for the stupid part.
The directions say to clearance the low gear shift fork down, but they dont tell You to grind the roll pin for that fork down, or dont drive it all the way home. Because if You dont shorten that roll pin or do drive it down all the way........Guess what?
It then hits the in new oversized gear and locks Your Up!
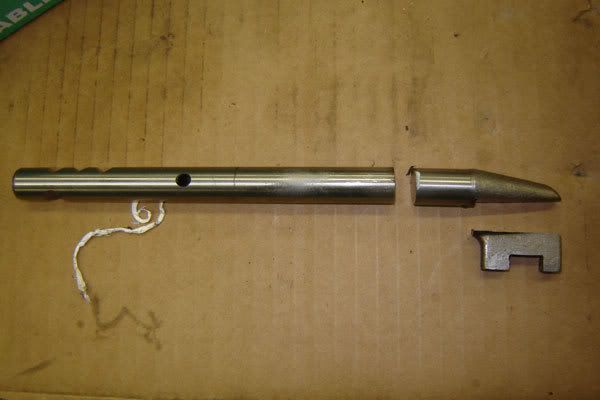
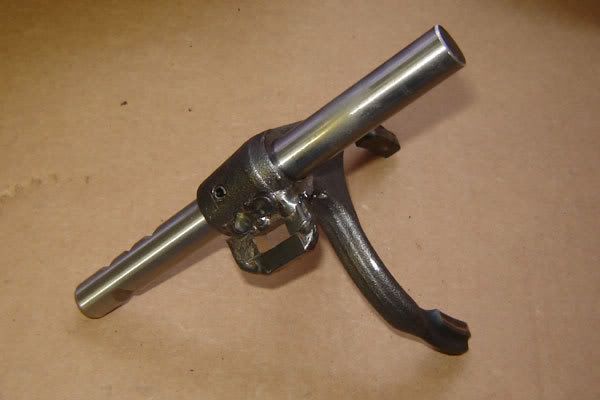
This is the pin in question after shortening it.
In low gear, after the fix.
I hope this helps some other Noob, do it right the First time.
Kiwi
When you read the directions, You dont really watch what's going on because You're depending on the step by step directions to guide You, plus looking at the cool pictures.
So I clearanced the case for the new oversized gear. I fit the gear in place and all looked good
I also clearanced the shift fork/dog for Low gear, just like the pictures tell You to do.
I put the whole thing back together, and thats when I found out that as soon as I put the case in low gear on the bench, that it locked up.
So, of course I just added some more force to fix the problem
. Well, when I did that it would make a ty noise and then would jump out of low gear. WTF.I pull the whole thing apart to trace the problem down. And now for the stupid part.
The directions say to clearance the low gear shift fork down, but they dont tell You to grind the roll pin for that fork down, or dont drive it all the way home. Because if You dont shorten that roll pin or do drive it down all the way........Guess what?
It then hits the in new oversized gear and locks Your Up!
This is the pin in question after shortening it.
In low gear, after the fix.
I hope this helps some other Noob, do it right the First time.
Kiwi
Kiwipushrod,
I noticed you are installing TG gears but the same applies with our instructions in that the former employee who made the guide left that part out!
So I have updated step 49 of our installer to include this required info
http://www.marlincrawler.com/tech/gu...1-gear-install
Thanks for the tip!
Mike
I noticed you are installing TG gears but the same applies with our instructions in that the former employee who made the guide left that part out!
So I have updated step 49 of our installer to include this required info
http://www.marlincrawler.com/tech/gu...1-gear-install
Thanks for the tip!
Mike
Convert Forward Shift Case to Top Shift Case
kits:
inchworm's kit
MARlin Crawler's conversion kit
from this Thread
*this is for a dual toyota t-case set-up.*
i know the shop is a mess.... so dont say anything
OK, since i had 2 extra forward cases, i decided i HAD to make them work for my marlin crawler. i know this isnt NEW. and using a forward shift case for the RANGE box has been done. but i needed it to work for the rear 4WD case.(id heard it couldnt be done:shaking: )
im not going to go through the teardown. hopefully if you are attempting this conversion, you already know how to tear it down.
*im going to refer to the 4L-4H rail as LEFT*
*the 2WD-4H as RIGHT*
1)get the SPARE shift fork from the DONOR case. and cut the lug off, using a die grinder. be sure not to cut it too close.

2) install the rails into the RANGE portion of the rear case. after the rails are in, put the shift detents back in place. this will help insure correct placement. and carefully measure for the roll pin. its VERY important to get it right. measure 5X cut once. leave the LEFT rail in 4wd(toward the front) and shift the RIGHT rail into 4wd also.(to the front.) mark where the new hole has to be, for the LUG on the right rail. i tried to match the lug(NOT THE HOLE) to the other fork as best i could.
do NOT attempt to drill the rail. it is hardened steel, and you will never get it. even if you could, i doubt it would be straight. i took mine to a local machine shop(Machine Service inc.)
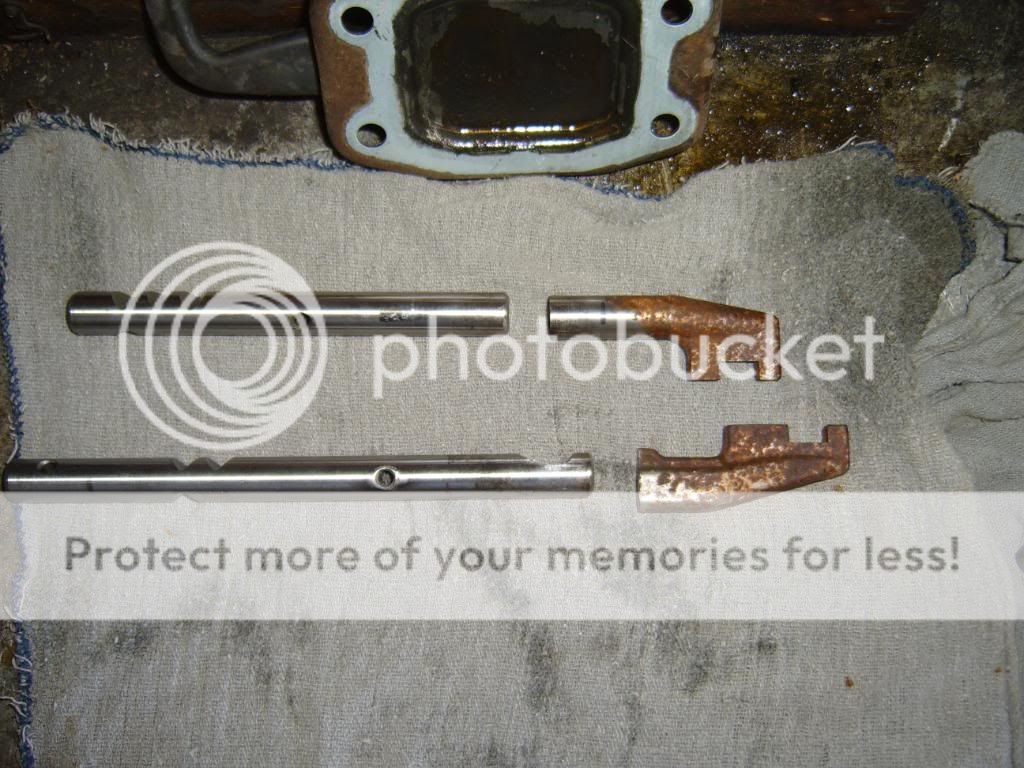
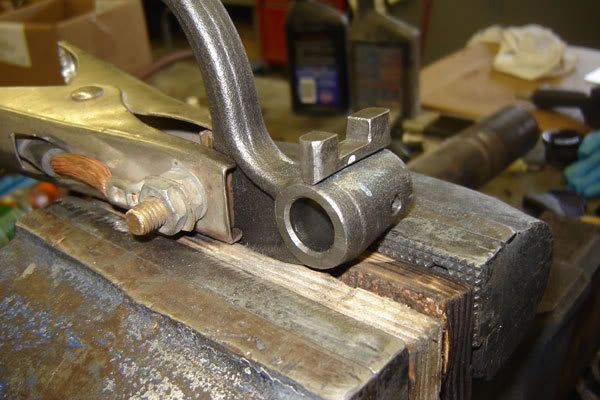
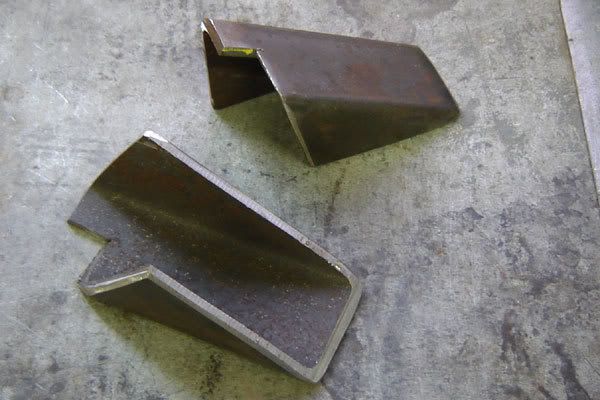
3) grab the ends u cut off, and remove the gates. set them aside, for now.

**note** this pic is out of sequence. when removing the gates, be sure to remove the entire portion off the 2WD gate. this prevents the shifter from falling into "space" when in 4L. i had to go back, and add this piece.

4) attach lug to the right rail, and the fork to the left rail, and the you need to clearance the INSIDE edge of each lug. you need a "flat" section to attach the gates to. since the lugs are angled, it wont be square. i ground them down close, and just clamped to the THICKER side. and filled in the small gap.

5) once you're certain you know where theyre going. carefully weld the gate onto the lugs. use the SHORT gate on the LEFT(with FORK) rail. and the LONG gate on the RIGHT rail. *see my note above.*
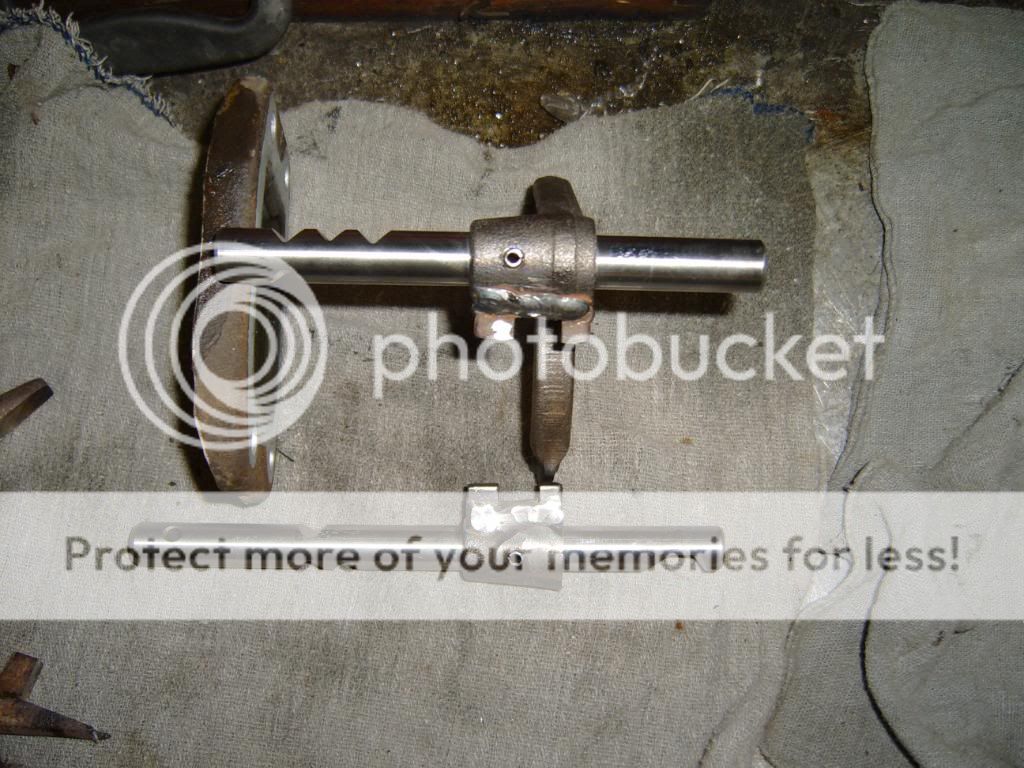
theres alot of test fitting. i dont remember when i did it. but at some point, after u instal the gates, you need to reinstall the main shaft, and most of the gears, and 2WD shift fork, and slide the outer portion of the t-case in place. be sure everything shifts good. then measure where to cut the STICK OUT, from the rails. they can only stick out about 1/4" when shifted into 4H. otherwise they will hit the 4L rail in the range box.
this pic also thems them after they were shortened.
6)put everything together for another test fit. you now need your gates to line up. if they dont, but are close, you can use a file to get them exact. mine were dead on, and no adjustments were needed. again, note the lug i added after the fact.
one thing i want to mention, as it messed with me a few times. when these rails are out, they can be put in 180* out of phase. it will work properly, but your shift detents will not work correctly. be sure on the final install, that the SINGLE detent notch is to the INSIDE.
make sure everything shifts correctly and smoothly. i used a bit of 90w to ease the install.
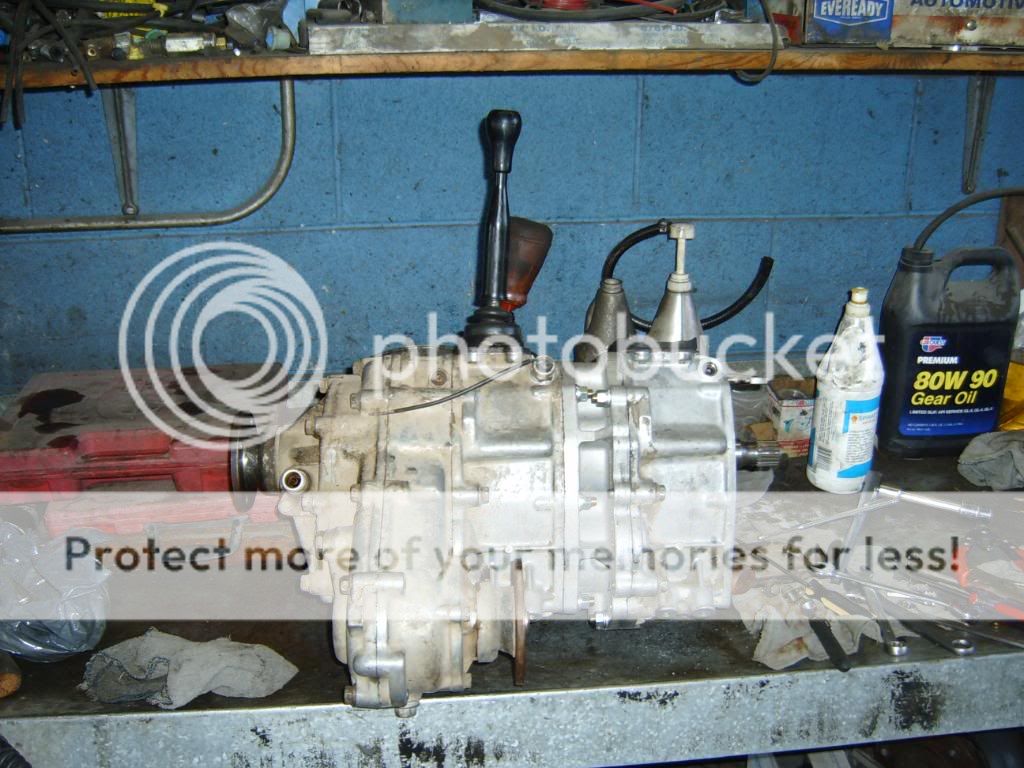
and finally, a forward shift tcase, converted to a top shift, ready to be installed.
hopefully this will help others who dont have a top shift case, but want a dual case set-up.
i know the shop is a mess.... so dont say anything
OK, since i had 2 extra forward cases, i decided i HAD to make them work for my marlin crawler. i know this isnt NEW. and using a forward shift case for the RANGE box has been done. but i needed it to work for the rear 4WD case.(id heard it couldnt be done:shaking: )
im not going to go through the teardown. hopefully if you are attempting this conversion, you already know how to tear it down.
*im going to refer to the 4L-4H rail as LEFT*
*the 2WD-4H as RIGHT*
1)get the SPARE shift fork from the DONOR case. and cut the lug off, using a die grinder. be sure not to cut it too close.
2) install the rails into the RANGE portion of the rear case. after the rails are in, put the shift detents back in place. this will help insure correct placement. and carefully measure for the roll pin. its VERY important to get it right. measure 5X cut once. leave the LEFT rail in 4wd(toward the front) and shift the RIGHT rail into 4wd also.(to the front.) mark where the new hole has to be, for the LUG on the right rail. i tried to match the lug(NOT THE HOLE) to the other fork as best i could.
do NOT attempt to drill the rail. it is hardened steel, and you will never get it. even if you could, i doubt it would be straight. i took mine to a local machine shop(Machine Service inc.)
3) grab the ends u cut off, and remove the gates. set them aside, for now.
**note** this pic is out of sequence. when removing the gates, be sure to remove the entire portion off the 2WD gate. this prevents the shifter from falling into "space" when in 4L. i had to go back, and add this piece.
4) attach lug to the right rail, and the fork to the left rail, and the you need to clearance the INSIDE edge of each lug. you need a "flat" section to attach the gates to. since the lugs are angled, it wont be square. i ground them down close, and just clamped to the THICKER side. and filled in the small gap.
5) once you're certain you know where theyre going. carefully weld the gate onto the lugs. use the SHORT gate on the LEFT(with FORK) rail. and the LONG gate on the RIGHT rail. *see my note above.*
theres alot of test fitting. i dont remember when i did it. but at some point, after u instal the gates, you need to reinstall the main shaft, and most of the gears, and 2WD shift fork, and slide the outer portion of the t-case in place. be sure everything shifts good. then measure where to cut the STICK OUT, from the rails. they can only stick out about 1/4" when shifted into 4H. otherwise they will hit the 4L rail in the range box.
this pic also thems them after they were shortened.
6)put everything together for another test fit. you now need your gates to line up. if they dont, but are close, you can use a file to get them exact. mine were dead on, and no adjustments were needed. again, note the lug i added after the fact.
one thing i want to mention, as it messed with me a few times. when these rails are out, they can be put in 180* out of phase. it will work properly, but your shift detents will not work correctly. be sure on the final install, that the SINGLE detent notch is to the INSIDE.
make sure everything shifts correctly and smoothly. i used a bit of 90w to ease the install.
and finally, a forward shift tcase, converted to a top shift, ready to be installed.
hopefully this will help others who dont have a top shift case, but want a dual case set-up.
converting a Forward shift to top shift (front box)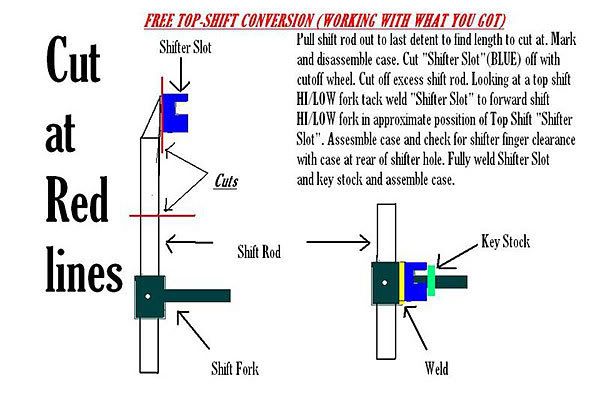
Last edited by dropzone; 10-20-2009 at 12:40 PM.
03-26-2009, 10:25 PM
#32

 04-02-2009, 11:57 PM
#37
E Locker in Early front axle
this one will have some more stuff added
following is from this thread:http://pirate4x4.com/forum/showthrea...=761084&page=6
Converting Elocker to Cable locker:
crolison's write up:
https://www.yotatech.com/forums/f2/e...ersion-189134/
elocker motor not working-clean up thread:http://www.worldpath.net/~thompson/tacoma/locker.htm
following is from this thread:http://pirate4x4.com/forum/showthrea...=761084&page=6
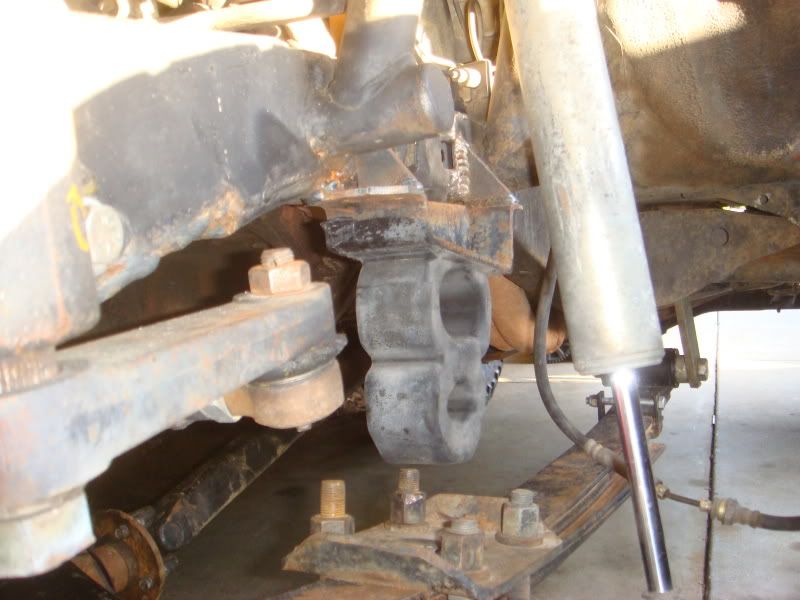
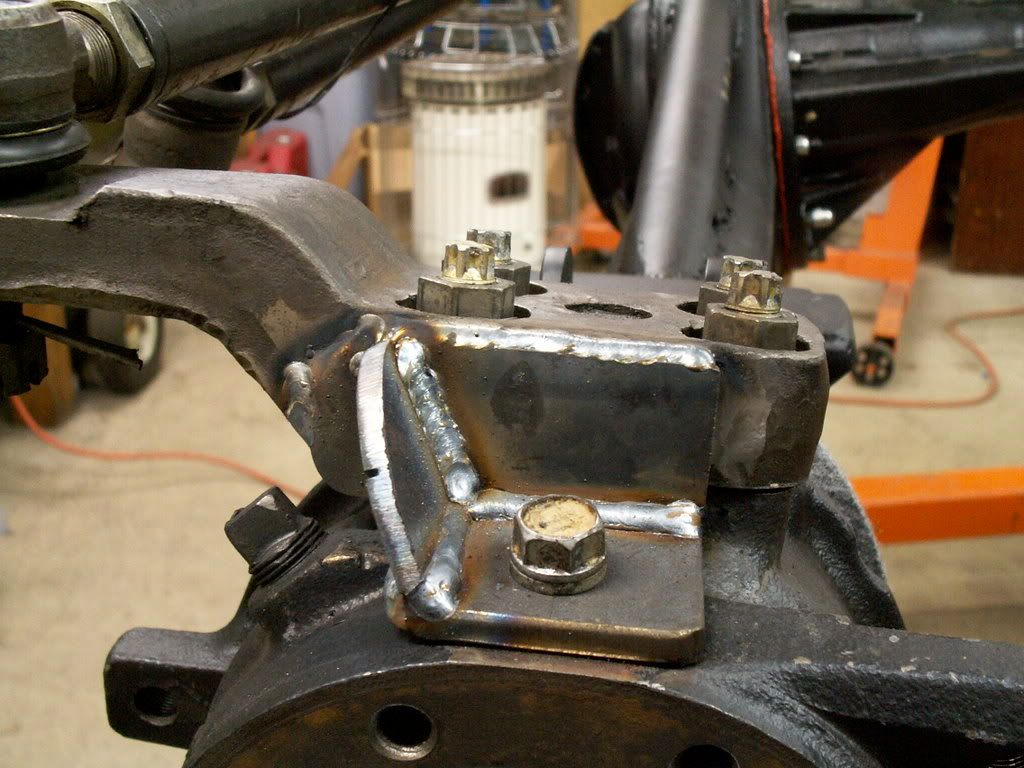
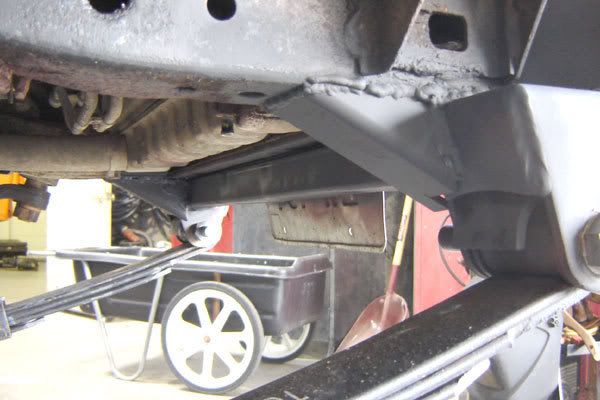
Figured I would add a little tech. Not that it is much. But for those of you looking to put a E-locker in the front of a older solid axle truck. You will need to do some clearancing to get it to fit around the spring and U-bolts. This is where you need to clearance. Of coarse you will also need to do some work to the housing but most of you already know about that. Write ups of that work. http://home.off-road.com/~kemanuel/elocker/elocker.html
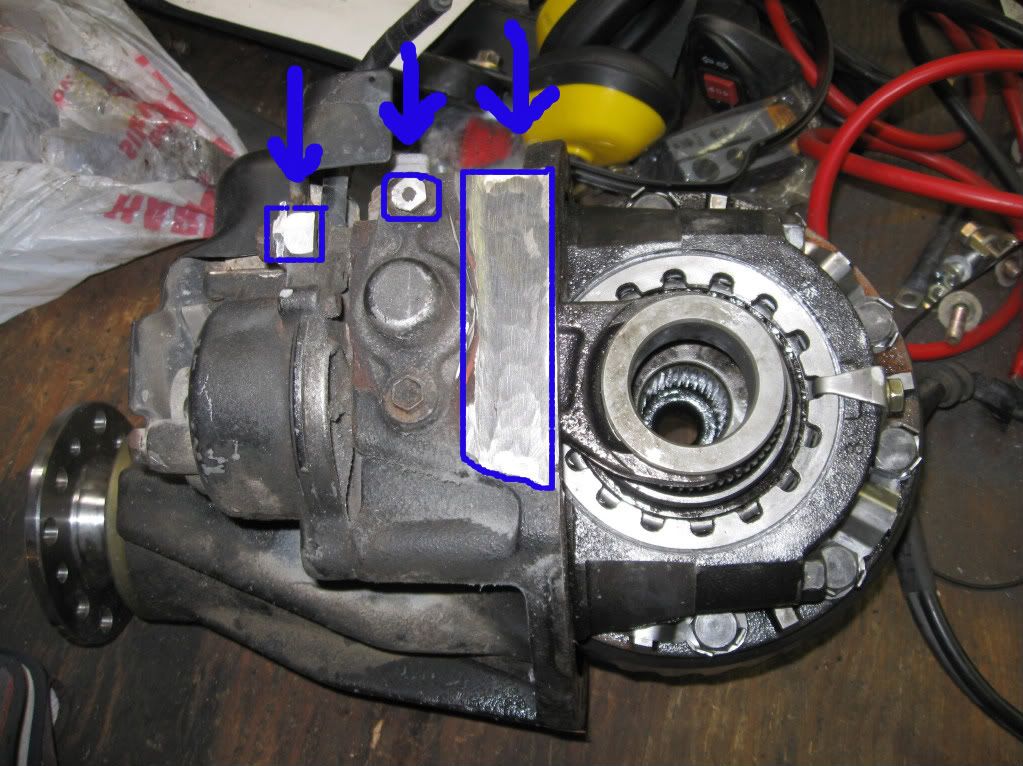
and this is why
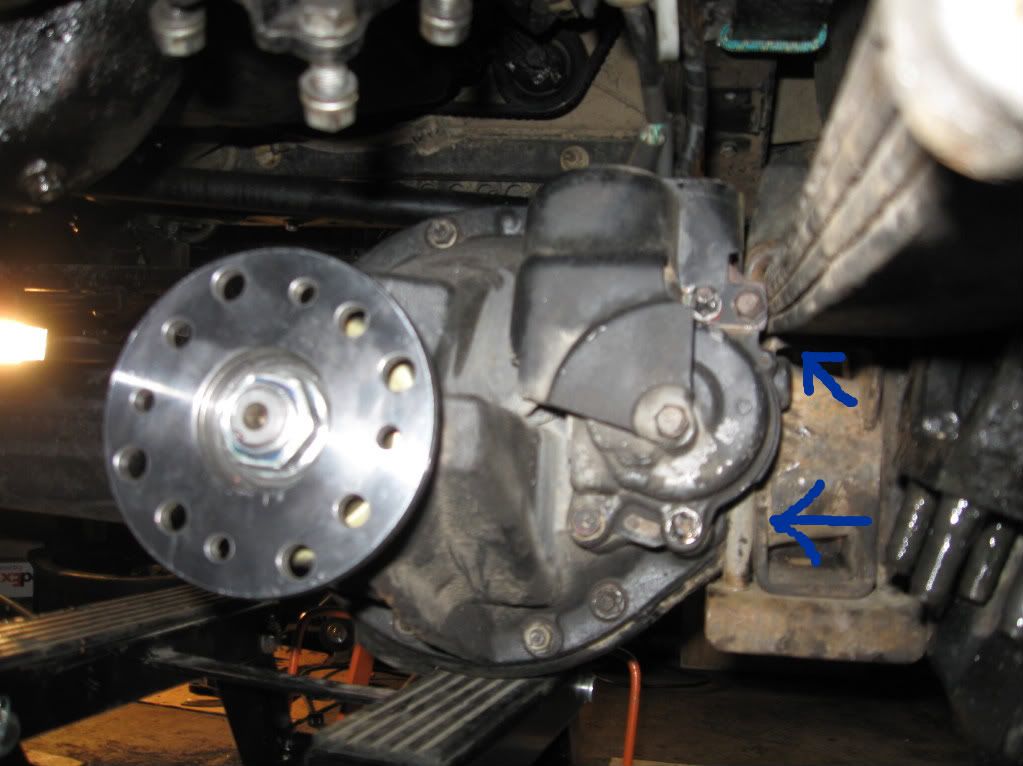
and this is why


crolison's write up:
https://www.yotatech.com/forums/f2/e...ersion-189134/
elocker motor not working-clean up thread:http://www.worldpath.net/~thompson/tacoma/locker.htm
Last edited by dropzone; 10-20-2009 at 12:31 PM.
04-11-2009, 12:36 AM
#38
cheap intake protector
so i know a lot of people have an extra engine sitting around for whatever reason, I hope to joins those ranks sometime soon
anyway I saw this alternate idea to a rag:
from MT-Toy's rebuild thread
anyway I saw this alternate idea to a rag:
from MT-Toy's rebuild thread
A little bit of redneck tech for Ya'll! 
I found that a rattle can cap fit perfectly inside the throttle body bore to keep moisture and contaminants out of the engine. Good seal too. I'd imagine the 22Re is similar and would work too, either slip in or slip over. I saw T1Tndra used a rag in his t-body and thought I'd come up with something a little different. Cheers!

I found that a rattle can cap fit perfectly inside the throttle body bore to keep moisture and contaminants out of the engine. Good seal too. I'd imagine the 22Re is similar and would work too, either slip in or slip over. I saw T1Tndra used a rag in his t-body and thought I'd come up with something a little different.
Cheers!
04-23-2009, 01:42 AM
#39
More will be posted when I find it but starting out with some options...some cheap, some expensive;
Portland Oregon shops:
http://drivelinetech.com/home.php
http://www.driveshafts.com/pages/company.html
http://highangledriveline.com/toy.html
http://davezoffroadperformance.com/f....php?f=3&t=296
http://www.reeldriveline.com/
tom woods: http://www.4xshaft.com/index.html
http://trail-gear.com/driveshaft.html
http://allprooffroad.com/pickupdrivetrain/31
http://marlincrawler.com/axle/drive-...rive-shaft-kit
Spline material: http://www.grobinc.com/coldrolled/st...ne_shafts.htm#
Source for Driveshaft stuff thread
U-Joint History
measuring for driveshafts
From this thread:
https://www.yotatech.com/forums/f115...t-size-230481/
So I was going to replace the u-joints on the front driveshaft Double Cardan joint today. Apparently, the original u-joints are slightly (20 thousandths give or take) smaller than the replacement u-joints. Does anyone have a workaround or the correct part numbers for replacement u-joints made specifically for the double cardan on an 84/85 front driveshaft?
Thanks...
Thanks...
Well, I am back up and running after the crazy u-joint issues. Thankfully, the ball and needle bearings were in excellent condition, so the u-joints were all replaced and the vibration that started all this has now disappeared. Here is some info for those needing to know that may be searching this same topic later.
The part number for the u-joints in the double cardan are:
(Same part, just cross referenced the part numbers.)
Precision #513
Neapco #1-5800
Auto Zone #1-5800DL
Rockford #407-10
Spicer #5-2532X
The Ball Repair Kit (.470 ball) is:
(Same part, just cross referenced the part numbers.)
Precision #613
Spicer #211407X
Rockford #407-0
The standard u-joint for the front joint (Differential end of the u-joint) is pretty common and stocked at most parts stores. You may have to order the two needed for the double-cardan (CV Style), but they are available. The dealer will tell you that you have to buy a complete shaft, but you don't. The repair parts are readily available, just not from the dealer as OEM parts.
If you're ball is in good shape and the rubber seals are good and you only need to replace the u-joints, be real careful when you pull the assembly apart so you don't lose any of the needle bearings out of the center ball. If they fall out, make sure you put them back in. We used a little grease with a wire nut inserted to hold them in place while we were moving the shaft around to keep the bearings in place.
Hope this helps someone in the future.
EDIT: dang there was another page, haha. Oh well, at least some of you guys know what a gimble joint is though now.
Some of these things came factory with 31 x 10.50's from the factory, your fine.
Oh and the joint your talking about is normally called a Universal or Cardon joint in vehicle world. I suppose in the industrial world you can call it a gimble joint though.
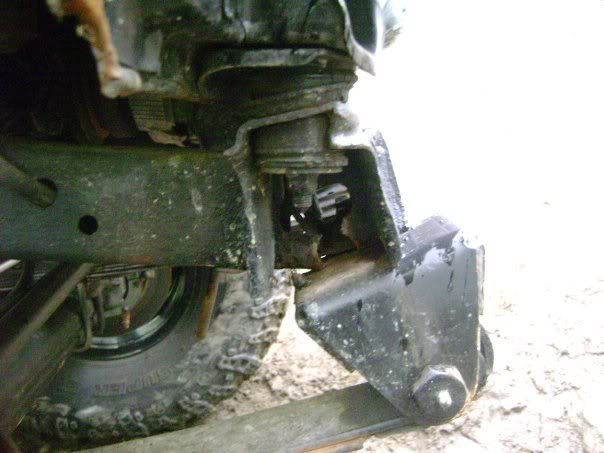
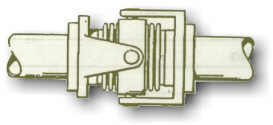
Gimble Joint
Cardon/Universal Joint THe joint all the way on the left is also called a Double Cardon or CV joint
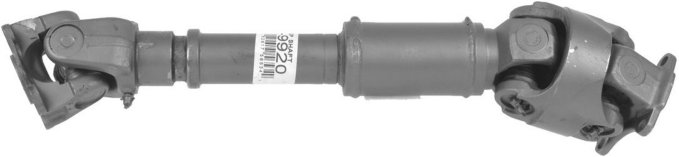
Not to be confused with this CV joint which is a drive axle not a driveshaft like above.

Some of these things came factory with 31 x 10.50's from the factory, your fine.
Oh and the joint your talking about is normally called a Universal or Cardon joint in vehicle world. I suppose in the industrial world you can call it a gimble joint though.
Gimble Joint
Cardon/Universal Joint THe joint all the way on the left is also called a Double Cardon or CV joint
Not to be confused with this CV joint which is a drive axle not a driveshaft like above.
Last edited by dropzone; 06-28-2012 at 05:43 PM. Reason: consolidating info


