22R Desmog Tutorial
 06-25-2013, 07:08 PM
#61
Registered User
Join Date: Feb 2013
Location: Portland Oregon
Posts: 178
Likes: 0
Received 0 Likes
on
0 Posts
I too have bookmarked and read your write up many times, right now i have my freshly rebuilt and smog-less engine on a stand and i am sans hard coolant lines. i was going to junk yard some up, but if i could avoid using them altogether and still have heat, i am all ears...er eyes,....whatever lol....i do have the barb on the bottom of my intake (offy c series with 22r bottom plate) and i do have a block off for the small hard line on the drivers side, back of timing cover.
whatcha got for me ?
?
can i just loop the bottom radiator to the timing cover-return-water-neck using coolant hose?
whatcha got for me
? can i just loop the bottom radiator to the timing cover-return-water-neck using coolant hose?
Last edited by Killgore Trout; 06-25-2013 at 07:09 PM.
 06-27-2013, 08:19 AM
#63
Registered User

Join Date: Jun 2013
Location: Craig, Colorado
Posts: 20
Likes: 0
Received 0 Likes
on
0 Posts
BTW the fitting to connect the pressure gauge to the regulator is actually a 3/8" male NPT to 1/8" female reducer not 1/4". At least that's how my gauge came and I ordered the exact gauge in your link.
06-27-2013, 11:07 AM
#64
Welp, I can't spoon feed everything to you guys or else it would be too easy for you all! LOL Thanks for the correction. Figuring out the fittings on that regulator and gauge were a pain in the ass and rather expensive for what they are.
07-09-2013, 01:46 PM
#65
Registered User

Join Date: May 2013
Location: Illinois
Posts: 51
Likes: 0
Received 0 Likes
on
0 Posts
oh boy!
After talking with Kawazx636, he brought to my attention that I should post some of the problems I am having on my desmog.
I own a 1982 4x4 shortbed. I recently picked it up from Vegas and it was not running all that great. There were unhooked vacuum hoses all over, oil all over the motor (still some on there!) but a rust free body. I am no mechanic, but certainly not afraid to get my hands dirty and learn a thing or two. So I started off copying and googling all the desmog parts that the generous Kawazx636 decided to share. Since he owns a 1983, my 1982 should be the same exact thing right? AHH not! I ordered an 11 bolt block off plate but my intake needs an 8 bolt one. Being new to all of this, I didn't even know where the plate went until I started digging in. No biggie, as it's an easy swap. The real problem is on the head. I do not see a plate for this hole (see photos), and the manifold only covers half of it. Also, if the did make a plate, it wouldn't fit because again, the manifold needs to bolt up there. For the life of me, I cannot figure out what I took off that was originally there. I even looked at the fsm that was posted but cannot figure it out. Help anyone?
[IMG]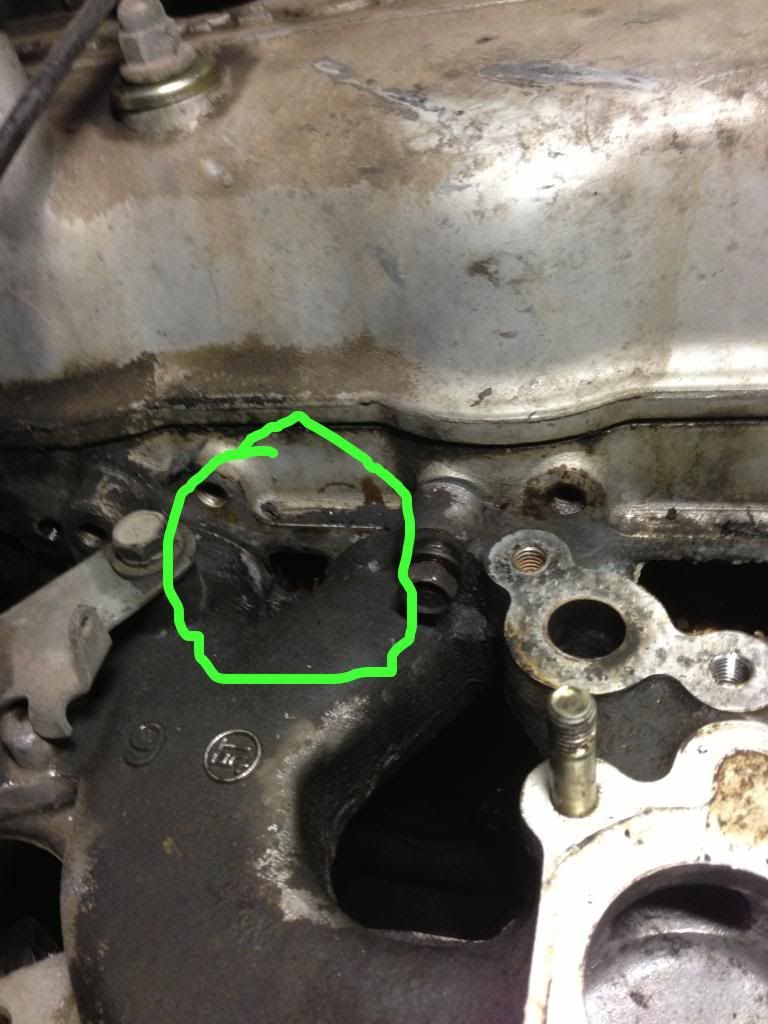 [/IMG]
[IMG]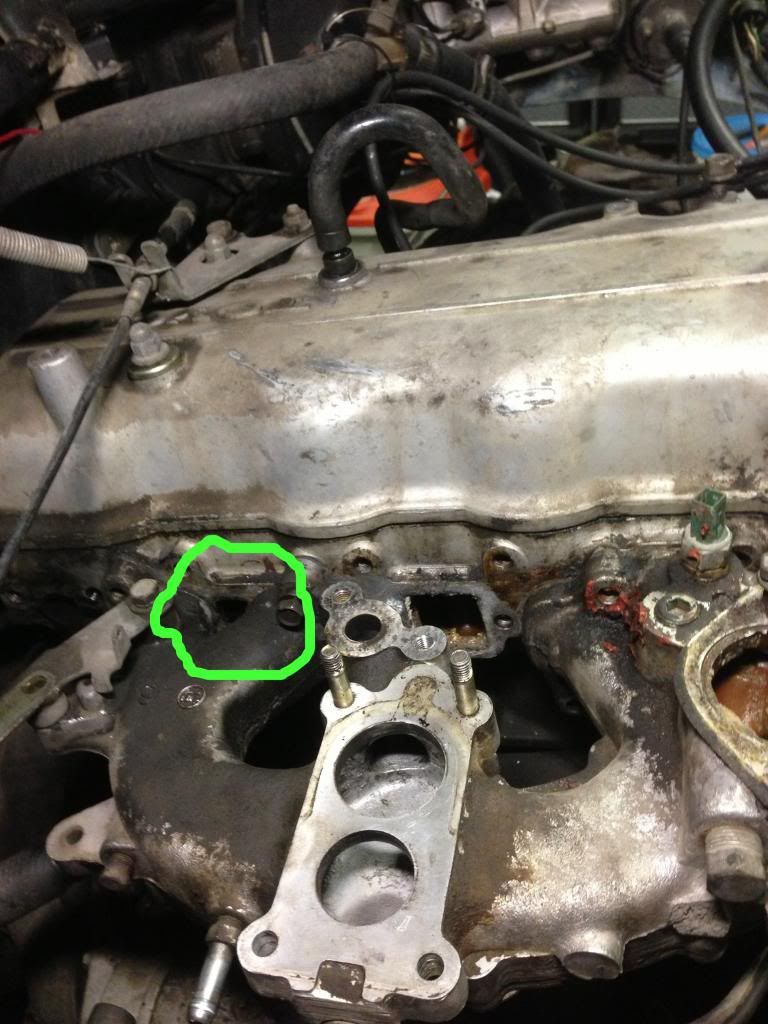 [/IMG]
I own a 1982 4x4 shortbed. I recently picked it up from Vegas and it was not running all that great. There were unhooked vacuum hoses all over, oil all over the motor (still some on there!) but a rust free body. I am no mechanic, but certainly not afraid to get my hands dirty and learn a thing or two. So I started off copying and googling all the desmog parts that the generous Kawazx636 decided to share. Since he owns a 1983, my 1982 should be the same exact thing right? AHH not! I ordered an 11 bolt block off plate but my intake needs an 8 bolt one. Being new to all of this, I didn't even know where the plate went until I started digging in. No biggie, as it's an easy swap. The real problem is on the head. I do not see a plate for this hole (see photos), and the manifold only covers half of it. Also, if the did make a plate, it wouldn't fit because again, the manifold needs to bolt up there. For the life of me, I cannot figure out what I took off that was originally there. I even looked at the fsm that was posted but cannot figure it out. Help anyone?
[IMG]
 [/IMG]
[IMG]
 [/IMG]
 07-09-2013, 02:28 PM
#69
Registered User
Is it actually a passage of some sort or is it just a void in the head casting? If there's a passage, is it for coolant or just emisions/exhaust recirculation crap?
 07-09-2013, 04:17 PM
#71
Registered User
Join Date: Feb 2013
Location: Portland Oregon
Posts: 178
Likes: 0
Received 0 Likes
on
0 Posts
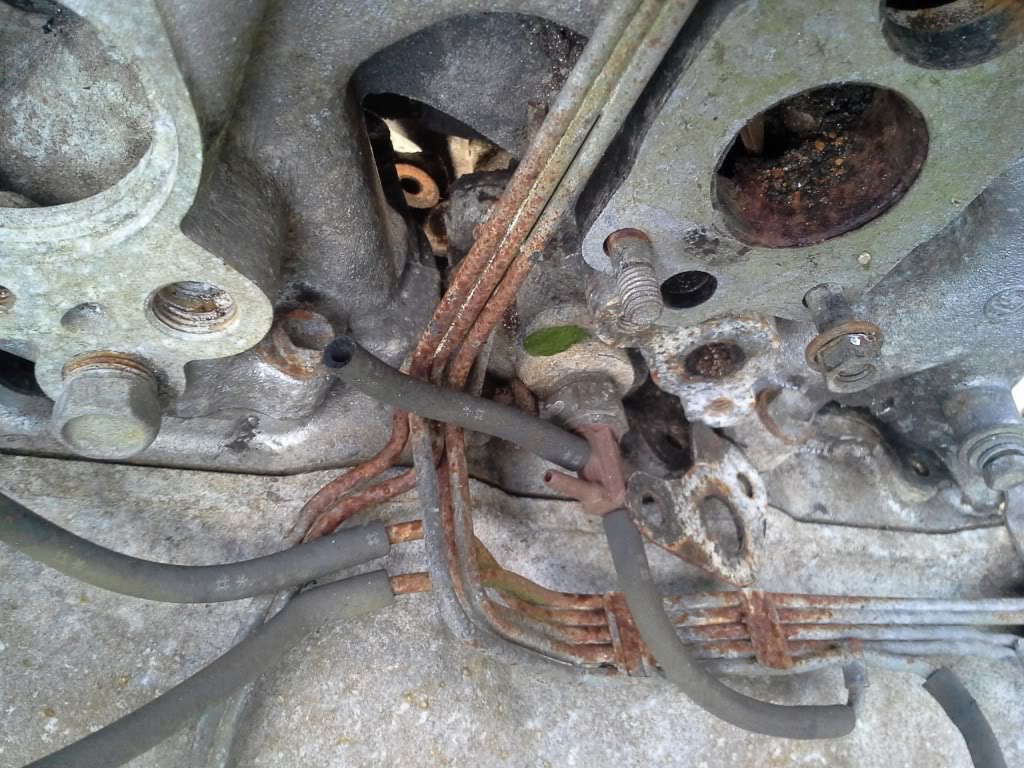
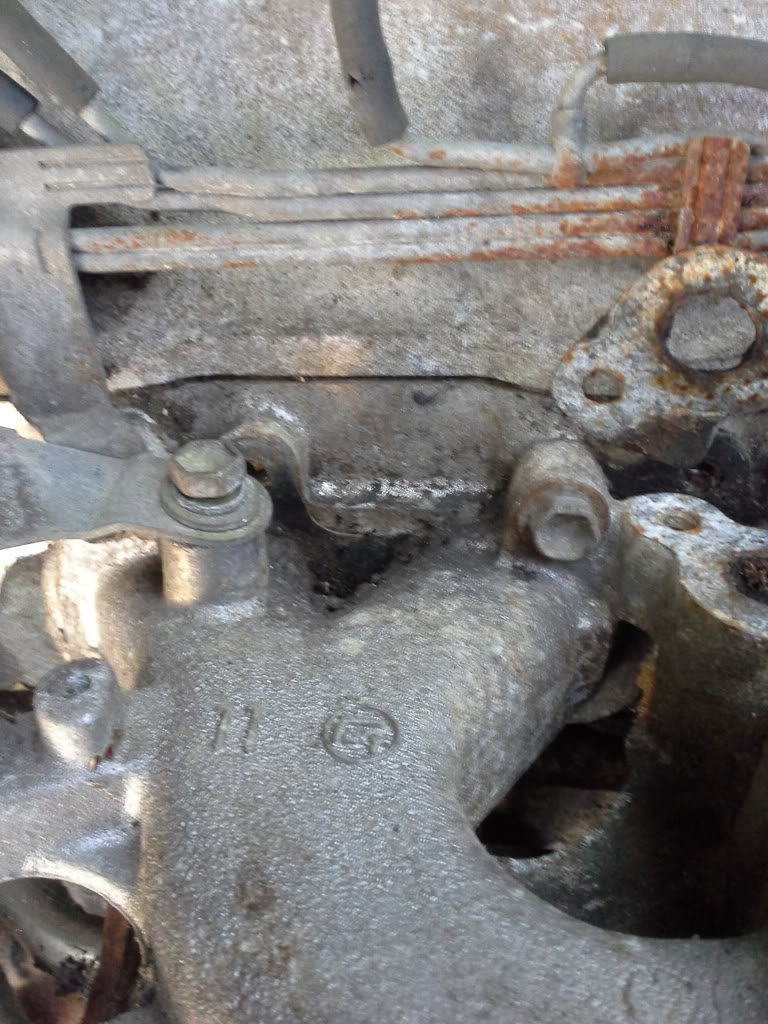
ok, this is my 20r, the intake manifold runners split like yours, if there is a piece of sheet metal in there, its well hidden, i poked at the area and it feels like a gasket was just slapped over the hole with fipg, 
i had a hard time getting a good angle but this is the area in question
i had a hard time getting a good angle but this is the area in question
07-09-2013, 05:42 PM
#72
Plowzilla, that hole is just a hole-nothing functional about it. It is just a cavity in the head. I just ran out to my garage to double check on my spare head to verify that. You wouldn't need a plate for that.
As for the rest of you guys posting pictures here, do yourself and the rest of us a favor and draw arrows to or circle the parts/areas that you are refering to. It'll better help us get you answers quicker. I'm not trying to be an ass, I just like to be as efficient as possible so we are all making progress.
As for the rest of you guys posting pictures here, do yourself and the rest of us a favor and draw arrows to or circle the parts/areas that you are refering to. It'll better help us get you answers quicker. I'm not trying to be an ass, I just like to be as efficient as possible so we are all making progress.
07-10-2013, 05:53 PM
#73
Registered User

Join Date: May 2013
Posts: 190
Likes: 0
Received 0 Likes
on
0 Posts
First of all this is an awesome and very helpful thread. You refer to the big obnoxious vacuum fitting on the manifold. It is the most outboard on the passenger side. Has anyone had any problems getting this bugger off? People complain about the crank bolt... That thing is a piece of cake next to this thing. If I knew it was going to be such a beast, I would have attacked it before dissassembling my motor so I could get a little more torque on it... The manifold is on my work bench now and I have tried every thing I know on it. I've got a large 24 mm wrench that fits it great; I've tapped with a hammer; I've nuked it with every penetrating oil I have (even my secret weapon... Mouse Milk!); I've torched it... I'm at my wits end. I'm about to take a sledge to this punk and just start saving for a new manifold... Well hopefully not... Just curious if anyone's had an issue and how they resolved it.
07-10-2013, 07:59 PM
#74
I've had luck before throwing seized parts into the freezer. Sometimes I have to torch it a little afterwards, but the quick expanding and contracting of th two different metals usually helps it break free. Be careful on how you torque on that manifold. You don't want to tweak the mating surface to the head or the carb - that would be bad. If you have a nice sturdy work bench, try bolting it down to the work bench using lags in all bolt holes to remove the vacuum monstrosity. I have a work bench with all kinds of holes in it from doing things like this!
07-12-2013, 07:51 AM
#75
Registered User
Join Date: May 2013
Location: Illinois
Posts: 51
Likes: 0
Received 0 Likes
on
0 Posts
First of all this is an awesome and very helpful thread. You refer to the big obnoxious vacuum fitting on the manifold. It is the most outboard on the passenger side. Has anyone had any problems getting this bugger off? People complain about the crank bolt... That thing is a piece of cake next to this thing. If I knew it was going to be such a beast, I would have attacked it before dissassembling my motor so I could get a little more torque on it... The manifold is on my work bench now and I have tried every thing I know on it. I've got a large 24 mm wrench that fits it great; I've tapped with a hammer; I've nuked it with every penetrating oil I have (even my secret weapon... Mouse Milk!); I've torched it... I'm at my wits end. I'm about to take a sledge to this punk and just start saving for a new manifold... Well hopefully not... Just curious if anyone's had an issue and how they resolved it.
Some wax down in the threads. I did it twice and it came right out. I had my intake off when I did it. Make
Sure you put something just under that end of the intake. This way your putting most of the pressure on the
Piece your trying to remove.
07-14-2013, 02:14 PM
#76
Registered User
Join Date: Jun 2013
Location: Fairbanks, AK
Posts: 69
Likes: 0
Received 0 Likes
on
0 Posts
So I've got a quick question. I'm looking at buying all of the block off plates for my desmog, but I'm considering using the factory carb. I've got two of them, and I'm sure that one or both of them works pretty well. I just want to make sure that I'm not going to screw myself over by installing all of the LCE plates. Are the vacuum actuators on the Asian just connected to plugs on the manifold? Should I still buy the plug kit? Seems like it would be a good idea if I ever did go to a Weber.
The Asian seems pretty complex, but it sounds like it can be a good performer if it's done right. I've had the 38/38 before, and it was a monster, but I'd like to save my money for something else if the stocker can be used well with a desmog.
Here's the POS celica that I built in high school, the carb was easily the nicest part of the car. If you look closely you can see the chunk of steel that I used as a blockoff plate, so they can be fabbed pretty easily with no tools other than a grinder, but it took a few hours. Ignore the disconnected choke and various unplugged vacuum lines. I did fix those about a week after the photo was taken. In fact... ignore just about everything about this car.
 07-14-2013, 02:29 PM
#77
Registered User
Join Date: Jan 2010
Location: Sonora, CA (Central Sierra)
Posts: 447
Received 0 Likes
on
0 Posts
Smilemon:
I have a bunch of info on using the Aisin carb on my desmog thread here:
https://www.yotatech.com/forums/f114...ly-22r-205845/
The plug kit from LCE was not out when I wrote this thread, but would be a good application for you. The Aisin has a lot of functionality, after reading about it, you can decide what is more or less important to you. If you just want simplicity, you will be using a lot of vacuum caps on the Aisin to close vacuum circuits. I recommend buying the more expensive silicon variety, the rubber ones dry out and crack within months.
Good luck!
07-14-2013, 03:10 PM
#78
Registered User
Join Date: Jun 2013
Location: Fairbanks, AK
Posts: 69
Likes: 0
Received 0 Likes
on
0 Posts
Cool. Read through most of your stuff last night, but it's all starting to make more sense now that I've slept and read it again. The blue bass links are dead, so thank you for direct posting their stuff into the forum. I've been watching asian carb rebuild videos on youtube, but now I realize that it's for a Land Cruiser carb, not a pickup. Still picked up some good information from the videos though.
07-15-2013, 01:19 PM
#79
Registered User
Join Date: Jan 2010
Location: Sonora, CA (Central Sierra)
Posts: 447
Received 0 Likes
on
0 Posts
Well, not really true about the sensors. I agree that a weber is a good investment, and your vehicle will likely run better with one. However, the Aisin is not sensor dependent. If you look towards the end of my thread, you will see a vacuum diagram for a federal emissions Aisin, it is very minimal. There are no "sensors" to speak of that attach to the carb, only a few vacuum circuits, such as HAC, AAP, etc. that you can hook up or not at your preference. There are literally millions of trucks out there in this configuration, on every continent on the planet. If you are on a budget build, you can certainly run an Aisin, I've done it in my rig for years. I also have a Weber now, and would not go back. If you have the cash, buy a Weber. If you don't, use that Federal vacuum diagram as a starting point, add other circuits if you prefer, and save for a Weber later, you won't regret it.
07-18-2013, 06:09 PM
#80
Registered User
Join Date: May 2013
Location: Illinois
Posts: 51
Likes: 0
Received 0 Likes
on
0 Posts
vacuum advance barb
Hey Kawazx636, I am installing my intake back on. I am going to run the vacuum advance the same way you did, off the back of the intake. I cannot find a 90 degree barb to fit this small hole so I picked up a 1/8" MIP x 1/8" FIP street elbow from Lowe's. I then could add the OEM piece inside that. The weirdest thing though, the OEM piece screws into the female end of the elbow perfectly, but the male end on the elbow will not screw into the manifold!?? I took the OEM piece off and tried to screw it directly into the manifold and it went in perfectly. the threads appear to be fine. I am thinking the taper on the OEM piece makes this possible. Any suggestions?


