When you click on links to various merchants on this site and make a purchase, this can result in this site earning a commission. Affiliate programs and affiliations include, but are not limited to, the eBay Partner Network.
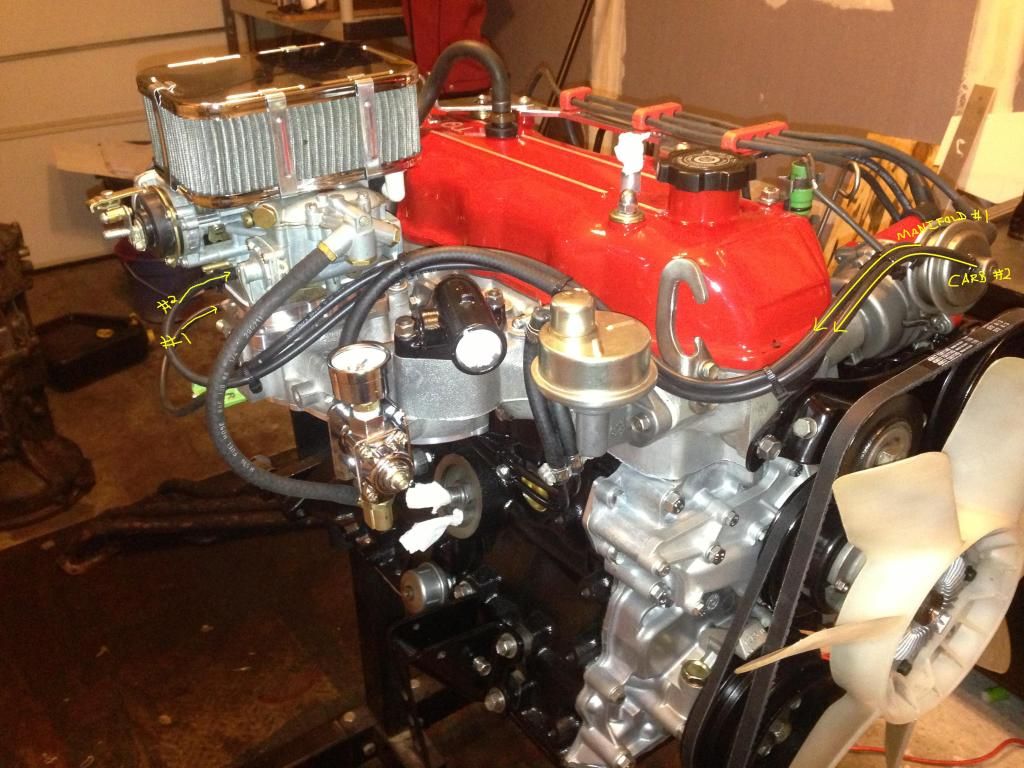
I have 4 sensors around my thermostat housing. I know one is the BVSV for EGR. I know one will be for the temp gauge, but what are the other two? Green/red and yellow wires in the pic.
Next, is this little length of hose correct? I cannot remember if it was there before I started. It also looks like it has some liquid (gas I think) leaking from the hardline when it is disconnected. Is that the symptom of a torn AAP diaphragm? Idle is high with it disconnected and capped off.
Finally, is it possible to remove all the vacuum hardlines while still keeping EGR and the stock carb? The hardlines make it impossible to trace where vacuum is going. I have read that EGR is only a good thing and would like to keep it intact. I know this is a controversial opinion.
Looks like you have yourself a California emissions truck - my answers below are based on that assumption.
In the first picture:
*Green w/ red stripe --> thermo switch #2
*Green solid --> thermo switch #1
*Yellow w/ green stripe (should have a green stripe on it) --> Water temp sender to the gauge cluster
In the second picture:
*I'm not 100% sure, but it does look correct. Also, If you pull that vacuum hose (or any other vacuum hose) and your idle goes up (not down) then it is likely that your carb is tuned too rich and the vacuum leak is actually adding air to make a more combustible air/fuel mixture.
Yes, you may remove everything but the EGR and retain the stock carb, but why? Typically the EGR on an older vehicle is completely clogged and actually counterproductive. Also, you would have a whole lot of vacuum hoses to cap which will likely lead to vacuum leaks when those caps deteriorate and crack. I would suggest that if you are going to remove some, you might as well remove it all.
Ah, I had it backwards. I guess the two thermo switches are just different set points for when to maybe turn off the CMH or start an evap purge? I always like to understand why things are done the way they are before messing with it. Not easy as every single year seems to be different.
I think mine's a federal, as it looks like the 1988 federal was the only one to have the below unnamed air pump can thing on the fenderwell. I also definitely don't have an EBCV or EACV.
Looking back at your first posts, it looks like the Canadian 4x4 didn't come with EGR from the factory. That's wild, so maybe EGR isn't as essential as I thought? The Canadians also don't have the OVCV or FCS, two things I need to kill on the stock carb.
Just a FYI, you'll likely have less problems sparking up that engine WITHOUT the smog emissions equipment than you would with it. Desmogging will remove several variables that could cause you issues. I rebuilt my 22R and let it sit for nearly 2 years while I restored the rest of the truck. It fired right up when I went to start it for the first time. Set the timing, adjusted the carb and I was rolling down the road in no time.
I agree with ya! however I'm not sure if I want to take the weber kit out of the box, until I know the engine runs as it should. I'm keeping my fingers crossed that it will, with only 65,000 on the clock, but when I received the engine it looked greasy, so I have some doubt. I did pressure wash some of the slime off before I installed it, but it's still not to my liking yet.
Well it turns out my factory carb's secondary throttle plate hasn't worked since I got it. It's completely cemented in place with carbon buildup. Never going to open again. Amazingly the motor ran well enough without it that I never suspected a thing. But since it's technically ruined, I figured I'd have some fun with it.
I've removed literally everything from it except the fuel line and choke heater and got it to start up and run. I removed the FCS and replaced it with a bolt. I removed the OVCV and replaced it with a block plate made from a beer can. The vacuum hardlines are all gone. The AAP, CB, and Choke Opener are all unplugged. Even the vacuum advance lines are off, and it idles alright. It stumbles bad when I give it gas, but that's prolly because of the advancers. I'm going to get some vacuum hose later and see how well it runs with those two hooked back up. It should actually be fine once it's warmed up. Not sure how much of a impact a disabled choke breaker will have.
Here's all the crap I just removed:
Here's the block-offs for the OVCV and FCS:
With the stupid FCS removed, the vacuum switch can finally be removed. If you remove the VS with the FCS still active, the engine will not run past 2200 RPM.
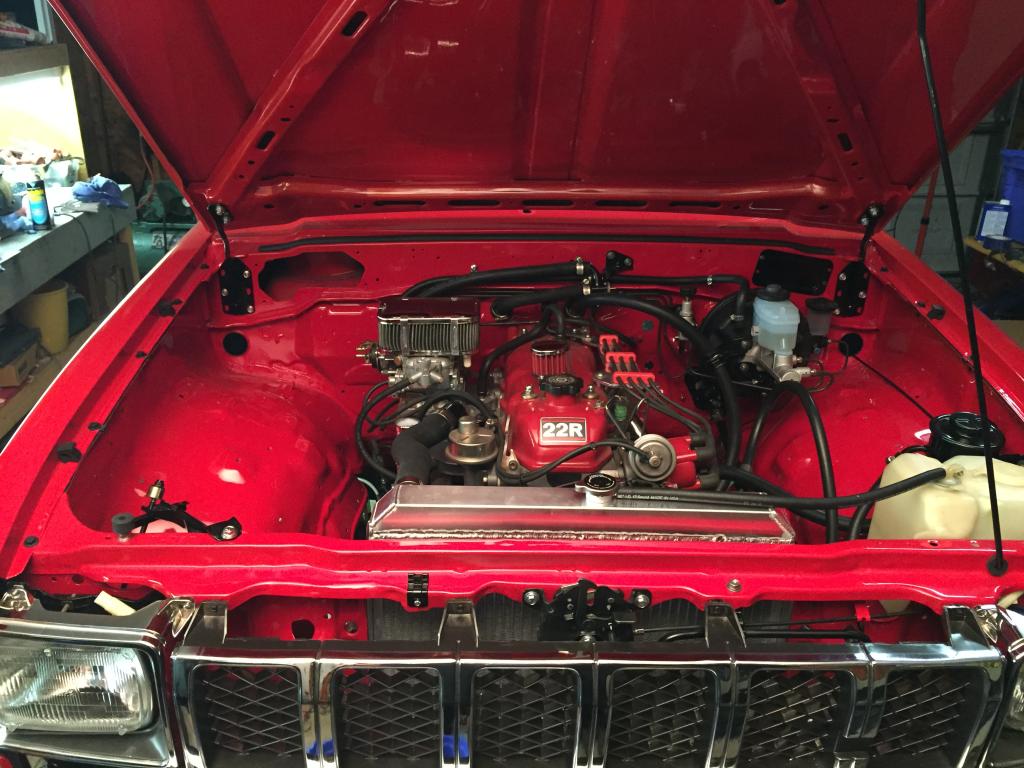
Here's the end result. Of course I will add the air cleaner back, but the HAI and MC are deleted as well. It actually idles with literally everything disconnected!
Hey Guys,
So I finally got my truck on the road and am having a problem when I get up around 40 MPH, it starts to buck and surge. To me it feels the carb bowl isn't staying full so it gets lean because if I let off the gas and coast a bit it seems like it fills back up and runs normal.
I have the Holley fuel pressure regulator setup with the Mr gasket pressure gauge like this thread outlines. For some reason the PSI always reads between 0-1.5PSI no matter how much I mess with the adjustment on the regulator. I've try revving it and looking at the gauge, it doesn't seem to get up to 2-3 no matter what I do.
Do you think that I am correct in assuming the carb isn't staying properly filled? And if so, what should I do about it? I guess I could try replacing the pump but wanted to see if the masters had a better idea or things for me to test.
That looks to be correct - the fuel returns don't matter as much as the delivery does since there is only one fuel line in the tank that sucks from the bottom of the tank. Obviously, if you aren't getting any fuel then you have the fuel delivery hooked up wrong.
On another note, had my fuel lines ran slightly differently. Instead of having the fuel return going down to the hard line by the starter like yours, I had mine going to the hard line on the passenger fender wall next to your fuel delivery line and completely removed the hard line down by the starter. Both ways are correct, I just did it that way for looks and simplicity.
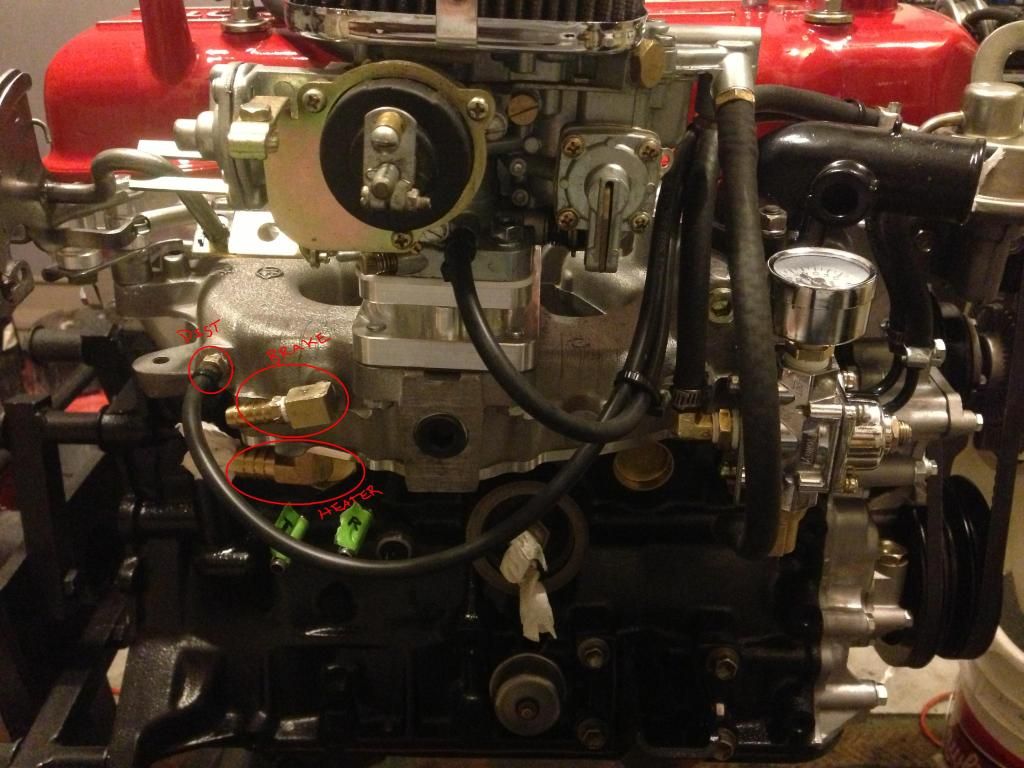
Also, what is that fitting for on the manifold just behind the brake booster hose (in the picture above)? Looks like a brake flare fitting on an NPT fitting.
I see that the fuel lines are run correctly, however do you just cap off the 90* hard pipe to the left?
thanks!
Just a FYI, you'll likely have less problems sparking up that engine WITHOUT the smog emissions equipment than you would with it. Desmogging will remove several variables that could cause you issues. I rebuilt my 22R and let it sit for nearly 2 years while I restored the rest of the truck. It fired right up when I went to start it for the first time. Set the timing, adjusted the carb and I was rolling down the road in no time.
I decided to take your advise and install the desmogging and install the weber.
I'm stuck on the fuel return and fuel supply lines. I started another thread on this, but feel it is appropriate to link it here and I'm still not 100% sure if they are correct? and any help would be appreciated! I'm trying to get this truck on the road ASAP..carpooling sucks .. https://www.yotatech.com/forums/f116.../#post52295528
I bent and installed all new fuel lines so I can't help you out on routing them; however, I can tell you that there are two return lines and one feed line. One return goes to the canister and the other is the return from the fuel pump. Those two can get run backwards and you won't have any issues. For the feed, the feed line is the only line that sumps from the bottom of the tank so if you have fuel in the tank then you should be able to blow on the line and hear bubbles in the tank. Or simply hook up a vacuum pump and vacuum each line - if you end up drawing fuel then that's your feed line
I bent and installed all new fuel lines so I can't help you out on routing them; however, I can tell you that there are two return lines and one feed line. One return goes to the canister and the other is the return from the fuel pump. Those two can get run backwards and you won't have any issues. For the feed, the feed line is the only line that sumps from the bottom of the tank so if you have fuel in the tank then you should be able to blow on the line and hear bubbles in the tank. Or simply hook up a vacuum pump and vacuum each line - if you end up drawing fuel then that's your feed line
Thanks!!
I found the fuel feed line the old fashioned way...by sucking on it and got a mouthful, spit it out and said "that's the one!"
I should have done that sooner, but at my age now and with as much crap I keep in my head...it's a wonder I do what I do... lol
my Toyota has been pulled apart for years and am finally getting it running along with desmog, i wanted to verify my fuel lines with somebody, the 2 in the engine bay on the fender well, the one bent up goes to charcoal canister and straight hard line to filter? then the one on the frame rail is return?
my Toyota has been pulled apart for years and am finally getting it running along with desmog, i wanted to verify my fuel lines with somebody, the 2 in the engine bay on the fender well, the one bent up goes to charcoal canister and straight hard line to filter? then the one on the frame rail is return?
I thought i would share some of my experiences while doing the Desmogging
The LC engineering weber 32/36 carb kit install went smooth and easy. I only had an issue with the throttle linkage adaptor fork. I had to bend it apart some to get it on the original throttle arm, because of the diameter thickness of the original arm, but it worked out ok. I had to add a heavy pull spring to the bottom of the original throttle linkage, so it would pull the throttle back to idle. The cam choke was easy to adjust and the electric choke was easy to hook up and worked perfectly.
The kit I purchased also came with a LC fuel pressure regulator and pressure gauge. I thought I would not install it and start the truck up for the first time using the mechanical fuel pump, that was a mistake! The engine started fine but the mechanical fuel pump was pushing too much fuel pressure into the needle and seat, thus resulting in fuel pushing past the seat and flooding the Weber.
I installed the LC fuel pressure regulator and pressure gauge, started the engine and adjusted the fuel pressure to 3psi max. The truck ran a lot better, now it was time to set mixture screw, so I found the sweet spot and she was running like a brand new engine.
The process took 'bout 4 hours and was well worth the time and money spent on the Weber kit. I just need to titty up a few things and she should be good to go...
feel free to visit my site. It is devoted to street machines, which is what I'm working on. Please check it out! and feel free to provide whatever info you can to help others
I'm still in the construction stages of the forum and any suggestion on new categories will be appreciated...cheers! http://yotastreetmachines.forumotion.com/
Working on the 100% desmog now, I already did weber and plunged all hoses, now I have the water plate for bottom of intake manifold and just a couple of questions.
My 4Runner has rear heater to. Can I still block the pass side water pump behind timing cover and the water plate in center of head? I'm just little confused what hoses I can keep vs block to keep my heater.
Also what did you use for the awaken on the intake manifold plugs? White thread tape? Or some sort of pipe dope stuff at Home Depot?
I can take pictures of my water hoses in engine bay if needed. I just have a few more than the pickups so wanted to make sure I did it right.
Also I have a conplete smog set up with converted ac to the new stuff. Worked great last three years. Just let me know it all came off a California model 4Runner (22R)
Last edited by user 82300; 11-21-2015 at 06:40 AM.
I talked with a tech from LCE a few weeks ago about the timing and advance on my truck and he said that the idle/manifold advance (port closest to the head) on the distributor is not necessary to use. I have since removed that vacuum hose and plugged the fitting on my setup and my truck is running well with a a more appropriate advance at higher RPM.
I can confirm that removing that vacuum line worked well for me; however, the results may not be the same for everybody else. Just passing on the information.
Hi I am confused where the heater runs. one side is from the intake manifold barb that came with the lce block off plate (input). But where does the other side go (output)? do I not use one off the block off plates and run it there? thanks for the great write up
Originally Posted by kawazx636
NOTE (11/30/2015): I talked with a tech from LCE a few weeks ago about the timing and advance on my truck and he said that the idle/manifold advance (port closest to the head) on the distributor is not necessary to use (#1 in the pictures below). I have since removed that vacuum hose and plugged the fitting on my setup and my truck is running well with a a more appropriate advance at higher RPM.
You now only need TWO, 2, DOS, DUEX vacuum lines!
1) Main/Port Advance - From the vacuum port on the distributor closest to the radiator to the vacuum port on the Weber.
2) Sub/Idle Advance - From the vacuum port on the distributor closest to the head to the vacuum port on the intake manifold. For the manifold port I installed a 1/4" NPT Male to 3/16" barb fitting on one of the existing holes on the intake manfold (temporarily plugged earlier).
You will only need about 6ft of 5/32" vacuum hose. See below:
Also in the picture above, you can see the 90* barb I installed for my brake booster (you can use the factory barb, but I wanted the hose to be better routed) and the 90* barb for the heater core that comes with the LCE Under Manifold Water Block Plate Kit.
-Barb under the intake manifold --> Top inlet of the heater control valve
-Bottom outlet of the heater control valve --> passenger side heater core inlet
-Driver side heater core outlet --> barb on the hard coolant pipe mounted with the -driver side engine mount
From what I understand, some models or years do not have that hard coolant pipe down by the driver side engine mount. If that is the case, that heater hose can be routed to the back side of the timing cover on the driver side.
here is a picture of my routing before I ran all of my wiring so you can see it a little better.
Welp, I can't spoon feed everything to you guys or else it would be too easy for you all! LOL Thanks for the correction. Figuring out the fittings on that regulator and gauge were a pain in the ass and rather expensive for what they are.
While a bit spendy these little regulators are worth it, I tried to build one out of a small ball valve and T fitting with gauge and it DID NOT WORK!! I'm pretty sure the holleys have a needle valve that allows smooth flow, fuel pressure was erratic and Weber ran like shat!! Some corners ya just cant cut!
While a bit spendy these little regulators are worth it, I tried to build one out of a small ball valve and T fitting with gauge and it DID NOT WORK!! I'm pretty sure the holleys have a needle valve that allows smooth flow, fuel pressure was erratic and Weber ran like shat!! Some corners ya just cant cut!
Nope, a ball valve would not work. It's like when you put your thumb over the end of an hose to control the spray pattern - you actually increase the pressure by reducing the opening that the same volume of water is trying to get through. The idea behind a fuel pressure regulator is to decrease pressure while maintaining volume.
 10-16-2015, 07:18 AM